
User's Guide
Page 4
... step on or trip over the line cord, and the line cord cannot be construed as allowed under the copyright laws. registered trademarks of HP, BroadCom and LinkSys. 4. Pentium® is a registered trademark of Microsoft Corporation. Use only a grounded electrical outlet when connecting this product ...change without prior written permission is a registered trademark of Microsoft Corporation. The information contained herein is grounded, check with the printer. 2. Safety Information Always follow basic safety precautions when using this product from fire or electric shock. 1.
... step on or trip over the line cord, and the line cord cannot be construed as allowed under the copyright laws. registered trademarks of HP, BroadCom and LinkSys. 4. Pentium® is a registered trademark of Microsoft Corporation. Use only a grounded electrical outlet when connecting this product ...change without prior written permission is a registered trademark of Microsoft Corporation. The information contained herein is grounded, check with the printer. 2. Safety Information Always follow basic safety precautions when using this product from fire or electric shock. 1.

User's Guide
Page 5
......5 Front view...5 Control panel...6 Back view...7 2 Installing the accessories Installing the duplex unit...10 Installing tray 2...11 3 Using the printer Selecting print media...14 Tips for selecting and using print media 14 Understanding specifications for supported media 15 Understanding supported sizes 15 Understanding supported media ...
......5 Front view...5 Control panel...6 Back view...7 2 Installing the accessories Installing the duplex unit...10 Installing tray 2...11 3 Using the printer Selecting print media...14 Tips for selecting and using print media 14 Understanding specifications for supported media 15 Understanding supported sizes 15 Understanding supported media ...
User's Guide
Page 6
... 34 To replace the printheads...36 Calibrating the color...37 Troubleshooting tips and resources...38 General troubleshooting tips...39 Resolving printing problems...40 Printer shuts down unexpectedly 40 All printer lights are on...40 Printer is not responding (nothing prints 40 Printer does not accept printhead 41 Printer takes a long time to print 41 Blank page...
... 34 To replace the printheads...36 Calibrating the color...37 Troubleshooting tips and resources...38 General troubleshooting tips...39 Resolving printing problems...40 Printer shuts down unexpectedly 40 All printer lights are on...40 Printer is not responding (nothing prints 40 Printer does not accept printhead 41 Printer takes a long time to print 41 Blank page...
User's Guide
Page 7
... (10.2, 10.3, 10.4))......83 To share the printer on a locally shared network (Mac OS X (10.2, 10.3, 10.4 83 Setting up the printer for wireless communication (HP Officejet Pro K550dtwn 85 Understanding 802.11 wireless network settings 85 To set up the printer on an ad hoc network (Mac OS 87 To... set up the printer for wireless communication (Windows 87 To set up wireless ...
... (10.2, 10.3, 10.4))......83 To share the printer on a locally shared network (Mac OS X (10.2, 10.3, 10.4 83 Setting up the printer for wireless communication (HP Officejet Pro K550dtwn 85 Understanding 802.11 wireless network settings 85 To set up the printer on an ad hoc network (Mac OS 87 To... set up the printer for wireless communication (Windows 87 To set up wireless ...
User's Guide
Page 8
Appendix B Support and warranty Obtaining electronic support...100 Obtaining HP telephone support...101 Before you return a product 108 Appendix C Printer specifications Appendix D Regulatory information FCC statement...116 Shielded cables...116 Exposure to radio frequency radiation 116 Other regulatory information...117 Regulatory information... and supplies 123 Index...1. 25 vi ENWW Warranty Quick Reference 108 Is your product covered under warranty 108 HP Inkjet Supplies Expiration 108 How do Brasil...118 Notice to users in Italy...118 Notice to users in France...118 Notice to users ...
Appendix B Support and warranty Obtaining electronic support...100 Obtaining HP telephone support...101 Before you return a product 108 Appendix C Printer specifications Appendix D Regulatory information FCC statement...116 Shielded cables...116 Exposure to radio frequency radiation 116 Other regulatory information...117 Regulatory information... and supplies 123 Index...1. 25 vi ENWW Warranty Quick Reference 108 Is your product covered under warranty 108 HP Inkjet Supplies Expiration 108 How do Brasil...118 Notice to users in Italy...118 Notice to users in France...118 Notice to users ...

User's Guide
Page 9
This guide provides details about how to use the printer and to resolve printer and printing problems. This section contains the following information: ● Finding other resources for buying the printer. 1 Getting started Thank you for the product ● Accessibility ● Understanding the printer parts ENWW 1
This guide provides details about how to use the printer and to resolve printer and printing problems. This section contains the following information: ● Finding other resources for buying the printer. 1 Getting started Thank you for the product ● Accessibility ● Understanding the printer parts ENWW 1

User's Guide
Page 10
... printheads, print the configuration page of the document is available as a printed guide in the box with the printer. HP Instant Support Helps you choose an installation option that are not included in the printer driver. You can obtain product information and further troubleshooting resources that includes it. Available through the Toolbox (Windows...
... printheads, print the configuration page of the document is available as a printed guide in the box with the printer. HP Instant Support Helps you choose an installation option that are not included in the printer driver. You can obtain product information and further troubleshooting resources that includes it. Available through the Toolbox (Windows...
User's Guide
Page 11
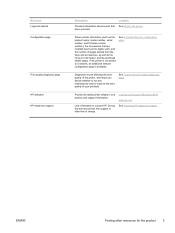
...such as the product name, model number, serial number, and firmware version number), the accessories that See Monitor the printer. www.hp.com/support/officejetprok550 www.hp.com Lists information to improve the print quality of your printouts. ENWW Finding other resources for the product 3 During... affecting the print quality of the printer, and helps you decide whether to run any maintenance tools to contact HP. See To print the print quality diagnostic page. Provide the latest printer software, and product and support information. If the printer is connected to a network, an...
...such as the product name, model number, serial number, and firmware version number), the accessories that See Monitor the printer. www.hp.com/support/officejetprok550 www.hp.com Lists information to improve the print quality of your printouts. ENWW Finding other resources for the product 3 During... affecting the print quality of the printer, and helps you decide whether to run any maintenance tools to contact HP. See To print the print quality diagnostic page. Provide the latest printer software, and product and support information. If the printer is connected to a network, an...

User's Guide
Page 12
... your operating system's accessibility options and features. For users who are color blind, colored buttons and tabs used in the software and on the HP printer have simple text or icon labels that make it accessible for people with mobility impairments, the printer software functions can be executed through the use of features that convey...
... your operating system's accessibility options and features. For users who are color blind, colored buttons and tabs used in the software and on the HP printer have simple text or icon labels that make it accessible for people with mobility impairments, the printer software functions can be executed through the use of features that convey...

User's Guide
Page 13
Understanding the printer parts Front view 1 Control panel 2 Output tray 3 Paper guides 4 Tray 1 5 Tray 2 (HP Officejet Pro K550dtn/K550dtwn) 6 Ink cartridge cover 7 Ink cartridges 8 Printheads 9 Printhead latch 10 Top cover ENWW Understanding the printer parts 5
Understanding the printer parts Front view 1 Control panel 2 Output tray 3 Paper guides 4 Tray 1 5 Tray 2 (HP Officejet Pro K550dtn/K550dtwn) 6 Ink cartridge cover 7 Ink cartridges 8 Printheads 9 Printhead latch 10 Top cover ENWW Understanding the printer parts 5
User's Guide
Page 14
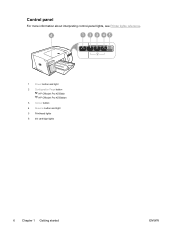
Control panel For more information about interpreting control-panel lights, see Printer lights reference. 1 Power button and light 2 Configuration Page button HP Officejet Pro K550dtn HP Officejet Pro K550dtwn 3 Cancel button 4 Resume button and light 5 Printhead lights 6 Ink cartridge lights 6 Chapter 1 Getting started ENWW
Control panel For more information about interpreting control-panel lights, see Printer lights reference. 1 Power button and light 2 Configuration Page button HP Officejet Pro K550dtn HP Officejet Pro K550dtwn 3 Cancel button 4 Resume button and light 5 Printhead lights 6 Ink cartridge lights 6 Chapter 1 Getting started ENWW
User's Guide
Page 15
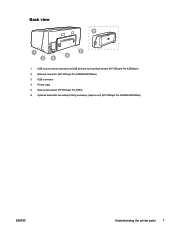
Back view 1 USB host connector (connects to USB devices such as flash drives) (HP Officejet Pro K550dtwn) 2 Network connector (HP Officejet Pro K550dtn/K550dtwn) 3 USB connector 4 Power input 5 Rear access panel (HP Officejet Pro K550) 6 Optional automatic two-sided printing accessory (duplex unit) (HP Officejet Pro K550dtn/K550dtwn) ENWW Understanding the printer parts 7
Back view 1 USB host connector (connects to USB devices such as flash drives) (HP Officejet Pro K550dtwn) 2 Network connector (HP Officejet Pro K550dtn/K550dtwn) 3 USB connector 4 Power input 5 Rear access panel (HP Officejet Pro K550) 6 Optional automatic two-sided printing accessory (duplex unit) (HP Officejet Pro K550dtn/K550dtwn) ENWW Understanding the printer parts 7
User's Guide
Page 18
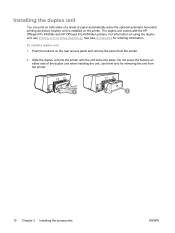
... for ordering information. Push the buttons on the rear access panel and remove the panel from the printer. 10 Chapter 2 Installing the accessories ENWW To install a duplex unit 1. Slide the duplex unit into the printer until the unit locks into place. For information on using the duplex unit, see Printing on the... printing accessory (duplex unit) is installed on both sides of a sheet of the duplex unit when installing the unit; The duplex unit comes with the HP Officejet Pro K550dtn and HP Officejet Pro K550dtwn printers. See also Accessories for removing the unit from the...
... for ordering information. Push the buttons on the rear access panel and remove the panel from the printer. 10 Chapter 2 Installing the accessories ENWW To install a duplex unit 1. Slide the duplex unit into the printer until the unit locks into place. For information on using the duplex unit, see Printing on the... printing accessory (duplex unit) is installed on both sides of a sheet of the duplex unit when installing the unit; The duplex unit comes with the HP Officejet Pro K550dtn and HP Officejet Pro K550dtwn printers. See also Accessories for removing the unit from the...
User's Guide
Page 19
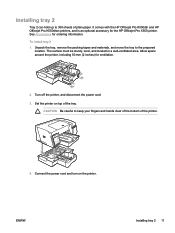
.... Connect the power cord and turn on top of plain paper. ENWW Installing tray 2 11 Allow space around the printer, including 50 mm (2 inches) for the HP Officejet Pro K550 printer. It comes with the HP Officejet Pro K550dtn and HP Officejet Pro K550dtwn printers, and is an optional accessory for ventilation. 2. The surface must be sturdy, level, and located in a well-ventilated...
.... Connect the power cord and turn on top of plain paper. ENWW Installing tray 2 11 Allow space around the printer, including 50 mm (2 inches) for the HP Officejet Pro K550 printer. It comes with the HP Officejet Pro K550dtn and HP Officejet Pro K550dtwn printers, and is an optional accessory for ventilation. 2. The surface must be sturdy, level, and located in a well-ventilated...
User's Guide
Page 21
3 Using the printer This section provides information on media usage for the printer, changing print settings, and performing basic printing tasks. ● Selecting print media ● Loading media ● Configuring trays ● Changing print settings ● Canceling a print job ● Printing on both sides (duplexing) ● Printing on special and custom-sized media ENWW 13
3 Using the printer This section provides information on media usage for the printer, changing print settings, and performing basic printing tasks. ● Selecting print media ● Loading media ● Configuring trays ● Changing print settings ● Canceling a print job ● Printing on both sides (duplexing) ● Printing on special and custom-sized media ENWW 13

User's Guide
Page 22
... ● Media with most types of media at www.hp.com for supported media. ● To prevent jams, poor print quality, and other printer problems, avoid the following guidelines. ● Always use media that conforms to the printer specifications. See Understanding specifications for supported media. ● ...avoid cards and envelopes with the flaps facing up may cause smearing. 14 Chapter 3 Using the printer ENWW Allowing wet media to stack up . Visit HP website at a time into the printer with thick, irregular, or curled edges, or areas that in this mode, printing takes longer...
... ● Media with most types of media at www.hp.com for supported media. ● To prevent jams, poor print quality, and other printer problems, avoid the following guidelines. ● Always use media that conforms to the printer specifications. See Understanding specifications for supported media. ● ...avoid cards and envelopes with the flaps facing up may cause smearing. 14 Chapter 3 Using the printer ENWW Allowing wet media to stack up . Visit HP website at a time into the printer with thick, irregular, or curled edges, or areas that in this mode, printing takes longer...
User's Guide
Page 23
...comes with the rough side down and the adhesive strip pointing towards the back of the printer. ● Use the Best mode to the output tray. If not, set the media size in the printer driver. Letter* (216 by 279 mm; 8.5 by 11 inches) 8.5 by 13 inches...356 mm; 8.5 by 14 inches) A4* (210 by 297 mm; 8.3 by 10.5 inches) U.S. Transparencies ● Insert transparencies with the HP Officejet Pro K550dtn and HP Officejet Pro K550dtwn printers. This mode provides longer drying time and ensures that the ink dries completely before printing the document. Executive* (184 by 267 mm; 7.25...
...comes with the rough side down and the adhesive strip pointing towards the back of the printer. ● Use the Best mode to the output tray. If not, set the media size in the printer driver. Letter* (216 by 279 mm; 8.5 by 11 inches) 8.5 by 13 inches...356 mm; 8.5 by 14 inches) A4* (210 by 297 mm; 8.3 by 10.5 inches) U.S. Transparencies ● Insert transparencies with the HP Officejet Pro K550dtn and HP Officejet Pro K550dtwn printers. This mode provides longer drying time and ensures that the ink dries completely before printing the document. Executive* (184 by 267 mm; 7.25...

User's Guide
Page 24
See Printing on both sides (duplexing). 16 Chapter 3 Using the printer ENWW Media size Tray 1 A2 Envelope (111 by 146 mm; 4.37 by 5.75 inches) DL Envelope (110 by 220 mm; 4.3 by 8.7 inches) C5 Envelope (162 ...
See Printing on both sides (duplexing). 16 Chapter 3 Using the printer ENWW Media size Tray 1 A2 Envelope (111 by 146 mm; 4.37 by 5.75 inches) DL Envelope (110 by 220 mm; 4.3 by 8.7 inches) C5 Envelope (162 ...
User's Guide
Page 26
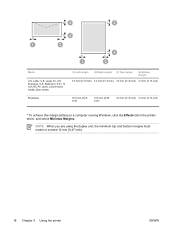
...) 16.5 mm (0.65 inch) 3.3 mm (0.13 inch) 3.3 mm (0.13 inch) * To achieve this margin setting on a computer running Windows, click the Effects tab in the printer driver, and select Minimize Margins. Legal, A4, U.S. Media U.S. NOTE When you are using the duplex unit, the minimum top and bottom margins must match or...
...) 16.5 mm (0.65 inch) 3.3 mm (0.13 inch) 3.3 mm (0.13 inch) * To achieve this margin setting on a computer running Windows, click the Effects tab in the printer driver, and select Minimize Margins. Legal, A4, U.S. Media U.S. NOTE When you are using the duplex unit, the minimum top and bottom margins must match or...

User's Guide
Page 27
... along the right of the tray. 3. Loading media This section provides instructions for the size that you have loaded. Pull the tray out of the printer by grasping under the front of the tray, and does not exceed the line marking in the tray to adjust them for loading media into...
... along the right of the tray. 3. Loading media This section provides instructions for the size that you have loaded. Pull the tray out of the printer by grasping under the front of the tray, and does not exceed the line marking in the tray to adjust them for loading media into...


