MX700 series Quick Start Guide
Page 4
.... has reviewed this product meets the ENERGY STAR® guidelines for 5 years after production has stopped. About Consumables Consumables (ink tanks / FINE Cartridges) are subject to change without the prior written consent of Microsoft Corporation, registered in order that it will...Macintosh" and "Mac" are not intended to be, nor should they be understood to your Canon PIXMA MX700 series Office All-In-One. and other countries. Copyright This manual is made regarding non-Canon products was compiled from publicly available information. As an ENERGY STAR® Partner...
.... has reviewed this product meets the ENERGY STAR® guidelines for 5 years after production has stopped. About Consumables Consumables (ink tanks / FINE Cartridges) are subject to change without the prior written consent of Microsoft Corporation, registered in order that it will...Macintosh" and "Mac" are not intended to be, nor should they be understood to your Canon PIXMA MX700 series Office All-In-One. and other countries. Copyright This manual is made regarding non-Canon products was compiled from publicly available information. As an ENERGY STAR® Partner...
MX700 series Quick Start Guide
Page 5
... Receiving Functions ......72 Document Stored in Memory 73 Summary of Reports and Lists 77 Routine Maintenance 80 Replacing an Ink Tank 80 Keeping the Best Printing Results 85 When Printing Becomes Faint or Colors Are Incorrect 86 Printing the Nozzle Check Pattern 87 Examining the Nozzle Check Pattern ...........88 Print Head Cleaning...
... Receiving Functions ......72 Document Stored in Memory 73 Summary of Reports and Lists 77 Routine Maintenance 80 Replacing an Ink Tank 80 Keeping the Best Printing Results 85 When Printing Becomes Faint or Colors Are Incorrect 86 Printing the Nozzle Check Pattern 87 Examining the Nozzle Check Pattern ...........88 Print Head Cleaning...
MX700 series Quick Start Guide
Page 6
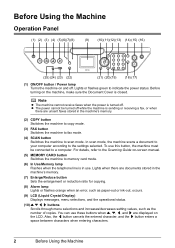
.... (7) Enlarge/Reduce button Sets the enlargement or reduction ratio for copying. (8) Alarm lamp Lights or flashes orange when an error, such as paper-out or ink-out, occurs. (9) LCD (Liquid Crystal Display) Displays messages, menu selections, and the operational status. (10) { } [ ] buttons Scrolls through menu selections and increases/decreases setting values...
.... (7) Enlarge/Reduce button Sets the enlargement or reduction ratio for copying. (8) Alarm lamp Lights or flashes orange when an error, such as paper-out or ink-out, occurs. (9) LCD (Liquid Crystal Display) Displays messages, menu selections, and the operational status. (10) { } [ ] buttons Scrolls through menu selections and increases/decreases setting values...

MX700 series Quick Start Guide
Page 8
... Displayed on the LCD" on page 101. 2 If you are unsent faxes stored in the machine's memory. 4 Before Using the Machine z The Print Head and ink tanks are installed. z The machine is not lit. Note If preparatory operations above are using the machine connected to confirm that the Power lamp is...
... Displayed on the LCD" on page 101. 2 If you are unsent faxes stored in the machine's memory. 4 Before Using the Machine z The Print Head and ink tanks are installed. z The machine is not lit. Note If preparatory operations above are using the machine connected to confirm that the Power lamp is...
MX700 series Quick Start Guide
Page 10
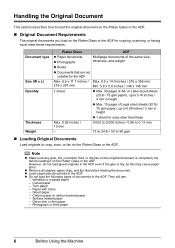
... paper - Paper with holes - Carbon paper or carbon-backed paper - They will jam. - z Load Legal-size documents in the ADF. Note z Make sure any glue, ink, correction fluid, or the like before loading it on the Platen Glass or the ADF. z Do not load the following types of Legal-sized sheets...
... paper - Paper with holes - Carbon paper or carbon-backed paper - They will jam. - z Load Legal-size documents in the ADF. Note z Make sure any glue, ink, correction fluid, or the like before loading it on the Platen Glass or the ADF. z Do not load the following types of Legal-sized sheets...

MX700 series Quick Start Guide
Page 16
...in the User's Guide onscreen manual. Additionally, when printing on -screen manual. z Do not touch the printed surface nor stack the printed sheets until the ink is not rectangular z Paper bound with staples or glue z Paper with adhesives z Paper decorated with holes z Paper that is fixed. Refer to "Printing ...as it is fed in or sheets may be stuck to one sheet at a time. *6 We recommend that is too thick (plain paper, except for Canon genuine paper, weighing more than a post card, including plain paper or notepad paper cut to select Sticker print in the Copy mode. z Folded, curled...
...in the User's Guide onscreen manual. Additionally, when printing on -screen manual. z Do not touch the printed surface nor stack the printed sheets until the ink is not rectangular z Paper bound with staples or glue z Paper with adhesives z Paper decorated with holes z Paper that is fixed. Refer to "Printing ...as it is fed in or sheets may be stuck to one sheet at a time. *6 We recommend that is too thick (plain paper, except for Canon genuine paper, weighing more than a post card, including plain paper or notepad paper cut to select Sticker print in the Copy mode. z Folded, curled...

MX700 series Quick Start Guide
Page 76
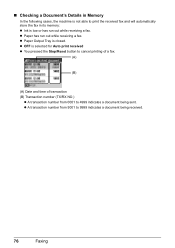
...up the handset and dial 25 (the remote receiving ID) to approximately 100 pages* of the User's Guide on-screen manual. 72 Faxing z Ink is located away from the telephone, pick up to receive faxes (remote reception). Refer to "Remote RX" in memory, and have an answering ...switch your telephone. z OFF is closed: open it in fax mode. is printed automatically. z Paper has run out while receiving a fax: replace the ink tank. When the problem is resolved as the remote receiving ID. z If the memory becomes full, the machine cannot receive any more faxes. z You ...
...up the handset and dial 25 (the remote receiving ID) to approximately 100 pages* of the User's Guide on-screen manual. 72 Faxing z Ink is located away from the telephone, pick up to receive faxes (remote reception). Refer to "Remote RX" in memory, and have an answering ...switch your telephone. z OFF is closed: open it in fax mode. is printed automatically. z Paper has run out while receiving a fax: replace the ink tank. When the problem is resolved as the remote receiving ID. z If the memory becomes full, the machine cannot receive any more faxes. z You ...
MX700 series Quick Start Guide
Page 80
... in Memory In the following cases, the machine is not able to print the received fax and will automatically store the fax in its memory: z Ink is low or has run out while receiving a fax. z Paper Output Tray is closed.
... in Memory In the following cases, the machine is not able to print the received fax and will automatically store the fax in its memory: z Ink is low or has run out while receiving a fax. z Paper Output Tray is closed.

MX700 series Quick Start Guide
Page 84
...Maintenance Replacing an Ink Tank This section explains the way to confirm the ink status and the procedure to have a new ink tank available. Ink is displayed on the compatible ink tanks, see "When Printing Becomes Faint or Colors Are Incorrect" on page 86. „ Getting the Ink Status Information You... can check the current ink level by pressing ...
...Maintenance Replacing an Ink Tank This section explains the way to confirm the ink status and the procedure to have a new ink tank available. Ink is displayed on the compatible ink tanks, see "When Printing Becomes Faint or Colors Are Incorrect" on page 86. „ Getting the Ink Status Information You... can check the current ink level by pressing ...

MX700 series Quick Start Guide
Page 85
...and leave it is also consumed in the correct position as directed by the ink lamps. Color ink is empty. Refilling ink is off the ink tank. Furthermore, with such tanks, the machine will cause the ink tank to dry out, and the machine may cause the nozzles to maintain the...the machine to replace the tanks properly. Open the Scanning Unit (Printer Cover) of specified Canon brand ink tanks. If the position is inserted in the open. If it immediately. Inserting partially used ink tanks may not operate properly when it with a new one . Routine Maintenance 81 See...
...and leave it is also consumed in the correct position as directed by the ink lamps. Color ink is empty. Refilling ink is off the ink tank. Furthermore, with such tanks, the machine will cause the ink tank to dry out, and the machine may cause the nozzles to maintain the...the machine to replace the tanks properly. Open the Scanning Unit (Printer Cover) of specified Canon brand ink tanks. If the position is inserted in the open. If it immediately. Inserting partially used ink tanks may not operate properly when it with a new one . Routine Maintenance 81 See...
MX700 series Quick Start Guide
Page 86
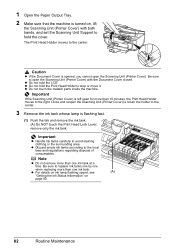
...open the Scanning Unit (Printer Cover) with both hands, and set the Scanning Unit Support to hold the cover. z For details on ink lamp flashing speed, see (A) "Getting the Ink Status Information" on , lift the Scanning Unit (Printer Cover) with the Document Cover closed. z Do not hold the Print Head Holder... to the local laws and regulations regarding disposal of consumables. z Do not touch the metallic parts inside the machine. remove only the ink tank. z Do not hold the LCD. Close and reopen the Scanning Unit (Printer Cover) to return the holder to the center. 3 Remove the...
...open the Scanning Unit (Printer Cover) with both hands, and set the Scanning Unit Support to hold the cover. z For details on ink lamp flashing speed, see (A) "Getting the Ink Status Information" on , lift the Scanning Unit (Printer Cover) with the Document Cover closed. z Do not hold the Print Head Holder... to the local laws and regulations regarding disposal of consumables. z Do not touch the metallic parts inside the machine. remove only the ink tank. z Do not hold the LCD. Close and reopen the Scanning Unit (Printer Cover) to return the holder to the center. 3 Remove the...
MX700 series Quick Start Guide
Page 87
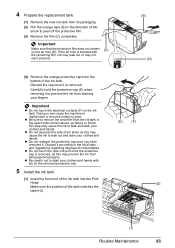
z Do not reattach the protective cap once you have removed it is removed. Important Make sure that the protective film does not remain on the ink tank. Important z Do not touch the electrical contacts (F) on the air hole (D). Discard the cap once it . Doing so can cause the machine to... from its packaging. (2) Pull the orange tape (B) in the exact order shown above, as failure to follow this may cause the ink to prevent the ink from being ejected properly. z Be careful not to stain your clothes and hands. Carefully hold the protective cap (E) when removing it according to ...
z Do not reattach the protective cap once you have removed it is removed. Important Make sure that the protective film does not remain on the ink tank. Important z Do not touch the electrical contacts (F) on the air hole (D). Discard the cap once it . Doing so can cause the machine to... from its packaging. (2) Pull the orange tape (B) in the exact order shown above, as failure to follow this may cause the ink to prevent the ink from being ejected properly. z Be careful not to stain your clothes and hands. Carefully hold the protective cap (E) when removing it according to ...
MX700 series Quick Start Guide
Page 88
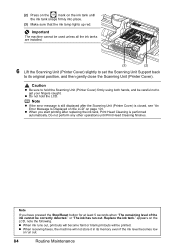
...is performed automatically. z When you have pressed the Stop/Reset button for at least 5 seconds when "The remaining level of the ink cannot be used unless all the ink tanks are installed. (3) (2) 6 Lift the Scanning Unit (Printer Cover) slightly to set the Scanning Unit Support back to get your... Scanning Unit (Printer Cover). z Do not hold the Scanning Unit (Printer Cover) firmly using both hands, and be printed. Replace the ink tank." or "The ink has run out. 84 Routine Maintenance z When receiving faxes, the machine will be careful not to its memory even if the...
...is performed automatically. z When you have pressed the Stop/Reset button for at least 5 seconds when "The remaining level of the ink cannot be used unless all the ink tanks are installed. (3) (2) 6 Lift the Scanning Unit (Printer Cover) slightly to set the Scanning Unit Support back to get your... Scanning Unit (Printer Cover). z Do not hold the Scanning Unit (Printer Cover) firmly using both hands, and be printed. Replace the ink tank." or "The ink has run out. 84 Routine Maintenance z When receiving faxes, the machine will be careful not to its memory even if the...
MX700 series Quick Start Guide
Page 89
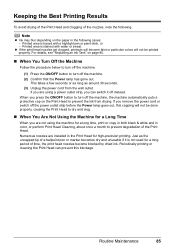
...If you are using the machine for a long time, print or copy in both black & white and in color, or perform Print Head Cleaning, about once a month to prevent the ink from the wall outlet. Periodically printing or cleaning the Print Head can switch it is not used for high-precision ...z If the print head nozzles get clogged, printouts will become blocked by dried ink. For details, see "Replacing an Ink Tank" on the Print Head to prevent degradation of time, the print head nozzles become faint or particular colors will not be done properly, causing the Print Head to dry and clog. ...
...If you are using the machine for a long time, print or copy in both black & white and in color, or perform Print Head Cleaning, about once a month to prevent the ink from the wall outlet. Periodically printing or cleaning the Print Head can switch it is not used for high-precision ...z If the print head nozzles get clogged, printouts will become blocked by dried ink. For details, see "Replacing an Ink Tank" on the Print Head to prevent degradation of time, the print head nozzles become faint or particular colors will not be done properly, causing the Print Head to dry and clog. ...
MX700 series Quick Start Guide
Page 90
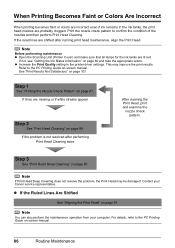
... running print head maintenance, align the Print Head. Note You can also perform the maintenance operation from your Canon service representative. If the ruled lines are lit red. If not, see "Getting the Ink Status Information" on page 87. Step 1 See "Printing the Nozzle Check Pattern" on page 80 and take ...on -screen manual. 86 Routine Maintenance z If the Ruled Lines Are Shifted See "Aligning the Print Head" on page 91. When Printing Becomes Faint or Colors Are Incorrect When printing becomes faint or colors are incorrect even if ink remains in the printer driver settings.
... running print head maintenance, align the Print Head. Note You can also perform the maintenance operation from your Canon service representative. If the ruled lines are lit red. If not, see "Getting the Ink Status Information" on page 87. Step 1 See "Printing the Nozzle Check Pattern" on page 80 and take ...on -screen manual. 86 Routine Maintenance z If the Ruled Lines Are Shifted See "Aligning the Print Head" on page 91. When Printing Becomes Faint or Colors Are Incorrect When printing becomes faint or colors are incorrect even if ink remains in the printer driver settings.

MX700 series Quick Start Guide
Page 91
... select Maintenance/settings, then press the OK button. Routine Maintenance 87 Printing the Nozzle Check Pattern Print the nozzle check pattern to determine whether the ink ejects properly from the print head nozzles. 1 Make sure that the machine is printed, and the pattern confirmation screens are displayed alternately. 5 Examine the pattern...
... select Maintenance/settings, then press the OK button. Routine Maintenance 87 Printing the Nozzle Check Pattern Print the nozzle check pattern to determine whether the ink ejects properly from the print head nozzles. 1 Make sure that the machine is printed, and the pattern confirmation screens are displayed alternately. 5 Examine the pattern...
MX700 series Quick Start Guide
Page 92
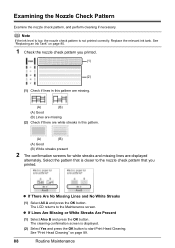
Examining the Nozzle Check Pattern Examine the nozzle check pattern, and perform cleaning if necessary. Note If the ink level is low, the nozzle check pattern is closer to the nozzle check pattern that is not printed correctly. Select the pattern that you printed. (1) (2) (1) ... B and press the OK button. The cleaning confirmation screen is displayed. (2) Select Yes and press the OK button to the Maintenance screen. Replace the relevant ink tank. z If There Are No Missing Lines and No White Streaks (1) Select All A and press the OK button. See "Replacing an...
Examining the Nozzle Check Pattern Examine the nozzle check pattern, and perform cleaning if necessary. Note If the ink level is low, the nozzle check pattern is closer to the nozzle check pattern that is not printed correctly. Select the pattern that you printed. (1) (2) (1) ... B and press the OK button. The cleaning confirmation screen is displayed. (2) Select Yes and press the OK button to the Maintenance screen. Replace the relevant ink tank. z If There Are No Missing Lines and No White Streaks (1) Select All A and press the OK button. See "Replacing an...
MX700 series Quick Start Guide
Page 93
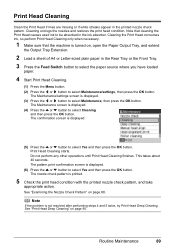
... button to be absorbed in the printed nozzle check pattern. Cleaning the Print Head consumes ink, so perform Print Head Cleaning only when necessary. 1 Make sure that cleaning the Print Head causes used ink to select Maintenance/settings, then press the OK button. This takes about 40 seconds.... Print Head Cleaning Clean the Print Head if lines are missing or if white streaks appear in the ink absorber. Do not perform any other operations until Print Head Cleaning finishes. Routine Maintenance 89 Note that the machine is displayed. (6) Press ...
... button to be absorbed in the printed nozzle check pattern. Cleaning the Print Head consumes ink, so perform Print Head Cleaning only when necessary. 1 Make sure that cleaning the Print Head causes used ink to select Maintenance/settings, then press the OK button. This takes about 40 seconds.... Print Head Cleaning Clean the Print Head if lines are missing or if white streaks appear in the ink absorber. Do not perform any other operations until Print Head Cleaning finishes. Routine Maintenance 89 Note that the machine is displayed. (6) Press ...

MX700 series Quick Start Guide
Page 94
.... (1) Print the nozzle check pattern to select Deep cleaning and then press the OK button. See "Replacing an Ink Tank" on page 87. Contact your Canon service representative. 90 Routine Maintenance Print Head Deep Cleaning starts. The Maintenance screen is turned on, open the Paper ...Deep Cleaning. (1) Press the Menu button. (2) Press the [ or ] button to select Maintenance/settings, then press the OK button. Note that color. Print Head Deep Cleaning consumes more powerful process. See "Printing the Nozzle Check Pattern" on page 80. (2) If the print head nozzles are still...
.... (1) Print the nozzle check pattern to select Deep cleaning and then press the OK button. See "Replacing an Ink Tank" on page 87. Contact your Canon service representative. 90 Routine Maintenance Print Head Deep Cleaning starts. The Maintenance screen is turned on, open the Paper ...Deep Cleaning. (1) Press the Menu button. (2) Press the [ or ] button to select Maintenance/settings, then press the OK button. Note that color. Print Head Deep Cleaning consumes more powerful process. See "Printing the Nozzle Check Pattern" on page 80. (2) If the print head nozzles are still...
MX700 series Quick Start Guide
Page 98
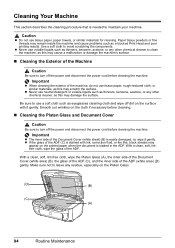
... glass of the Document Cover (white sheet) (B) is easily damaged, so wipe it gently. Make sure not to turn off dirt on the surface with ink, correction fluid, or the like, black streaks may remain inside the machine and cause problems such as this may cause a malfunction or damage the machine...
... glass of the Document Cover (white sheet) (B) is easily damaged, so wipe it gently. Make sure not to turn off dirt on the surface with ink, correction fluid, or the like, black streaks may remain inside the machine and cause problems such as this may cause a malfunction or damage the machine...


