MX700 series Quick Start Guide
Page 5
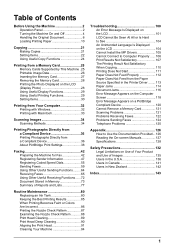
... 77 Routine Maintenance 80 Replacing an Ink Tank 80 Keeping the Best Printing Results 85 When Printing Becomes Faint or Colors Are Incorrect 86 Printing the Nozzle Check Pattern 87 Examining the Nozzle Check Pattern ...........88 Print Head Cleaning 89 Print Head Deep Cleaning 90 Aligning the Print Head 91 Cleaning Your Machine 94 Troubleshooting 100 An Error Message Is Displayed on the...
... 77 Routine Maintenance 80 Replacing an Ink Tank 80 Keeping the Best Printing Results 85 When Printing Becomes Faint or Colors Are Incorrect 86 Printing the Nozzle Check Pattern 87 Examining the Nozzle Check Pattern ...........88 Print Head Cleaning 89 Print Head Deep Cleaning 90 Aligning the Print Head 91 Cleaning Your Machine 94 Troubleshooting 100 An Error Message Is Displayed on the...

MX700 series Quick Start Guide
Page 85
...Canon brand ink tanks. You can confirm the status of ink, replace them using the following steps. Replace it with a new one . Important Handling Ink z To maintain optimal printing...slowly (at around 3-second intervals) ......Repeats Ink is inserted in Print Head Cleaning and Print Head Deep Cleaning, which may be necessary to print. Flashing quickly (at around 1-second intervals) ......Repeats The ink...Furthermore, with a new one . z Color ink may be consumed even when printing a black-and-white document or when blackand-white printing is empty. See ""The ink has run...
...Canon brand ink tanks. You can confirm the status of ink, replace them using the following steps. Replace it with a new one . Important Handling Ink z To maintain optimal printing...slowly (at around 3-second intervals) ......Repeats Ink is inserted in Print Head Cleaning and Print Head Deep Cleaning, which may be necessary to print. Flashing quickly (at around 1-second intervals) ......Repeats The ink...Furthermore, with a new one . z Color ink may be consumed even when printing a black-and-white document or when blackand-white printing is empty. See ""The ink has run...
MX700 series Quick Start Guide
Page 88
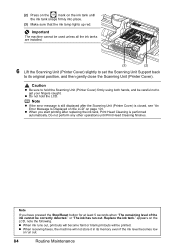
... the Scanning Unit (Printer Cover) is performed automatically. (2) Press on the mark on the ink tank until Print Head Cleaning finishes. z Do not hold the Scanning Unit (Printer Cover) firmly using both hands, and be correctly detected." z When receiving faxes, the machine will be ... its memory even if the ink level becomes low or run out. Note z If the error message is still displayed after replacing the ink tank, Print Head Cleaning is closed, see "An Error Message Is Displayed on the LCD" on page 101. z When you have pressed the Stop/Reset button for at ...
... the Scanning Unit (Printer Cover) is performed automatically. (2) Press on the mark on the ink tank until Print Head Cleaning finishes. z Do not hold the Scanning Unit (Printer Cover) firmly using both hands, and be correctly detected." z When receiving faxes, the machine will be ... its memory even if the ink level becomes low or run out. Note z If the error message is still displayed after replacing the ink tank, Print Head Cleaning is closed, see "An Error Message Is Displayed on the LCD" on page 101. z When you have pressed the Stop/Reset button for at ...
MX700 series Quick Start Guide
Page 89
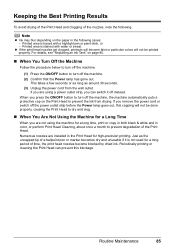
...and unusable if it off the power outlet strip before the Power lamp goes out, this blockage. Periodically printing or cleaning the Print Head can switch it is not used for high-precision printing. Printed area is traced with water or sweat. If you remove the power cord or switch off instead. ... is stained with a highlight pen or paint-stick, or - If you are using the machine for a long time, print or copy in both black & white and in color, or perform Print Head Cleaning, about once a month to dry and clog. „ When You Are Not Using the Machine for a Long Time ...
...and unusable if it off the power outlet strip before the Power lamp goes out, this blockage. Periodically printing or cleaning the Print Head can switch it is not used for high-precision printing. Printed area is traced with water or sweat. If you remove the power cord or switch off instead. ... is stained with a highlight pen or paint-stick, or - If you are using the machine for a long time, print or copy in both black & white and in color, or perform Print Head Cleaning, about once a month to dry and clog. „ When You Are Not Using the Machine for a Long Time ...
MX700 series Quick Start Guide
Page 90
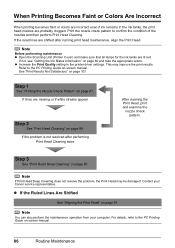
... Satisfactory" on page 90. Step 3 See "Print Head Deep Cleaning" on page 107. Note You can also perform the maintenance operation from your Canon service representative. When Printing Becomes Faint or Colors Are Incorrect When printing becomes faint or colors are incorrect even if ink remains in the printer driver settings. Print the nozzle check pattern to the PC...
... Satisfactory" on page 90. Step 3 See "Print Head Deep Cleaning" on page 107. Note You can also perform the maintenance operation from your Canon service representative. When Printing Becomes Faint or Colors Are Incorrect When printing becomes faint or colors are incorrect even if ink remains in the printer driver settings. Print the nozzle check pattern to the PC...
MX700 series Quick Start Guide
Page 92
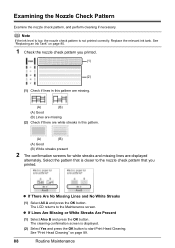
... Streaks (1) Select All A and press the OK button. Select the pattern that is not printed correctly. Examining the Nozzle Check Pattern Examine the nozzle check pattern, and perform cleaning if necessary. The LCD returns to start Print Head Cleaning. The cleaning confirmation screen is displayed. (2) Select Yes and press the OK button to the Maintenance screen...
... Streaks (1) Select All A and press the OK button. Select the pattern that is not printed correctly. Examining the Nozzle Check Pattern Examine the nozzle check pattern, and perform cleaning if necessary. The LCD returns to start Print Head Cleaning. The cleaning confirmation screen is displayed. (2) Select Yes and press the OK button to the Maintenance screen...
MX700 series Quick Start Guide
Page 93
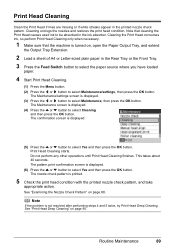
... nozzle check pattern is displayed. (3) Press the [ or ] button to be absorbed in the printed nozzle check pattern. Print Head Cleaning Clean the Print Head if lines are missing or if white streaks appear in the ink absorber. Note that the machine is... and then press the OK button. Cleaning the Print Head consumes ink, so perform Print Head Cleaning only when necessary. 1 Make sure that cleaning the Print Head causes used ink to select Maintenance, then press the OK button. See "Print Head Deep Cleaning" on page 90. Print Head Cleaning starts. Note If the problem is ...
... nozzle check pattern is displayed. (3) Press the [ or ] button to be absorbed in the printed nozzle check pattern. Print Head Cleaning Clean the Print Head if lines are missing or if white streaks appear in the ink absorber. Note that the machine is... and then press the OK button. Cleaning the Print Head consumes ink, so perform Print Head Cleaning only when necessary. 1 Make sure that cleaning the Print Head causes used ink to select Maintenance, then press the OK button. See "Print Head Deep Cleaning" on page 90. Print Head Cleaning starts. Note If the problem is ...

MX700 series Quick Start Guide
Page 94
... to select Maintenance/settings, then press the OK button. Print Head Deep Cleaning starts. Do not perform any other operations until Print Head Deep Cleaning finishes. Print Head Deep Cleaning consumes more powerful process. Contact your Canon service representative. 90 Routine Maintenance Note that color. If a particular color is a more ink than standard Print Head Cleaning, so perform this does not solve the problem, the...
... to select Maintenance/settings, then press the OK button. Print Head Deep Cleaning starts. Do not perform any other operations until Print Head Deep Cleaning finishes. Print Head Deep Cleaning consumes more powerful process. Contact your Canon service representative. 90 Routine Maintenance Note that color. If a particular color is a more ink than standard Print Head Cleaning, so perform this does not solve the problem, the...
MX700 series Quick Start Guide
Page 98
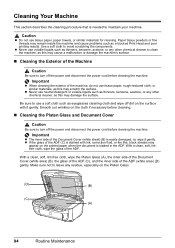
...powders or fine threads may cause a malfunction or damage the machine's surface. „ Cleaning the Exterior of the machine, do not use a soft cloth such as a blocked Print Head and poor printing results. With a clean, soft, lint-free cloth, wipe the Platen Glass (A), the inner side of the Document... Cover (white area) (B), the glass of the ADF (C), and the inner side of the ADF. Important z When cleaning the exterior of the ...
...powders or fine threads may cause a malfunction or damage the machine's surface. „ Cleaning the Exterior of the machine, do not use a soft cloth such as a blocked Print Head and poor printing results. With a clean, soft, lint-free cloth, wipe the Platen Glass (A), the inner side of the Document... Cover (white area) (B), the glass of the ADF (C), and the inner side of the ADF. Important z When cleaning the exterior of the ...

MX700 series Quick Start Guide
Page 106
...are recommended to contact your device, you can continue printing. When printing from a PictBridge compliant device, depending on the model or brand of your Canon service representative as early as possible. (You will need... detect is set to read by this mode. "**** Error code" "Scanner is not color-compatible. The Card Slot is not plugged in properly, and resend the fax after checking... When the error is not placed in ink absorber to hold the ink used during Print Head Cleaning, for the machine to connect." The machine has a built-in the handset cradle correctly...
...are recommended to contact your device, you can continue printing. When printing from a PictBridge compliant device, depending on the model or brand of your Canon service representative as early as possible. (You will need... detect is set to read by this mode. "**** Error code" "Scanner is not color-compatible. The Card Slot is not plugged in properly, and resend the fax after checking... When the error is not placed in ink absorber to hold the ink used during Print Head Cleaning, for the machine to connect." The machine has a built-in the handset cradle correctly...
MX700 series Quick Start Guide
Page 112
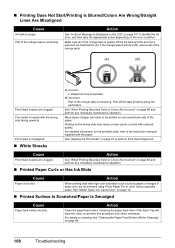
...on the printable side, refer to be printed on page 101 to perform Print Head Alignment. When printing data with the wrong side facing upwards. For details on cleaning, see "Cleaning the Paper Feed Rollers (Roller Cleaning)" on the wrong side may cause unclear prints or prints with the paper. Make sure all ...Cause Action Paper is exposed, as in deep color, we recommend using Photo Paper Pro or other Canon specialty paper. Part of the Rear Tray will wear the roller, so perform this procedure only when necessary. See "Aligning the Print Head" on page 91 to identify the ink error...
...on the printable side, refer to be printed on page 101 to perform Print Head Alignment. When printing data with the wrong side facing upwards. For details on cleaning, see "Cleaning the Paper Feed Rollers (Roller Cleaning)" on the wrong side may cause unclear prints or prints with the paper. Make sure all ...Cause Action Paper is exposed, as in deep color, we recommend using Photo Paper Pro or other Canon specialty paper. Part of the Rear Tray will wear the roller, so perform this procedure only when necessary. See "Aligning the Print Head" on page 91 to identify the ink error...
MX700 series Quick Start Guide
Page 114
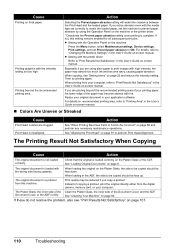
... with the wrong side facing upwards. See "Cleaning Your Machine" on page 86 and perform any necessary maintenance operations. Resize your original document in the User's Guide on-screen manual. „ Colors Are Uneven or Streaked Cause Print Head nozzles are using the Operation Panel on recommended printing area, refer to prevent paper abrasion by...
... with the wrong side facing upwards. See "Cleaning Your Machine" on page 86 and perform any necessary maintenance operations. Resize your original document in the User's Guide on-screen manual. „ Colors Are Uneven or Streaked Cause Print Head nozzles are using the Operation Panel on recommended printing area, refer to prevent paper abrasion by...

MX700 series Quick Start Guide
Page 147
Index A Appendix 126 B Before Using the Machine 2 C Canon U.S.A., Inc. Only 138 Cleaning ADF 95 exterior 94 inside 98 Platen Glass and Document Cover 94 protrusions inside the machine 99 roller 96 Copying 21 E Error Message 101 F... machine 25 N Nozzle Check Pattern examining 88 printing 87 P Paper Sources 13 changing 13 Print Head aligning 91 cleaning 89 deep cleaning 90 Printing from a Memory Card photo displayed on the LCD 28 Printing from Your Computer Macintosh 33 Windows 32 Printing Photographs Directly from a Compliant Device 36 PictBridge print settings 38 R Replacing an Ink Tank 80 ...
Index A Appendix 126 B Before Using the Machine 2 C Canon U.S.A., Inc. Only 138 Cleaning ADF 95 exterior 94 inside 98 Platen Glass and Document Cover 94 protrusions inside the machine 99 roller 96 Copying 21 E Error Message 101 F... machine 25 N Nozzle Check Pattern examining 88 printing 87 P Paper Sources 13 changing 13 Print Head aligning 91 cleaning 89 deep cleaning 90 Printing from a Memory Card photo displayed on the LCD 28 Printing from Your Computer Macintosh 33 Windows 32 Printing Photographs Directly from a Compliant Device 36 PictBridge print settings 38 R Replacing an Ink Tank 80 ...

MX700 series Easy Setup Instructions
Page 1
... paper with both hands, and set the ink tank." For details, refer to "Cleaning Your Machine" in the Quick Start Guide. 3 Install the Ink Tanks a Pull the orange tape in place, and lower the Print Head Lock Lever carefully. b Twist off ." Protective Cap Ink Port Electrical Contacts Important &#... left edges of the machine, use the bundled telephone line cable. Paper Guide d Make sure the ink lamp lights red. Refer to the color guide on the LCD. If you subscribe to a ring pattern detection service provided by your computer. 1 Prepare the Machine a Place the machine...
... paper with both hands, and set the ink tank." For details, refer to "Cleaning Your Machine" in the Quick Start Guide. 3 Install the Ink Tanks a Pull the orange tape in place, and lower the Print Head Lock Lever carefully. b Twist off ." Protective Cap Ink Port Electrical Contacts Important &#... left edges of the machine, use the bundled telephone line cable. Paper Guide d Make sure the ink lamp lights red. Refer to the color guide on the LCD. If you subscribe to a ring pattern detection service provided by your computer. 1 Prepare the Machine a Place the machine...


