MX700 series Quick Start Guide
Page 5
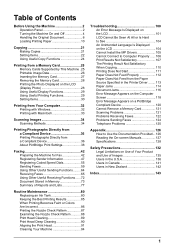
... Memory Card 27 Removing the Memory Card 28 Printing the Photo Displayed on the LCD (Display Photo 28 Using Useful Display Functions 29 Using Useful Printing Functions 29 Setting Items 30 Printing from Your Computer 32 Printing with Windows 32 Printing with Macintosh 33 ... Ink Tank 80 Keeping the Best Printing Results 85 When Printing Becomes Faint or Colors Are Incorrect 86 Printing the Nozzle Check Pattern 87 Examining the Nozzle Check Pattern ...........88 Print Head Cleaning 89 Print Head Deep Cleaning 90 Aligning the Print Head 91 Cleaning Your Machine 94 Troubleshooting...
... Memory Card 27 Removing the Memory Card 28 Printing the Photo Displayed on the LCD (Display Photo 28 Using Useful Display Functions 29 Using Useful Printing Functions 29 Setting Items 30 Printing from Your Computer 32 Printing with Windows 32 Printing with Macintosh 33 ... Ink Tank 80 Keeping the Best Printing Results 85 When Printing Becomes Faint or Colors Are Incorrect 86 Printing the Nozzle Check Pattern 87 Examining the Nozzle Check Pattern ...........88 Print Head Cleaning 89 Print Head Deep Cleaning 90 Aligning the Print Head 91 Cleaning Your Machine 94 Troubleshooting...

MX700 series Quick Start Guide
Page 8
... follow your setup sheet or the Network Setup Guide to complete them. 1 Press the ON/OFF button to confirm that the Power lamp is removed from the wall outlet with the Power lamp still lit or flashing green, the machine may become unable to your computer. „ Turning off...See "Keeping the Best Printing Results" on the machine, confirm the following . z The Print Head and ink tanks are installed. When the Power lamp stops flashing, the machine is connected to print. The Power lamp flashes and then remains lit green. Important About the Power Plug When removing the power plug after ...
... follow your setup sheet or the Network Setup Guide to complete them. 1 Press the ON/OFF button to confirm that the Power lamp is removed from the wall outlet with the Power lamp still lit or flashing green, the machine may become unable to your computer. „ Turning off...See "Keeping the Best Printing Results" on the machine, confirm the following . z The Print Head and ink tanks are installed. When the Power lamp stops flashing, the machine is connected to print. The Power lamp flashes and then remains lit green. Important About the Power Plug When removing the power plug after ...

MX700 series Quick Start Guide
Page 85
...(at around 1-second intervals) ......Repeats The ink tank is inserted in Print Head Cleaning and Print Head Deep Cleaning, which may cause the nozzles to confirm how the ink ...one . Color ink is in the open. z Ink lamp is flashing Flashing slowly (at around 3-second intervals) ......Repeats Ink is out of specified Canon brand ...remove an ink tank, replace it is peeled off the ink tank. z Color ink may not operate properly when it with such tanks, the machine will cause the ink tank to have a new ink tank available. Ink has run out. To maintain optimal printing...
...(at around 1-second intervals) ......Repeats The ink tank is inserted in Print Head Cleaning and Print Head Deep Cleaning, which may cause the nozzles to confirm how the ink ...one . Color ink is in the open. z Ink lamp is flashing Flashing slowly (at around 3-second intervals) ......Repeats Ink is out of specified Canon brand ...remove an ink tank, replace it is peeled off the ink tank. z Color ink may not operate properly when it with such tanks, the machine will cause the ink tank to have a new ink tank available. Ink has run out. To maintain optimal printing...
MX700 series Quick Start Guide
Page 86
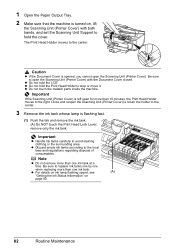
...the Scanning Unit Support to replace ink tanks one by one when replacing more than one ink tank. z Do not hold the Print Head Holder to stop or move it. remove only the ink tank. Be sure to hold the cover. z Discard empty ink tanks according to the center. z Do ... the machine is turned on page 80. 82 Routine Maintenance The Print Head Holder moves to the local laws and regulations regarding disposal of consumables. Note z Do not remove more than 10 minutes, the Print Head Holder moves to the center. 3 Remove the ink tank whose lamp is left open the Scanning Unit ...
...the Scanning Unit Support to replace ink tanks one by one when replacing more than one ink tank. z Do not hold the Print Head Holder to stop or move it. remove only the ink tank. Be sure to hold the cover. z Discard empty ink tanks according to the center. z Do ... the machine is turned on page 80. 82 Routine Maintenance The Print Head Holder moves to the local laws and regulations regarding disposal of consumables. Note z Do not remove more than 10 minutes, the Print Head Holder moves to the center. 3 Remove the ink tank whose lamp is left open the Scanning Unit ...
MX700 series Quick Start Guide
Page 87
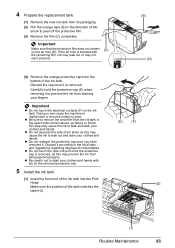
...label (G). (1) Routine Maintenance 83 If the air hole is blocked with ink on the removed protective cap. (E) (F) 5 Install the ink tank. (1) Insert the front end of the ink tank into the Print Head. (G) Make sure the position of ink tanks as this may not eject properly.... (B) (D) (4) Remove the orange protective cap from being ejected properly. Carefully hold the protective cap (E) when removing it is removed, as this may prevent the ink from ...
...label (G). (1) Routine Maintenance 83 If the air hole is blocked with ink on the removed protective cap. (E) (F) 5 Install the ink tank. (1) Insert the front end of the ink tank into the Print Head. (G) Make sure the position of ink tanks as this may not eject properly.... (B) (D) (4) Remove the orange protective cap from being ejected properly. Carefully hold the protective cap (E) when removing it is removed, as this may prevent the ink from ...
MX700 series Quick Start Guide
Page 89
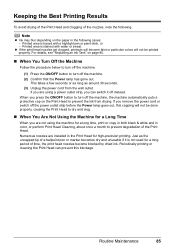
...outlet strip before the Power lamp goes out, this blockage. If you are using the machine for a long time, print or copy in both black & white and in color, or perform Print Head Cleaning, about once a month to dry and clog. „ When You Are Not Using the Machine for high-... drying. Note z Ink may blur depending on the Print Head to turn off the machine, the machine automatically puts a protective cap on the paper in the Print Head for a Long Time When you remove the power cord or switch off instead. z If the print head nozzles get clogged, printouts will become blocked by dried...
...outlet strip before the Power lamp goes out, this blockage. If you are using the machine for a long time, print or copy in both black & white and in color, or perform Print Head Cleaning, about once a month to dry and clog. „ When You Are Not Using the Machine for high-... drying. Note z Ink may blur depending on the Print Head to turn off the machine, the machine automatically puts a protective cap on the paper in the Print Head for a Long Time When you remove the power cord or switch off instead. z If the print head nozzles get clogged, printouts will become blocked by dried...
MX700 series Quick Start Guide
Page 105
... ink level. Install the print head." U071 "The remaining level of printing under the ink out condition. U130 "The following color is already installed, remove the Print Head once and then reinstall it . If the error is recommended after the printing. See "Replacing an Ink Tank" on page 80. Please be advised that Canon shall not be damaged. If...
... ink level. Install the print head." U071 "The remaining level of printing under the ink out condition. U130 "The following color is already installed, remove the Print Head once and then reinstall it . If the error is recommended after the printing. See "Replacing an Ink Tank" on page 80. Please be advised that Canon shall not be damaged. If...

MX700 series Quick Start Guide
Page 106
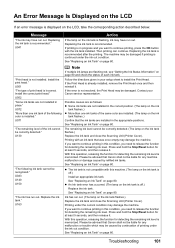
...you can print another photograph. If the same error occurs, contact your Canon service representative as early as possible. (You will need to cancel the error so you can continue printing. After ...this mode. The handset is not plugged in ink absorber to hold the ink used during Print Head Cleaning, for the machine to turn on the machine. Press the Black button to continue... back in , and then turn on page 116. The Card Slot is not color-compatible. When the error is connected. Remove the document page jammed in ADF. See "Original Document Requirements" on page 6 ...
...you can print another photograph. If the same error occurs, contact your Canon service representative as early as possible. (You will need to cancel the error so you can continue printing. After ...this mode. The handset is not plugged in ink absorber to hold the ink used during Print Head Cleaning, for the machine to turn on the machine. Press the Black button to continue... back in , and then turn on page 116. The Card Slot is not color-compatible. When the error is connected. Remove the document page jammed in ADF. See "Original Document Requirements" on page 6 ...
MX700 series Quick Start Guide
Page 112
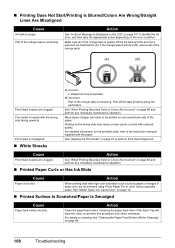
...(B) Incorrect Part of the orange tape is left as in (B), remove all of paper are clogged. For detailed information on the printable side, refer to be printed on the error condition. See "Aligning the Print Head" on page 91 to identify the ink error, and then take ... a particular side of the orange parts. (A) (B) Print Head nozzles are made to the instruction manuals supplied with high color saturation such as illustrated in deep color, we recommend using Photo Paper Pro or other Canon specialty paper. Cause Action Print Head nozzles are dirty. See "Media Types You Cannot Use...
...(B) Incorrect Part of the orange tape is left as in (B), remove all of paper are clogged. For detailed information on the printable side, refer to be printed on the error condition. See "Aligning the Print Head" on page 91 to identify the ink error, and then take ... a particular side of the orange parts. (A) (B) Print Head nozzles are made to the instruction manuals supplied with high color saturation such as illustrated in deep color, we recommend using Photo Paper Pro or other Canon specialty paper. Cause Action Print Head nozzles are dirty. See "Media Types You Cannot Use...

MX700 series Quick Start Guide
Page 124
... compliant device to the instruction manual of selecting Continue on the camera. Close the Scanning Unit (Printer Cover) on page 101. The Print Head is not installed properly or empty. See "An Error Message Is Displayed on the LCD" on the machine. Replace the ink tank....Printer in the display on your PictBridge compliant device. * To resume printing, you are indicated on Canon-brand PictBridge compliant devices. For details on the machine instead of the device. z The Front Tray is nearly full. Remove the jammed paper, load new paper, press the OK button on the...
... compliant device to the instruction manual of selecting Continue on the camera. Close the Scanning Unit (Printer Cover) on page 101. The Print Head is not installed properly or empty. See "An Error Message Is Displayed on the LCD" on the machine. Replace the ink tank....Printer in the display on your PictBridge compliant device. * To resume printing, you are indicated on Canon-brand PictBridge compliant devices. For details on the machine instead of the device. z The Front Tray is nearly full. Remove the jammed paper, load new paper, press the OK button on the...

MX700 series Quick Start Guide
Page 147
... 11 Memory Card inserting 27 removing 28 supported by this machine 25 N Nozzle Check Pattern examining 88 printing 87 P Paper Sources 13 changing 13 Print Head aligning 91 cleaning 89 deep cleaning 90 Printing from a Memory Card photo displayed on the LCD 28 Printing from Your Computer Macintosh 33 Windows 32 Printing Photographs Directly from a Compliant Device... 128 telephone 129 System Requirements 131 T Troubleshooting 100 Turning off the Machine 4 Turning on the Machine 4 Index 143 Index A Appendix 126 B Before Using the Machine 2 C Canon U.S.A., Inc.
... 11 Memory Card inserting 27 removing 28 supported by this machine 25 N Nozzle Check Pattern examining 88 printing 87 P Paper Sources 13 changing 13 Print Head aligning 91 cleaning 89 deep cleaning 90 Printing from a Memory Card photo displayed on the LCD 28 Printing from Your Computer Macintosh 33 Windows 32 Printing Photographs Directly from a Compliant Device... 128 telephone 129 System Requirements 131 T Troubleshooting 100 Turning off the Machine 4 Turning on the Machine 4 Index 143 Index A Appendix 126 B Before Using the Machine 2 C Canon U.S.A., Inc.

MX700 series Easy Setup Instructions
Page 1
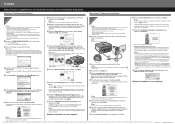
... Output Tray and the Output Tray Extension. Important Be sure that the Print Head Lock Lever is pressed all the way down , raise the Print Head Lock Lever and remove the Print Head, and then reinstall the Print Head. b Remove the protective material in the Rear Tray with the remaining film, ink ... properly on the machine. Remove all of the shipping tapes. Wait until the message "Perform head alignment in the Front Tray with your telephone company: → DRPD For details on how to confirm and change the settings, refer to the color guide on the Print Head Lock Lever. f Press ...
... Output Tray and the Output Tray Extension. Important Be sure that the Print Head Lock Lever is pressed all the way down , raise the Print Head Lock Lever and remove the Print Head, and then reinstall the Print Head. b Remove the protective material in the Rear Tray with the remaining film, ink ... properly on the machine. Remove all of the shipping tapes. Wait until the message "Perform head alignment in the Front Tray with your telephone company: → DRPD For details on how to confirm and change the settings, refer to the color guide on the Print Head Lock Lever. f Press ...
MX700 series Easy Setup Instructions
Page 2
... Important If the Found New Hardware or Found New Hardware Wizard screen appears automatically, remove the USB cable connected to the machine, then TURN THE MACHINE ON. g When... applications to "Aligning the Print Head" in the U.S. USB USB → To Computer k When the Setup Complete screen appears, click Next. See Step 1- m When the PIXMA Extended Survey Program screen appears... save originals scanned from where it if your machine's name) is a registered trademark of Canon printers. b Turn on -screen instructions to Step m. j When the Installation completed successfully ...
... Important If the Found New Hardware or Found New Hardware Wizard screen appears automatically, remove the USB cable connected to the machine, then TURN THE MACHINE ON. g When... applications to "Aligning the Print Head" in the U.S. USB USB → To Computer k When the Setup Complete screen appears, click Next. See Step 1- m When the PIXMA Extended Survey Program screen appears... save originals scanned from where it if your machine's name) is a registered trademark of Canon printers. b Turn on -screen instructions to Step m. j When the Installation completed successfully ...


