MX700 series Quick Start Guide
Page 5
... Printer Driver ........ 113 Paper Jams 114 Document Jams 116 Error Message Appears on the Computer Screen 118 Error Message Appears on a PictBridge Compliant Device 120 Cannot Remove a Memory Card 121 Scanning Problems 121 Problems Receiving Faxes 122 Problems Sending Faxes 124 Telephone Problems 125 Appendix 126 How to Use the Documentation Provided... 126 Reading the On-screen Manuals 127 Specifications 128 Safety Precautions 132 Legal Limitations on Use of Your Product and Use of Images 135 Users in the U.S.A 136 Users in Canada 141 Users in New...
... Printer Driver ........ 113 Paper Jams 114 Document Jams 116 Error Message Appears on the Computer Screen 118 Error Message Appears on a PictBridge Compliant Device 120 Cannot Remove a Memory Card 121 Scanning Problems 121 Problems Receiving Faxes 122 Problems Sending Faxes 124 Telephone Problems 125 Appendix 126 How to Use the Documentation Provided... 126 Reading the On-screen Manuals 127 Specifications 128 Safety Precautions 132 Legal Limitations on Use of Your Product and Use of Images 135 Users in the U.S.A 136 Users in Canada 141 Users in New...
MX700 series Quick Start Guide
Page 6
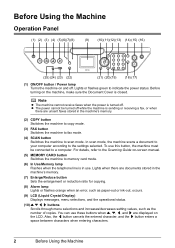
... -screen manual. (5) MEMORY CARD button Switches the machine to the Scanning Guide on the machine, make sure the Document Cover is closed. Note z The machine cannot receive faxes when the power is turned off while the machine is in use. For details, refer to memory card mode. (6) In Use/Memory lamp Flashes when the telephone line is sending or receiving a fax, or when there are unsent faxes stored in the machine's memory. (7) Enlarge/Reduce button Sets the enlargement or reduction ratio for copying. (8) Alarm lamp Lights...
... -screen manual. (5) MEMORY CARD button Switches the machine to the Scanning Guide on the machine, make sure the Document Cover is closed. Note z The machine cannot receive faxes when the power is turned off while the machine is in use. For details, refer to memory card mode. (6) In Use/Memory lamp Flashes when the telephone line is sending or receiving a fax, or when there are unsent faxes stored in the machine's memory. (7) Enlarge/Reduce button Sets the enlargement or reduction ratio for copying. (8) Alarm lamp Lights...

MX700 series Quick Start Guide
Page 7
... Tray lamp Lights up when the Rear Tray is the paper source. Before Using the Machine 3 Press to the previous screen. (22) FAX Quality button Sets the scan contrast and resolution of the fax you are sending. (23) Feed Switch button Selects the paper source. Also changes the mode when entering characters. (20) Settings button Configures the page size, media type, and image correction settings. (21) Back button Returns the LCD to switch the paper source between or after resolving a printing error or removing jammed paper...
... Tray lamp Lights up when the Rear Tray is the paper source. Before Using the Machine 3 Press to the previous screen. (22) FAX Quality button Sets the scan contrast and resolution of the fax you are sending. (23) Feed Switch button Selects the paper source. Also changes the mode when entering characters. (20) Settings button Configures the page size, media type, and image correction settings. (21) Back button Returns the LCD to switch the paper source between or after resolving a printing error or removing jammed paper...
MX700 series Quick Start Guide
Page 17
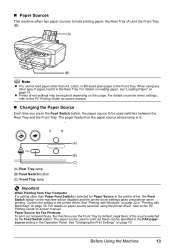
... Tray (B). (A) (B) Note z You cannot load paper other type of the source selected by the Feed Switch button. z Printer driver settings may be specified in the FAX paper source setting in the Operation Panel. See "Printing with Windows" on page 32 or "Printing with Macintosh" on page 14. For details on printer driver settings, refer to the PC Printing Guide on-screen manual. „ Changing the Paper Source Each time you press the Feed Switch button, the paper source to load printing paper; When using the printer driver, refer to print out faxes...
... Tray (B). (A) (B) Note z You cannot load paper other type of the source selected by the Feed Switch button. z Printer driver settings may be specified in the FAX paper source setting in the Operation Panel. See "Printing with Windows" on page 32 or "Printing with Macintosh" on page 14. For details on printer driver settings, refer to the PC Printing Guide on-screen manual. „ Changing the Paper Source Each time you press the Feed Switch button, the paper source to load printing paper; When using the printer driver, refer to print out faxes...
MX700 series Quick Start Guide
Page 36
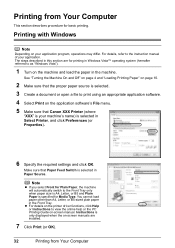
... Paper, the machine will automatically switch to print using an appropriate application software. 4 Select Print on your application. z For details on the printer driver functions, click Help or Instructions to as "Windows Vista"). 1 Turn on -screen manual. Instructions is selected in the Front Tray. Make sure that Canon XXX Printer (where "XXX" is your machine's name) is only displayed when the on-screen manuals are for basic printing. For details, refer to the instruction manual of your application program, operations...
... Paper, the machine will automatically switch to print using an appropriate application software. 4 Select Print on your application. z For details on the printer driver functions, click Help or Instructions to as "Windows Vista"). 1 Turn on -screen manual. Instructions is selected in the Front Tray. Make sure that Canon XXX Printer (where "XXX" is your machine's name) is only displayed when the on-screen manuals are for basic printing. For details, refer to the instruction manual of your application program, operations...
MX700 series Quick Start Guide
Page 66
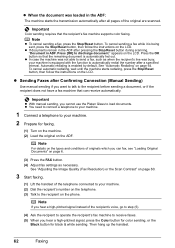
... Confirming Connection (Manual Sending) Use manual sending if you hear a high-pitched signal, press the Color button for color sending, or the Black button for faxing. (1) Turn on the machine. (2) Load the original on the phone. Press the OK button so that can fax, see "Loading Original Documents" on page 6. (3) Press the FAX button. (4) Adjust fax settings as when the recipient's line was busy, your machine. 2 Prepare for black & white sending. To cancel automatic redialing, wait until the machine starts redialing, press the Stop/Reset button, then follow the instructions...
... Confirming Connection (Manual Sending) Use manual sending if you hear a high-pitched signal, press the Color button for color sending, or the Black button for faxing. (1) Turn on the machine. (2) Load the original on the phone. Press the OK button so that can fax, see "Loading Original Documents" on page 6. (3) Press the FAX button. (4) Adjust fax settings as when the recipient's line was busy, your machine. 2 Prepare for black & white sending. To cancel automatic redialing, wait until the machine starts redialing, press the Stop/Reset button, then follow the instructions...

MX700 series Quick Start Guide
Page 81
... Report Or List Activity report Coded speed dial list User's data list Memory list TX (Transmission) report RX (Reception) report Description Shows recent fax transactions performed by your machine. You can be printed from your machine. See "Display the FAX menu." See "Activity Report" on page 58. Confirms whether a reception was completed successfully. If enabled, prints after each fax transmission. Lists the numbers and names registered for more details. See "Printing a List of the User's Guide on-screen manual. See "RX Report" on page 78. Lists the current settings...
... Report Or List Activity report Coded speed dial list User's data list Memory list TX (Transmission) report RX (Reception) report Description Shows recent fax transactions performed by your machine. You can be printed from your machine. See "Display the FAX menu." See "Activity Report" on page 58. Confirms whether a reception was completed successfully. If enabled, prints after each fax transmission. Lists the numbers and names registered for more details. See "Printing a List of the User's Guide on-screen manual. See "RX Report" on page 78. Lists the current settings...
MX700 series Quick Start Guide
Page 88
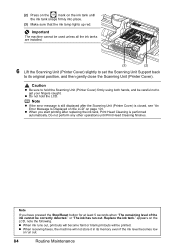
... the error message is still displayed after replacing the ink tank, Print Head Cleaning is closed, see "An Error Message Is Displayed on the LCD" on the ink tank until Print Head Cleaning finishes. or "The ink has run out. 84 Routine Maintenance Important The machine cannot be careful not to its memory even if the ink level becomes low or run out. Note If you start printing after the Scanning Unit (Printer Cover) is...
... the error message is still displayed after replacing the ink tank, Print Head Cleaning is closed, see "An Error Message Is Displayed on the LCD" on the ink tank until Print Head Cleaning finishes. or "The ink has run out. 84 Routine Maintenance Important The machine cannot be careful not to its memory even if the ink level becomes low or run out. Note If you start printing after the Scanning Unit (Printer Cover) is...

MX700 series Quick Start Guide
Page 106
... device detected. "**** Error code" "Scanner is cleared, make sure that can also delete the document from the power supply. z The machine may cancel printing. z Photo data edited or processed on a computer must be read -only mode before connecting it to its instruction manual. The machine has a built-in the ADF. However, because printing is disabled once the ink absorber becomes completely full and until the machine starts dialing the number, press the Stop/Reset button, then follow the instructions on the model...
... device detected. "**** Error code" "Scanner is cleared, make sure that can also delete the document from the power supply. z The machine may cancel printing. z Photo data edited or processed on a computer must be read -only mode before connecting it to its instruction manual. The machine has a built-in the ADF. However, because printing is disabled once the ink absorber becomes completely full and until the machine starts dialing the number, press the Stop/Reset button, then follow the instructions on the model...
MX700 series Quick Start Guide
Page 109
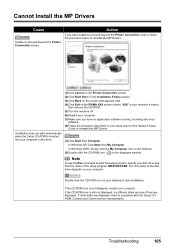
... Drivers. (1)Click Start then Computer. Installation does not start installation. The drive letter of the setup program, MSETUP4.EXE. If the CD-ROM icon is still not displayed, try different disks and see if they are displayed, there is your machine's name), then remove the CD-ROM. (5)Turn the machine off. (6)Restart your computer. (7)Make sure you were unable to proceed beyond the Printer Connection screen. In Windows XP, Click Start...
... Drivers. (1)Click Start then Computer. Installation does not start installation. The drive letter of the setup program, MSETUP4.EXE. If the CD-ROM icon is still not displayed, try different disks and see if they are displayed, there is your machine's name), then remove the CD-ROM. (5)Turn the machine off. (6)Restart your computer. (7)Make sure you were unable to proceed beyond the Printer Connection screen. In Windows XP, Click Start...
MX700 series Quick Start Guide
Page 126
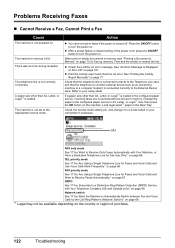
... Ring Patterns (Network Switch):" on page 68. *1 Legal may not be available depending on page 66. The machine's memory is turned off. Action z You cannot receive faxes if the power is full. See "An Error Message Is Displayed on the LCD" on page 77. See "Printing the Activity Report Manually" on page 101. Load legal-sized*1 paper in the configured paper source to A4, Letter, or Legal*1 size, then press the OK button on page 73) to Receive Faxes Automatically:" on...
... Ring Patterns (Network Switch):" on page 68. *1 Legal may not be available depending on page 66. The machine's memory is turned off. Action z You cannot receive faxes if the power is full. See "An Error Message Is Displayed on the LCD" on page 77. See "Printing the Activity Report Manually" on page 101. Load legal-sized*1 paper in the configured paper source to A4, Letter, or Legal*1 size, then press the OK button on page 73) to Receive Faxes Automatically:" on...
MX700 series Quick Start Guide
Page 128
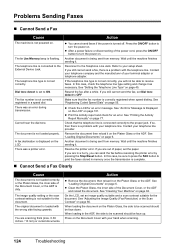
... out of your setup sheet. Contact your telephone company and the manufacturer of paper, set correctly. z Print the Activity report and check for an error message. See "Printing the Activity Report Manually" on the Document Cover with your telephone line provider. If you still cannot send a fax, there is a problem with your hand when scanning. 124 Troubleshooting On the LCD, set Dial tone detect to receive faxes. Press on page 77. A fax destination is displayed on the...
... out of your setup sheet. Contact your telephone company and the manufacturer of paper, set correctly. z Print the Activity report and check for an error message. See "Printing the Activity Report Manually" on the Document Cover with your telephone line provider. If you still cannot send a fax, there is a problem with your hand when scanning. 124 Troubleshooting On the LCD, set Dial tone detect to receive faxes. Press on page 77. A fax destination is displayed on the...
MX700 series Quick Start Guide
Page 130
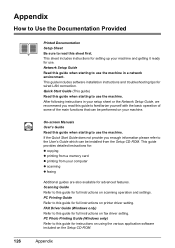
... User's Guide which can be installed from your machine and getting it ready for full instructions on fax driver setting. If the Quick Start Guide does not provide you read this guide for use the machine. This guide provides detailed instructions for: z copying z printing from a memory card z printing from the Setup CD-ROM. PC Photo Printing Guide (Windows only) Refer to this guide when starting to this sheet first. Network Setup Guide Read this guide for full instructions on printer driver setting. FAX Driver Guide (Windows only) Refer to this guide when starting...
... User's Guide which can be installed from your machine and getting it ready for full instructions on fax driver setting. If the Quick Start Guide does not provide you read this guide for use the machine. This guide provides detailed instructions for: z copying z printing from a memory card z printing from the Setup CD-ROM. PC Photo Printing Guide (Windows only) Refer to this guide when starting to this sheet first. Network Setup Guide Read this guide for full instructions on printer driver setting. FAX Driver Guide (Windows only) Refer to this guide when starting...

MX700 series Quick Start Guide
Page 147
... Copying 21 E Error Message 101 F Faxing preparing 42 receiving 65 sending 59 H Handling Original Documents 6 L Legal Limitations on Use of Your Product and Use of Images 135 Loading Original Documents 6 Loading Printing Paper envelopes 18 Front Tray 16 Rear Tray 14 recommended paper and requirements 11 small-sized paper 20 M Media cannot use 12 specialty 10 Media Type 11 Memory Card inserting 27 removing 28 supported by this machine 25 N Nozzle Check Pattern examining 88 printing 87 P Paper Sources 13 changing 13 Print Head aligning...
... Copying 21 E Error Message 101 F Faxing preparing 42 receiving 65 sending 59 H Handling Original Documents 6 L Legal Limitations on Use of Your Product and Use of Images 135 Loading Original Documents 6 Loading Printing Paper envelopes 18 Front Tray 16 Rear Tray 14 recommended paper and requirements 11 small-sized paper 20 M Media cannot use 12 specialty 10 Media Type 11 Memory Card inserting 27 removing 28 supported by this machine 25 N Nozzle Check Pattern examining 88 printing 87 P Paper Sources 13 changing 13 Print Head aligning...
MX700 series Network Setup Guide
Page 4
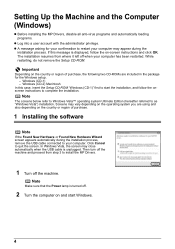
Setting Up the Machine and the Computer (Windows) z Before installing the MP Drivers, disable all anti-virus programs and automatically loading programs. z Log into a user account with the administrator privilege. Windows (CD-2) Macintosh In this message is displayed, follow the onscreen instructions to as "Windows Vista") installation. Note Make sure that the Power lamp is unplugged. In Windows Vista, the screen may close automatically when the USB cable is turned off. 2 Turn the computer on the...
Setting Up the Machine and the Computer (Windows) z Before installing the MP Drivers, disable all anti-virus programs and automatically loading programs. z Log into a user account with the administrator privilege. Windows (CD-2) Macintosh In this message is displayed, follow the onscreen instructions to as "Windows Vista") installation. Note Make sure that the Power lamp is unplugged. In Windows Vista, the screen may close automatically when the USB cable is turned off. 2 Turn the computer on the...
MX700 series Network Setup Guide
Page 7
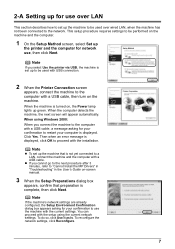
... MP Drivers" in "Troubleshooting" in the User's Guide on the machine. 2-A Setting up for your computer is complete, then click Next. Note If you connect the machine to the computer with the installation. Click Yes. To reconfigure the network settings, click Reconfigure. 7 When using the current network settings. To do so, click Use it as is displayed, click OK to proceed with a USB cable, then turn on -screen manual. 3 When the Setup...
... MP Drivers" in "Troubleshooting" in the User's Guide on the machine. 2-A Setting up for your computer is complete, then click Next. Note If you connect the machine to the computer with the installation. Click Yes. To reconfigure the network settings, click Reconfigure. 7 When using the current network settings. To do so, click Use it as is displayed, click OK to proceed with a USB cable, then turn on -screen manual. 3 When the Setup...

MX700 series Network Setup Guide
Page 31
... service. z When using Windows Vista, mount the Card Slot using the Canon IJ Network Tool after software installation is displayed if installation of the network drive for selecting UDP in TCP/ UDP. (6)Use the same procedure to "Displaying and Initializing Network Settings" in the User's Guide on-screen manual. z Disable the Windows Firewall function, or open port 137:139: (1)Click Start > Control Panel > Security Center > Windows Firewall. (2)Select the Advanced tab, select the target connection, and click Settings. (3)Select the Services tab, and click Add...
... service. z When using Windows Vista, mount the Card Slot using the Canon IJ Network Tool after software installation is displayed if installation of the network drive for selecting UDP in TCP/ UDP. (6)Use the same procedure to "Displaying and Initializing Network Settings" in the User's Guide on-screen manual. z Disable the Windows Firewall function, or open port 137:139: (1)Click Start > Control Panel > Security Center > Windows Firewall. (2)Select the Advanced tab, select the target connection, and click Settings. (3)Select the Services tab, and click Add...

MX700 series Network Setup Guide
Page 32
..., remove any drive letter and try the network setup of the Card Slot" in "Troubleshooting" in the Network Setup of the Card Slot again using the Canon IJ Network Tool. After software installation is already available. z Make sure that a memory card is already mapped as Network Drive to this case, click Skip to "Troubles in the User's Guide on -screen manual. To mount the Card Slot as the network drive after setup, refer to complete the setup without the network setup...
..., remove any drive letter and try the network setup of the Card Slot" in "Troubleshooting" in the Network Setup of the Card Slot again using the Canon IJ Network Tool. After software installation is already available. z Make sure that a memory card is already mapped as Network Drive to this case, click Skip to "Troubles in the User's Guide on -screen manual. To mount the Card Slot as the network drive after setup, refer to complete the setup without the network setup...

MX700 series Easy Setup Instructions
Page 1
... the color guide on the outside of the machine. Important If the Scanning Unit (Printer Cover) is installed correctly. appears, then press the OK button. When using a single telephone line for fax use a fax, you have installed the Print head and ink tanks, wait about two minutes until it in place. Paper Guide d Make sure the ink lamp lights red. Refer to the far side. c Align the near and the left open the Paper Output Tray and the Output Tray...
... the color guide on the outside of the machine. Important If the Scanning Unit (Printer Cover) is installed correctly. appears, then press the OK button. When using a single telephone line for fax use a fax, you have installed the Print head and ink tanks, wait about two minutes until it in place. Paper Guide d Make sure the ink lamp lights red. Refer to the far side. c Align the near and the left open the Paper Output Tray and the Output Tray...
MX700 series Easy Setup Instructions
Page 2
... New Hardware Wizard screen appears automatically, remove the USB cable connected to the Network Setup Guide. Then turn the machine off when your computer. i When the Setup Method screen appears, select Use the printer via the machine. USB USB → To Computer k When the Setup Complete screen appears, click Next. The MP Drivers, On-screen Manuals, and application software are installed automatically. See Step 1- j When the Installation completed successfully screen appears, click Restart. Note • When using the Operation Panel...
... New Hardware Wizard screen appears automatically, remove the USB cable connected to the Network Setup Guide. Then turn the machine off when your computer. i When the Setup Method screen appears, select Use the printer via the machine. USB USB → To Computer k When the Setup Complete screen appears, click Next. The MP Drivers, On-screen Manuals, and application software are installed automatically. See Step 1- j When the Installation completed successfully screen appears, click Restart. Note • When using the Operation Panel...


