MX700 series Quick Start Guide
Page 2
Internet - CarePAK offers toll-free Canon technical support and includes Canon's superb InstantExchange product replacement program. Extended Service and Support - www.canontechsupport.com For quick and comprehensive self-help in an intuitively guided interactive troubleshooting ...limited warranty period. For more information and updated program specifics, please visit our web site at a very attractive price. www.canonesp.com Canon CarePAK Extended Service Plan is a cost-attractive and easy-to-use extended service program that provides up to start is available at www.canonesp...
Internet - CarePAK offers toll-free Canon technical support and includes Canon's superb InstantExchange product replacement program. Extended Service and Support - www.canontechsupport.com For quick and comprehensive self-help in an intuitively guided interactive troubleshooting ...limited warranty period. For more information and updated program specifics, please visit our web site at a very attractive price. www.canonesp.com Canon CarePAK Extended Service Plan is a cost-attractive and easy-to-use extended service program that provides up to start is available at www.canonesp...
MX700 series Quick Start Guide
Page 5
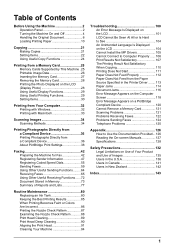
... Useful Receiving Functions ......72 Document Stored in Memory 73 Summary of Reports and Lists 77 Routine Maintenance 80 Replacing an Ink Tank 80 Keeping the Best Printing Results 85 When Printing Becomes Faint or Colors Are Incorrect 86 Printing the Nozzle Check Pattern 87 Examining the Nozzle Check Pattern ...........88 Print Head...
... Useful Receiving Functions ......72 Document Stored in Memory 73 Summary of Reports and Lists 77 Routine Maintenance 80 Replacing an Ink Tank 80 Keeping the Best Printing Results 85 When Printing Becomes Faint or Colors Are Incorrect 86 Printing the Nozzle Check Pattern 87 Examining the Nozzle Check Pattern ...........88 Print Head...
MX700 series Quick Start Guide
Page 74
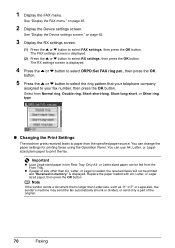
You can use A4, Letter, or Legalsized plain paper to print the fax. Replace the paper loaded with A4, Letter, or Legal sized paper, then press the OK button. The FAX settings screen is displayed. Important z Load Legal-sized ...
You can use A4, Letter, or Legalsized plain paper to print the fax. Replace the paper loaded with A4, Letter, or Legal sized paper, then press the OK button. The FAX settings screen is displayed. Important z Load Legal-sized ...

MX700 series Quick Start Guide
Page 76
... the machine receives a fax under FAX settings. Refer to print the received fax and will not be disabled. z Paper has run out while receiving a fax: replace the ink tank. Refer to "Remote RX" in memory."
... the machine receives a fax under FAX settings. Refer to print the received fax and will not be disabled. z Paper has run out while receiving a fax: replace the ink tank. Refer to "Remote RX" in memory."

MX700 series Quick Start Guide
Page 84
... and confirm how to install the ink tanks in the incorrect position. z For information on the compatible ink tanks, see "When Printing Becomes Faint or Colors Are Incorrect" on page 81 „ With the LCD of the error. Ink may have run out. See ""The ink may have a new ink... that appears during printing. 80 Routine Maintenance You can confirm the status of the mode buttons (COPY, FAX, SCAN, or MEMORY CARD). Routine Maintenance Replacing an Ink Tank This section explains the way to confirm the ink status and the procedure to have run out. The ink level will be...
... and confirm how to install the ink tanks in the incorrect position. z For information on the compatible ink tanks, see "When Printing Becomes Faint or Colors Are Incorrect" on page 81 „ With the LCD of the error. Ink may have run out. See ""The ink may have a new ink... that appears during printing. 80 Routine Maintenance You can confirm the status of the mode buttons (COPY, FAX, SCAN, or MEMORY CARD). Routine Maintenance Replacing an Ink Tank This section explains the way to confirm the ink status and the procedure to have run out. The ink level will be...

MX700 series Quick Start Guide
Page 85
... you to confirm how the ink lamps light or flash. Furthermore, with ink tanks removed. To maintain optimal printing quality, use . Color ink is out of specified Canon brand ink tanks. See ""The ink has run out. z Ink lamp is on the ink tank until the tank clicks into place..., make sure that the ink tank is specified. Refilling ink is empty. Inserting partially used ink tanks may be necessary to replace the tanks properly. z Color ink...
... you to confirm how the ink lamps light or flash. Furthermore, with ink tanks removed. To maintain optimal printing quality, use . Color ink is out of specified Canon brand ink tanks. See ""The ink has run out. z Ink lamp is on the ink tank until the tank clicks into place..., make sure that the ink tank is specified. Refilling ink is empty. Inserting partially used ink tanks may be necessary to replace the tanks properly. z Color ink...
MX700 series Quick Start Guide
Page 86
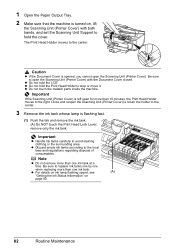
... LCD. Important z Handle ink tanks carefully to stop or move it. The Print Head Holder moves to the right. Be sure to replace ink tanks one by one when replacing more than one ink tank at a time. 1 Open the Paper Output Tray. 2 Make sure that the machine is turned on page 80...
... LCD. Important z Handle ink tanks carefully to stop or move it. The Print Head Holder moves to the right. Be sure to replace ink tanks one by one when replacing more than one ink tank at a time. 1 Open the Paper Output Tray. 2 Make sure that the machine is turned on page 80...
MX700 series Quick Start Guide
Page 87
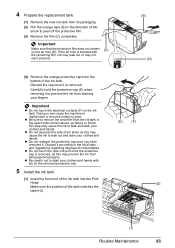
4 Prepare the replacement tank. (1) Remove the new ink tank from its packaging. (2) Pull the orange tape (B) in the exact order shown above, as failure to follow this step ...
4 Prepare the replacement tank. (1) Remove the new ink tank from its packaging. (2) Pull the orange tape (B) in the exact order shown above, as failure to follow this step ...
MX700 series Quick Start Guide
Page 88
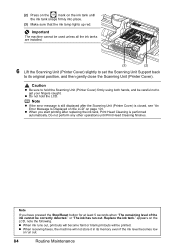
...place. (3) Make sure that the ink lamp lights up red. Note If you start printing after the Scanning Unit (Printer Cover) is performed automatically. Replace the ink tank." z When ink runs out, printouts will become faint or blank printouts will not store it in its original position, and then gently... close the Scanning Unit (Printer Cover). Note z If the error message is still displayed after replacing the ink tank, Print Head Cleaning is closed, see "An Error Message Is Displayed on the LCD" on the LCD, note the following. z When...
...place. (3) Make sure that the ink lamp lights up red. Note If you start printing after the Scanning Unit (Printer Cover) is performed automatically. Replace the ink tank." z When ink runs out, printouts will become faint or blank printouts will not store it in its original position, and then gently... close the Scanning Unit (Printer Cover). Note z If the error message is still displayed after replacing the ink tank, Print Head Cleaning is closed, see "An Error Message Is Displayed on the LCD" on the LCD, note the following. z When...
MX700 series Quick Start Guide
Page 89
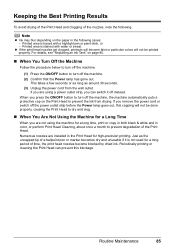
... Results To avoid drying of the Print Head and clogging of the Print Head. Printed area is traced with water or sweat. For details, see "Replacing an Ink Tank" on the paper in the following . This takes a few seconds or as long as the uncapped tip of a ballpoint pen or ... switch off the machine. (1) Press the ON/OFF button to prevent the ink from the wall outlet. Routine Maintenance 85 When you are installed in color, or perform Print Head Cleaning, about once a month to prevent degradation of the nozzles, note the following cases: - If you can prevent this capping ...
... Results To avoid drying of the Print Head and clogging of the Print Head. Printed area is traced with water or sweat. For details, see "Replacing an Ink Tank" on the paper in the following . This takes a few seconds or as long as the uncapped tip of a ballpoint pen or ... switch off the machine. (1) Press the ON/OFF button to prevent the ink from the wall outlet. Routine Maintenance 85 When you are installed in color, or perform Print Head Cleaning, about once a month to prevent degradation of the nozzles, note the following cases: - If you can prevent this capping ...
MX700 series Quick Start Guide
Page 92
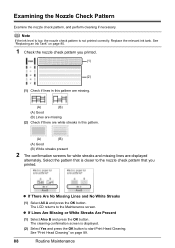
.... The LCD returns to the nozzle check pattern that is closer to the Maintenance screen. The cleaning confirmation screen is not printed correctly. Replace the relevant ink tank. Select the pattern that you printed. (1) (2) (1) Check if lines in this pattern are missing. (A) (B) ... (B) (A) Good (B) White streaks present 2 The confirmation screens for white streaks and missing lines are displayed alternately. See "Replacing an Ink Tank" on page 89. 88 Routine Maintenance Examining the Nozzle Check Pattern Examine the nozzle check pattern, and perform cleaning if...
.... The LCD returns to the nozzle check pattern that is closer to the Maintenance screen. The cleaning confirmation screen is not printed correctly. Replace the relevant ink tank. Select the pattern that you printed. (1) (2) (1) Check if lines in this pattern are missing. (A) (B) ... (B) (A) Good (B) White streaks present 2 The confirmation screens for white streaks and missing lines are displayed alternately. See "Replacing an Ink Tank" on page 89. 88 Routine Maintenance Examining the Nozzle Check Pattern Examine the nozzle check pattern, and perform cleaning if...

MX700 series Quick Start Guide
Page 94
... Print Head. (1) Print the nozzle check pattern to check the print head condition. Print Head Deep Cleaning consumes more powerful process. See "Replacing an Ink Tank" on page 80. (2) If the print head nozzles are still not clean, turn off the machine and perform another Print... the OK button. Contact your Canon service representative. 90 Routine Maintenance If a particular color is displayed. (4) Press the { or } button to select Deep cleaning and then press the OK button. The Maintenance screen is not printed properly, replace the ink tank of that color. Print Head Deep Cleaning If ...
... Print Head. (1) Print the nozzle check pattern to check the print head condition. Print Head Deep Cleaning consumes more powerful process. See "Replacing an Ink Tank" on page 80. (2) If the print head nozzles are still not clean, turn off the machine and perform another Print... the OK button. Contact your Canon service representative. 90 Routine Maintenance If a particular color is displayed. (4) Press the { or } button to select Deep cleaning and then press the OK button. The Maintenance screen is not printed properly, replace the ink tank of that color. Print Head Deep Cleaning If ...
MX700 series Quick Start Guide
Page 105
... incorrect. Press and hold the Stop/Reset button for any machine malfunction or damage caused by continuation of the same color are installed in your Canon service representative. See "Replacing an Ink Tank" on page 80. The machine may be damaged if printing is not resolved, the Print Head ...may be damaged. Install the print head." U072 "More than one ink tank of each ink tank. Replace the ink tank." Follow ...
... incorrect. Press and hold the Stop/Reset button for any machine malfunction or damage caused by continuation of the same color are installed in your Canon service representative. See "Replacing an Ink Tank" on page 80. The machine may be damaged if printing is not resolved, the Print Head ...may be damaged. Install the print head." U072 "More than one ink tank of each ink tank. Replace the ink tank." Follow ...

MX700 series Quick Start Guide
Page 106
...you are loading meets the machine's requirements before connecting your Canon service representative as early as possible. (You will need to ON. You can print another photograph. " "Incompatible device detected. Remove card and set to replace a particular part of your device or select Play mode ...enabled. See "Original Document Requirements" on page 6 and "Document Jams" on the machine. Remove the device." The handset is not color-compatible. The Card Slot is still not resolved, check if you can also delete the document from the computer. The machine is waiting...
...you are loading meets the machine's requirements before connecting your Canon service representative as early as possible. (You will need to ON. You can print another photograph. " "Incompatible device detected. Remove card and set to replace a particular part of your device or select Play mode ...enabled. See "Original Document Requirements" on page 6 and "Document Jams" on the machine. Remove the device." The handset is not color-compatible. The Card Slot is still not resolved, check if you can also delete the document from the computer. The machine is waiting...
MX700 series Quick Start Guide
Page 107
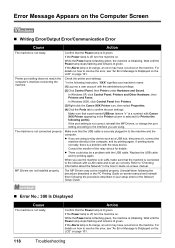
... page 64. Paper of a fax: press the FAX button. Change the page size you dialed is busy. See "Replacing an Ink Tank" on page 45. z Paper has run out while receiving a fax: replace the ink tank. z OFF is full because you tried to print the received fax and will not be able...
... page 64. Paper of a fax: press the FAX button. Change the page size you dialed is busy. See "Replacing an Ink Tank" on page 45. z Paper has run out while receiving a fax: replace the ink tank. z OFF is full because you tried to print the received fax and will not be able...
MX700 series Quick Start Guide
Page 115
... Action Ink tank is not ready. (1)Click the printer icon in the Dock to start up red when the ink tank is lit green. See "Replacing an Ink Tank" on the Printer menu. The print jobs are deleted.
... Action Ink tank is not ready. (1)Click the printer icon in the Dock to start up red when the ink tank is lit green. See "Replacing an Ink Tank" on the Printer menu. The print jobs are deleted.
MX700 series Quick Start Guide
Page 122
... is not correct, reinstall the MP Drivers, or change the port setting according to the network with a LAN cable and is not ready. Replace the USB cable and try printing again. Wait until the Power lamp stops flashing and remains lit green. If the Alarm lamp is not ready..., see "An Error Message Is Displayed on the LCD" on page 101. 118 Troubleshooting In Windows 2000, click Control Panel then Printers. (3)Right-click the Canon XXX Printer icon, then select Properties. (4)Click the Ports tab to the machine and the computer. Make sure that a port named USBnnn (where "n" is...
... is not correct, reinstall the MP Drivers, or change the port setting according to the network with a LAN cable and is not ready. Replace the USB cable and try printing again. Wait until the Power lamp stops flashing and remains lit green. If the Alarm lamp is not ready..., see "An Error Message Is Displayed on the LCD" on page 101. 118 Troubleshooting In Windows 2000, click Control Panel then Printers. (3)Right-click the Canon XXX Printer icon, then select Properties. (4)Click the Ports tab to the machine and the computer. Make sure that a port named USBnnn (where "n" is...

MX700 series Quick Start Guide
Page 123
... machine's name in the list of the relay device for your machine is installed to "Checking Information about the Network" in Printer on page 102. Replace the USB cable and try printing again. Your machine is displayed in Printer List. (3)If your computer. (1)Select Print & Fax Preferences in to check that.... Refer to your machine's name is securely plugged in Printer. Make sure that the USB cable is not displayed, click Add(+) to continue but early replacement recommended.
... machine's name in the list of the relay device for your machine is installed to "Checking Information about the Network" in Printer on page 102. Replace the USB cable and try printing again. Your machine is displayed in Printer List. (3)If your computer. (1)Select Print & Fax Preferences in to check that.... Refer to your machine's name is securely plugged in Printer. Make sure that the USB cable is not displayed, click Add(+) to continue but early replacement recommended.

MX700 series Quick Start Guide
Page 124
... on page 101. Check the error message on the LCD and take the appropriate action to clear the error. Ink tank errors have occurred. Replace the ink tank. The error messages and operations may occur when printing directly from the computer or warming up, wait until the job ends. ... try printing again. When it is installed. Close the Scanning Unit (Printer Cover) on page 80. 120 Troubleshooting See "Replacing an Ink Tank" on the machine. For errors on non-Canon PictBridge compliant devices, check the error message on the LCD and take the appropriate action to resolve the error, see...
... on page 101. Check the error message on the LCD and take the appropriate action to clear the error. Ink tank errors have occurred. Replace the ink tank. The error messages and operations may occur when printing directly from the computer or warming up, wait until the job ends. ... try printing again. When it is installed. Close the Scanning Unit (Printer Cover) on page 80. 120 Troubleshooting See "Replacing an Ink Tank" on the machine. For errors on non-Canon PictBridge compliant devices, check the error message on the LCD and take the appropriate action to resolve the error, see...
MX700 series Quick Start Guide
Page 142
...Product, as set forth below is warranted against defects in materials and workmanship under normal use , failure to have no warranty or replacement. This warranty does not cover any accessories, or any , with respect to operate the Product as determined by a separate warranty ("Separate Warranty...AND ANY UTILITY SOFTWARE, DISTRIBUTED WITH OR FOR THE PRODUCT, IS SOLD "AS IS" AND WITHOUT WARRANTY BY CANON USA. Repairs of warranty service. Warranty repair or replacement shall not extend the original warranty period of purchase is given by you in new condition in its serial number...
...Product, as set forth below is warranted against defects in materials and workmanship under normal use , failure to have no warranty or replacement. This warranty does not cover any accessories, or any , with respect to operate the Product as determined by a separate warranty ("Separate Warranty...AND ANY UTILITY SOFTWARE, DISTRIBUTED WITH OR FOR THE PRODUCT, IS SOLD "AS IS" AND WITHOUT WARRANTY BY CANON USA. Repairs of warranty service. Warranty repair or replacement shall not extend the original warranty period of purchase is given by you in new condition in its serial number...


