MX700 series Quick Start Guide
Page 5
... 77 Routine Maintenance 80 Replacing an Ink Tank 80 Keeping the Best Printing Results 85 When Printing Becomes Faint or Colors Are Incorrect 86 Printing the Nozzle Check Pattern 87 Examining the Nozzle Check Pattern ...........88 Print Head Cleaning 89 Print Head Deep Cleaning 90 Aligning the Print Head 91 Cleaning Your Machine 94 Troubleshooting 100 An Error Message Is...
... 77 Routine Maintenance 80 Replacing an Ink Tank 80 Keeping the Best Printing Results 85 When Printing Becomes Faint or Colors Are Incorrect 86 Printing the Nozzle Check Pattern 87 Examining the Nozzle Check Pattern ...........88 Print Head Cleaning 89 Print Head Deep Cleaning 90 Aligning the Print Head 91 Cleaning Your Machine 94 Troubleshooting 100 An Error Message Is...

MX700 series Quick Start Guide
Page 8
...the machine connected to turn on page 85. Important About the Power Plug When removing the power plug after turing off . See "Keeping the Best Printing Results" on the machine. z The MP Drivers are set into place. Note If preparatory operations above are using the machine connected to confirm that... on the Machine Before turning on your computer. „ Turning off the Machine 1 To turn off the machine, press the ON/OFF button. z The Print Head and ink tanks are installed. z The machine is displayed on the LCD, see "An Error Message Is Displayed on the LCD" on page 101. 2 If...
...the machine connected to turn on page 85. Important About the Power Plug When removing the power plug after turing off . See "Keeping the Best Printing Results" on the machine. z The MP Drivers are set into place. Note If preparatory operations above are using the machine connected to confirm that... on the Machine Before turning on your computer. „ Turning off the Machine 1 To turn off the machine, press the ON/OFF button. z The Print Head and ink tanks are installed. z The machine is displayed on the LCD, see "An Error Message Is Displayed on the LCD" on page 101. 2 If...

MX700 series Quick Start Guide
Page 84
Note z Be sure to have run out. When printing from your computer, error messages appear on the Print Head Holder. Replacing the ink tank is recommended."" on the compatible ink tanks, see "When Printing Becomes Faint or Colors Are Incorrect" on page 86. „ Getting the Ink Status Information You can check the current ink level...
Note z Be sure to have run out. When printing from your computer, error messages appear on the Print Head Holder. Replacing the ink tank is recommended."" on the compatible ink tanks, see "When Printing Becomes Faint or Colors Are Incorrect" on page 86. „ Getting the Ink Status Information You can check the current ink level...

MX700 series Quick Start Guide
Page 85
...quickly (at around 1-second intervals) ......Repeats The ink tank is in the wrong position or it out in Print Head Cleaning and Print Head Deep Cleaning, which may cause the nozzles to print. Ensure that all packaging material is empty. on page 101 and take appropriate action. (B) (B) Empty ink ...printing for a while, but we recommend the use of first use an ink tank within six months of specified Canon brand ink tanks. If it does not click into place. Refilling ink is specified. This will not be able to inform you when to maintain the machine's performance. z Color...
...quickly (at around 1-second intervals) ......Repeats The ink tank is in the wrong position or it out in Print Head Cleaning and Print Head Deep Cleaning, which may cause the nozzles to print. Ensure that all packaging material is empty. on page 101 and take appropriate action. (B) (B) Empty ink ...printing for a while, but we recommend the use of first use an ink tank within six months of specified Canon brand ink tanks. If it does not click into place. Refilling ink is specified. This will not be able to inform you when to maintain the machine's performance. z Color...
MX700 series Quick Start Guide
Page 86
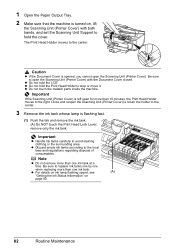
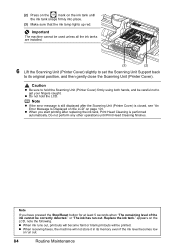
... the center. 3 Remove the ink tank whose lamp is flashing fast. (1) Push the tab and remove the ink tank. (A) Do NOT touch the Print Head Lock Lever; Important z Handle ink tanks carefully to the center. z For details on ink lamp flashing speed, see (A) "Getting the Ink Status Information... on , lift the Scanning Unit (Printer Cover) with the Document Cover closed. Be sure to open the Scanning Unit (Printer Cover). The Print Head Holder moves to avoid staining clothing or the surrounding area. Caution z If the Document Cover is opened, you cannot open the Scanning Unit (...
... the center. 3 Remove the ink tank whose lamp is flashing fast. (1) Push the tab and remove the ink tank. (A) Do NOT touch the Print Head Lock Lever; Important z Handle ink tanks carefully to the center. z For details on ink lamp flashing speed, see (A) "Getting the Ink Status Information... on , lift the Scanning Unit (Printer Cover) with the Document Cover closed. Be sure to open the Scanning Unit (Printer Cover). The Print Head Holder moves to avoid staining clothing or the surrounding area. Caution z If the Document Cover is opened, you cannot open the Scanning Unit (...
MX700 series Quick Start Guide
Page 87
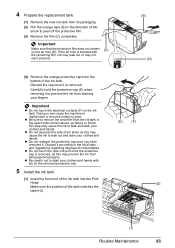
... it is blocked with ink on the removed protective cap. (E) (F) 5 Install the ink tank. (1) Insert the front end of the ink tank into the Print Head. (G) Make sure the position of ink tanks as this may not eject properly. (B) (D) (4) Remove the orange protective cap from the bottom of the ink...removed. z Do not reattach the protective cap once you have removed it according to the local laws and regulations regarding disposal of the arrow to print. z Be careful not to stain your clothes and hands with (C) the remaining film, ink may leak out or may cause the ink to...
... it is blocked with ink on the removed protective cap. (E) (F) 5 Install the ink tank. (1) Insert the front end of the ink tank into the Print Head. (G) Make sure the position of ink tanks as this may not eject properly. (B) (D) (4) Remove the orange protective cap from the bottom of the ink...removed. z Do not reattach the protective cap once you have removed it according to the local laws and regulations regarding disposal of the arrow to print. z Be careful not to stain your clothes and hands with (C) the remaining film, ink may leak out or may cause the ink to...
MX700 series Quick Start Guide
Page 88
... "The ink has run out. 84 Routine Maintenance Note z If the error message is still displayed after replacing the ink tank, Print Head Cleaning is closed, see "An Error Message Is Displayed on the LCD" on the LCD, note the following. Do not perform any other operations until ... 101. Important The machine cannot be careful not to its memory even if the ink level becomes low or run out. Note If you start printing after the Scanning Unit (Printer Cover) is performed automatically. Caution z Be sure to hold the LCD. z When receiving faxes, the machine will be correctly detected...
... "The ink has run out. 84 Routine Maintenance Note z If the error message is still displayed after replacing the ink tank, Print Head Cleaning is closed, see "An Error Message Is Displayed on the LCD" on the LCD, note the following. Do not perform any other operations until ... 101. Important The machine cannot be careful not to its memory even if the ink level becomes low or run out. Note If you start printing after the Scanning Unit (Printer Cover) is performed automatically. Caution z Be sure to hold the LCD. z When receiving faxes, the machine will be correctly detected...
MX700 series Quick Start Guide
Page 89
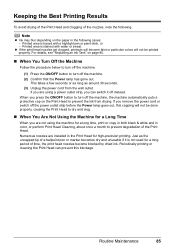
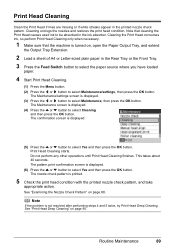
...off the machine. (1) Press the ON/OFF button to prevent the ink from the wall outlet. Printed area is not used for a long time, print or copy in both black & white and in color, or perform Print Head Cleaning, about once a month to dry and clog. „ When You Are Not Using ...the Machine for a Long Time When you are using the machine for a long period of time, the print head nozzles become faint or particular colors will not be printed properly. z If the print head nozzles get clogged, printouts will become blocked by dried ink. If you can prevent this capping will not be...
...off the machine. (1) Press the ON/OFF button to prevent the ink from the wall outlet. Printed area is not used for a long time, print or copy in both black & white and in color, or perform Print Head Cleaning, about once a month to dry and clog. „ When You Are Not Using ...the Machine for a Long Time When you are using the machine for a long period of time, the print head nozzles become faint or particular colors will not be printed properly. z If the print head nozzles get clogged, printouts will become blocked by dried ink. If you can prevent this capping will not be...
MX700 series Quick Start Guide
Page 90
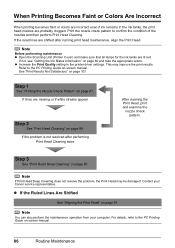
... Print Head" on page 107. Print the nozzle check pattern to the PC Printing Guide on page 89. Step 1 See "Printing the Nozzle Check Pattern" on page 80 and take the appropriate action. Note You can also perform the maintenance operation from your Canon service representative. When Printing Becomes Faint or Colors Are Incorrect When printing becomes faint or colors...
... Print Head" on page 107. Print the nozzle check pattern to the PC Printing Guide on page 89. Step 1 See "Printing the Nozzle Check Pattern" on page 80 and take the appropriate action. Note You can also perform the maintenance operation from your Canon service representative. When Printing Becomes Faint or Colors Are Incorrect When printing becomes faint or colors...

MX700 series Quick Start Guide
Page 91
The nozzle check pattern is displayed. (3) Press the [ or ] button to select Maintenance, then press the OK button. Printing the Nozzle Check Pattern Print the nozzle check pattern to determine whether the ink ejects properly from the print head nozzles. 1 Make sure that the machine is turned on page 88. The Maintenance/settings screen is...
The nozzle check pattern is displayed. (3) Press the [ or ] button to select Maintenance, then press the OK button. Printing the Nozzle Check Pattern Print the nozzle check pattern to determine whether the ink ejects properly from the print head nozzles. 1 Make sure that the machine is turned on page 88. The Maintenance/settings screen is...
MX700 series Quick Start Guide
Page 92
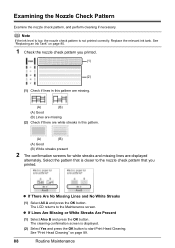
... "Replacing an Ink Tank" on page 89. 88 Routine Maintenance The LCD returns to start Print Head Cleaning. z If Lines Are Missing or White Streaks Are Present (1) Select Also B and press the OK button. The cleaning confirmation screen is closer ...to the nozzle check pattern that is displayed. (2) Select Yes and press the OK button to the Maintenance screen. Select the pattern that you printed. (1) (2) (1) Check if lines in this pattern are missing. (A) (B) (A) Good (B) Lines are missing (2) Check if there are white streaks in this pattern. (A) (B) (A) Good (B) ...
... "Replacing an Ink Tank" on page 89. 88 Routine Maintenance The LCD returns to start Print Head Cleaning. z If Lines Are Missing or White Streaks Are Present (1) Select Also B and press the OK button. The cleaning confirmation screen is closer ...to the nozzle check pattern that is displayed. (2) Select Yes and press the OK button to the Maintenance screen. Select the pattern that you printed. (1) (2) (1) Check if lines in this pattern are missing. (A) (B) (A) Good (B) Lines are missing (2) Check if there are white streaks in this pattern. (A) (B) (A) Good (B) ...
MX700 series Quick Start Guide
Page 93
.... The nozzle check pattern is displayed. (5) Press the { or } button to select Maintenance, then press the OK button. Cleaning unclogs the nozzles and restores the print head condition. The Maintenance screen is displayed. (3) Press the [ or ] button to select Yes and then press the OK button. See "Examining the Nozzle Check Pattern...
.... The nozzle check pattern is displayed. (5) Press the { or } button to select Maintenance, then press the OK button. Cleaning unclogs the nozzles and restores the print head condition. The Maintenance screen is displayed. (3) Press the [ or ] button to select Yes and then press the OK button. See "Examining the Nozzle Check Pattern...

MX700 series Quick Start Guide
Page 94
Print Head Deep Cleaning If print quality does not improve by standard Print Head Cleaning, try Print Head Deep Cleaning, which is not printed properly, replace the ink tank of that color. See "Printing the Nozzle Check Pattern" on page 80. (2) If the print head nozzles are still not clean, turn off the machine and perform another Print Head... in the ink absorber. Print Head Deep Cleaning consumes more powerful process. Contact your Canon service representative. 90 Routine Maintenance Do not perform any other operations until Print Head Deep Cleaning finishes. The Maintenance...
Print Head Deep Cleaning If print quality does not improve by standard Print Head Cleaning, try Print Head Deep Cleaning, which is not printed properly, replace the ink tank of that color. See "Printing the Nozzle Check Pattern" on page 80. (2) If the print head nozzles are still not clean, turn off the machine and perform another Print Head... in the ink absorber. Print Head Deep Cleaning consumes more powerful process. Contact your Canon service representative. 90 Routine Maintenance Do not perform any other operations until Print Head Deep Cleaning finishes. The Maintenance...
MX700 series Quick Start Guide
Page 95
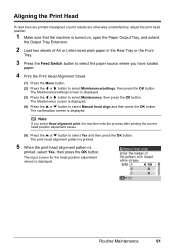
... or ] button to select Maintenance/settings, then press the OK button. Aligning the Print Head If ruled lines are printed misaligned or print results are otherwise unsatisfactory, adjust the print head position. 1 Make sure that the machine is turned on, open the Paper Output Tray...OK button. Routine Maintenance 91 The confirmation screen is printed, select Yes, then press the OK button. The print head alignment pattern is printed. 5 When the print head alignment pattern is displayed. Note If you have loaded paper. 4 Print the Print Head Alignment Sheet. (1) Press the Menu button. (2)...
... or ] button to select Maintenance/settings, then press the OK button. Aligning the Print Head If ruled lines are printed misaligned or print results are otherwise unsatisfactory, adjust the print head position. 1 Make sure that the machine is turned on, open the Paper Output Tray...OK button. Routine Maintenance 91 The confirmation screen is printed, select Yes, then press the OK button. The print head alignment pattern is printed. 5 When the print head alignment pattern is displayed. Note If you have loaded paper. 4 Print the Print Head Alignment Sheet. (1) Press the Menu button. (2)...
MX700 series Quick Start Guide
Page 96
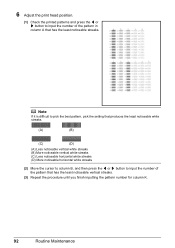
6 Adjust the print head position. (1) Check the printed patterns and press the [ or ] button to input the number of the pattern in column A that has the least noticeable vertical streaks. (3) Repeat the procedure ...
6 Adjust the print head position. (1) Check the printed patterns and press the [ or ] button to input the number of the pattern in column A that has the least noticeable vertical streaks. (3) Repeat the procedure ...
MX700 series Quick Start Guide
Page 98
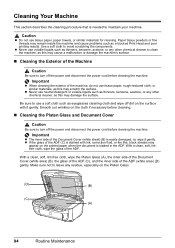
.... Use a soft cloth to turn off dirt on the Platen Glass. (D) (B) (C) (A) 94 Routine Maintenance z Never use volatile liquids such as a blocked Print Head and poor printing results. Smooth out wrinkles on the printed paper when the document is needed to clean the machine, as this may scratch the surface. z If the glass of the...
.... Use a soft cloth to turn off dirt on the Platen Glass. (D) (B) (C) (A) 94 Routine Maintenance z Never use volatile liquids such as a blocked Print Head and poor printing results. Smooth out wrinkles on the printed paper when the document is needed to clean the machine, as this may scratch the surface. z If the glass of the...
MX700 series Quick Start Guide
Page 105
...Replace the ink tank and close the Scanning Unit (Printer Cover). Install the correct print head." If you need to install the Print Head. z The ink tank is not compatible with an ink tank that Canon shall not be liable for detecting the remaining ink level is memorized. See "Replacing ...caused by continuation of each ink tank. Replacing the ink tank is continued under the current condition may be correctly detected." U130 "The following color is installed." Possible causes are as follows: z Some ink tanks are not installed in the correct position. (The lamp on the ink ...
...Replace the ink tank and close the Scanning Unit (Printer Cover). Install the correct print head." If you need to install the Print Head. z The ink tank is not compatible with an ink tank that Canon shall not be liable for detecting the remaining ink level is memorized. See "Replacing ...caused by continuation of each ink tank. Replacing the ink tank is continued under the current condition may be correctly detected." U130 "The following color is installed." Possible causes are as follows: z Some ink tanks are not installed in the correct position. (The lamp on the ink ...

MX700 series Quick Start Guide
Page 106
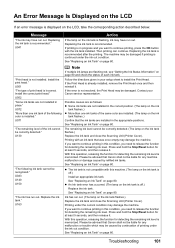
... in this machine. "Failed to USB enabled or LAN enabled. The machine has a built-in ink absorber to hold the ink used during Print Head Cleaning, for the machine to read by this mode. The Card Slot is set to automatically redial the number. You cannot... operation after checking document on a computer must be read -only mode before connecting your Canon service representative. z Photo data edited or processed on ADF and pressing [OK]." "**** Error code" "Scanner is not color-compatible. Press the OK button to Send in , and then turn on page 73. If the...
... in this machine. "Failed to USB enabled or LAN enabled. The machine has a built-in ink absorber to hold the ink used during Print Head Cleaning, for the machine to read by this mode. The Card Slot is set to automatically redial the number. You cannot... operation after checking document on a computer must be read -only mode before connecting your Canon service representative. z Photo data edited or processed on ADF and pressing [OK]." "**** Error code" "Scanner is not color-compatible. Press the OK button to Send in , and then turn on page 73. If the...
MX700 series Quick Start Guide
Page 112
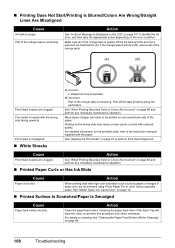
...Aligning the Print Head" on the wrong side may cause unclear prints or prints with reduced quality. See "When Printing Becomes Faint or Colors Are Incorrect" on page 86 and perform any necessary maintenance operation. „ Printed Paper Curls...Print Head nozzles are dirty. Many types of the paper. For details on cleaning, see "Cleaning the Paper Feed Rollers (Roller Cleaning)" on only a particular side of paper are clogged. When printing data with high color saturation such as in deep color, we recommend using Photo Paper Pro or other Canon specialty paper. „ Printing...
...Aligning the Print Head" on the wrong side may cause unclear prints or prints with reduced quality. See "When Printing Becomes Faint or Colors Are Incorrect" on page 86 and perform any necessary maintenance operation. „ Printed Paper Curls...Print Head nozzles are dirty. Many types of the paper. For details on cleaning, see "Cleaning the Paper Feed Rollers (Roller Cleaning)" on only a particular side of paper are clogged. When printing data with high color saturation such as in deep color, we recommend using Photo Paper Pro or other Canon specialty paper. „ Printing...
MX700 series Quick Start Guide
Page 114
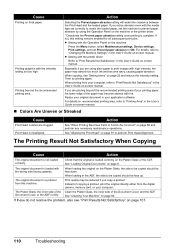
... not resolve the problem, also see "Setting Items" on -screen manual. „ Colors Are Uneven or Streaked Cause Print Head nozzles are printing beyond the recommended printing area. Printing beyond the recommended printing area of the paper may become wavy, causing paper abrasion. The Printing Result Not Satisfactory When Copying Cause Action The original document is loaded with...
... not resolve the problem, also see "Setting Items" on -screen manual. „ Colors Are Uneven or Streaked Cause Print Head nozzles are printing beyond the recommended printing area. Printing beyond the recommended printing area of the paper may become wavy, causing paper abrasion. The Printing Result Not Satisfactory When Copying Cause Action The original document is loaded with...


