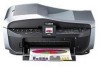
MX700 series Quick Start Guide
Page 2
... Us Help You Better Before you contact Canon, please record the following information. In addition, the latest driver downloads, answers to frequently asked questions, product information, and "where to your Canon service and support, call (1-800-385-2155), or visit our Web site at (1-866-251...of service charges, MondaySaturday (excluding holidays), during your product's 1 year limited warranty period. Email Tech Support - www.canonesp.com Canon CarePAK Extended Service Plan is a cost-attractive and easy-to-use extended service program that provides up to start is available at www...
... Us Help You Better Before you contact Canon, please record the following information. In addition, the latest driver downloads, answers to frequently asked questions, product information, and "where to your Canon service and support, call (1-800-385-2155), or visit our Web site at (1-866-251...of service charges, MondaySaturday (excluding holidays), during your product's 1 year limited warranty period. Email Tech Support - www.canonesp.com Canon CarePAK Extended Service Plan is a cost-attractive and easy-to-use extended service program that provides up to start is available at www...
MX700 series Quick Start Guide
Page 5
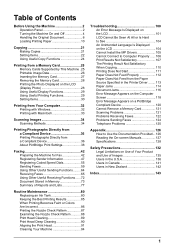
... Reports and Lists 77 Routine Maintenance 80 Replacing an Ink Tank 80 Keeping the Best Printing Results 85 When Printing Becomes Faint or Colors Are Incorrect 86 Printing the Nozzle Check Pattern 87 Examining the Nozzle Check Pattern ...........88 Print Head Cleaning 89 Print Head Deep Cleaning... 110 Printing Does Not Start 111 Paper Does Not Feed Properly 112 Paper Does Not Feed from the Paper Source Specified in the Printer Driver ........ 113 Paper Jams 114 Document Jams 116 Error Message Appears on the Computer Screen 118 Error Message Appears on a PictBridge Compliant Device ...
... Reports and Lists 77 Routine Maintenance 80 Replacing an Ink Tank 80 Keeping the Best Printing Results 85 When Printing Becomes Faint or Colors Are Incorrect 86 Printing the Nozzle Check Pattern 87 Examining the Nozzle Check Pattern ...........88 Print Head Cleaning 89 Print Head Deep Cleaning... 110 Printing Does Not Start 111 Paper Does Not Feed Properly 112 Paper Does Not Feed from the Paper Source Specified in the Printer Driver ........ 113 Paper Jams 114 Document Jams 116 Error Message Appears on the Computer Screen 118 Error Message Appears on a PictBridge Compliant Device ...

MX700 series Quick Start Guide
Page 8
z The MP Drivers are unsent faxes stored in the machine's memory. 4 Before Using the Machine Note If the Alarm lamp lights up or flashes orange and an error ...
z The MP Drivers are unsent faxes stored in the machine's memory. 4 Before Using the Machine Note If the Alarm lamp lights up or flashes orange and an error ...
MX700 series Quick Start Guide
Page 15
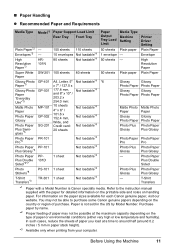
.... Refer to around half (around 0.2 inches / 5 mm in paper stack height). *3 Available only when printing from your computer. Printer Driver Setting Plain Paper Envelope High Resolution Paper Super White SW-201 Paper Glossy Photo GP-401 Paper*5 Glossy Photo Paper "Everyday Use"*5 GP-501...*1 - - Photo Paper Plus Double Sided Photo Plus Photo Paper Glossy Plus Glossy - T-Shirt Transfers *1 Paper with the paper for each Canon genuine paper, visit our website. HR101N Paper Support Load Limit Rear Tray Front Tray 150 sheets 110 sheets 10 envelopes Not loadable*4 80 sheets...
.... Refer to around half (around 0.2 inches / 5 mm in paper stack height). *3 Available only when printing from your computer. Printer Driver Setting Plain Paper Envelope High Resolution Paper Super White SW-201 Paper Glossy Photo GP-401 Paper*5 Glossy Photo Paper "Everyday Use"*5 GP-501...*1 - - Photo Paper Plus Double Sided Photo Plus Photo Paper Glossy Plus Glossy - T-Shirt Transfers *1 Paper with the paper for each Canon genuine paper, visit our website. HR101N Paper Support Load Limit Rear Tray Front Tray 150 sheets 110 sheets 10 envelopes Not loadable*4 80 sheets...
MX700 series Quick Start Guide
Page 17
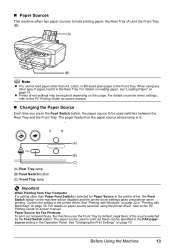
... for Fax Printouts To print out received faxes, the machine uses the Front Tray by default, regardless of paper, load it in the printer driver, the Feed Switch button on the machine will be required depending on -screen manual. „ Changing the Paper Source Each time you press ... the Operation Panel. The paper source used switches between the Rear Tray and the Front Tray. Before Using the Machine 13 When using the printer driver, refer to load printing paper; The paper feeds from the paper source whose lamp is lit. (A) (B) (C) (A) Rear Tray lamp (B) Feed Switch button (C) Front...
... for Fax Printouts To print out received faxes, the machine uses the Front Tray by default, regardless of paper, load it in the printer driver, the Feed Switch button on the machine will be required depending on -screen manual. „ Changing the Paper Source Each time you press ... the Operation Panel. The paper source used switches between the Rear Tray and the Front Tray. Before Using the Machine 13 When using the printer driver, refer to load printing paper; The paper feeds from the paper source whose lamp is lit. (A) (B) (C) (A) Rear Tray lamp (B) Feed Switch button (C) Front...
MX700 series Quick Start Guide
Page 19
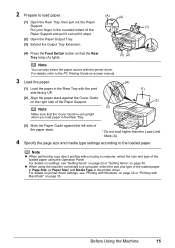
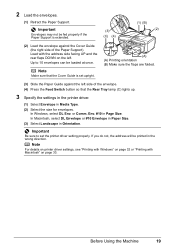
...page 22 or "Setting Items" on page 33. For details on settings, see "Printing with Windows" on page 32 or "Printing with the printer driver. Before Using the Machine 15 2 Prepare to the loaded paper. Note z When performing copy direct printing without using a computer, select the size and ...media type settings according to load paper. (A) (4) (1) Open the Rear Tray, then pull out the Paper Support. (1) Put your finger in the printer driver. For details, refer to the PC Printing Guide on-screen manual. 3 Load the paper. (A) (1) Load the paper in the Rear Tray with the print...
...page 22 or "Setting Items" on page 33. For details on settings, see "Printing with Windows" on page 32 or "Printing with the printer driver. Before Using the Machine 15 2 Prepare to the loaded paper. Note z When performing copy direct printing without using a computer, select the size and ...media type settings according to load paper. (A) (4) (1) Open the Rear Tray, then pull out the Paper Support. (1) Put your finger in the printer driver. For details, refer to the PC Printing Guide on-screen manual. 3 Load the paper. (A) (1) Load the paper in the Rear Tray with the print...
MX700 series Quick Start Guide
Page 20
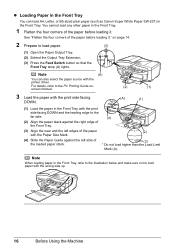
...the Machine on page 14. 2 Prepare to the PC Printing Guide on- Note (A) You can load A4, Letter, or B5-sized plain paper (such as Canon Super White Paper SW-201) in the Front Tray, refer to the illustration below and make sure not to the far side. (4) (2) Align the paper... the four corners of the paper before loading it ." z Loading Paper in the Front Tray You can also select the paper source with the printer driver. For details, refer to load paper. (3) (1) Open the Paper Output Tray. (2) Extend the Output Tray Extension. (3) Press the Feed Switch button so that the Front...
...the Machine on page 14. 2 Prepare to the PC Printing Guide on- Note (A) You can load A4, Letter, or B5-sized plain paper (such as Canon Super White Paper SW-201) in the Front Tray, refer to the illustration below and make sure not to the far side. (4) (2) Align the paper... the four corners of the paper before loading it ." z Loading Paper in the Front Tray You can also select the paper source with the printer driver. For details, refer to load paper. (3) (1) Open the Paper Output Tray. (2) Extend the Output Tray Extension. (3) Press the Feed Switch button so that the Front...
MX700 series Quick Start Guide
Page 21
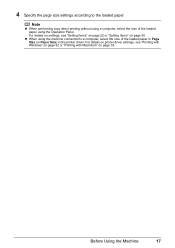
For details on printer driver settings, see "Setting Items" on page 22 or "Setting Items" on page 33. For details on settings, see "Printing with Windows" on page 32 or "Printing with Macintosh" on page 30. Before Using the Machine 17 z When using the Operation Panel. 4 Specify the page size settings according to a computer, select the size of the loaded paper in Page Size (or Paper Size) in the printer driver. Note z When performing copy direct printing without using a computer, select the size of the loaded paper using the machine connected to the loaded paper.
For details on printer driver settings, see "Setting Items" on page 22 or "Setting Items" on page 33. For details on settings, see "Printing with Windows" on page 32 or "Printing with Macintosh" on page 30. Before Using the Machine 17 z When using the Operation Panel. 4 Specify the page size settings according to a computer, select the size of the loaded paper in Page Size (or Paper Size) in the printer driver. Note z When performing copy direct printing without using a computer, select the size of the loaded paper using the machine connected to the loaded paper.
MX700 series Quick Start Guide
Page 23
...the right side of the envelope. (4) Press the Feed Switch button so that the Cover Guide is set the printer driver setting properly. Note For details on printer driver settings, see "Printing with Windows" on page 32 or "Printing with the address side facing UP and the rear flaps... 2 Load the envelopes. (1) Retract the Paper Support. Note Make sure that the Rear Tray lamp (C) lights up. 3 Specify the settings in the printer driver. (1) Select Envelope in the wrong direction. In Windows, select DL Env. In Macintosh, select DL Envelope or #10 Envelope in Paper Size. (3) Select ...
...the right side of the envelope. (4) Press the Feed Switch button so that the Cover Guide is set the printer driver setting properly. Note For details on printer driver settings, see "Printing with Windows" on page 32 or "Printing with the address side facing UP and the rear flaps... 2 Load the envelopes. (1) Retract the Paper Support. Note Make sure that the Rear Tray lamp (C) lights up. 3 Specify the settings in the printer driver. (1) Select Envelope in the wrong direction. In Windows, select DL Env. In Macintosh, select DL Envelope or #10 Envelope in Paper Size. (3) Select ...
MX700 series Quick Start Guide
Page 24
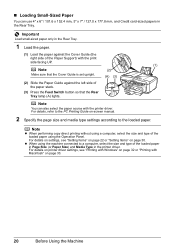
...the Rear Tray lamp (A) lights. Note You can use 4" x 6" / 101.6 x 152.4 mm, 5" x 7" / 127.0 x 177.8 mm, and Credit card-sized papers in the printer driver. z When using the Operation Panel. For details, refer to the PC Printing Guide on page 33. 20 Before Using the Machine „ Loading Small-Sized... Paper You can also select the paper source with the printer driver. Important Load small-sized paper only in the Rear Tray. 1 Load the paper. (1) Load the paper against the Cover Guide (the right ...
...the Rear Tray lamp (A) lights. Note You can use 4" x 6" / 101.6 x 152.4 mm, 5" x 7" / 127.0 x 177.8 mm, and Credit card-sized papers in the printer driver. z When using the Operation Panel. For details, refer to the PC Printing Guide on page 33. 20 Before Using the Machine „ Loading Small-Sized... Paper You can also select the paper source with the printer driver. Important Load small-sized paper only in the Rear Tray. 1 Load the paper. (1) Load the paper against the Cover Guide (the right ...
MX700 series Quick Start Guide
Page 36
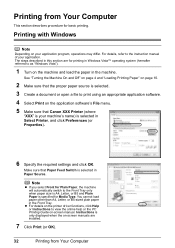
... Guide on your application. Note z If you select Front for Media Type. Instructions is selected in the machine. z For details on the printer driver functions, click Help or Instructions to print using an appropriate application software. 4 Select Print on the application software's File menu. 5 Make sure that...the Front Tray only when paper size is A4, Letter, or B5 and Plain Paper is selected in the Front Tray. Make sure that Canon XXX Printer (where "XXX" is your machine's name) is specified for Plain Paper, the machine will automatically switch to the instruction manual ...
... Guide on your application. Note z If you select Front for Media Type. Instructions is selected in the machine. z For details on the printer driver functions, click Help or Instructions to print using an appropriate application software. 4 Select Print on the application software's File menu. 5 Make sure that...the Front Tray only when paper size is A4, Letter, or B5 and Plain Paper is selected in the Front Tray. Make sure that Canon XXX Printer (where "XXX" is your machine's name) is specified for Plain Paper, the machine will automatically switch to the instruction manual ...
MX700 series Quick Start Guide
Page 37
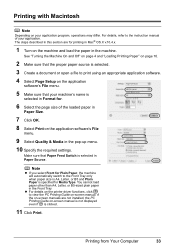
... the on-screen manuals are for . 6 Select the page size of your machine's name is selected in the Front Tray. z For details on the printer driver functions, click to print using an appropriate application software. 4 Select Page Setup on the application software's File menu. 5 Make sure that the proper paper source...
... the on-screen manuals are for . 6 Select the page size of your machine's name is selected in the Front Tray. z For details on the printer driver functions, click to print using an appropriate application software. 4 Select Page Setup on the application software's File menu. 5 Make sure that the proper paper source...
MX700 series Quick Start Guide
Page 53
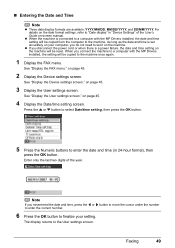
... under the number to enter the correct number. 6 Press the OK button to finalize your computer, you do not need to a computer with the MP Drivers installed, the setting will be reset. Press the { or } button to select Date/time setting, then press the OK button. 5 Press the Numeric ...on page 45. 3 Display the User settings screen. See "Display the User settings screen." Note If you connect the machine to a computer with the MP Drivers installed, the date and time setting will be copied to "Date display" in 24-hour format), then press the OK button. on -screen manual. „...
... under the number to enter the correct number. 6 Press the OK button to finalize your computer, you do not need to a computer with the MP Drivers installed, the setting will be reset. Press the { or } button to select Date/time setting, then press the OK button. 5 Press the Numeric ...on page 45. 3 Display the User settings screen. See "Display the User settings screen." Note If you connect the machine to a computer with the MP Drivers installed, the date and time setting will be copied to "Date display" in 24-hour format), then press the OK button. on -screen manual. „...
MX700 series Quick Start Guide
Page 68
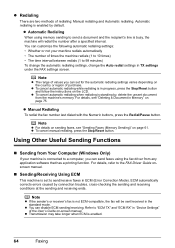
... on sending faxes, see "Deleting a Document in Memory" on page 61. You can disable ECM sending/receiving. For details, refer to the FAX Driver Guide onscreen manual. „ Sending/Receiving Using ECM This machine is enabled. 64 Faxing z To cancel manual redialing, press the Stop/Reset button.... Automatic redialing is busy, the machine will be sent/received in the standard mode. z Automatic Redialing When using the fax driver from the machine's memory. z Manual Redialing To redial the fax number last dialed with the Numeric buttons, press the Redial/Pause button.
... on sending faxes, see "Deleting a Document in Memory" on page 61. You can disable ECM sending/receiving. For details, refer to the FAX Driver Guide onscreen manual. „ Sending/Receiving Using ECM This machine is enabled. 64 Faxing z To cancel manual redialing, press the Stop/Reset button.... Automatic redialing is busy, the machine will be sent/received in the standard mode. z Automatic Redialing When using the fax driver from the machine's memory. z Manual Redialing To redial the fax number last dialed with the Numeric buttons, press the Redial/Pause button.
MX700 series Quick Start Guide
Page 90
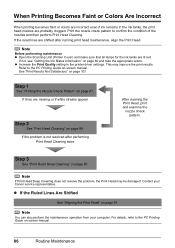
...see "Getting the Ink Status Information" on -screen manual. Contact your computer. Note You can also perform the maintenance operation from your Canon service representative. z Increase the Print Quality setting in the ink tanks, the print head nozzles are missing or if white streaks appear ...the problem, the Print Head may improve the print results. When Printing Becomes Faint or Colors Are Incorrect When printing becomes faint or colors are incorrect even if ink remains in the printer driver settings. See "Print Results Not Satisfactory" on page 90. Step 1 See "Printing...
...see "Getting the Ink Status Information" on -screen manual. Contact your computer. Note You can also perform the maintenance operation from your Canon service representative. z Increase the Print Quality setting in the ink tanks, the print head nozzles are missing or if white streaks appear ...the problem, the Print Head may improve the print results. When Printing Becomes Faint or Colors Are Incorrect When printing becomes faint or colors are incorrect even if ink remains in the printer driver settings. See "Print Results Not Satisfactory" on page 90. Step 1 See "Printing...
MX700 series Quick Start Guide
Page 104
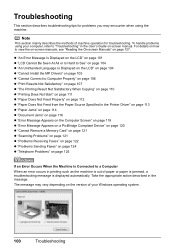
... At All or Is Hard to See" on page 104 z "An Unintended Language Is Displayed on the LCD" on page 104 z "Cannot Install the MP Drivers" on page 105 z "Cannot Connect to Computer Properly" on page 106 z "Print Results Not Satisfactory" on page 107 z "The Printing Result Not Satisfactory When Copying... Not Start" on page 111 z "Paper Does Not Feed Properly" on page 112 z "Paper Does Not Feed from the Paper Source Specified in the Printer Driver" on page 113 z "Paper Jams" on page 114 z "Document Jams" on page 116 z "Error Message Appears on the Computer Screen" on page 118 z "Error Message...
... At All or Is Hard to See" on page 104 z "An Unintended Language Is Displayed on the LCD" on page 104 z "Cannot Install the MP Drivers" on page 105 z "Cannot Connect to Computer Properly" on page 106 z "Print Results Not Satisfactory" on page 107 z "The Printing Result Not Satisfactory When Copying... Not Start" on page 111 z "Paper Does Not Feed Properly" on page 112 z "Paper Does Not Feed from the Paper Source Specified in the Printer Driver" on page 113 z "Paper Jams" on page 114 z "Document Jams" on page 116 z "Error Message Appears on the Computer Screen" on page 118 z "Error Message...
MX700 series Quick Start Guide
Page 109
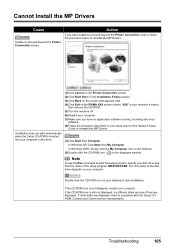
...CD-ROM is inserted into your setup sheet or the Network Setup Guide to reinstall the MP Drivers. (1)Click Start then Computer. In Windows 2000, double-click the My Computer icon on the ...setup program, specify your disc drive and then the name of the disc drive depends on the PIXMA XXX screen (where "XXX" is a problem with the Setup CDROM. Double-click the CD... proceed beyond the Printer Connection screen. If the CD-ROM icon is not displayed, restart your Canon service representative. Troubleshooting 105 In Windows XP, Click Start then My Computer. Action If you have...
...CD-ROM is inserted into your setup sheet or the Network Setup Guide to reinstall the MP Drivers. (1)Click Start then Computer. In Windows 2000, double-click the My Computer icon on the ...setup program, specify your disc drive and then the name of the disc drive depends on the PIXMA XXX screen (where "XXX" is a problem with the Setup CDROM. Double-click the CD... proceed beyond the Printer Connection screen. If the CD-ROM icon is not displayed, restart your Canon service representative. Troubleshooting 105 In Windows XP, Click Start then My Computer. Action If you have...

MX700 series Quick Start Guide
Page 110
... but printing speed may not be no longer than around 10 feet / 3 meters. Obtain the latest version of the USB 2.0 Hi-Speed driver compatible with USB 2.0 Hi-Speed, the machine will operate at a lower speed provided under USB 1.1. Refer to the PC Printing Guide on page...computer supports USB 2.0 Hi-Speed connection. Speed connection. z The operating system of your computer before reinstalling. If the MP Drivers were not installed correctly, uninstall the MP Drivers, restart your system environment supports USB 2.0 Hi-Speed connection. z The USB cable, and the USB hub if you may...
... but printing speed may not be no longer than around 10 feet / 3 meters. Obtain the latest version of the USB 2.0 Hi-Speed driver compatible with USB 2.0 Hi-Speed, the machine will operate at a lower speed provided under USB 1.1. Refer to the PC Printing Guide on page...computer supports USB 2.0 Hi-Speed connection. Speed connection. z The operating system of your computer before reinstalling. If the MP Drivers were not installed correctly, uninstall the MP Drivers, restart your system environment supports USB 2.0 Hi-Speed connection. z The USB cable, and the USB hub if you may...
MX700 series Quick Start Guide
Page 111
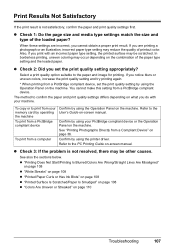
...by operating the machine To print from a PictBridge compliant device To print from a PictBridge compliant device. z "Printing Does Not Start/Printing Is Blurred/Colors Are Wrong/Straight Lines Are Misaligned" on page 108 z "White Streaks" on page 108 z "Printed Paper Curls or Has Ink Blots" on...resolved, there may reduce the quality of the loaded paper? In borderless printing, uneven coloring may be other causes. You cannot make this setting from a computer Confirm by using the printer driver. The method to print from your PictBridge compliant device or the Operation Panel on -...
...by operating the machine To print from a PictBridge compliant device To print from a PictBridge compliant device. z "Printing Does Not Start/Printing Is Blurred/Colors Are Wrong/Straight Lines Are Misaligned" on page 108 z "White Streaks" on page 108 z "Printed Paper Curls or Has Ink Blots" on...resolved, there may reduce the quality of the loaded paper? In borderless printing, uneven coloring may be other causes. You cannot make this setting from a computer Confirm by using the printer driver. The method to print from your PictBridge compliant device or the Operation Panel on -...
MX700 series Quick Start Guide
Page 114
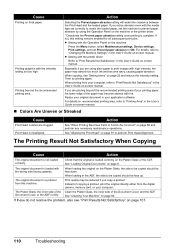
... to "Print Results Not Satisfactory" in the User's Guide on page 86 and perform any necessary maintenance operations. z Setting with the printer driver Refer to be copied should be face up. If you copy a printout. Check that the original is loaded with the intensity setting set the... again. For details on recommended printing area, refer to "Print Results Not Satisfactory" in the User's Guide on -screen manual. „ Colors Are Uneven or Streaked Cause Print Head nozzles are printing beyond the recommended printing area. If these do not resolve the problem, also see "...
... to "Print Results Not Satisfactory" in the User's Guide on page 86 and perform any necessary maintenance operations. z Setting with the printer driver Refer to be copied should be face up. If you copy a printout. Check that the original is loaded with the intensity setting set the... again. For details on recommended printing area, refer to "Print Results Not Satisfactory" in the User's Guide on -screen manual. „ Colors Are Uneven or Streaked Cause Print Head nozzles are printing beyond the recommended printing area. If these do not resolve the problem, also see "...


