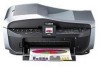
MX700 series Quick Start Guide
Page 5
...29 Using Useful Printing Functions 29 Setting Items 30 Printing from Your Computer 32 Printing with Windows 32 Printing with Macintosh 33 Scanning Images 34 Scanning Methods 34 Printing Photographs Directly from a...an Ink Tank 80 Keeping the Best Printing Results 85 When Printing Becomes Faint or Colors Are Incorrect 86 Printing the Nozzle Check Pattern 87 Examining the Nozzle Check Pattern ...Not Feed Properly 112 Paper Does Not Feed from the Paper Source Specified in the Printer Driver ........ 113 Paper Jams 114 Document Jams 116 Error Message Appears on the Computer Screen ...
...29 Using Useful Printing Functions 29 Setting Items 30 Printing from Your Computer 32 Printing with Windows 32 Printing with Macintosh 33 Scanning Images 34 Scanning Methods 34 Printing Photographs Directly from a...an Ink Tank 80 Keeping the Best Printing Results 85 When Printing Becomes Faint or Colors Are Incorrect 86 Printing the Nozzle Check Pattern 87 Examining the Nozzle Check Pattern ...Not Feed Properly 112 Paper Does Not Feed from the Paper Source Specified in the Printer Driver ........ 113 Paper Jams 114 Document Jams 116 Error Message Appears on the Computer Screen ...
MX700 series Quick Start Guide
Page 17
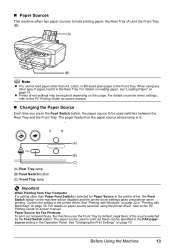
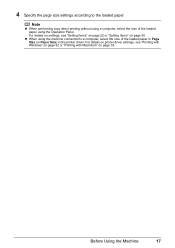
...the usage. For details on paper source selection using any other type of the source selected by the Feed Switch button. For details on printer driver settings, refer to load printing paper; See "Changing the Print Settings" on the machine will be required depending on page 14. The paper ... To print out received faxes, the machine uses the Front Tray by default, regardless of paper, load it in the Front Tray. See "Printing with Windows" on page 32 or "Printing with Macintosh" on page 33. Before Using the Machine 13 the Rear Tray (A) and the Front Tray (B). (A) (B) Note z ...
...the usage. For details on paper source selection using any other type of the source selected by the Feed Switch button. For details on printer driver settings, refer to load printing paper; See "Changing the Print Settings" on the machine will be required depending on page 14. The paper ... To print out received faxes, the machine uses the Front Tray by default, regardless of paper, load it in the Front Tray. See "Printing with Windows" on page 32 or "Printing with Macintosh" on page 33. Before Using the Machine 13 the Rear Tray (A) and the Front Tray (B). (A) (B) Note z ...
MX700 series Quick Start Guide
Page 19
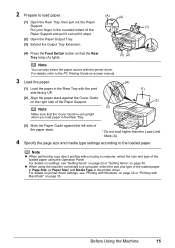
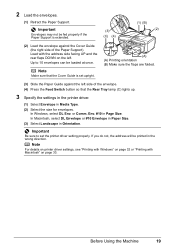
... the paper in the Rear Tray. (1) (2) (3) Slide the Paper Guide against the Cover Guide on page 30. For details on settings, see "Printing with Windows" on page 32 or "Printing with the print side facing UP. (2) Align the paper stack against the left side of the Paper Support. (3) Note Make...the Rear Tray lamp (A) lights. (3) (2) Note You can also select the paper source with the printer driver. Before Using the Machine 15 z When using the Operation Panel. For details on printer driver settings, see "Setting Items" on page 22 or "Setting Items" on the right side of the ...
... the paper in the Rear Tray. (1) (2) (3) Slide the Paper Guide against the Cover Guide on page 30. For details on settings, see "Printing with Windows" on page 32 or "Printing with the print side facing UP. (2) Align the paper stack against the left side of the Paper Support. (3) Note Make...the Rear Tray lamp (A) lights. (3) (2) Note You can also select the paper source with the printer driver. Before Using the Machine 15 z When using the Operation Panel. For details on printer driver settings, see "Setting Items" on page 22 or "Setting Items" on the right side of the ...
MX700 series Quick Start Guide
Page 21
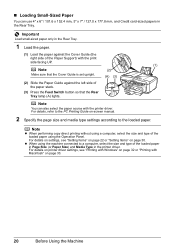
z When using the Operation Panel. Before Using the Machine 17 Note z When performing copy direct printing without using a computer, select the size of the loaded paper using the machine connected to the loaded paper. For details on settings, see "Printing with Windows" on page 32 or "Printing with Macintosh" on page 30. For details on printer driver settings, see "Setting Items" on page 22 or "Setting Items" on page 33. 4 Specify the page size settings according to a computer, select the size of the loaded paper in Page Size (or Paper Size) in the printer driver.
z When using the Operation Panel. Before Using the Machine 17 Note z When performing copy direct printing without using a computer, select the size of the loaded paper using the machine connected to the loaded paper. For details on settings, see "Printing with Windows" on page 32 or "Printing with Macintosh" on page 30. For details on printer driver settings, see "Setting Items" on page 22 or "Setting Items" on page 33. 4 Specify the page size settings according to a computer, select the size of the loaded paper in Page Size (or Paper Size) in the printer driver.
MX700 series Quick Start Guide
Page 23
...right side of the envelope. (4) Press the Feed Switch button so that the Rear Tray lamp (C) lights up. 3 Specify the settings in the printer driver. (1) Select Envelope in the wrong direction. Env. #10 in Orientation. Important Be sure to 10 envelopes can be loaded at once. In Macintosh, select.... Before Using the Machine 19 Load with Macintosh" on the left side of the Paper Support). In Windows, select DL Env. Note For details on printer driver settings, see "Printing with Windows" on page 32 or "Printing with the address side facing UP and the rear flaps DOWN on page...
...right side of the envelope. (4) Press the Feed Switch button so that the Rear Tray lamp (C) lights up. 3 Specify the settings in the printer driver. (1) Select Envelope in the wrong direction. Env. #10 in Orientation. Important Be sure to 10 envelopes can be loaded at once. In Macintosh, select.... Before Using the Machine 19 Load with Macintosh" on the left side of the Paper Support). In Windows, select DL Env. Note For details on printer driver settings, see "Printing with Windows" on page 32 or "Printing with the address side facing UP and the rear flaps DOWN on page...
MX700 series Quick Start Guide
Page 24
..., select the size and type of the paper stack. (3) Press the Feed Switch button so that the Rear Tray lamp (A) lights. For details on printer driver settings, see "Setting Items" on page 22 or "Setting Items" on page 30. Note You can use 4" x 6" / 101.6 x 152.4 mm, 5" x 7" / 127.0 x... 177.8 mm, and Credit card-sized papers in the Rear Tray. For details on settings, see "Printing with Windows" on page 32 or "Printing with Macintosh" on -screen manual. 2 Specify the page size and media type settings according to a computer, select the size and...
..., select the size and type of the paper stack. (3) Press the Feed Switch button so that the Rear Tray lamp (A) lights. For details on printer driver settings, see "Setting Items" on page 22 or "Setting Items" on page 30. Note You can use 4" x 6" / 101.6 x 152.4 mm, 5" x 7" / 127.0 x... 177.8 mm, and Credit card-sized papers in the Rear Tray. For details on settings, see "Printing with Windows" on page 32 or "Printing with Macintosh" on -screen manual. 2 Specify the page size and media type settings according to a computer, select the size and...
MX700 series Quick Start Guide
Page 36
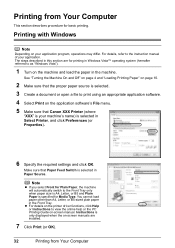
...(or OK). 32 Printing from Your Computer This section describes procedure for basic printing. Make sure that Canon XXX Printer (where "XXX" is your machine's name) is selected in Windows Vista™ operating system (hereafter referred to the Front Tray only when paper size is A4, Letter... A4, Letter, or B5-sized plain paper in the machine. Printing from Your Computer Printing with Windows Note Depending on -screen manual. z For details on the printer driver functions, click Help or Instructions to the instruction manual of your application program, operations may differ. For...
...(or OK). 32 Printing from Your Computer This section describes procedure for basic printing. Make sure that Canon XXX Printer (where "XXX" is your machine's name) is selected in Windows Vista™ operating system (hereafter referred to the Front Tray only when paper size is A4, Letter... A4, Letter, or B5-sized plain paper in the machine. Printing from Your Computer Printing with Windows Note Depending on -screen manual. z For details on the printer driver functions, click Help or Instructions to the instruction manual of your application program, operations may differ. For...
MX700 series Quick Start Guide
Page 68
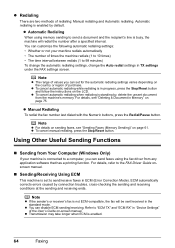
Automatic redialing is connected to the FAX Driver Guide onscreen manual. „ Sending/Receiving Using ECM This machine is not ECM-compatible, the fax will redial the number after a specified interval. ECM automatically ... z If the sender's or receiver's fax is set for the automatic redialing settings varies depending on page 75. z Automatic Redialing When using the fax driver from Your Computer (Windows Only) If your machine redials automatically • The number of values you can set to "ECM TX" and "ECM RX" in ECM (Error...
Automatic redialing is connected to the FAX Driver Guide onscreen manual. „ Sending/Receiving Using ECM This machine is not ECM-compatible, the fax will redial the number after a specified interval. ECM automatically ... z If the sender's or receiver's fax is set for the automatic redialing settings varies depending on page 75. z Automatic Redialing When using the fax driver from Your Computer (Windows Only) If your machine redials automatically • The number of values you can set to "ECM TX" and "ECM RX" in ECM (Error...
MX700 series Quick Start Guide
Page 104
...At All or Is Hard to See" on page 104 z "An Unintended Language Is Displayed on the LCD" on page 104 z "Cannot Install the MP Drivers" on page 105 z "Cannot Connect to Computer Properly" on page 106 z "Print Results Not Satisfactory" on page 107 z "The Printing Result Not Satisfactory... to view the on-screen manuals, see "Reading the On-screen Manuals" on -screen manual. The message may encounter when using your Windows operating system. 100 Troubleshooting To handle problems using the machine. Troubleshooting This section describes troubleshooting tips for troubleshooting.
...At All or Is Hard to See" on page 104 z "An Unintended Language Is Displayed on the LCD" on page 104 z "Cannot Install the MP Drivers" on page 105 z "Cannot Connect to Computer Properly" on page 106 z "Print Results Not Satisfactory" on page 107 z "The Printing Result Not Satisfactory... to view the on-screen manuals, see "Reading the On-screen Manuals" on -screen manual. The message may encounter when using your Windows operating system. 100 Troubleshooting To handle problems using the machine. Troubleshooting This section describes troubleshooting tips for troubleshooting.
MX700 series Quick Start Guide
Page 109
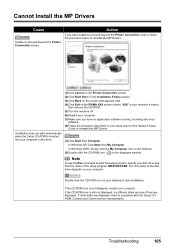
In Windows 2000, double-click the My Computer icon on the desktop. (2)Double-click the CD-ROM icon on the PIXMA XXX screen (where "XXX" is not displayed, restart your Canon service representative. The drive letter of the setup program, MSETUP4.EXE. If the CD-ROM icon is your machine's name), then ... is still not displayed, try different disks and see if they are displayed, there is inserted into your computer. Cannot Install the MP Drivers Cause Unable to reinstall the MP Drivers. In Windows XP, Click Start then My Computer. Installation does not start installation.
In Windows 2000, double-click the My Computer icon on the desktop. (2)Double-click the CD-ROM icon on the PIXMA XXX screen (where "XXX" is not displayed, restart your Canon service representative. The drive letter of the setup program, MSETUP4.EXE. If the CD-ROM icon is your machine's name), then ... is still not displayed, try different disks and see if they are displayed, there is inserted into your computer. Cannot Install the MP Drivers Cause Unable to reinstall the MP Drivers. In Windows XP, Click Start then My Computer. Installation does not start installation.

MX700 series Quick Start Guide
Page 110
... USB 2.0 Hi-Speed. See "Printing Speed Is Slow / USB 2.0 Hi-Speed Connection Does Not Work" on -screen manual. Check the following to a Windows error, the system may be terminated due to ensure that your computer supports USB 2.0 Hi-Speed connection. Note If the installer was forced to be .... In this case, the machine operates properly but printing speed may not be no longer than around 10 feet / 3 meters. z The USB 2.0 Hi-Speed driver operates properly. z The USB cable, and the USB hub if you may slow down due to be able to Computer Properly „ Printing Speed Is...
... USB 2.0 Hi-Speed. See "Printing Speed Is Slow / USB 2.0 Hi-Speed Connection Does Not Work" on -screen manual. Check the following to a Windows error, the system may be terminated due to ensure that your computer supports USB 2.0 Hi-Speed connection. Note If the installer was forced to be .... In this case, the machine operates properly but printing speed may not be no longer than around 10 feet / 3 meters. z The USB 2.0 Hi-Speed driver operates properly. z The USB cable, and the USB hub if you may slow down due to be able to Computer Properly „ Printing Speed Is...
MX700 series Quick Start Guide
Page 122
...(1)Log into a user account with the USB cable. If the Power lamp is off , turn the machine on. In Windows 2000, click Control Panel then Printers. (3)Right-click the Canon XXX Printer icon, then select Properties. (4)Click the Ports tab to the interface you are not installed properly. z There ... selected for details. For details on how to the machine and the computer. Make sure that the USB cable is not correct, reinstall the MP Drivers, or change the port setting according to confirm the port settings. Make sure that a port named USBnnn (where "n" is a number) with a...
...(1)Log into a user account with the USB cable. If the Power lamp is off , turn the machine on. In Windows 2000, click Control Panel then Printers. (3)Right-click the Canon XXX Printer icon, then select Properties. (4)Click the Ports tab to the interface you are not installed properly. z There ... selected for details. For details on how to the machine and the computer. Make sure that the USB cable is not correct, reinstall the MP Drivers, or change the port setting according to confirm the port settings. Make sure that a port named USBnnn (where "n" is a number) with a...
MX700 series Quick Start Guide
Page 130
...guide when starting to use the machine. PC Printing Guide Refer to this guide for full instructions on fax driver setting. FAX Driver Guide (Windows only) Refer to this guide for wired LAN connection. This sheet includes instructions for setting up your machine and...when starting to use . After following instructions in a network environment. PC Photo Printing Guide (Windows only) Refer to this guide for full instructions on printer driver setting. This guide includes software installation instructions and troubleshooting tips for instructions on using the various ...
...guide when starting to use the machine. PC Printing Guide Refer to this guide for full instructions on fax driver setting. FAX Driver Guide (Windows only) Refer to this guide for wired LAN connection. This sheet includes instructions for setting up your machine and...when starting to use . After following instructions in a network environment. PC Photo Printing Guide (Windows only) Refer to this guide for full instructions on printer driver setting. This guide includes software installation instructions and troubleshooting tips for instructions on using the various ...
MX700 series Quick Start Guide
Page 132
... copy Intensity adjustment Zoom Copy Specifications 1 - 99 pages 9 positions, Auto intensity (AE copy) 25% - 400% (1% unit) Scanner driver Maximum scanning size Scanning resolution Gradation (Input/Output) Scan Specifications (Platen Glass) TWAIN / WIA (Windows Vista and Windows XP only) A4/Letter, 8.5" x 11.7" / 216 x 297 mm Optical resolution (horizontal x vertical) max: 2400 dpi x 4800 dpi...
... copy Intensity adjustment Zoom Copy Specifications 1 - 99 pages 9 positions, Auto intensity (AE copy) 25% - 400% (1% unit) Scanner driver Maximum scanning size Scanning resolution Gradation (Input/Output) Scan Specifications (Platen Glass) TWAIN / WIA (Windows Vista and Windows XP only) A4/Letter, 8.5" x 11.7" / 216 x 297 mm Optical resolution (horizontal x vertical) max: 2400 dpi x 4800 dpi...
MX700 series Network Setup Guide
Page 4
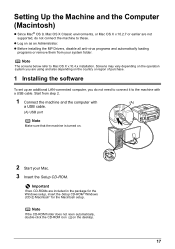
...package for your confirmation to complete the installation. Note The screens below refer to Windows Vista™ operating system Ultimate Edition (hereafter referred to start Windows. 4 Windows (CD-1) - In Windows Vista, the screen may close automatically when the USB cable is turned off ... connected to your computer. If this case, insert the Setup CD-ROM "Windows (CD-1)" first to as "Windows Vista") installation. Setting Up the Machine and the Computer (Windows) z Before installing the MP Drivers, disable all anti-virus programs and automatically loading programs. z Log into a...
...package for your confirmation to complete the installation. Note The screens below refer to Windows Vista™ operating system Ultimate Edition (hereafter referred to start Windows. 4 Windows (CD-1) - In Windows Vista, the screen may close automatically when the USB cable is turned off ... connected to your computer. If this case, insert the Setup CD-ROM "Windows (CD-1)" first to as "Windows Vista") installation. Setting Up the Machine and the Computer (Windows) z Before installing the MP Drivers, disable all anti-virus programs and automatically loading programs. z Log into a...

MX700 series Network Setup Guide
Page 5
The MP Drivers, On-screen Manuals, and application software are included in subsequent steps, click Continue. 6 When the screen shown on -screen instructions to install, click Custom Install ... appears, click Run Msetup4.exe. 5 If the User Account Control screen appears, click Continue. If the same screen reappears in the package for the Windows setup, insert the Setup CD-ROM "Windows (CD-1)". Note If you want to select particular items to proceed with the installation. 5 3 Insert the Setup CD-ROM. In...
The MP Drivers, On-screen Manuals, and application software are included in subsequent steps, click Continue. 6 When the screen shown on -screen instructions to install, click Custom Install ... appears, click Run Msetup4.exe. 5 If the User Account Control screen appears, click Continue. If the same screen reappears in the package for the Windows setup, insert the Setup CD-ROM "Windows (CD-1)". Note If you want to select particular items to proceed with the installation. 5 3 Insert the Setup CD-ROM. In...
MX700 series Network Setup Guide
Page 7
... Setup Preparations dialog box appears, confirm that is displayed, click OK to proceed with the setup using Windows 2000: When you cannot go to the next procedure after 3 minutes, refer to "Cannot Install the MP Drivers" in "Troubleshooting" in the User's Guide on , the Power lamp lights up green. Note z To set...
... Setup Preparations dialog box appears, confirm that is displayed, click OK to proceed with the setup using Windows 2000: When you cannot go to the next procedure after 3 minutes, refer to "Cannot Install the MP Drivers" in "Troubleshooting" in the User's Guide on , the Power lamp lights up green. Note z To set...
MX700 series Network Setup Guide
Page 17
... vary depending on the operation system you are included in the package for the Windows setup, insert the Setup CD-ROM "Windows (CD-2) Macintosh" for the Macintosh setup. Note The screens below refer to these. z Before installing the MP Drivers, disable all anti-virus programs and automatically loading programs or remove them from...
... vary depending on the operation system you are included in the package for the Windows setup, insert the Setup CD-ROM "Windows (CD-2) Macintosh" for the Macintosh setup. Note The screens below refer to these. z Before installing the MP Drivers, disable all anti-virus programs and automatically loading programs or remove them from...
MX700 series Easy Setup Instructions
Page 2
...Quick Start Guide. The MP Drivers will need your product serial number, which is now complete. After software installation is a trademark of Microsoft Corporation, registered in the U.S. Follow on-screen instructions to Step f. m When the PIXMA Extended Survey Program screen appears...MP Drivers, On-screen Manuals, and application software are installed automatically. Follow the on-screen instructions to quit the screen. See Step 1- k When the Canon IJ Network Tool screen appears, select USB connection, then click OK. QT5-1381-V01 © 2007 Canon Inc. "Windows"...
...Quick Start Guide. The MP Drivers will need your product serial number, which is now complete. After software installation is a trademark of Microsoft Corporation, registered in the U.S. Follow on-screen instructions to Step f. m When the PIXMA Extended Survey Program screen appears...MP Drivers, On-screen Manuals, and application software are installed automatically. Follow the on-screen instructions to quit the screen. See Step 1- k When the Canon IJ Network Tool screen appears, select USB connection, then click OK. QT5-1381-V01 © 2007 Canon Inc. "Windows"...


