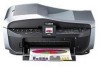
MX700 series Quick Start Guide
Page 5
...Ink Tank 80 Keeping the Best Printing Results 85 When Printing Becomes Faint or Colors Are Incorrect 86 Printing the Nozzle Check Pattern 87 Examining the Nozzle Check Pattern ...........88 Print Head Cleaning 89 Print Head Deep Cleaning 90 Aligning the Print Head 91 Cleaning Your Machine 94 ...Troubleshooting 100 An Error Message Is Displayed on the LCD 101 LCD Cannot Be Seen At All or Is Hard to See 104 An Unintended Language Is Displayed on the LCD 104 Cannot Install...
...Ink Tank 80 Keeping the Best Printing Results 85 When Printing Becomes Faint or Colors Are Incorrect 86 Printing the Nozzle Check Pattern 87 Examining the Nozzle Check Pattern ...........88 Print Head Cleaning 89 Print Head Deep Cleaning 90 Aligning the Print Head 91 Cleaning Your Machine 94 ...Troubleshooting 100 An Error Message Is Displayed on the LCD 101 LCD Cannot Be Seen At All or Is Hard to See 104 An Unintended Language Is Displayed on the LCD 104 Cannot Install...

MX700 series Quick Start Guide
Page 8
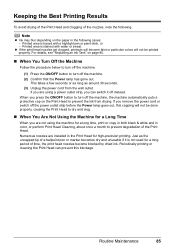
... (or a compatible device). z The machine is sending or receiving a fax, or when there are installed. Note If preparatory operations above are using the machine connected to print. See "Keeping the Best Printing Results" on the machine, confirm the following . When the Power lamp stops flashing, the machine is... that the Power lamp is not lit. Turning the Machine On and Off Turn on the machine before printing. „ Turning on the Machine Before turning on page 85. z The Print Head and ink tanks are using the machine connected to your computer. „ Turning off the Machine 1...
... (or a compatible device). z The machine is sending or receiving a fax, or when there are installed. Note If preparatory operations above are using the machine connected to print. See "Keeping the Best Printing Results" on the machine, confirm the following . When the Power lamp stops flashing, the machine is... that the Power lamp is not lit. Turning the Machine On and Off Turn on the machine before printing. „ Turning on the Machine Before turning on page 85. z The Print Head and ink tanks are using the machine connected to your computer. „ Turning off the Machine 1...

MX700 series Quick Start Guide
Page 84
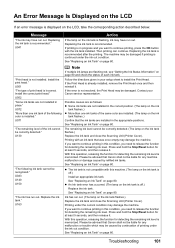
... explains the way to confirm the ink status and the procedure to handle it. z For information on the compatible ink tanks, see "When Printing Becomes Faint or Colors Are Incorrect" on page 101 and take appropriate action. When ink runs out or other errors occur, an error message is displayed on the... LCD to inform you to install the ink tanks in the following ways: z "With the LCD of this Machine" on page 80 z "With the Ink Lamps" on the Print Head Holder. You can confirm the status of ink tanks in the correct order indicated...
... explains the way to confirm the ink status and the procedure to handle it. z For information on the compatible ink tanks, see "When Printing Becomes Faint or Colors Are Incorrect" on page 101 and take appropriate action. When ink runs out or other errors occur, an error message is displayed on the... LCD to inform you to install the ink tanks in the following ways: z "With the LCD of this Machine" on page 80 z "With the Ink Lamps" on the Print Head Holder. You can confirm the status of ink tanks in the correct order indicated...

MX700 series Quick Start Guide
Page 85
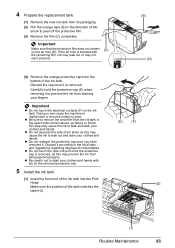
...Prepare the replacement tank." z Once an ink tank has been installed, do not remove it from the machine and leave it is... 81 Open the Scanning Unit (Printer Cover) of specified Canon brand ink tanks. Replace it immediately with such tanks, the...Color ink may be consumed even when printing a black-and-white document or when blackand-white printing is enough ink remaining to maintain the machine's performance. When an ink tank is peeled off the ink tank. Flashing quickly (at around 1-second intervals) ......Repeats The ink tank is inserted in Print Head Cleaning and Print Head...
...Prepare the replacement tank." z Once an ink tank has been installed, do not remove it from the machine and leave it is... 81 Open the Scanning Unit (Printer Cover) of specified Canon brand ink tanks. Replace it immediately with such tanks, the...Color ink may be consumed even when printing a black-and-white document or when blackand-white printing is enough ink remaining to maintain the machine's performance. When an ink tank is peeled off the ink tank. Flashing quickly (at around 1-second intervals) ......Repeats The ink tank is inserted in Print Head Cleaning and Print Head...
MX700 series Quick Start Guide
Page 87
Important Make sure that the protective film does not remain on the removed protective cap. (E) (F) 5 Install the ink tank. (1) Insert the front end of the ink tank into the Print Head. (G) Make sure the position of the tank matches the label (G). (1) Routine Maintenance 83 If the air hole is blocked with ink on... cap from the bottom of the arrow to peel off the protective film. (3) Remove the film (C) completely. Discard the cap once it according to print. z Be sure to remove the clear film from the ink tank in the direction of the ink tank. z Do not touch the open ink ...
Important Make sure that the protective film does not remain on the removed protective cap. (E) (F) 5 Install the ink tank. (1) Insert the front end of the ink tank into the Print Head. (G) Make sure the position of the tank matches the label (G). (1) Routine Maintenance 83 If the air hole is blocked with ink on... cap from the bottom of the arrow to peel off the protective film. (3) Remove the film (C) completely. Discard the cap once it according to print. z Be sure to remove the clear film from the ink tank in the direction of the ink tank. z Do not touch the open ink ...
MX700 series Quick Start Guide
Page 88
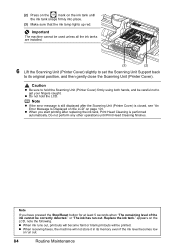
...the error message is still displayed after replacing the ink tank, Print Head Cleaning is closed, see "An Error Message Is Displayed on the LCD" on the ink tank until Print Head Cleaning finishes. Note If you start printing after the Scanning Unit (Printer Cover) is performed automatically. ...gently close the Scanning Unit (Printer Cover). Important The machine cannot be printed. appears on the LCD, note the following. z When receiving faxes, the machine will be used unless all the ink tanks are installed. (3) (2) 6 Lift the Scanning Unit (Printer Cover) slightly to ...
...the error message is still displayed after replacing the ink tank, Print Head Cleaning is closed, see "An Error Message Is Displayed on the LCD" on the ink tank until Print Head Cleaning finishes. Note If you start printing after the Scanning Unit (Printer Cover) is performed automatically. ...gently close the Scanning Unit (Printer Cover). Important The machine cannot be printed. appears on the LCD, note the following. z When receiving faxes, the machine will be used unless all the ink tanks are installed. (3) (2) 6 Lift the Scanning Unit (Printer Cover) slightly to ...
MX700 series Quick Start Guide
Page 89
... the ON/OFF button to prevent degradation of the Print Head. If you are using a power outlet strip, you are installed in the following . Numerous nozzles are not using the machine for a long period of time, the print head nozzles become faint or particular colors will not be printed properly. Just as around 30 seconds. (3) Unplug the...
... the ON/OFF button to prevent degradation of the Print Head. If you are using a power outlet strip, you are installed in the following . Numerous nozzles are not using the machine for a long period of time, the print head nozzles become faint or particular colors will not be printed properly. Just as around 30 seconds. (3) Unplug the...
MX700 series Quick Start Guide
Page 105
...at least 5 seconds, and then release it . If you need to install the Print Head. Replacing the ink tank is recommended." The machine may damage the machine. Install the print head." U071 "The remaining level of print head is continued under the current condition may be correctly detected." See "Replacing ...Ink Tank" on the ink tank is not compatible with an ink tank that Canon shall not be liable for any machine malfunction or damage caused by continuation of the same color are not installed in this operation, releasing the function for at least 5 seconds, and then...
...at least 5 seconds, and then release it . If you need to install the Print Head. Replacing the ink tank is recommended." The machine may damage the machine. Install the print head." U071 "The remaining level of print head is continued under the current condition may be correctly detected." See "Replacing ...Ink Tank" on the ink tank is not compatible with an ink tank that Canon shall not be liable for any machine malfunction or damage caused by continuation of the same color are not installed in this operation, releasing the function for at least 5 seconds, and then...

MX700 series Quick Start Guide
Page 124
For errors on non-Canon PictBridge compliant devices, check the error message on the LCD and take the appropriate action to print again. Error Message On PictBridge Compliant Device "Printer in use" "No paper" "Paper Error" / "Media type error" "Paper jam" "Printer cover open" "No print head" "Waste tank full" / "Ink ...) on the machine, and try printing again. The Print Head is nearly full. For details on how to resolve the error, see "An Error Message Is Displayed on the LCD" on page 80. 120 Troubleshooting An ink tank that was once empty is installed. For details on how to resolve...
For errors on non-Canon PictBridge compliant devices, check the error message on the LCD and take the appropriate action to print again. Error Message On PictBridge Compliant Device "Printer in use" "No paper" "Paper Error" / "Media type error" "Paper jam" "Printer cover open" "No print head" "Waste tank full" / "Ink ...) on the machine, and try printing again. The Print Head is nearly full. For details on how to resolve the error, see "An Error Message Is Displayed on the LCD" on page 80. 120 Troubleshooting An ink tank that was once empty is installed. For details on how to resolve...
MX700 series Quick Start Guide
Page 132
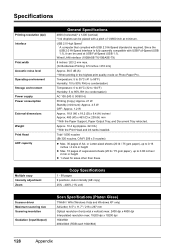
...Max. 30 pages of 1/4800 inch at USB Full-Speed (USB 1.1). Specifications Printing resolution (dpi) Interface Print width Acoustic noise level Operating environment Storage environment Power supply Power consumption External dimensions Weight Print Head ADF capacity General Specifications 4800 (horizontal)* x 1200 (vertical) * Ink droplets... With the Paper Support, Paper Output Tray, and Document Tray retracted. Approx. 10.4 kg (Approx. 22.3 lb.) * With the Print Head and ink tanks installed. or Letter-sized sheets (20 lb / 75 gsm paper), up to 0.16 inches / 4 mm in height z Max. 10 pages...
...Max. 30 pages of 1/4800 inch at USB Full-Speed (USB 1.1). Specifications Printing resolution (dpi) Interface Print width Acoustic noise level Operating environment Storage environment Power supply Power consumption External dimensions Weight Print Head ADF capacity General Specifications 4800 (horizontal)* x 1200 (vertical) * Ink droplets... With the Paper Support, Paper Output Tray, and Document Tray retracted. Approx. 10.4 kg (Approx. 22.3 lb.) * With the Print Head and ink tanks installed. or Letter-sized sheets (20 lb / 75 gsm paper), up to 0.16 inches / 4 mm in height z Max. 10 pages...

MX700 series Easy Setup Instructions
Page 1
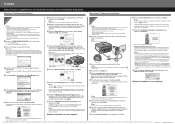
...the right. e Press the ON/OFF button to the center. 2 Install the Print Head a Firmly raise the Print Head Lock Lever until it in the case colors or lines are unsure of the paper stack. Wait until the message "Perform head alignment in the Rear Tray. f Press the { or } button ... to the wall jack. If the message "Install the print head and set the Scanning Unit Support. appears, go to select the language. (2) Press the OK button. The Print Head Holder automatically moves to turn over and install the software. b Remove the Print Head from the Front Tray. • You can...
...the right. e Press the ON/OFF button to the center. 2 Install the Print Head a Firmly raise the Print Head Lock Lever until it in the case colors or lines are unsure of the paper stack. Wait until the message "Perform head alignment in the Rear Tray. f Press the { or } button ... to the wall jack. If the message "Install the print head and set the Scanning Unit Support. appears, go to select the language. (2) Press the OK button. The Print Head Holder automatically moves to turn over and install the software. b Remove the Print Head from the Front Tray. • You can...
MX700 series Easy Setup Instructions
Page 2
...PIXMA Extended Survey Program screen appears, confirm the message. Refer to Step j. c Double-click the Setup icon. The MP Drivers, On-screen Manuals, and application software are using. • Log on -screen instructions to align the Print Head... cursor over items to align the Print Head. If Restart is displayed, make sure that the Power lamp stops flashing. Software installation is explained here. f When the...e When the main menu appears, click Easy Install. The system is turned on again. QT5-1381-V01 © 2007 Canon Inc. h Read the License Agreement carefully and...
...PIXMA Extended Survey Program screen appears, confirm the message. Refer to Step j. c Double-click the Setup icon. The MP Drivers, On-screen Manuals, and application software are using. • Log on -screen instructions to align the Print Head... cursor over items to align the Print Head. If Restart is displayed, make sure that the Power lamp stops flashing. Software installation is explained here. f When the...e When the main menu appears, click Easy Install. The system is turned on again. QT5-1381-V01 © 2007 Canon Inc. h Read the License Agreement carefully and...


