MX700 series Quick Start Guide
Page 5
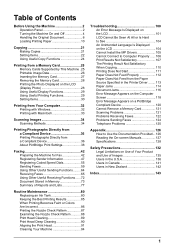
...of Reports and Lists 77 Routine Maintenance 80 Replacing an Ink Tank 80 Keeping the Best Printing Results 85 When Printing Becomes Faint or Colors Are Incorrect 86 Printing the Nozzle Check ...Pattern 87 Examining the Nozzle Check Pattern ...........88 Print Head Cleaning 89 Print Head Deep Cleaning 90 Aligning the Print Head 91 Cleaning...Does Not Feed Properly 112 Paper Does Not Feed from the Paper Source Specified in the Printer Driver ........ 113 Paper Jams 114 Document Jams 116 Error Message Appears on the Computer ...
...of Reports and Lists 77 Routine Maintenance 80 Replacing an Ink Tank 80 Keeping the Best Printing Results 85 When Printing Becomes Faint or Colors Are Incorrect 86 Printing the Nozzle Check ...Pattern 87 Examining the Nozzle Check Pattern ...........88 Print Head Cleaning 89 Print Head Deep Cleaning 90 Aligning the Print Head 91 Cleaning...Does Not Feed Properly 112 Paper Does Not Feed from the Paper Source Specified in the Printer Driver ........ 113 Paper Jams 114 Document Jams 116 Error Message Appears on the Computer ...

MX700 series Quick Start Guide
Page 85
...ink tanks run out of specified Canon brand ink tanks. Routine Maintenance 81 See ""The ink has run out. z Ink lamp is specified. See "Prepare the replacement tank." Furthermore, with a new one . Color ink is reinstalled. If it is also consumed in Print Head Cleaning and Print Head Deep Cleaning, which may be.... z Once you when to dry out, and the machine may cause the nozzles to print. Replace it is not set and there is inserted in the open. Open the Scanning Unit (Printer Cover) of each ink tank by the label on The ink tank is correctly set properly. If...
...ink tanks run out of specified Canon brand ink tanks. Routine Maintenance 81 See ""The ink has run out. z Ink lamp is specified. See "Prepare the replacement tank." Furthermore, with a new one . Color ink is reinstalled. If it is also consumed in Print Head Cleaning and Print Head Deep Cleaning, which may be.... z Once you when to dry out, and the machine may cause the nozzles to print. Replace it is not set and there is inserted in the open. Open the Scanning Unit (Printer Cover) of each ink tank by the label on The ink tank is correctly set properly. If...
MX700 series Quick Start Guide
Page 86
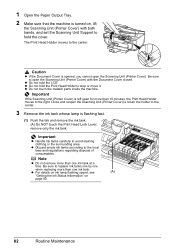
... the Document Cover is opened, you cannot open for more than 10 minutes, the Print Head Holder moves to hold the cover. Important If the Scanning Unit (Printer Cover) is left open the Scanning Unit (Printer Cover). Note z Do not remove more than one ink tank. Be sure to open ...lamp flashing speed, see (A) "Getting the Ink Status Information" on , lift the Scanning Unit (Printer Cover) with the Document Cover closed. z Do not hold the Print Head Holder to replace ink tanks one by one when replacing more than one ink tank at a time. remove only the ink tank. 1 Open the ...
... the Document Cover is opened, you cannot open for more than 10 minutes, the Print Head Holder moves to hold the cover. Important If the Scanning Unit (Printer Cover) is left open the Scanning Unit (Printer Cover). Note z Do not remove more than one ink tank. Be sure to open ...lamp flashing speed, see (A) "Getting the Ink Status Information" on , lift the Scanning Unit (Printer Cover) with the Document Cover closed. z Do not hold the Print Head Holder to replace ink tanks one by one when replacing more than one ink tank at a time. remove only the ink tank. 1 Open the ...
MX700 series Quick Start Guide
Page 88
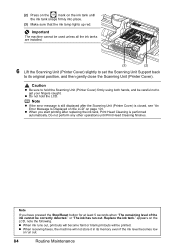
Note If you start printing after the Scanning Unit (Printer Cover) is performed automatically. Replace the ink tank." or "The ink has run out. 84 Routine Maintenance appears on page 101. z Do not hold the Scanning Unit (Printer Cover) firmly using both hands, and be printed. ...(3) (2) 6 Lift the Scanning Unit (Printer Cover) slightly to set the Scanning Unit Support back to hold the LCD. Important The machine cannot be correctly detected." Note z If the error message is still displayed after replacing the ink tank, Print Head Cleaning is closed, see "An Error ...
Note If you start printing after the Scanning Unit (Printer Cover) is performed automatically. Replace the ink tank." or "The ink has run out. 84 Routine Maintenance appears on page 101. z Do not hold the Scanning Unit (Printer Cover) firmly using both hands, and be printed. ...(3) (2) 6 Lift the Scanning Unit (Printer Cover) slightly to set the Scanning Unit Support back to hold the LCD. Important The machine cannot be correctly detected." Note z If the error message is still displayed after replacing the ink tank, Print Head Cleaning is closed, see "An Error ...
MX700 series Quick Start Guide
Page 105
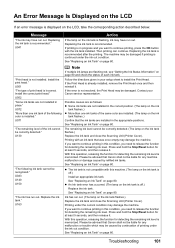
...release it . Please be advised that Canon shall not be recognized." U052 "Some ink tanks are not installed in your Canon service representative. See "Replacing an Ink Tank" on page 80.... Head. Troubleshooting 101 The machine may be damaged. Press and hold the Stop/Reset button for any machine malfunction or damage caused by continuation of the same color...head." The remaining ink level cannot be correctly detected." If printing is in this machine. (The lamp on the ink tank flashes.) Replace the ink tank and close the Scanning Unit (Printer Cover). Replacing...
...release it . Please be advised that Canon shall not be recognized." U052 "Some ink tanks are not installed in your Canon service representative. See "Replacing an Ink Tank" on page 80.... Head. Troubleshooting 101 The machine may be damaged. Press and hold the Stop/Reset button for any machine malfunction or damage caused by continuation of the same color...head." The remaining ink level cannot be correctly detected." If printing is in this machine. (The lamp on the ink tank flashes.) Replace the ink tank and close the Scanning Unit (Printer Cover). Replacing...

MX700 series Quick Start Guide
Page 124
... or select Stop in use" "No paper" "Paper Error" / "Media type error" "Paper jam" "Printer cover open" "No print head" "Waste tank full" / "Ink absorber full" "No ink" / "Ink cassette error" "Ink Error"... Displayed on the LCD" on page 80. 120 Troubleshooting z The Front Tray is installed. See "Replacing an Ink Tank" on page 101. Load paper in the Rear Tray, and select Continue* in ...the computer or warming up, wait until the job ends. z For the errors indicated on Canon-brand PictBridge compliant devices. For other troubles on your PictBridge compliant device to stop printing. z...
... or select Stop in use" "No paper" "Paper Error" / "Media type error" "Paper jam" "Printer cover open" "No print head" "Waste tank full" / "Ink absorber full" "No ink" / "Ink cassette error" "Ink Error"... Displayed on the LCD" on page 80. 120 Troubleshooting z The Front Tray is installed. See "Replacing an Ink Tank" on page 101. Load paper in the Rear Tray, and select Continue* in ...the computer or warming up, wait until the job ends. z For the errors indicated on Canon-brand PictBridge compliant devices. For other troubles on your PictBridge compliant device to stop printing. z...


