MX700 series Quick Start Guide
Page 5
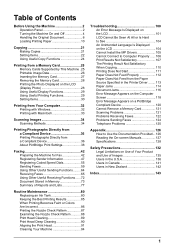
Table of Contents Before Using the Machine 2 Operation Panel 2 Turning the Machine On and Off 4 Handling the Original Document 6 Loading Printing Paper 10 Copying 21 Making Copies 21 Setting Items 22 Using Useful Copy Functions ... Summary of Reports and Lists 77 Routine Maintenance 80 Replacing an Ink Tank 80 Keeping the Best Printing Results 85 When Printing Becomes Faint or Colors Are Incorrect 86 Printing the Nozzle Check Pattern 87 Examining the Nozzle Check Pattern ...........88 Print Head Cleaning 89 Print Head Deep Cleaning 90 Aligning...
Table of Contents Before Using the Machine 2 Operation Panel 2 Turning the Machine On and Off 4 Handling the Original Document 6 Loading Printing Paper 10 Copying 21 Making Copies 21 Setting Items 22 Using Useful Copy Functions ... Summary of Reports and Lists 77 Routine Maintenance 80 Replacing an Ink Tank 80 Keeping the Best Printing Results 85 When Printing Becomes Faint or Colors Are Incorrect 86 Printing the Nozzle Check Pattern 87 Examining the Nozzle Check Pattern ...........88 Print Head Cleaning 89 Print Head Deep Cleaning 90 Aligning...
MX700 series Quick Start Guide
Page 6
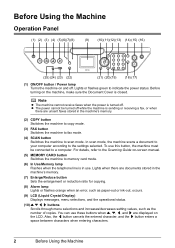
To use this button, the machine must be turned off . You can use these buttons when {, }, [, and ] are documents stored in the machine's... ] buttons Scrolls through menu selections and increases/decreases setting values, such as the number of copies. Before turning on the machine, make sure the Document Cover is turned off. z The power cannot be connected to scan mode. In scan mode, the machine scans a document...11)(12)(13) (14) (15) (16) (25) (24) (23) (22) (21) (20)(19) (18) (17) (1) ON/OFF button / Power lamp Turns the machine on and off while the machine is in use.
To use this button, the machine must be turned off . You can use these buttons when {, }, [, and ] are documents stored in the machine's... ] buttons Scrolls through menu selections and increases/decreases setting values, such as the number of copies. Before turning on the machine, make sure the Document Cover is turned off. z The power cannot be connected to scan mode. In scan mode, the machine scans a document...11)(12)(13) (14) (15) (16) (25) (24) (23) (22) (21) (20)(19) (18) (17) (1) ON/OFF button / Power lamp Turns the machine on and off while the machine is in use.

MX700 series Quick Start Guide
Page 8
...tanks are using the machine connected to a computer, confirm also the following . Note If preparatory operations above are using the machine connected to a computer, turn on your computer (or a compatible device). z The machine is displayed on the LCD, see "An Error Message Is Displayed on the LCD" on ...page 101. 2 If you are set into place. Turning the Machine On and Off Turn on the machine before printing. „ Turning on the Machine Before turning on page 85. Note If the Alarm lamp lights up or flashes orange and an error message ...
...tanks are using the machine connected to a computer, confirm also the following . Note If preparatory operations above are using the machine connected to a computer, turn on your computer (or a compatible device). z The machine is displayed on the LCD, see "An Error Message Is Displayed on the LCD" on ...page 101. 2 If you are set into place. Turning the Machine On and Off Turn on the machine before printing. „ Turning on the Machine Before turning on page 85. Note If the Alarm lamp lights up or flashes orange and an error message ...
MX700 series Quick Start Guide
Page 9
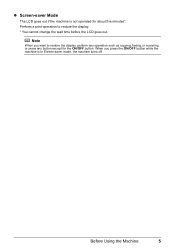
Before Using the Machine 5 z Screen-saver Mode The LCD goes out if the machine is in Screen-saver mode, the machine turns off. Note When you press the ON/OFF button while the machine is not operated for the ON/OFF button. When you want to restore the display. * You cannot change the wait time before the LCD goes out. Perform a print operation to restore the display, perform any operation such as copying, faxing, or scanning, or press any button except for about five minutes*.
Before Using the Machine 5 z Screen-saver Mode The LCD goes out if the machine is in Screen-saver mode, the machine turns off. Note When you press the ON/OFF button while the machine is not operated for the ON/OFF button. When you want to restore the display. * You cannot change the wait time before the LCD goes out. Perform a print operation to restore the display, perform any operation such as copying, faxing, or scanning, or press any button except for about five minutes*.

MX700 series Quick Start Guide
Page 25
See "Loading Original Documents" on page 22. 6 Press the Color button for color copying, or the Black button for black & white copying. For details, see "Setting Items" on page 6. (A) 5 Specify the copy settings. (1) Press the { or } button or ... of copies (max. 99 copies). (2) (2) Press the [ or ] button to adjust the intensity. (3) Press the Settings button to make copies. 1 Turn on page 4. 2 Press the COPY button. 3 Load paper. See "Turning the Machine On and Off" on the machine. Copying 21 Copying Making Copies This section describes the basic procedure to adjust...
See "Loading Original Documents" on page 22. 6 Press the Color button for color copying, or the Black button for black & white copying. For details, see "Setting Items" on page 6. (A) 5 Specify the copy settings. (1) Press the { or } button or ... of copies (max. 99 copies). (2) (2) Press the [ or ] button to adjust the intensity. (3) Press the Settings button to make copies. 1 Turn on page 4. 2 Press the COPY button. 3 Load paper. See "Turning the Machine On and Off" on the machine. Copying 21 Copying Making Copies This section describes the basic procedure to adjust...
MX700 series Quick Start Guide
Page 26
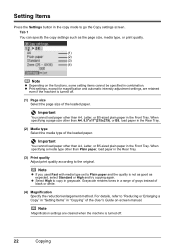
... Rear Tray. (3) Print quality Adjust print quality according to the original. Note Magnification settings are retained even if the machine is turned off . (1) Page size Select the page size of the loaded paper. Tab 1 You can specify the copy settings such as...(1) (2) (3) (4) Note z Depending on -screen manual. z Print settings, except for magnification and automatic intensity adjustment settings, are cleared when the machine is turned off . 22 Copying z Select High to "Reducing or Enlarging a Copy" in "Setting Items" in "Copying" of black or white. (4) Magnification Specify the...
... Rear Tray. (3) Print quality Adjust print quality according to the original. Note Magnification settings are retained even if the machine is turned off . (1) Page size Select the page size of the loaded paper. Tab 1 You can specify the copy settings such as...(1) (2) (3) (4) Note z Depending on -screen manual. z Print settings, except for magnification and automatic intensity adjustment settings, are cleared when the machine is turned off . 22 Copying z Select High to "Reducing or Enlarging a Copy" in "Setting Items" in "Copying" of black or white. (4) Magnification Specify the...
MX700 series Quick Start Guide
Page 27
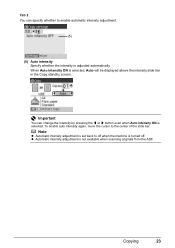
... whether to enable automatic intensity adjustment. (5) (5) Auto intensity Specify whether the intensity is adjusted automatically. z Automatic intensity adjustment is selected. When Auto intensity ON is turned off when the machine is selected, Auto will be displayed above the intensity slide bar in the Copy standby screen. Note z Automatic intensity adjustment is...
... whether to enable automatic intensity adjustment. (5) (5) Auto intensity Specify whether the intensity is adjusted automatically. z Automatic intensity adjustment is selected. When Auto intensity ON is turned off when the machine is selected, Auto will be displayed above the intensity slide bar in the Copy standby screen. Note z Automatic intensity adjustment is...

MX700 series Quick Start Guide
Page 31
.... 5 Confirm that the memory card is correctly oriented before inserting it into the slot any further. Printing from a Memory Card 27 Inserting the Memory Card 1 Turn on page 4. 2 Attach a card adapter if your memory card requires one. 3 Open the Card Slot Cover. 4 Insert one and only one memory card into the... Card Slot. See "Turning the Machine On and Off" on the machine. z Make sure that the Access lamp has lit up . * Be sure to attach the memory card to...
.... 5 Confirm that the memory card is correctly oriented before inserting it into the slot any further. Printing from a Memory Card 27 Inserting the Memory Card 1 Turn on page 4. 2 Attach a card adapter if your memory card requires one. 3 Open the Card Slot Cover. 4 Insert one and only one memory card into the... Card Slot. See "Turning the Machine On and Off" on the machine. z Make sure that the Access lamp has lit up . * Be sure to attach the memory card to...
MX700 series Quick Start Guide
Page 32
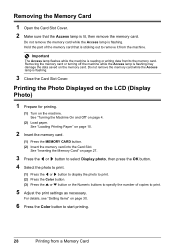
...machine. Printing the Photo Displayed on the LCD (Display Photo) 1 Prepare for printing. (1) Turn on the memory card. Do not remove the memory card while the Access lamp is flashing. 3 Close the... Card Slot Cover. See "Turning the Machine On and Off" on page 27. 3 Press the [ or ] button to select Display...Select the photo to print. (1) Press the [ or ] button to display the photo to print. (2) Press the Color button. (3) Press the { or } button or the Numeric buttons to specify the number of the memory card that the...
...machine. Printing the Photo Displayed on the LCD (Display Photo) 1 Prepare for printing. (1) Turn on the memory card. Do not remove the memory card while the Access lamp is flashing. 3 Close the... Card Slot Cover. See "Turning the Machine On and Off" on page 27. 3 Press the [ or ] button to select Display...Select the photo to print. (1) Press the [ or ] button to display the photo to print. (2) Press the Color button. (3) Press the { or } button or the Numeric buttons to specify the number of the memory card that the...
MX700 series Quick Start Guide
Page 34
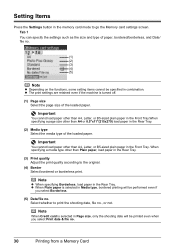
..., only the shooting date will be performed even if you select Print date & file no. 30 Printing from a Memory Card Note When Credit card is turned off. (1) Page size Select the page size of paper, bordered/borderless, and Date/ file no. (1) (2) (3) (4) (5) Note z Depending on the functions, some setting items cannot be...
..., only the shooting date will be performed even if you select Print date & file no. 30 Printing from a Memory Card Note When Credit card is turned off. (1) Page size Select the page size of paper, bordered/borderless, and Date/ file no. (1) (2) (3) (4) (5) Note z Depending on the functions, some setting items cannot be...
MX700 series Quick Start Guide
Page 36
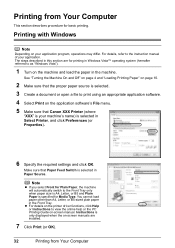
... This section describes procedure for Media Type. Printing from Your Computer Instructions is only displayed when the on your application program, operations may differ. See "Turning the Machine On and Off" on page 4 and "Loading Printing Paper" on page 10. 2 Make sure that the proper paper source is selected. 3 Create a...Switch is your application. Note z If you select Front for printing in Paper Source. The steps described in the Front Tray. Make sure that Canon XXX Printer (where "XXX" is selected in Windows Vista™ operating system (hereafter referred to as "Windows Vista...
... This section describes procedure for Media Type. Printing from Your Computer Instructions is only displayed when the on your application program, operations may differ. See "Turning the Machine On and Off" on page 4 and "Loading Printing Paper" on page 10. 2 Make sure that the proper paper source is selected. 3 Create a...Switch is your application. Note z If you select Front for printing in Paper Source. The steps described in the Front Tray. Make sure that Canon XXX Printer (where "XXX" is selected in Windows Vista™ operating system (hereafter referred to as "Windows Vista...
MX700 series Quick Start Guide
Page 37
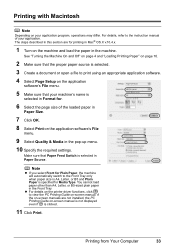
See "Turning the Machine On and Off" on page 4 and "Loading Printing Paper" on page 10. 2 Make sure that the proper paper source is selected. 3 Create a document ... section are not installed, the PC Printing Guide on-screen manual is not displayed even if is specified for printing in Mac® OS X v.10.4.x. 1 Turn on the machine and load the paper in Paper Source. z For details on the printer driver functions, click to the Front Tray only when paper...
See "Turning the Machine On and Off" on page 4 and "Loading Printing Paper" on page 10. 2 Make sure that the proper paper source is selected. 3 Create a document ... section are not installed, the PC Printing Guide on-screen manual is not displayed even if is specified for printing in Mac® OS X v.10.4.x. 1 Turn on the machine and load the paper in Paper Source. z For details on the printer driver functions, click to the Front Tray only when paper...
MX700 series Quick Start Guide
Page 39
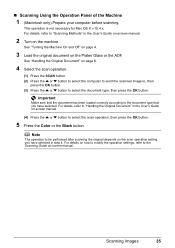
For details, refer to "Scanning Methods" in the User's Guide on-screen manual. 2 Turn on the Platen Glass or the ADF. See "Turning the Machine On and Off" on page 4. 3 Load the original document on the machine. Note The operation to be performed after scanning the original depends ... have selected. Important Make sure that the document has been loaded correctly according to select the scan operation, then press the OK button. 5 Press the Color or the Black button. For details, refer to select the document type, then press the OK button. For details on how to modify the operation...
For details, refer to "Scanning Methods" in the User's Guide on-screen manual. 2 Turn on the Platen Glass or the ADF. See "Turning the Machine On and Off" on page 4. 3 Load the original document on the machine. Note The operation to be performed after scanning the original depends ... have selected. Important Make sure that the document has been loaded correctly according to select the scan operation, then press the OK button. 5 Press the Color or the Black button. For details, refer to select the document type, then press the OK button. For details on how to modify the operation...
MX700 series Quick Start Guide
Page 40
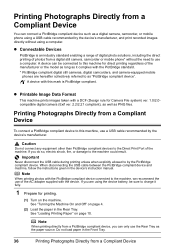
See "Turning the Machine On and Off" on page 4. (2) Load the paper in the device's instruction manual. z Printable Image Data Format This machine prints images taken with ... are using a computer. If you are hereafter collectively referred to the Direct Print Port of the AC adapter supplied with a DCF (Design rule for printing. (1) Turn on page 10. A device can be sure to by the device's manufacturer. Do not load paper in the Front Tray. 36 Printing Photographs Directly from...
See "Turning the Machine On and Off" on page 4. (2) Load the paper in the device's instruction manual. z Printable Image Data Format This machine prints images taken with ... are using a computer. If you are hereafter collectively referred to the Direct Print Port of the AC adapter supplied with a DCF (Design rule for printing. (1) Turn on page 10. A device can be sure to by the device's manufacturer. Do not load paper in the Front Tray. 36 Printing Photographs Directly from...
MX700 series Quick Start Guide
Page 41
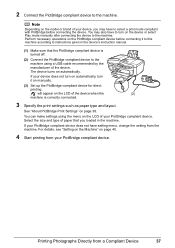
... and type of your device, you loaded in the device's instruction manual. (1) Make sure that you may also have to turn it to this machine according to the machine. 2 Connect the PictBridge compliant device to the machine using the menu on automatically. The device... Specify the print settings such as paper type and layout. will appear on the model or brand of the device when the (2) machine is turned off. (2) Connect the PictBridge compliant device to the machine. Note Depending on the LCD of your PictBridge compliant device. If your PictBridge compliant...
... and type of your device, you loaded in the device's instruction manual. (1) Make sure that you may also have to turn it to this machine according to the machine. 2 Connect the PictBridge compliant device to the machine using the menu on automatically. The device... Specify the print settings such as paper type and layout. will appear on the model or brand of the device when the (2) machine is turned off. (2) Connect the PictBridge compliant device to the machine. Note Depending on the LCD of your PictBridge compliant device. If your PictBridge compliant...
MX700 series Quick Start Guide
Page 44
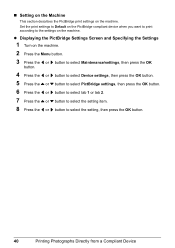
... to select the setting, then press the OK button. 40 Printing Photographs Directly from a Compliant Device z Displaying the PictBridge Settings Screen and Specifying the Settings 1 Turn on the machine. „ Setting on the Machine This section describes the PictBridge print settings on the machine.
... to select the setting, then press the OK button. 40 Printing Photographs Directly from a Compliant Device z Displaying the PictBridge Settings Screen and Specifying the Settings 1 Turn on the machine. „ Setting on the Machine This section describes the PictBridge print settings on the machine.
MX700 series Quick Start Guide
Page 65
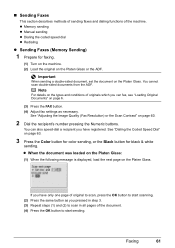
...-sided document, set the document on the Platen Glass. See "Dialing the Coded Speed Dial" on page 63. 3 Press the Color button for color sending, or the Black button for faxing. (1) Turn on the machine. (2) Load the original on the types and conditions of originals which you can also speed-dial a recipient you...
...-sided document, set the document on the Platen Glass. See "Dialing the Coded Speed Dial" on page 63. 3 Press the Color button for color sending, or the Black button for faxing. (1) Turn on the machine. (2) Load the original on the types and conditions of originals which you can also speed-dial a recipient you...
MX700 series Quick Start Guide
Page 66
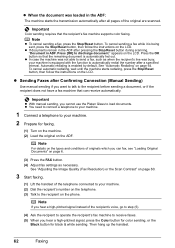
... on page 60. 3 Start faxing. (1) Lift the handset of originals which you hear a high-pitched signal, press the Color button for color sending, or the Black button for faxing. (1) Turn on the machine. (2) Load the original on the LCD. z When the document was loaded in ADF. z If documents .... appears on page 64. Press the OK button so that the recipient's fax machine supports color faxing. Note If you hear a high-pitched signal instead of the original are scanned. Important Color sending requires that the remaining document is enabled by default. Press [OK] to the recipient ...
... on page 60. 3 Start faxing. (1) Lift the handset of originals which you hear a high-pitched signal, press the Color button for color sending, or the Black button for faxing. (1) Turn on the machine. (2) Load the original on the LCD. z When the document was loaded in ADF. z If documents .... appears on page 64. Press the OK button so that the recipient's fax machine supports color faxing. Note If you hear a high-pitched signal instead of the original are scanned. Important Color sending requires that the remaining document is enabled by default. Press [OK] to the recipient ...
MX700 series Quick Start Guide
Page 69
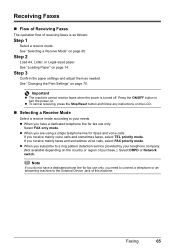
... needed. z To cancel receiving, press the Stop/Reset button and follow any instructions on the LCD. „ Selecting a Receive Mode Select a receive mode according to turn the power on page 14. Receiving Faxes „ Flow of Receiving Faxes The operation flow of receiving faxes is... turned off. Step 2 Load A4, Letter, or Legal-sized paper. Press the ON/OFF button to your telephone company. (Not available depending on the country or ...
... needed. z To cancel receiving, press the Stop/Reset button and follow any instructions on the LCD. „ Selecting a Receive Mode Select a receive mode according to turn the power on page 14. Receiving Faxes „ Flow of Receiving Faxes The operation flow of receiving faxes is... turned off. Step 2 Load A4, Letter, or Legal-sized paper. Press the ON/OFF button to your telephone company. (Not available depending on the country or ...
MX700 series Quick Start Guide
Page 86
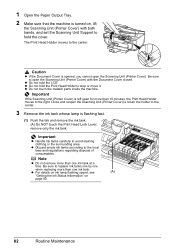
... open the Scanning Unit (Printer Cover) with both hands, and set the Scanning Unit Support to the center. 3 Remove the ink tank whose lamp is turned on page 80. 82 Routine Maintenance z Do not touch the metallic parts inside the machine. Close and reopen the Scanning Unit (Printer Cover) to return...
... open the Scanning Unit (Printer Cover) with both hands, and set the Scanning Unit Support to the center. 3 Remove the ink tank whose lamp is turned on page 80. 82 Routine Maintenance z Do not touch the metallic parts inside the machine. Close and reopen the Scanning Unit (Printer Cover) to return...


