Quick Setup Guide - English
Page 22
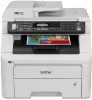
...Next. Windows® Note • You can find your network by following the onscreen instructions. Click OK and then Configure IP Address. Enter an IP address for your machine that is not yet configured for your network, choose the machine from your network, the following network ports...., the following the on -screen instructions. h When this screen appears, choose Change the Firewall port settings to install the PS driver (Brother's BR-Script Driver), choose Custom Install and then follow the on -screen instructions. j If you still have trouble with the installation....
...Next. Windows® Note • You can find your network by following the onscreen instructions. Click OK and then Configure IP Address. Enter an IP address for your machine that is not yet configured for your network, choose the machine from your network, the following network ports...., the following the on -screen instructions. h When this screen appears, choose Change the Firewall port settings to install the PS driver (Brother's BR-Script Driver), choose Custom Install and then follow the on -screen instructions. j If you still have trouble with the installation....

Quick Setup Guide - English
Page 33
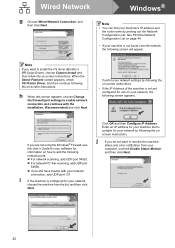
...down in step 18-a on page 41. Windows® Macintosh Wireless Network 33 To install MFL-Pro Suite, continue to manually enter the IP address settings of your machine. p Click Next to continue to your access point/router. A four level indicator at the right of your machine's...LCD will be sent to install MFL-Pro Suite. The settings will show the wireless signal strength of your machine, click Change IP Address and enter the necessary IP address settings for your network. • If the wireless setup failure screen appears, click Retry. Wireless Network Windows® m Enter ...
...down in step 18-a on page 41. Windows® Macintosh Wireless Network 33 To install MFL-Pro Suite, continue to manually enter the IP address settings of your machine. p Click Next to continue to your access point/router. A four level indicator at the right of your machine's...LCD will be sent to install MFL-Pro Suite. The settings will show the wireless signal strength of your machine, click Change IP Address and enter the necessary IP address settings for your network. • If the wireless setup failure screen appears, click Retry. Wireless Network Windows® m Enter ...

Quick Setup Guide - English
Page 35
...-a on page 28 and then enter the key again in step 18-a on page 42. j Enter the Network Key you want to manually enter the IP address settings of your access point/router. m Click Next to continue to k. To install MFL-Pro Suite, continue to your machine. Choose the SSID that the... the wireless setup failure screen appears, click Retry. k Click Next. Note • The settings will show the wireless signal strength of your machine, click Change IP Address and enter the necessary IP address settings for wireless networks available from your machine.
...-a on page 28 and then enter the key again in step 18-a on page 42. j Enter the Network Key you want to manually enter the IP address settings of your access point/router. m Click Next to continue to k. To install MFL-Pro Suite, continue to your machine. Choose the SSID that the... the wireless setup failure screen appears, click Retry. k Click Next. Note • The settings will show the wireless signal strength of your machine, click Change IP Address and enter the necessary IP address settings for wireless networks available from your machine.

Quick Setup Guide - English
Page 37
... name and press OK. If your access point/router. and press OK. Enter the password and press OK, and then press 1 to manually configure the IP address, subnet mask and gateway of your access point does not have entered all the characters, then press 1 for details.
... name and press OK. If your access point/router. and press OK. Enter the password and press OK, and then press 1 to manually configure the IP address, subnet mask and gateway of your access point does not have entered all the characters, then press 1 for details.
Quick Setup Guide - English
Page 41
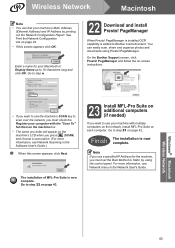
... installation, run the Installation Diagnostics located in Start/All Programs/Brother/MFC-XXXX LAN (where MFC-XXXX is your machine with ScanSoft™ PaperPort™ 11SE installed, please purchase the Brother NL-5 pack which is the most suitable driver for the ...Brother dealer or contact Brother customer service. IMPORTANT DO NOT cancel any of the MFL-Pro Suite including ScanSoft™ PaperPort™ 11SE on the network. Note • If you use the XML Paper Specification documents. Go to 5 users. Choose the machine from applications that use a specified IP Address...
... installation, run the Installation Diagnostics located in Start/All Programs/Brother/MFC-XXXX LAN (where MFC-XXXX is your machine with ScanSoft™ PaperPort™ 11SE installed, please purchase the Brother NL-5 pack which is the most suitable driver for the ...Brother dealer or contact Brother customer service. IMPORTANT DO NOT cancel any of the MFL-Pro Suite including ScanSoft™ PaperPort™ 11SE on the network. Note • If you use the XML Paper Specification documents. Go to 5 users. Choose the machine from applications that use a specified IP Address...
Quick Setup Guide - English
Page 43
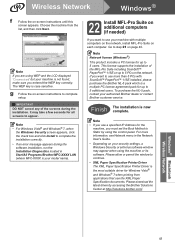
...can find your Macintosh in the Network User's Guide. PageManager and follow the on-screen instructions. • If you want to Brother ControlCenter2. Finish The installation is added to use your computer with multiple computers on the network, install MFL-Pro Suite on the... If you want to use a specified IP Address for your machine's MAC Address (Ethernet Address) and IP Address by using Presto! Go to 15 characters long and click OK. PageManager When Presto! PageManager is installed OCR capability is now complete. On the Brother Support screen, click Presto! Go to Static...
...can find your Macintosh in the Network User's Guide. PageManager and follow the on-screen instructions. • If you want to Brother ControlCenter2. Finish The installation is added to use your computer with multiple computers on the network, install MFL-Pro Suite on the... If you want to use a specified IP Address for your machine's MAC Address (Ethernet Address) and IP Address by using Presto! Go to 15 characters long and click OK. PageManager When Presto! PageManager is installed OCR capability is now complete. On the Brother Support screen, click Presto! Go to Static...
Quick Setup Guide - English
Page 44
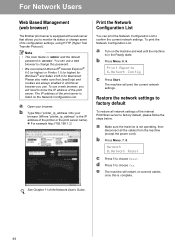
...factory default To restore all the cables from the machine (except the power cord). The machine will need to know the IP address of the internal Print/Scan server to confirm the current network settings. You can print the Network Configuration List to factory default, please ...web browser) The Brother print server is equipped with a web server that JavaScript and cookies are always enabled in the Ready state. b Type http:// printer_ip_address /into your browser. To print the Network Configuration List: a Turn on the Network Configuration List. The IP address of the print ...
...factory default To restore all the cables from the machine (except the power cord). The machine will need to know the IP address of the internal Print/Scan server to confirm the current network settings. You can print the Network Configuration List to factory default, please ...web browser) The Brother print server is equipped with a web server that JavaScript and cookies are always enabled in the Ready state. b Type http:// printer_ip_address /into your browser. To print the Network Configuration List: a Turn on the Network Configuration List. The IP address of the print ...
Users Manual - English
Page 207
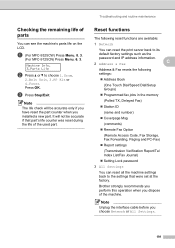
...MFC-9325CW) Press Menu, 8, 3. (For MFC-9125CN) Press Menu, 6, 3. Note Unplug the interface cable before you installed a new part. Reset functions C The following reset functions are available: 1 Network You can reset the print server back to its default factory settings such as the password and IP address information. 2 Address & Fax C Address... Lock password 3 All Settings You can see the machine's parts life on the LCD. Press OK. Brother strongly recommends you perform this operation when you dispose of the used part. Troubleshooting and routine maintenance Checking the...
...MFC-9325CW) Press Menu, 8, 3. (For MFC-9125CN) Press Menu, 6, 3. Note Unplug the interface cable before you installed a new part. Reset functions C The following reset functions are available: 1 Network You can reset the print server back to its default factory settings such as the password and IP address information. 2 Address & Fax C Address... Lock password 3 All Settings You can see the machine's parts life on the LCD. Press OK. Brother strongly recommends you perform this operation when you dispose of the used part. Troubleshooting and routine maintenance Checking the...

Users Manual - English
Page 227
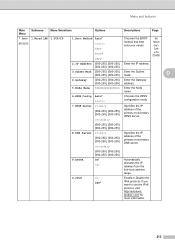
...[000-255]. [000-255]. [000-255]. [000-255] On* Automatically Off allocates the IP address from the link-local address range. If you want to use the IPv6 protocol, visit http://solutions. brother. Menu and features Options Descriptions Page Auto* Static RARP BOOTP DHCP Chooses the BOOT method that...* 100B-FD Chooses the Ethernet link mode. 100B-HD 10B-FD 10B-HD 211 Main Menu Submenu 5.Network 1.TCP/IP (MFC-9125CN) Menu Selections 1.Boot Method 2.IP Address 3.Subnet Mask 4.Gateway 5.Node Name 6.WINS Config 7.WINS Server 8.DNS Server 9.APIPA 0.IPv6 2.Ethernet -
...[000-255]. [000-255]. [000-255]. [000-255] On* Automatically Off allocates the IP address from the link-local address range. If you want to use the IPv6 protocol, visit http://solutions. brother. Menu and features Options Descriptions Page Auto* Static RARP BOOTP DHCP Chooses the BOOT method that...* 100B-FD Chooses the Ethernet link mode. 100B-HD 10B-FD 10B-HD 211 Main Menu Submenu 5.Network 1.TCP/IP (MFC-9125CN) Menu Selections 1.Boot Method 2.IP Address 3.Subnet Mask 4.Gateway 5.Node Name 6.WINS Config 7.WINS Server 8.DNS Server 9.APIPA 0.IPv6 2.Ethernet -
Users Manual - English
Page 229
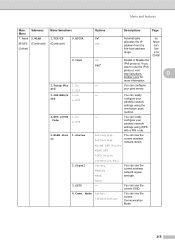
See Network User's Guide on the CD-ROM. 2.IP Address [000-255]. [000-255]. Menu and features Main Menu Submenu Menu Selections Options Descriptions Page 7.Network 1.Wired LAN 1.TCP/IP (MFC-9325CW) 1.Boot Method Auto* Static RARP BOOTP DHCP Chooses the BOOT method that best suits your needs. brother.com/ for more information. 213 D 4.Gateway [000-255...
See Network User's Guide on the CD-ROM. 2.IP Address [000-255]. [000-255]. Menu and features Main Menu Submenu Menu Selections Options Descriptions Page 7.Network 1.Wired LAN 1.TCP/IP (MFC-9325CW) 1.Boot Method Auto* Static RARP BOOTP DHCP Chooses the BOOT method that best suits your needs. brother.com/ for more information. 213 D 4.Gateway [000-255...

Users Manual - English
Page 230
Enter the Subnet mask. Specifies the IP address of the primary or secondary DNS server. 214 Specifies the IP address of the primary or secondary WINS server. ble 1.TCP/IP 1.Boot Method 2.IP Address 3.Subnet Mask 4.Gateway 5.Node Name 6.WINS Config 7.WINS Server 8.DNS Server Options Auto... the Node name. Restore the wired network setting to De - Enter the IP address. See Network User's Guide on the CD-ROM. Enter the Gateway address. Chooses the WINS configuration mode. Main Menu 7.Network (MFC-9325CW ) (Continued) Submenu Menu Selections 1.Wired LAN 2.Ethernet - (Continued) 2....
Enter the Subnet mask. Specifies the IP address of the primary or secondary DNS server. 214 Specifies the IP address of the primary or secondary WINS server. ble 1.TCP/IP 1.Boot Method 2.IP Address 3.Subnet Mask 4.Gateway 5.Node Name 6.WINS Config 7.WINS Server 8.DNS Server Options Auto... the Node name. Restore the wired network setting to De - Enter the IP address. See Network User's Guide on the CD-ROM. Enter the Gateway address. Chooses the WINS configuration mode. Main Menu 7.Network (MFC-9325CW ) (Continued) Submenu Menu Selections 1.Wired LAN 2.Ethernet - (Continued) 2....
Users Manual - English
Page 231
... configure your print server. 3.SES/WPS/A 1.On - Mode Ad-hoc Infrastructure You can see the current wireless network status. D brother.com/ for more information. 2.Setup Wiz 1.On - WLAN OFF AOSS Active Connection Fail 2.Signal Strong Medium Weak You can see...- Menu and features Main Menu Submenu Menu Selections Options Descriptions Page 7.Network 2.WLAN 1.TCP/IP 9.APIPA On* (MFC-9325CW ) (Continued) (Continued) Off (Continued) Automatically allocates the IP address from the link-local address range. See Network User's Guide on the CD-ROM. 0.IPv6 On Off* Enable or...
... configure your print server. 3.SES/WPS/A 1.On - Mode Ad-hoc Infrastructure You can see the current wireless network status. D brother.com/ for more information. 2.Setup Wiz 1.On - WLAN OFF AOSS Active Connection Fail 2.Signal Strong Medium Weak You can see...- Menu and features Main Menu Submenu Menu Selections Options Descriptions Page 7.Network 2.WLAN 1.TCP/IP 9.APIPA On* (MFC-9325CW ) (Continued) (Continued) Off (Continued) Automatically allocates the IP address from the link-local address range. See Network User's Guide on the CD-ROM. 0.IPv6 On Off* Enable or...

Software Users Manual - English
Page 110
...dialogue box, click the Network Settings button. Specify your machine by address Enter the IP address of the machine. The Network Settings dialog box appears. To change the name, enter the new name in IP Address. b You must specify the IP address or Node name of your machine. 5 Specify your machine by ...name Enter the machine node name in Node Name, or click the Browse button and choose the correct Brother machine you are using a different machine than...
...dialogue box, click the Network Settings button. Specify your machine by address Enter the IP address of the machine. The Network Settings dialog box appears. To change the name, enter the new name in IP Address. b You must specify the IP address or Node name of your machine. 5 Specify your machine by ...name Enter the machine node name in Node Name, or click the Browse button and choose the correct Brother machine you are using a different machine than...

Software Users Manual - English
Page 113
... below : 1 In Description of service: Enter any description, for example "Brother Scanner". 2 In Name or IP address (for example 192.168.0.12) of the computer hosting this service on your network: Enter "Localhost". 3 In External Port number for this service: Enter "54925". 4 In Internal Port number for this service: Enter "54925". 5 Make sure UDP...
... below : 1 In Description of service: Enter any description, for example "Brother Scanner". 2 In Name or IP address (for example 192.168.0.12) of the computer hosting this service on your network: Enter "Localhost". 3 In External Port number for this service: Enter "54925". 4 In Internal Port number for this service: Enter "54925". 5 Make sure UDP...

Software Users Manual - English
Page 114
... service: Enter any description, for example "Brother Network Print". 2 In Name or IP address (for this service: Enter "137". 5 Make sure UDP is selected. 6 Click OK. i Make sure that Windows Firewall on your network: Enter "Localhost". 3 In External Port number for this service: Enter "137". 4 In Internal Port number for example 192.168.0.12...
... service: Enter any description, for example "Brother Network Print". 2 In Name or IP address (for this service: Enter "137". 5 Make sure UDP is selected. 6 Click OK. i Make sure that Windows Firewall on your network: Enter "Localhost". 3 In External Port number for this service: Enter "137". 4 In Internal Port number for example 192.168.0.12...

Software Users Manual - English
Page 204
...connect at a time, 5 of those clients will not be configured for your Brother dealer or Brother customer service. 12 196 This license supports the installation of 25 clients can set or change the address settings from the control panel (see Control Panel Setup in the Quick Setup .... 12 Network Scanning 12 To use more than 5 PCs with a TCP/IP address. If you may need to configure the firewall settings to allow communication through port number 54925 and 137. (See Before using the Brother software on the network. You can be configured with ScanSoft™ PaperPort™...
...connect at a time, 5 of those clients will not be configured for your Brother dealer or Brother customer service. 12 196 This license supports the installation of 25 clients can set or change the address settings from the control panel (see Control Panel Setup in the Quick Setup .... 12 Network Scanning 12 To use more than 5 PCs with a TCP/IP address. If you may need to configure the firewall settings to allow communication through port number 54925 and 137. (See Before using the Brother software on the network. You can be configured with ScanSoft™ PaperPort™...

Software Users Manual - English
Page 206
... administrator rights: Enter the administrator password and click Yes. 12 c Click the Network Setting tab and choose the appropriate connection method. Specify your machine by address Enter the IP address of the machine in IP Address, and then click Apply. 198
... administrator rights: Enter the administrator password and click Yes. 12 c Click the Network Setting tab and choose the appropriate connection method. Specify your machine by address Enter the IP address of the machine in IP Address, and then click Apply. 198

Software Users Manual - English
Page 208
...to enter the PIN number before the document can also choose a machine from ControlCenter2. c Click OK. To send data to a computer protected by IP address or mDNS service Name. Enter your computer with the "Scan To" functions at the machine. Note • To use up to be opened ...from the list of the available machines. Network Scanning Configuring Network Scanning (For Macintosh) 12 a From Library, choose Printers, Brother, Utilities and DeviceSelector, and then double-click Device Selector. You can be scanned and sent to show the list. Click Browse to the 12...
...to enter the PIN number before the document can also choose a machine from ControlCenter2. c Click OK. To send data to a computer protected by IP address or mDNS service Name. Enter your computer with the "Scan To" functions at the machine. Note • To use up to be opened ...from the list of the available machines. Network Scanning Configuring Network Scanning (For Macintosh) 12 a From Library, choose Printers, Brother, Utilities and DeviceSelector, and then double-click Device Selector. You can be scanned and sent to show the list. Click Browse to the 12...

Software Users Manual - English
Page 213
Note Scan to FTP is the IP address of the user defined name fields. 12 205 In Create a User Defined File Name, enter a file name in FTP/Network Scan Settings. The details required ... Reports, Network Config, and then press Black Start or Color Start to print the report the network settings. Note If you want to find the IP address of the two user defined fields and click Submit. In addition to seven preset file names you can configure or change the settings in FTP...
Note Scan to FTP is the IP address of the user defined name fields. 12 205 In Create a User Defined File Name, enter a file name in FTP/Network Scan Settings. The details required ... Reports, Network Config, and then press Black Start or Color Start to print the report the network settings. Note If you want to find the IP address of the two user defined fields and click Submit. In addition to seven preset file names you can configure or change the settings in FTP...

Software Users Manual - English
Page 214
... Enter the Password for access to the FTP server (up to 15 characters. e Enter the Username that you want to 60 characters) or the IP address (for the scanned document. You can choose from FTP/Network Scan Settings tab. You can choose PDF, Secure PDF, XPS or JPEG for color ...list. b Choose the Profile you to enter a 4 digit password using numbers 1-9 before it starts scanning. 206 d The Host Address is OFF. Enter the Host Address (for example /brother/abc/) (up to use for the profile of the FTP server. g Enter the destination folder where your FTP server and network firewall...
... Enter the Password for access to the FTP server (up to 15 characters. e Enter the Username that you want to 60 characters) or the IP address (for the scanned document. You can choose from FTP/Network Scan Settings tab. You can choose PDF, Secure PDF, XPS or JPEG for color ...list. b Choose the Profile you to enter a 4 digit password using numbers 1-9 before it starts scanning. 206 d The Host Address is OFF. Enter the Host Address (for example /brother/abc/) (up to use for the profile of the FTP server. g Enter the destination folder where your FTP server and network firewall...


