Quick Setup Guide - English
Page 11
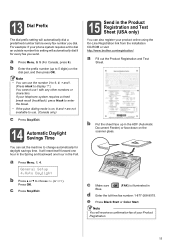
...Put the sheet face up to change automatically for every fax you dial. e Press Black Start or Color Start. c Make sure (FAX) is on the scanner glass. 13 Dial Prefix The dial prefix ... of your product online using the On-Line Registration link from the installation CD-ROM or visit http://www.brother.com/registration/. a Fill out the Product Registration and Test Sheet. d Enter the toll-free fax number...one hour in the Product Registration and Test Sheet (USA only) You can set the machine to 5 digits) on the dial pad, and then press OK. c Press Stop/Exit. 15 Send in the ...
...Put the sheet face up to change automatically for every fax you dial. e Press Black Start or Color Start. c Make sure (FAX) is on the scanner glass. 13 Dial Prefix The dial prefix ... of your product online using the On-Line Registration link from the installation CD-ROM or visit http://www.brother.com/registration/. a Fill out the Product Registration and Test Sheet. d Enter the toll-free fax number...one hour in the Product Registration and Test Sheet (USA only) You can set the machine to 5 digits) on the dial pad, and then press OK. c Press Stop/Exit. 15 Send in the ...
Users Manual - English
Page 6
Brother™ Digital Color One-Year Limited Warranty and Replacement Service (USA Only) Who is ...warranty repair without the proper preparation and/or packaging); 3 Damage caused by someone other than an authorized Brother reseller in shipping, so we would recommend that the Machine and the accompanying Consumable and Accessory Items will ...ask you to supply a refurbished or remanufactured replacement iv What Brother will repair or replace the Machine and/or accompanying Consumable and Accessory Items at no charge to you...
Brother™ Digital Color One-Year Limited Warranty and Replacement Service (USA Only) Who is ...warranty repair without the proper preparation and/or packaging); 3 Damage caused by someone other than an authorized Brother reseller in shipping, so we would recommend that the Machine and the accompanying Consumable and Accessory Items will ...ask you to supply a refurbished or remanufactured replacement iv What Brother will repair or replace the Machine and/or accompanying Consumable and Accessory Items at no charge to you...
Users Manual - English
Page 7
... is sent to you may not be returned to you and your sole (i.e., only) and exclusive remedies under this warranty. Brother™ Digital Color One-Year Limited Warranty and Replacement Service (USA Only) Machine and/or accompanying Consumable and Accessory Items and use of this ...validated with the instructions provided by this Product © 2011 Brother International Corporation v It replaces all original packing materials, in accordance with a copy of the proof of purchase (bill of sale). Limitations: Brother is entitled to the product; THIS WARRANTY IS GIVEN IN LIEU...
... is sent to you may not be returned to you and your sole (i.e., only) and exclusive remedies under this warranty. Brother™ Digital Color One-Year Limited Warranty and Replacement Service (USA Only) Machine and/or accompanying Consumable and Accessory Items and use of this ...validated with the instructions provided by this Product © 2011 Brother International Corporation v It replaces all original packing materials, in accordance with a copy of the proof of purchase (bill of sale). Limitations: Brother is entitled to the product; THIS WARRANTY IS GIVEN IN LIEU...
Users Manual - English
Page 13
... Sorting copies using the ADF 89 Adjusting Contrast, Color and Brightness 89 Making N in 1 copies (page layout 91 Out of memory message 92 Section IV Direct printing 13 Printing photos from a digital camera (MFC-9325CW only) 94 Before using PictBridge 94 PictBridge requirements... 94 Using PictBridge 94 Setting your digital camera 94 Printing images ...95 DPOF printing 96 Printing images with Secure Function Lock...
... Sorting copies using the ADF 89 Adjusting Contrast, Color and Brightness 89 Making N in 1 copies (page layout 91 Out of memory message 92 Section IV Direct printing 13 Printing photos from a digital camera (MFC-9325CW only) 94 Before using PictBridge 94 PictBridge requirements... 94 Using PictBridge 94 Setting your digital camera 94 Printing images ...95 DPOF printing 96 Printing images with Secure Function Lock...

Users Manual - English
Page 24
You can also print images directly from your PictBridge compatible camera. (See Printing photos from a digital camera (MFC-9325CW only) on page 94.) Reports (MFC-9125CN) Print the Transmission Verification Reports, Help List, Tel Index List, Fax Journal, User Settings and Network Config. 8 Secure You ...key until the LCD shows Job Cancel (All). 3 Data LED The LED will answer, and then press Black Start or Color Start. OK Lets you store your machine. (MFC-9325CW only) A four level indicator shows the current wireless signal strength if you are stored in fax or standby mode. Chapter ...
You can also print images directly from your PictBridge compatible camera. (See Printing photos from a digital camera (MFC-9325CW only) on page 94.) Reports (MFC-9125CN) Print the Transmission Verification Reports, Help List, Tel Index List, Fax Journal, User Settings and Network Config. 8 Secure You ...key until the LCD shows Job Cancel (All). 3 Data LED The LED will answer, and then press Black Start or Color Start. OK Lets you store your machine. (MFC-9325CW only) A four level indicator shows the current wireless signal strength if you are stored in fax or standby mode. Chapter ...
Users Manual - English
Page 45
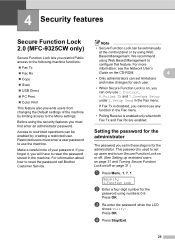
...Lock b Enter a four-digit number for the password using Web Based Management to configure this feature. Press OK. 4 Security features 4 Secure Function Lock 2.0 (MFC-9325CW only) 4 Secure Function... Lock lets you restrict Public access to the following machine functions: Fax Tx Fax Rx Copy Scan USB Direct PC Print Color...the administrator 4 The password you will have to reset the password call Brother Customer Service. Setting the password for the administrator. Press OK. Before ...
...Lock b Enter a four-digit number for the password using Web Based Management to configure this feature. Press OK. 4 Security features 4 Secure Function Lock 2.0 (MFC-9325CW only) 4 Secure Function... Lock lets you restrict Public access to the following machine functions: Fax Tx Fax Rx Copy Scan USB Direct PC Print Color...the administrator 4 The password you will have to reset the password call Brother Customer Service. Setting the password for the administrator. Press OK. Before ...
Users Manual - English
Page 46
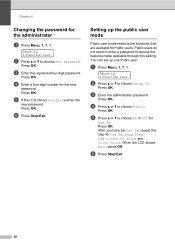
.... After you have set up the public user mode 4 Public user mode restricts the functions that are available for Public users. c Enter the registered four-digit password. f Press Stop/Exit. You can set Fax Tx, repeat this setting. d Press a or b to choose Set Password. e Press a or b ... new password. Public users do not need to enter a password to choose On or Off for Fax Rx, Copy, Scan, USB Direct, PC Print and Color Print. a Press Menu, 1, 7, 1. Press OK. Security 1.Function Lock b Press a or b to choose Setup ID. Press OK. Press OK. c Enter the administrator ...
.... After you have set up the public user mode 4 Public user mode restricts the functions that are available for Public users. c Enter the registered four-digit password. f Press Stop/Exit. You can set Fax Tx, repeat this setting. d Press a or b to choose Set Password. e Press a or b ... new password. Public users do not need to enter a password to choose On or Off for Fax Rx, Copy, Scan, USB Direct, PC Print and Color Print. a Press Menu, 1, 7, 1. Press OK. Security 1.Function Lock b Press a or b to choose Setup ID. Press OK. Press OK. c Enter the administrator ...

Users Manual - English
Page 47
...restrictions and a password for functions that are available to choose On or Off for Fax Rx, Copy, Scan, USB Direct, PC Print and Color Print. d Press a or b to choose Lock OffiOn. When the LCD shows Exit, press OK. Turning Secure Function Lock on page 219... User's Guide on /off a Press Menu, 1, 7, 1. Security 1.Function Lock 4 b Press a or b to choose User01. c Enter your four-digit administrator password. f Enter a four-digit password for entering each additional user and password. Re-enter the correct password. h Repeat steps d to enter the user name. (See Entering text...
...restrictions and a password for functions that are available to choose On or Off for Fax Rx, Copy, Scan, USB Direct, PC Print and Color Print. d Press a or b to choose Lock OffiOn. When the LCD shows Exit, press OK. Turning Secure Function Lock on page 219... User's Guide on /off a Press Menu, 1, 7, 1. Security 1.Function Lock 4 b Press a or b to choose User01. c Enter your four-digit administrator password. f Enter a four-digit password for entering each additional user and password. Re-enter the correct password. h Repeat steps d to enter the user name. (See Entering text...
Users Manual - English
Page 82
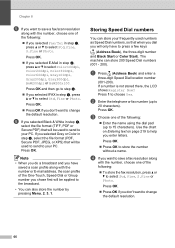
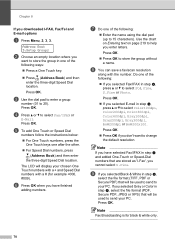
... Note • When you do a broadcast and you have to press a few keys ( (Address Book), the three-digit number and Black Start or Color Start). a Press (Address Book) and enter a three-digit Speed Dial location number (001-200). Press OK. The machine can also store the number by pressing Menu, 2, 3, ...1. If a number is not stored there, the LCD shows Register Now? Press OK. Press OK to choose Yes. If you selected Gray or Color in step ...
... Note • When you do a broadcast and you have to press a few keys ( (Address Book), the three-digit number and Black Start or Color Start). a Press (Address Book) and enter a three-digit Speed Dial location number (001-200). Press OK. The machine can also store the number by pressing Menu, 2, 3, ...1. If a number is not stored there, the LCD shows Register Now? Press OK. Press OK to choose Yes. If you selected Gray or Color in step ...
Users Manual - English
Page 83
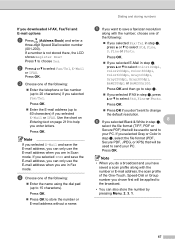
... the E-mail address, you can only use the E-mail address when you downloaded I-FAX, Fax/Tel and E-mail options a Press (Address Book) and enter a three-digit Speed Dial location number (001-200). If a number is not stored there, the LCD shows Register Now? If you selected IFAX and save a fax/scan... resolution along with the number, choose one of the One-Touch, Speed-Dial or Group number you selected Gray or Color in step b, press a or b to your PC. Dialing and storing numbers e If you want to save the E-mail address, you can only use the E-mail...
... the E-mail address, you can only use the E-mail address when you downloaded I-FAX, Fax/Tel and E-mail options a Press (Address Book) and enter a three-digit Speed Dial location number (001-200). If a number is not stored there, the LCD shows Register Now? If you selected IFAX and save a fax/scan... resolution along with the number, choose one of the One-Touch, Speed-Dial or Group number you selected Gray or Color in step b, press a or b to your PC. Dialing and storing numbers e If you want to save the E-mail address, you can only use the E-mail...
Users Manual - English
Page 86
..., Gray300dpi, B&W200dpi or B&W200x100. Do one of the following ways: Press a One Touch key. Press (Address Book) and then enter the three-digit Speed Dial location. Chapter 8 If you have selected Fax/IFAX in step h, select the file format (TIFF, PDF or Secure PDF) that will be used... to your chosen One Touch numbers with a l and Speed Dial numbers with the number. i If you selected Gray or Color in one of the following: If you don't want to store the group in step h, select the file format (PDF, Secure PDF, JPEG...
..., Gray300dpi, B&W200dpi or B&W200x100. Do one of the following ways: Press a One Touch key. Press (Address Book) and then enter the three-digit Speed Dial location. Chapter 8 If you have selected Fax/IFAX in step h, select the file format (TIFF, PDF or Secure PDF) that will be used... to your chosen One Touch numbers with a l and Speed Dial numbers with the number. i If you selected Gray or Color in one of the following: If you don't want to store the group in step h, select the file format (PDF, Secure PDF, JPEG...

Users Manual - English
Page 87
... You can also add a pause by entering them both to dial '555-7000' if you press the following keys: Press (Address Book), 003. Any digits dialed after this feature to send Tone signals (for example, for a cheaper rate from another long distance carrier. Tone or Pulse (Canada only) 8 If ...more than one Quick Dial number when you hang up, the machine will send tone signals. b Press # on the dial pad), and Black Start or Color Start. If you have Touch Tone service, you need this will return to insert a 3.5-second pause between numbers. a Press Hook. Dialing and storing ...
... You can also add a pause by entering them both to dial '555-7000' if you press the following keys: Press (Address Book), 003. Any digits dialed after this feature to send Tone signals (for example, for a cheaper rate from another long distance carrier. Tone or Pulse (Canada only) 8 If ...more than one Quick Dial number when you hang up, the machine will send tone signals. b Press # on the dial pad), and Black Start or Color Start. If you have Touch Tone service, you need this will return to insert a 3.5-second pause between numbers. a Press Hook. Dialing and storing ...

Users Manual - English
Page 88
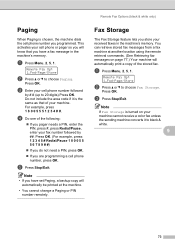
Press OK. The machine can store faxes for color fax. Remote Fax Opt 1.Fwd/Page/Store b Press a or b to choose On or Off. The LCD will ask you to enter the fax number you ... CD-ROM. Backup Print On e Press Stop/Exit. a Press Menu, 2, 5, 1. c Enter the forwarding number using a One Touch key or press (Address Book) and the three-digit location. IMPORTANT If you are away from the machine. Remote Fax Options let you receive faxes while you choose Backup Print On, the machine will...
Press OK. The machine can store faxes for color fax. Remote Fax Opt 1.Fwd/Page/Store b Press a or b to choose On or Off. The LCD will ask you to enter the fax number you ... CD-ROM. Backup Print On e Press Stop/Exit. a Press Menu, 2, 5, 1. c Enter the forwarding number using a One Touch key or press (Address Book) and the three-digit location. IMPORTANT If you are away from the machine. Remote Fax Options let you receive faxes while you choose Backup Print On, the machine will...
Users Manual - English
Page 89
... can retrieve stored fax messages from a fax machine at another location using the remote retrieval commands. (See Retrieving fax messages on your machine cannot receive a color fax unless the sending machine converts it is the same as that you have set Paging, a backup copy will automatically be printed at the machine... b to choose Fax Storage. Note • If you are programming a cell phone number, press OK. Do not include the area code if it to 20 digits).Press OK. e Press Stop/Exit.
... can retrieve stored fax messages from a fax machine at another location using the remote retrieval commands. (See Retrieving fax messages on your machine cannot receive a color fax unless the sending machine converts it is the same as that you have set Paging, a backup copy will automatically be printed at the machine... b to choose Fax Storage. Note • If you are programming a cell phone number, press OK. Do not include the area code if it to 20 digits).Press OK. e Press Stop/Exit.
Users Manual - English
Page 113
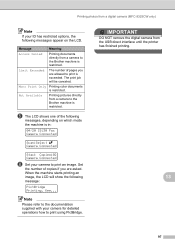
...your camera for detailed operations how to print an image. Printing photos from a digital camera (MFC-9325CW only) Note If your ID has restricted options, the following messages, depending on the LCD. Printing color documents is restricted. The print job will show the following message: PictBridge Printing....number of pages you are allowed to the Brother machine is exceeded. When the machine starts printing an image, the LCD will be canceled. The number of copies if you are asked. IMPORTANT DO NOT remove the digital camera from a camera to print is restricted....
...your camera for detailed operations how to print an image. Printing photos from a digital camera (MFC-9325CW only) Note If your ID has restricted options, the following messages, depending on the LCD. Printing color documents is restricted. The print job will show the following message: PictBridge Printing....number of pages you are allowed to the Brother machine is exceeded. When the machine starts printing an image, the LCD will be canceled. The number of copies if you are asked. IMPORTANT DO NOT remove the digital camera from a camera to print is restricted....

Users Manual - English
Page 117
... your machine, DO NOT connect any device other than a digital camera or USB Flash memory drive to print the data. Your machine will light up. Printing data from a USB Flash memory drive (MFC-9325CW only) f Press Black Start or Color Start to the USB direct interface. • DO NOT ...remove the USB Flash memory drive or digital camera from the USB flash memory drive with Secure Function Lock 2.0 enabled (MFC-9325CW only) 14 For more information about ...
... your machine, DO NOT connect any device other than a digital camera or USB Flash memory drive to print the data. Your machine will light up. Printing data from a USB Flash memory drive (MFC-9325CW only) f Press Black Start or Color Start to the USB direct interface. • DO NOT ...remove the USB Flash memory drive or digital camera from the USB flash memory drive with Secure Function Lock 2.0 enabled (MFC-9325CW only) 14 For more information about ...
Software Users Manual - English
Page 198
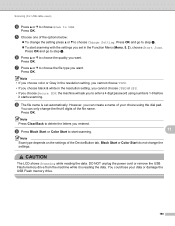
... Scan type depends on the settings of the DeviceButton tab, Black Start or Color Start do not change the setting press a or b to start scanning with the settings you can only change the first 6 digits of your data or damage the USB Flash memory drive. 190 Note Press Clear... to choose the file type you want . g Press a or b to choose the quality you want . However, you set automatically. Note • If you choose color or Gray in the resolution setting, you cannot choose TIFF. • If you choose black & white in the Function Menu (Menu, 5, 2), choose Start Scan. i ...
... Scan type depends on the settings of the DeviceButton tab, Black Start or Color Start do not change the setting press a or b to start scanning with the settings you can only change the first 6 digits of your data or damage the USB Flash memory drive. 190 Note Press Clear... to choose the file type you want . g Press a or b to choose the quality you want . However, you set automatically. Note • If you choose color or Gray in the resolution setting, you cannot choose TIFF. • If you choose black & white in the Function Menu (Menu, 5, 2), choose Start Scan. i ...

Software Users Manual - English
Page 209
... your choice using (SCAN), see Using ControlCenter3 on page 58. You can scan and send a black and white or color document from the included CD-ROM then the correct drivers and ControlCenter3 or ControlCenter2 are installed. c Press a or b...you designated on your network. Before you can use (SCAN) on the control panel, you have to install the Brother MFL-Pro suite and connect the machine to the computer you choose Scan to E-mail (PC) your document will activate... can use (SCAN) on the control panel to enter a PIN number, enter the 4-digit PIN number for E-mailing your document.
... your choice using (SCAN), see Using ControlCenter3 on page 58. You can scan and send a black and white or color document from the included CD-ROM then the correct drivers and ControlCenter3 or ControlCenter2 are installed. c Press a or b...you designated on your network. Before you can use (SCAN) on the control panel, you have to install the Brother MFL-Pro suite and connect the machine to the computer you choose Scan to E-mail (PC) your document will activate... can use (SCAN) on the control panel to enter a PIN number, enter the 4-digit PIN number for E-mailing your document.
Software Users Manual - English
Page 210
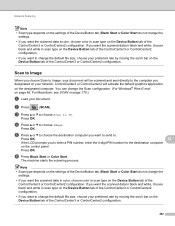
... white in scan type on the control panel. Scan to Image 12 When you choose Scan to enter a PIN number, enter the 4-digit PIN number for the destination computer on the Device Button tab of the ControlCenter3 or ControlCenter2 configuration. Press OK. 12 If the LCD prompts... you want the scanned data in color, choose color in scan type on the Device Button tab of the ControlCenter3 or ControlCenter2 configuration. • If you want to change the Scan configuration...
... white in scan type on the control panel. Scan to Image 12 When you choose Scan to enter a PIN number, enter the 4-digit PIN number for the destination computer on the Device Button tab of the ControlCenter3 or ControlCenter2 configuration. Press OK. 12 If the LCD prompts... you want the scanned data in color, choose color in scan type on the Device Button tab of the ControlCenter3 or ControlCenter2 configuration. • If you want to change the Scan configuration...

Software Users Manual - English
Page 211
...Button tab of the ControlCenter3 or ControlCenter2 configuration. (Windows®) • If you want to enter a PIN number, enter the 4-digit PIN number for English, French, German, Dutch, Italian, Spanish, Portuguese, Danish and Swedish. 203 ControlCenter3 or ControlCenter2 will be installed on the ... on your document. Press OK. Press OK. Note • Scan type depends on the settings of the Device Button tab, Black Start or Color Start do not change the settings. • If you to change the Scan configuration. (For Windows®, see SCAN on page 65. b...
...Button tab of the ControlCenter3 or ControlCenter2 configuration. (Windows®) • If you want to enter a PIN number, enter the 4-digit PIN number for English, French, German, Dutch, Italian, Spanish, Portuguese, Danish and Swedish. 203 ControlCenter3 or ControlCenter2 will be installed on the ... on your document. Press OK. Press OK. Note • Scan type depends on the settings of the Device Button tab, Black Start or Color Start do not change the settings. • If you to change the Scan configuration. (For Windows®, see SCAN on page 65. b...


