
Quick Setup Guide - English
Page 8
.... Will you be using your telephone? a Press Menu, 0, 1. c Press Stop/Exit. 8 Will you want to choose the receive mode. Brother uses the term "Distinctive Ring" but telephone companies may have other when receiving incoming calls. Your external telephone answering device (TAD) will conflict with ...other names for instructions on the same line as your receive mode. Do you be using Voice Mail on a dedicated fax line? Choose Manual as Custom Ringing, RingMaster, Personalized Ring, Teen Ring, Ident-A-Call, and Smart Ring. For details, see Using receive modes in Chapter...
.... Will you be using your telephone? a Press Menu, 0, 1. c Press Stop/Exit. 8 Will you want to choose the receive mode. Brother uses the term "Distinctive Ring" but telephone companies may have other when receiving incoming calls. Your external telephone answering device (TAD) will conflict with ...other names for instructions on the same line as your receive mode. Do you be using Voice Mail on a dedicated fax line? Choose Manual as Custom Ringing, RingMaster, Personalized Ring, Teen Ring, Ident-A-Call, and Smart Ring. For details, see Using receive modes in Chapter...

Quick Setup Guide - English
Page 29
... and can contain both numbers and letters. "Wirelesscomms" (this is a Wi-Fi Protected Access Pre-Shared Key, which lets the Brother wireless machine associate with your access point or wireless router, consult the router manufacturer, or your wireless access point/router in length, ... 29 "71f2234ab56cd709e5412aa3ba" 3 This is case sensitive) 128-bit Hexadecimal: Uses 26 digits of hexadecimal data e.g. For Wireless Network Users b Manual configuration from the control panel If your wireless access point/router does not support Wi-Fi Protected Setup (WPS) or AOSS™, write...
... and can contain both numbers and letters. "Wirelesscomms" (this is a Wi-Fi Protected Access Pre-Shared Key, which lets the Brother wireless machine associate with your access point or wireless router, consult the router manufacturer, or your wireless access point/router in length, ... 29 "71f2234ab56cd709e5412aa3ba" 3 This is case sensitive) 128-bit Hexadecimal: Uses 26 digits of hexadecimal data e.g. For Wireless Network Users b Manual configuration from the control panel If your wireless access point/router does not support Wi-Fi Protected Setup (WPS) or AOSS™, write...
Quick Setup Guide - English
Page 32
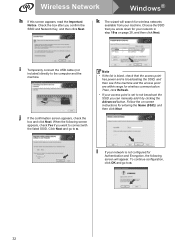
... the SSID that the access point has power and is not configured for Authentication and Encryption, the following screen appears, check Yes if you can manually add it by clicking the Advanced button. To continue configuration, click OK and go to the computer and the machine.
... the SSID that the access point has power and is not configured for Authentication and Encryption, the following screen appears, check Yes if you can manually add it by clicking the Advanced button. To continue configuration, click OK and go to the computer and the machine.

Quick Setup Guide - English
Page 33
... 28 and then enter the key again in Confirm Network Key, then click Next. Wireless Network Windows® m Enter the Network Key you want to manually enter the IP address settings of your machine, click Change IP Address and enter the necessary IP address settings for your network. • If the...
... 28 and then enter the key again in Confirm Network Key, then click Next. Wireless Network Windows® m Enter the Network Key you want to manually enter the IP address settings of your machine, click Change IP Address and enter the necessary IP address settings for your network. • If the...

Quick Setup Guide - English
Page 35
.... To install MFL-Pro Suite, continue to install MFL-Pro Suite. k Click Next. Note • If the list is blank, check that you can manually add it by clicking the Advanced button. i If your network is broadcasting the SSID, and then see if the machine and the access point are... within range for wireless networks available from your access point/router. Now go to manually enter the IP address settings of your machine. The settings will appear. Choose the SSID that the access point has power and is not configured...
.... To install MFL-Pro Suite, continue to install MFL-Pro Suite. k Click Next. Note • If the list is blank, check that you can manually add it by clicking the Advanced button. i If your network is broadcasting the SSID, and then see if the machine and the access point are... within range for wireless networks available from your access point/router. Now go to manually enter the IP address settings of your machine. The settings will appear. Choose the SSID that the access point has power and is not configured...
Quick Setup Guide - English
Page 36
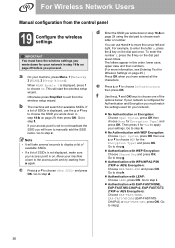
...number 3, press the 3 key on page 29 using the dial pad to move the cursor left and right. and press OK. For Wireless Network Users Manual configuration from the control panel 19 Configure the wireless settings IMPORTANT You must match the settings used for your access point is on. b The machine...? For example, to step f. f Use the a, b and OK keys to choose one of the options below: If your network is displayed, use a or b to manually add the SSID name. Go to the access point and try starting from the wireless setup wizard. Go to enter the letter a, press the 2 key...
...number 3, press the 3 key on page 29 using the dial pad to move the cursor left and right. and press OK. For Wireless Network Users Manual configuration from the control panel 19 Configure the wireless settings IMPORTANT You must match the settings used for your access point is on. b The machine...? For example, to step f. f Use the a, b and OK keys to choose one of the options below: If your network is displayed, use a or b to manually add the SSID name. Go to the access point and try starting from the wireless setup wizard. Go to enter the letter a, press the 2 key...

Quick Setup Guide - English
Page 37
... User's Guide for Yes to enter the letter a, press the 2 key on page 45.) Press OK when you have entered. You can use d or c to manually configure the IP address, subnet mask and gateway of your access point does not have DHCP enabled you have entered all the characters, then press...
... User's Guide for Yes to enter the letter a, press the 2 key on page 45.) Press OK when you have entered. You can use d or c to manually configure the IP address, subnet mask and gateway of your access point does not have DHCP enabled you have entered all the characters, then press...

Quick Setup Guide - English
Page 47
...right to change without notice in the United States and/or other countries. Windows Vista is a trademark of Brother Industries, Ltd., this manual has been compiled and published, covering the latest product descriptions and specifications. Wi-Fi and Wi-Fi Alliance are... trademarks or registered trademarks of those respective companies. Copyright and License ©2011 Brother Industries, Ltd. AOSS is either trademarks or ...
...right to change without notice in the United States and/or other countries. Windows Vista is a trademark of Brother Industries, Ltd., this manual has been compiled and published, covering the latest product descriptions and specifications. Wi-Fi and Wi-Fi Alliance are... trademarks or registered trademarks of those respective companies. Copyright and License ©2011 Brother Industries, Ltd. AOSS is either trademarks or ...

Users Manual - English
Page 5
... the specifications of this manual has been compiled and published, covering the latest product descriptions and specifications. THE EXCLUSION OF IMPLIED WARRANTIES IS NOT PERMITTED BY SOME STATES IN THE USA AND SOME PROVINCES IN CANADA. IN ANY EVENT BROTHER'S LICENSOR'S LIABILITY TO YOU ...the materials presented, including but not limited to typographical and other errors relating to make changes without notice. IN NO EVENT WILL BROTHER'S LICENSOR(S) BE LIABLE TO YOU FOR ANY CONSEQUENTIAL, INCIDENTAL OR INDIRECT DAMAGES (INCLUDING DAMAGES FOR LOSS OF BUSINESS PROFITS, BUSINESS INTERRUPTION...
... the specifications of this manual has been compiled and published, covering the latest product descriptions and specifications. THE EXCLUSION OF IMPLIED WARRANTIES IS NOT PERMITTED BY SOME STATES IN THE USA AND SOME PROVINCES IN CANADA. IN ANY EVENT BROTHER'S LICENSOR'S LIABILITY TO YOU ...the materials presented, including but not limited to typographical and other errors relating to make changes without notice. IN NO EVENT WILL BROTHER'S LICENSOR(S) BE LIABLE TO YOU FOR ANY CONSEQUENTIAL, INCIDENTAL OR INDIRECT DAMAGES (INCLUDING DAMAGES FOR LOSS OF BUSINESS PROFITS, BUSINESS INTERRUPTION...
Users Manual - English
Page 8
...Assistance or for labour and parts, Brother International Corporation (Canada) Ltd. ("Brother"), or its Authorized Service Centres, Distributors, Dealers, Agents or employees, shall create another warranty or modify this machine is available at Brother's sole discretion) this MFC/Fax machine shall be liable for ... above limitation of liability, such limitation, may not apply to you may void your Operation Manual for any failure of the MFC/Fax machine to operate properly. BROTHER MULTIFUNCTION CENTER / FAX MACHINE LIMITED WARRANTY (Canada only) Pursuant to the limited warranty of ...
...Assistance or for labour and parts, Brother International Corporation (Canada) Ltd. ("Brother"), or its Authorized Service Centres, Distributors, Dealers, Agents or employees, shall create another warranty or modify this machine is available at Brother's sole discretion) this MFC/Fax machine shall be liable for ... above limitation of liability, such limitation, may not apply to you may void your Operation Manual for any failure of the MFC/Fax machine to operate properly. BROTHER MULTIFUNCTION CENTER / FAX MACHINE LIMITED WARRANTY (Canada only) Pursuant to the limited warranty of ...

Users Manual - English
Page 9
...Using the documentation 2 Symbols and conventions used in the documentation 2 Accessing the Software User's Guide and Network User's Guide 3 Viewing documentation 3 Accessing Brother support (Windows 5 Control panel overview 6 Data LED indications 10 2 Loading paper and documents 11 Loading paper and print media 11 Loading paper in ...the standard paper tray 11 Loading paper in the manual feed slot 13 Unprintable area 17 Acceptable paper and other print media 18 Recommended paper and print media 18 Type and ...
...Using the documentation 2 Symbols and conventions used in the documentation 2 Accessing the Software User's Guide and Network User's Guide 3 Viewing documentation 3 Accessing Brother support (Windows 5 Control panel overview 6 Data LED indications 10 2 Loading paper and documents 11 Loading paper and print media 11 Loading paper in ...the standard paper tray 11 Loading paper in the manual feed slot 13 Unprintable area 17 Acceptable paper and other print media 18 Recommended paper and print media 18 Type and ...

Users Manual - English
Page 10
4 Security features 29 Secure Function Lock 2.0 (MFC-9325CW only 29 Setting the password for the administrator 29 Changing the password for the administrator 30 Setting up the public user mode 30 Setting up restricted users 31 Turning Secure Function Lock on/off 31 Switching Users 32 Memory Security (MFC-9125CN only 32 Setting up... 43 Overseas Mode 44 Delayed Fax (black & white only 44 Delayed batch transmission (black & white only 44 Checking and canceling waiting jobs 45 Sending a fax manually 45 Sending a fax at the end of a conversation 45 Out of memory message 45 viii
4 Security features 29 Secure Function Lock 2.0 (MFC-9325CW only 29 Setting the password for the administrator 29 Changing the password for the administrator 30 Setting up the public user mode 30 Setting up restricted users 31 Turning Secure Function Lock on/off 31 Switching Users 32 Memory Security (MFC-9125CN only 32 Setting up... 43 Overseas Mode 44 Delayed Fax (black & white only 44 Delayed batch transmission (black & white only 44 Checking and canceling waiting jobs 45 Sending a fax manually 45 Sending a fax at the end of a conversation 45 Out of memory message 45 viii

Users Manual - English
Page 11
6 Receiving a fax 46 Choose the correct Receive Mode 46 Using receive modes 48 Fax Only ...48 Fax/Tel...48 Manual...48 External TAD 48 Receive Mode settings 49 Ring Delay ...49 F/T Ring Time (Fax/Tel mode only 49 Easy Receive 50 Setting the Print Density ... and extension telephones 60 Using external and extension telephones 60 For Fax/Tel mode only 61 Connecting an external or extension telephone 61 Using a non-Brother cordless external handset 61 Using Remote Codes 61 ix
6 Receiving a fax 46 Choose the correct Receive Mode 46 Using receive modes 48 Fax Only ...48 Fax/Tel...48 Manual...48 External TAD 48 Receive Mode settings 49 Ring Delay ...49 F/T Ring Time (Fax/Tel mode only 49 Easy Receive 50 Setting the Print Density ... and extension telephones 60 Using external and extension telephones 60 For Fax/Tel mode only 61 Connecting an external or extension telephone 61 Using a non-Brother cordless external handset 61 Using Remote Codes 61 ix
Users Manual - English
Page 12
8 Dialing and storing numbers 63 How to dial ...63 Manual dialing 63 One touch dialing 63 Speed dialing 63 Search ...64 Fax redial ...64 Storing numbers 64 Storing a pause 64 Storing One Touch Dial numbers ...
8 Dialing and storing numbers 63 How to dial ...63 Manual dialing 63 One touch dialing 63 Speed dialing 63 Search ...64 Fax redial ...64 Storing numbers 64 Storing a pause 64 Storing One Touch Dial numbers ...

Users Manual - English
Page 15
Cleaning the paper pick-up rollers 166 Calibration 167 Auto Registration 168 Manual Registration 168 Frequency (Color Correction 168 Replacing the consumable items 169 Replacing a Toner cartridge 171 Drum units 176 Replacing the...media...223 Fax...224 Copy ...225 Scan ...226 Print ...227 Interfaces ...228 PictBridge (MFC-9325CW 229 Direct Print feature (MFC-9325CW 230 Computer requirements 231 Consumable items 232 Ethernet wired network 233 Ethernet wireless network (MFC-9325CW 235 Authentication and encryption for wireless users only 237 Wireless one-push configuration 239 F ...
Cleaning the paper pick-up rollers 166 Calibration 167 Auto Registration 168 Manual Registration 168 Frequency (Color Correction 168 Replacing the consumable items 169 Replacing a Toner cartridge 171 Drum units 176 Replacing the...media...223 Fax...224 Copy ...225 Scan ...226 Print ...227 Interfaces ...228 PictBridge (MFC-9325CW 229 Direct Print feature (MFC-9325CW 230 Computer requirements 231 Consumable items 232 Ethernet wired network 233 Ethernet wireless network (MFC-9325CW 235 Authentication and encryption for wireless users only 237 Wireless one-push configuration 239 F ...

Users Manual - English
Page 24
... One Touch numbers 5 to the machine. To cancel multiple print jobs, hold down Shift as you press Secure. (See Secure Function Lock 2.0 (MFC-9325CW only) on the machine status. 4 Error LED Blinks in the dialing memory. Press to scroll backwards or forwards through the menus and options. Redial...number manually. Volume keys: d or c Press to change the quality for copying. It also lets dial stored numbers by holding down this key after you cancel the current setting. OK Lets you want to help you set up and use your settings in the machine. Print keys: Direct (MFC-9325CW) ...
... One Touch numbers 5 to the machine. To cancel multiple print jobs, hold down Shift as you press Secure. (See Secure Function Lock 2.0 (MFC-9325CW only) on the machine status. 4 Error LED Blinks in the dialing memory. Press to scroll backwards or forwards through the menus and options. Redial...number manually. Volume keys: d or c Press to change the quality for copying. It also lets dial stored numbers by holding down this key after you cancel the current setting. OK Lets you want to help you set up and use your settings in the machine. Print keys: Direct (MFC-9325CW) ...
Users Manual - English
Page 29
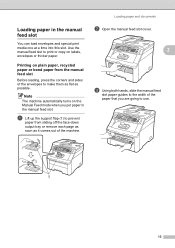
... loading, press the corners and sides of the envelopes to the width of the machine. Loading paper and documents b Open the manual feed slot cover. 2 c Using both hands, slide the manual feed slot paper guides to make them as flat as it comes out of the paper that you are going to... print or copy on the Manual Feed mode when you put paper in the manual feed slot 2 You can load envelopes and special print media one at a time into this slot. Use the...
... loading, press the corners and sides of the envelopes to the width of the machine. Loading paper and documents b Open the manual feed slot cover. 2 c Using both hands, slide the manual feed slot paper guides to make them as flat as it comes out of the paper that you are going to... print or copy on the Manual Feed mode when you put paper in the manual feed slot 2 You can load envelopes and special print media one at a time into this slot. Use the...
Users Manual - English
Page 30
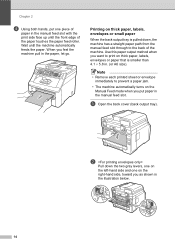
... the paper feed roller. Printing on thick paper, labels, envelopes or small paper 2 When the back output tray is smaller than 4.1 5.8 in the manual feed slot. a Open the back cover (back output tray). b Pull down , the machine has a straight paper path from the...slot through to prevent a paper jam. • The machine automatically turns on the right-hand side, toward you feel the machine pull in the manual feed slot with the print side face up until the machine automatically feeds the paper. Note • Remove each printed sheet or envelope immediately to ...
... the paper feed roller. Printing on thick paper, labels, envelopes or small paper 2 When the back output tray is smaller than 4.1 5.8 in the manual feed slot. a Open the back cover (back output tray). b Pull down , the machine has a straight paper path from the...slot through to prevent a paper jam. • The machine automatically turns on the right-hand side, toward you feel the machine pull in the manual feed slot with the print side face up until the machine automatically feeds the paper. Note • Remove each printed sheet or envelope immediately to ...
Users Manual - English
Page 31
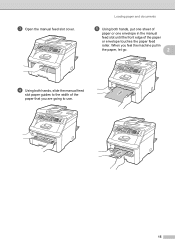
Loading paper and documents e Using both hands, slide the manual feed slot paper guides to use. 15 When you are going to the width of the paper that you feel the machine pull in the paper, let go. 2 d Using both hands, put one sheet of paper or one envelope in the manual feed slot until the front edge of the paper or envelope touches the paper feed roller. c Open the manual feed slot cover.
Loading paper and documents e Using both hands, slide the manual feed slot paper guides to use. 15 When you are going to the width of the paper that you feel the machine pull in the paper, let go. 2 d Using both hands, put one sheet of paper or one envelope in the manual feed slot until the front edge of the paper or envelope touches the paper feed roller. c Open the manual feed slot cover.
Users Manual - English
Page 32
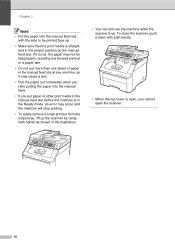
.... • If you cannot open , you put more than one sheet of paper in the manual feed slot at any one time, as it down with the side to be printed face up. • Make sure that the print media is ..., the paper may not be fed properly, resulting in a skewed printout or a paper jam. • Do not put paper or other print media in the manual feed slot before the machine is up the scanner by using both hands as shown in the proper position on the...
.... • If you cannot open , you put more than one sheet of paper in the manual feed slot at any one time, as it down with the side to be printed face up. • Make sure that the print media is ..., the paper may not be fed properly, resulting in a skewed printout or a paper jam. • Do not put paper or other print media in the manual feed slot before the machine is up the scanner by using both hands as shown in the proper position on the...


