Quick Setup Guide - English
Page 1
... and check the components CD-ROM Waste Toner Box (pre-installed) User's Guide Product Registration Sheet (USA only) Quick Setup Guide AC Power Cord Telephone Line Cord Belt Unit (pre-installed) Drum Unit and Starter Toner Cartridge Assemblies (Black, Cyan, Magenta and Yellow) USA/CAN...serious injuries. Quick Setup Guide Start Here MFC-9325CW Thank you should respond to a situation that may result in damage to property or loss of product functionality. Before using the machine, please read this Quick Setup Guide for choosing Brother, your business. WARNING WARNING indicates a ...
... and check the components CD-ROM Waste Toner Box (pre-installed) User's Guide Product Registration Sheet (USA only) Quick Setup Guide AC Power Cord Telephone Line Cord Belt Unit (pre-installed) Drum Unit and Starter Toner Cartridge Assemblies (Black, Cyan, Magenta and Yellow) USA/CAN...serious injuries. Quick Setup Guide Start Here MFC-9325CW Thank you should respond to a situation that may result in damage to property or loss of product functionality. Before using the machine, please read this Quick Setup Guide for choosing Brother, your business. WARNING WARNING indicates a ...
Quick Setup Guide - English
Page 2
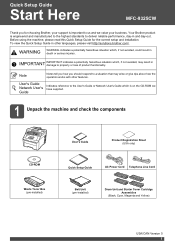
... your country. • Save all packing materials and the box in the packaging of your computer and not to a USB port on a keyboard or non-powered USB hub. Be careful not to pinch your machine. • The interface cable is done during MFL-Pro installation process. • When you use a USB...
... your country. • Save all packing materials and the box in the packaging of your computer and not to a USB port on a keyboard or non-powered USB hub. Be careful not to pinch your machine. • The interface cable is done during MFL-Pro installation process. • When you use a USB...

Quick Setup Guide - English
Page 3
... the packing tape from the outside of the drum unit. 3 b Remove the protective cover by lifting up on the tab as shown in the AC power cord yet. 3 Install the drum unit and toner cartridge assemblies a Unpack the four drum unit and toner cartridge assemblies and gently shake each of them...
... the packing tape from the outside of the drum unit. 3 b Remove the protective cover by lifting up on the tab as shown in the AC power cord yet. 3 Install the drum unit and toner cartridge assemblies a Unpack the four drum unit and toner cartridge assemblies and gently shake each of them...
Quick Setup Guide - English
Page 5
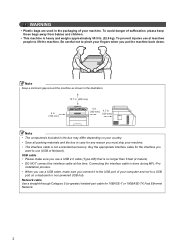
... to be printed on must be face down output tray. Turn the power switch on the machine marked LINE and the other end to a modular wall jack. 1 5 Connect one end of the paper so it is below the ... the paper tray firmly back in the tray, and make sure that the machine's power switch is off the face-down . 5 Connect the power cord and telephone line IMPORTANT DO NOT connect the interface cable yet. b Plug the AC power cord into the machine. a Make sure that the paper is completely inserted into...
... to be printed on must be face down output tray. Turn the power switch on the machine marked LINE and the other end to a modular wall jack. 1 5 Connect one end of the paper so it is below the ... the paper tray firmly back in the tray, and make sure that the machine's power switch is off the face-down . 5 Connect the power cord and telephone line IMPORTANT DO NOT connect the interface cable yet. b Plug the AC power cord into the machine. a Make sure that the paper is completely inserted into...
Quick Setup Guide - English
Page 6
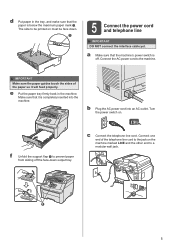
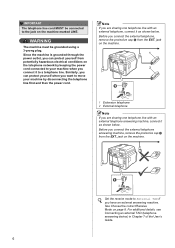
...on page 8. Note If you are sharing one telephone line with an external telephone, connect it to move your machine by keeping the power cord connected to your machine when you connect the external telephone, remove the protective cap a from the EXT. See Choose the correct ...are sharing one telephone line with an external telephone answering machine, connect it as shown below . Since the machine is grounded through the power outlet, you can protect yourself when you connect the external telephone answering machine, remove the protective cap a from the EXT. For additional ...
...on page 8. Note If you are sharing one telephone line with an external telephone, connect it to move your machine by keeping the power cord connected to your machine when you connect the external telephone, remove the protective cap a from the EXT. See Choose the correct ...are sharing one telephone line with an external telephone answering machine, connect it as shown below . Since the machine is grounded through the power outlet, you can protect yourself when you connect the external telephone answering machine, remove the protective cap a from the EXT. For additional ...

Quick Setup Guide - English
Page 16
Turn the power switch on -screen instructions. IMPORTANT DO NOT cancel any of the screens during the installation. Then connect the cable to ... to a USB port on the machine marked with the symbol. b Connect the USB cable to the USB connector on a keyboard or a non-powered USB hub. • Connect the machine directly to your selection and follow the on . It may take a few seconds for all screens to...For Windows Vista® and Windows® 7, when this window. a Remove the label covering the USB interface connector. 20 Connect the power cord a Plug the AC power cord into an AC outlet.
Turn the power switch on -screen instructions. IMPORTANT DO NOT cancel any of the screens during the installation. Then connect the cable to ... to a USB port on the machine marked with the symbol. b Connect the USB cable to the USB connector on a keyboard or a non-powered USB hub. • Connect the machine directly to your selection and follow the on . It may take a few seconds for all screens to...For Windows Vista® and Windows® 7, when this window. a Remove the label covering the USB interface connector. 20 Connect the power cord a Plug the AC power cord into an AC outlet.
Quick Setup Guide - English
Page 18
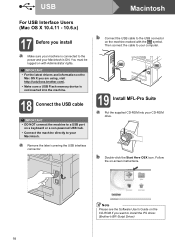
... rights. Note Please see the Software User's Guide on -screen instructions. b Connect the USB cable to the USB connector on a keyboard or a non-powered USB hub. • Connect the machine directly to your CD-ROM drive. b Double-click the Start Here OSX icon. IMPORTANT • For the latest... drivers and information on with the symbol. You must be logged on the Mac OS X you are using, visit http://solutions.brother.com/. • Make sure a USB Flash memory device is ON. USB Macintosh For USB Interface Users (Mac OS X 10.4.11 - 10.6.x) 17 ...
... rights. Note Please see the Software User's Guide on -screen instructions. b Connect the USB cable to the USB connector on a keyboard or a non-powered USB hub. • Connect the machine directly to your CD-ROM drive. b Double-click the Start Here OSX icon. IMPORTANT • For the latest... drivers and information on with the symbol. You must be logged on the Mac OS X you are using, visit http://solutions.brother.com/. • Make sure a USB Flash memory device is ON. USB Macintosh For USB Interface Users (Mac OS X 10.4.11 - 10.6.x) 17 ...
Quick Setup Guide - English
Page 20
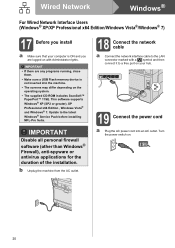
...or greater), XP Professional x64 Edition , Windows Vista® and Windows® 7. IMPORTANT • If there are logged on . 20 Turn the power switch on with a symbol and then connect it to the latest Windows® Service Pack before installing MFL-Pro Suite. Wired Network Windows® .../XP Professional x64 Edition/Windows Vista®/Windows® 7) 17 Before you install a Make sure that your hub. 19 Connect the power cord a Plug the AC power cord into the machine. • The screens may differ depending on the operating system. • The supplied CD-ROM includes ScanSoft&#...
...or greater), XP Professional x64 Edition , Windows Vista® and Windows® 7. IMPORTANT • If there are logged on . 20 Turn the power switch on with a symbol and then connect it to the latest Windows® Service Pack before installing MFL-Pro Suite. Wired Network Windows® .../XP Professional x64 Edition/Windows Vista®/Windows® 7) 17 Before you install a Make sure that your hub. 19 Connect the power cord a Plug the AC power cord into the machine. • The screens may differ depending on the operating system. • The supplied CD-ROM includes ScanSoft&#...
Quick Setup Guide - English
Page 25
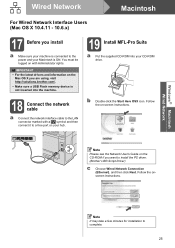
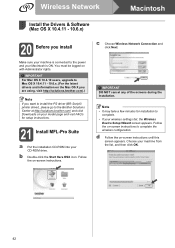
...Network Connection (Ethernet), and then click Next. Follow the onscreen instructions. You must be logged on with a symbol and then connect it to the power and your Macintosh is ON. b Double-click the Start Here OSX icon. IMPORTANT • For the latest drivers and information on the Mac ...OS X you are using, visit http://solutions.brother.com/. • Make sure a USB Flash memory device is not inserted into your CD-ROM drive. Follow the on-screen instructions. Windows® ...
...Network Connection (Ethernet), and then click Next. Follow the onscreen instructions. You must be logged on with a symbol and then connect it to the power and your Macintosh is ON. b Double-click the Start Here OSX icon. IMPORTANT • For the latest drivers and information on the Mac ...OS X you are using, visit http://solutions.brother.com/. • Make sure a USB Flash memory device is not inserted into your CD-ROM drive. Follow the on-screen instructions. Windows® ...
Quick Setup Guide - English
Page 32
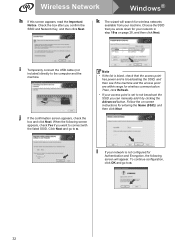
...) directly to not broadcast the SSID you confirm the SSID and Network Key, and then click Next. Choose the SSID that the access point has power and is set to the computer and the machine. k The wizard will appear. Note • If the list is blank, check that you want to...
...) directly to not broadcast the SSID you confirm the SSID and Network Key, and then click Next. Choose the SSID that the access point has power and is set to the computer and the machine. k The wizard will appear. Note • If the list is blank, check that you want to...

Quick Setup Guide - English
Page 35
... for wireless networks available from your network. • If the wireless setup failure screen appears, click Retry. Choose the SSID that the access point has power and is set to install MFL-Pro Suite. j Enter the Network Key you want to page 42 Windows® Macintosh Wireless Network 35 Wireless setup...
... for wireless networks available from your network. • If the wireless setup failure screen appears, click Retry. Choose the SSID that the access point has power and is set to install MFL-Pro Suite. j Enter the Network Key you want to page 42 Windows® Macintosh Wireless Network 35 Wireless setup...
Quick Setup Guide - English
Page 42
... - 10.6.x. (For the latest drivers and information on the Mac OS X you are using, visit http://solutions.brother.com/.) Note If you install Make sure your machine is connected to the power and your machine from the list, and then click OK. 42 c Choose Wireless Network Connection and click Next....Mac OS X 10.4.11 - 10.6.x) 20 Before you want to install the PS driver (BR-Script3 printer driver), please go to the Brother Solutions Center at http://solutions.brother.com/ and click Downloads on your model page and visit FAQ's for installation to complete. • If your CD-ROM drive. b ...
... - 10.6.x. (For the latest drivers and information on the Mac OS X you are using, visit http://solutions.brother.com/.) Note If you install Make sure your machine is connected to the power and your machine from the list, and then click OK. 42 c Choose Wireless Network Connection and click Next....Mac OS X 10.4.11 - 10.6.x) 20 Before you want to install the PS driver (BR-Script3 printer driver), please go to the Brother Solutions Center at http://solutions.brother.com/ and click Downloads on your model page and visit FAQ's for installation to complete. • If your CD-ROM drive. b ...
Quick Setup Guide - English
Page 44
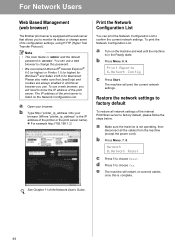
...Turn on the Network Configuration List. The machine will need to know the IP address of the internal Print/Scan server to factory default, please follow the steps below. Network 0.Network Reset c Press... of the Network User's Guide. 44 For Network Users Web Based Management (web browser) The Brother print server is equipped with a web server that JavaScript and cookies are always enabled in the ...use a web browser to factory default To restore all the cables from the machine (except the power cord). The IP address of its status or change this is complete. b Press Menu, 6,...
...Turn on the Network Configuration List. The machine will need to know the IP address of the internal Print/Scan server to factory default, please follow the steps below. Network 0.Network Reset c Press... of the Network User's Guide. 44 For Network Users Web Based Management (web browser) The Brother print server is equipped with a web server that JavaScript and cookies are always enabled in the ...use a web browser to factory default To restore all the cables from the machine (except the power cord). The IP address of its status or change this is complete. b Press Menu, 6,...
Users Manual - English
Page 26
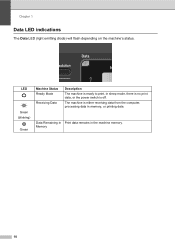
Memory 10 Data Remaining in Print data remains in memory, or printing data. LED Green (blinking) Green Machine Status Ready Mode Receiving Data Description The machine is ready to print, in sleep mode, there is no print data, or the power switch is either receiving data from the computer, processing data in the machine memory. The machine is off. Chapter 1 Data LED indications 1 The Data LED (light emitting diode) will flash depending on the machine's status.
Memory 10 Data Remaining in Print data remains in memory, or printing data. LED Green (blinking) Green Machine Status Ready Mode Receiving Data Description The machine is ready to print, in sleep mode, there is no print data, or the power switch is either receiving data from the computer, processing data in the machine memory. The machine is off. Chapter 1 Data LED indications 1 The Data LED (light emitting diode) will flash depending on the machine's status.
Users Manual - English
Page 43
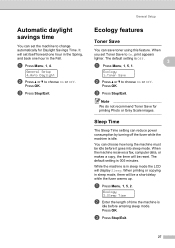
... Sleep Time setting can choose how long the machine must be idle before entering sleep mode. c Press Stop/Exit. 27 Press OK. You can reduce power consumption by turning off the fuser while the machine is idle. When the machine receives a fax, computer data, or makes a copy, the timer will be...
... Sleep Time setting can choose how long the machine must be idle before entering sleep mode. c Press Stop/Exit. 27 Press OK. You can reduce power consumption by turning off the fuser while the machine is idle. When the machine receives a fax, computer data, or makes a copy, the timer will be...

Users Manual - English
Page 49
... Security 1.Mem Security b Enter a four-digit number for the new password. The machine goes offline and the LCD shows Secure Mode. Note If there is a power failure the data will stay in Secure Mode until the registered password is automatically turned off a Press Menu. Note If you enter the wrong password...to choose Set Security. Press OK. Security features Setting up to set it, again. • If you forget the Memory Security password, please call Brother Customer Service (See Brother numbers on page i.). e Re-enter the password when the LCD shows Verify:. Press OK.
... Security 1.Mem Security b Enter a four-digit number for the new password. The machine goes offline and the LCD shows Secure Mode. Note If there is a power failure the data will stay in Secure Mode until the registered password is automatically turned off a Press Menu. Note If you enter the wrong password...to choose Set Security. Press OK. Security features Setting up to set it, again. • If you forget the Memory Security password, please call Brother Customer Service (See Brother numbers on page i.). e Re-enter the password when the LCD shows Verify:. Press OK.
Users Manual - English
Page 80
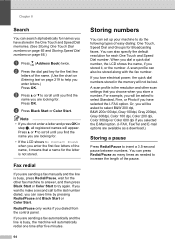
... of the name, it , or the number. You can press Redial/Pause as many times as needed to the last number dialed, you lose electrical power, the quick dial numbers stored in the One Touch and Speed Dial memories. (See Storing One Touch Dial numbers on page 65 and Storing Speed...
... of the name, it , or the number. You can press Redial/Pause as many times as needed to the last number dialed, you lose electrical power, the quick dial numbers stored in the One Touch and Speed Dial memories. (See Storing One Touch Dial numbers on page 65 and Storing Speed...

Users Manual - English
Page 88
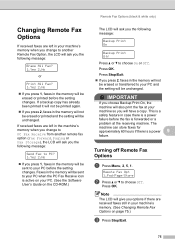
... your received faxes to . Press OK. d Press a or b to choose Fax Forward. Press OK. This is a safety feature in case there is a power failure before the fax is a power failure. 72 9 Remote Fax Options (black & white only) 9 Remote Fax Options ARE NOT available for color fax. c Enter the forwarding number using the...
... your received faxes to . Press OK. d Press a or b to choose Fax Forward. Press OK. This is a safety feature in case there is a power failure before the fax is a power failure. 72 9 Remote Fax Options (black & white only) 9 Remote Fax Options ARE NOT available for color fax. c Enter the forwarding number using the...
Users Manual - English
Page 90
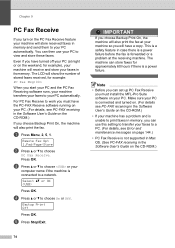
... the receiving machine. Select ab or OK Press OK. e Press Stop/Exit. Note • Before you can use your computer name if the machine is a power failure. You can store faxes for approximately 60 hours if there is connected to print faxes in its memory. The LCD will have the PC... Software User's Guide on your PC. c Press a or b to choose or your PC to your PC automatically. This is a safety feature in case there is a power failure before the fax is not supported in Mac OS. (See PC-FAX receiving in the Software User's Guide on the weekend, for example: PC...
... the receiving machine. Select ab or OK Press OK. e Press Stop/Exit. Note • Before you can use your computer name if the machine is a power failure. You can store faxes for approximately 60 hours if there is connected to print faxes in its memory. The LCD will have the PC... Software User's Guide on your PC. c Press a or b to choose or your PC to your PC automatically. This is a safety feature in case there is a power failure before the fax is not supported in Mac OS. (See PC-FAX receiving in the Software User's Guide on the weekend, for example: PC...
Users Manual - English
Page 91
... on your PC. (See the Software User's Guide on page 75.) c Press Stop/Exit. 75 This is a safety feature in case there is a power failure before the fax is a power 9 failure. Press OK. If a backup copy has already been printed it will not be printed again. If you press 2, faxes in...
... on your PC. (See the Software User's Guide on page 75.) c Press Stop/Exit. 75 This is a safety feature in case there is a power failure before the fax is a power 9 failure. Press OK. If a backup copy has already been printed it will not be printed again. If you press 2, faxes in...


