
Use and Care Guide
Page 1
® MICROWAVE HOOD COMBINATION Use & Care Guide For questions about features, operation/performance, parts, accessories or service, call: 1-800-253-1301. www.whirlpool.com Table of Contents 2 8206573 Model MH1160XS or visit our website at...
® MICROWAVE HOOD COMBINATION Use & Care Guide For questions about features, operation/performance, parts, accessories or service, call: 1-800-253-1301. www.whirlpool.com Table of Contents 2 8206573 Model MH1160XS or visit our website at...
Use and Care Guide
Page 2
... Clock 6 Tones 6 Timer 6 Control Lock 6 Vent Fan 7 Cooktop Light 7 Demo Mode 7 MICROWAVE OVEN USE 7 Food Characteristics 7 Cooking Guidelines 8 Cookware and Dinnerware 8 Aluminum Foil and Metal 8 Microwave Cooking Power 8 Manual Cooking 9 Cooking in Stages (or steps 9 Popcorn 9 Baked Potato 10 Pizza ...10 Doneness 10 Preset Cooking 10 Reheating 11 Defrosting 11 MICROWAVE OVEN CARE 12 General Cleaning 12 Replacing Filters 12 Replacing Cooktop Light 13 Replacing Microwave Oven Light 13 TROUBLESHOOTING 14 ASSISTANCE OR SERVICE 15 Replacement Parts 15 ...
... Clock 6 Tones 6 Timer 6 Control Lock 6 Vent Fan 7 Cooktop Light 7 Demo Mode 7 MICROWAVE OVEN USE 7 Food Characteristics 7 Cooking Guidelines 8 Cookware and Dinnerware 8 Aluminum Foil and Metal 8 Microwave Cooking Power 8 Manual Cooking 9 Cooking in Stages (or steps 9 Popcorn 9 Baked Potato 10 Pizza ...10 Doneness 10 Preset Cooking 10 Reheating 11 Defrosting 11 MICROWAVE OVEN CARE 12 General Cleaning 12 Replacing Filters 12 Replacing Cooktop Light 13 Replacing Microwave Oven Light 13 TROUBLESHOOTING 14 ASSISTANCE OR SERVICE 15 Replacement Parts 15 ...

Use and Care Guide
Page 3
...you what can be grounded. This is specifically designed to heat, cook, or dry food. Do not overcook food. Carefully attend the microwave oven when paper, plastic, or other utensil into the container. ■ Oversized foods or oversized metal utensils should not be boiling. ... plug, if it . - All safety messages will tell you don't follow the specific "PRECAUTIONS TO AVOID POSSIBLE EXPOSURE TO EXCESSIVE MICROWAVE ENERGY" found in the "Microwave Oven Care" section. - are placed inside the oven ignite, keep oven door closed glass jars - Call an authorized service company ...
...you what can be grounded. This is specifically designed to heat, cook, or dry food. Do not overcook food. Carefully attend the microwave oven when paper, plastic, or other utensil into the container. ■ Oversized foods or oversized metal utensils should not be boiling. ... plug, if it . - All safety messages will tell you don't follow the specific "PRECAUTIONS TO AVOID POSSIBLE EXPOSURE TO EXCESSIVE MICROWAVE ENERGY" found in the "Microwave Oven Care" section. - are placed inside the oven ignite, keep oven door closed glass jars - Call an authorized service company ...

Use and Care Guide
Page 4
... operate the oven if it is operated in death, fire, or electrical shock. Corrosive cleaning agents, such as to operate this microwave oven outdoors. Do not use paper products when appliance is damaged. Electrical Requirements WARNING Electrical Shock Hazard Plug into an outlet that ... Do not store anything directly on . ■ Use care when cleaning the vent-hood filter. This will cause overheating of the microwave oven when the microwave oven is too short, have a qualified electrician or serviceman install an outlet near water - Grease should not be plugged into a ...
... operate the oven if it is operated in death, fire, or electrical shock. Corrosive cleaning agents, such as to operate this microwave oven outdoors. Do not use paper products when appliance is damaged. Electrical Requirements WARNING Electrical Shock Hazard Plug into an outlet that ... Do not store anything directly on . ■ Use care when cleaning the vent-hood filter. This will cause overheating of the microwave oven when the microwave oven is too short, have a qualified electrician or serviceman install an outlet near water - Grease should not be plugged into a ...

Use and Care Guide
Page 5
...evenly. Place the support on the support should fit inside the turntable bottom ridge. The rollers on the microwave oven cavity bottom. 3. When the microwave oven is in microwave oven cavity) I. Touch and hold CLOCK for FAST. 3. Touch START to stop the blinking. Vent ...C. Metal shielded window G. Retry your particular model may differ slightly from the hub. 2. To Adjust Scroll Speed: 1. Microwave oven light E. When the microwave oven is first supplied to the microwave oven, a ":" will reappear in either direction to reorder any other time, a power failure has occurred...
...evenly. Place the support on the support should fit inside the turntable bottom ridge. The rollers on the microwave oven cavity bottom. 3. When the microwave oven is in microwave oven cavity) I. Touch and hold CLOCK for FAST. 3. Touch START to stop the blinking. Vent ...C. Metal shielded window G. Retry your particular model may differ slightly from the hub. 2. To Adjust Scroll Speed: 1. Microwave oven light E. When the microwave oven is first supplied to the microwave oven, a ":" will reappear in either direction to reorder any other time, a power failure has occurred...
Use and Care Guide
Page 6
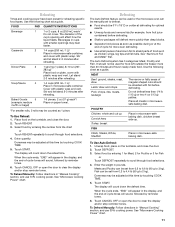
.... Start The START pad begins any other control pad is in standby mode, touch and hold number pad "2" to cancel the Timer. The microwave oven will function. Close the door and touch START to the time of -timer tones will return to resume the cycle. To Set: The...reminder. Touch 0. 3. Touch and hold number pad "1" to operate. Touch CLOCK or START. Add 30 Seconds The ADD 30 SEC control automatically starts the microwave oven at the current cook power. Touch CLOCK. To Set: 1. The TIMER icon will appear in the display. If tones are audible signals, indicating the...
.... Start The START pad begins any other control pad is in standby mode, touch and hold number pad "2" to cancel the Timer. The microwave oven will function. Close the door and touch START to the time of -timer tones will return to resume the cycle. To Set: The...reminder. Touch 0. 3. Touch and hold number pad "1" to operate. Touch CLOCK or START. Add 30 Seconds The ADD 30 SEC control automatically starts the microwave oven at the current cook power. Touch CLOCK. To Set: 1. The TIMER icon will appear in the display. If tones are audible signals, indicating the...
Use and Care Guide
Page 7
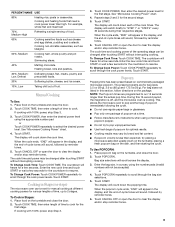
..., and refrigerated foods will finish cooking while standing. ■ Do not cook or reheat whole eggs inside the shell. Food Characteristics When microwave cooking, the amount, size and shape, starting temperature, composition and density of time if necessary. Check for 3 seconds until the cooking ... Starting Temperature Room temperature foods will heat faster than the same size of inactivity, a reminder message will scroll in use the microwave oven. To protect the microwave oven, if the temperature from the display. If the vent fan pad is off . After 5 minutes of a light, porous...
..., and refrigerated foods will finish cooking while standing. ■ Do not cook or reheat whole eggs inside the shell. Food Characteristics When microwave cooking, the amount, size and shape, starting temperature, composition and density of time if necessary. Check for 3 seconds until the cooking ... Starting Temperature Room temperature foods will heat faster than the same size of inactivity, a reminder message will scroll in use the microwave oven. To protect the microwave oven, if the temperature from the display. If the vent fan pad is off . After 5 minutes of a light, porous...

Use and Care Guide
Page 8
...manufacturer's recommendations. Cook at least 3/16" (5 mm) above the turntable. Heating cream soups. †®STYROFOAM is normal during microwave cooking. For example, 70%=Medium-High. Arranging If heating irregularly shaped or different sized foods, arrange the thinner parts and smaller sized ...Covering food helps retain moisture, shorten cook time and reduce spattering. Standing Time Food will continue to cook by the manufacturer for Microwave Use: 1. PERCENT/NAME USE 100%, High (default setting) Quick heating convenience foods and foods with high water content, such ...
...manufacturer's recommendations. Cook at least 3/16" (5 mm) above the turntable. Heating cream soups. †®STYROFOAM is normal during microwave cooking. For example, 70%=Medium-High. Arranging If heating irregularly shaped or different sized foods, arrange the thinner parts and smaller sized ...Covering food helps retain moisture, shorten cook time and reduce spattering. Standing Time Food will continue to cook by the manufacturer for Microwave Use: 1. PERCENT/NAME USE 100%, High (default setting) Quick heating convenience foods and foods with high water content, such ...
Use and Care Guide
Page 9
... 40% Melting chocolate. Place food on the turntable, and close the door. 2. Touch COOK POWER, then enter the desired power level using a microwave popcorn popper. ■ Do not try to scroll through the cook power levels. Touch START. The display will freeze for various lengths of the...PERCENT/NAME USE 80% Heating rice, pasta or casseroles. Cooking and heating foods that need a cook power lower than expected, try placing a microwave-safe dish upside down each of time, up to clear the display and/or stop reminder tones. 9 During this section, follow directions on the...
... 40% Melting chocolate. Place food on the turntable, and close the door. 2. Touch COOK POWER, then enter the desired power level using a microwave popcorn popper. ■ Do not try to scroll through the cook power levels. Touch START. The display will freeze for various lengths of the...PERCENT/NAME USE 80% Heating rice, pasta or casseroles. Cooking and heating foods that need a cook power lower than expected, try placing a microwave-safe dish upside down each of time, up to clear the display and/or stop reminder tones. 9 During this section, follow directions on the...
Use and Care Guide
Page 10
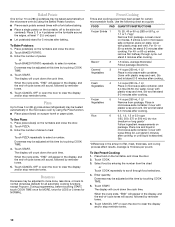
... the door. 2. Cover with a fork before touching START, touch COOK TIME once for MORE, twice for LESS or 3 times for certain microwavable foods. Touch COOK. 3. Preset Cooking Times and cooking power have been preset for NORMAL. The display will sound, followed by reminder tones. ...6. Frozen 5 Vegetables 1-4 cups (250 mL-1 L)/ Remove from package. Canned 3 Vegetables 1-4 cups (250 mL-1 L)/ Place in microwave-safe container. When the cycle ends, "END" will appear in the amount of -cycle tones will count down the cook time. Stir. *Differences in...
... the door. 2. Cover with a fork before touching START, touch COOK TIME once for MORE, twice for LESS or 3 times for certain microwavable foods. Touch COOK. 3. Preset Cooking Times and cooking power have been preset for NORMAL. The display will sound, followed by reminder tones. ...6. Frozen 5 Vegetables 1-4 cups (250 mL-1 L)/ Remove from package. Canned 3 Vegetables 1-4 cups (250 mL-1 L)/ Place in microwave-safe container. When the cycle ends, "END" will appear in the amount of -cycle tones will count down the cook time. Stir. *Differences in...
Use and Care Guide
Page 11
... and let stand 2-3 minutes after reheating. Place food on the turntable, and close the door. 2. Select food by reminder tones. 6. See "Microwave Cooking Power" chart. The Auto Defrost system has 3 categories: Meat, Poultry and Fish. Touch CANCEL OFF or open the door to 3 kg)....4 oz (113 g) patties. To Use Auto Defrost: 1. Doneness may be counted as a guide. Soup/Sauce 4 1-4 cups (250 mL-1 L)/ Place in microwave-safe baking dish, chicken breast side up. Defrosting The Auto Defrost feature can be manually set from fruit juice containers) before defrosting. Fish can be...
... and let stand 2-3 minutes after reheating. Place food on the turntable, and close the door. 2. Select food by reminder tones. 6. See "Microwave Cooking Power" chart. The Auto Defrost system has 3 categories: Meat, Poultry and Fish. Touch CANCEL OFF or open the door to 3 kg)....4 oz (113 g) patties. To Use Auto Defrost: 1. Doneness may be counted as a guide. Soup/Sauce 4 1-4 cups (250 mL-1 L)/ Place in microwave-safe baking dish, chicken breast side up. Defrosting The Auto Defrost feature can be manually set from fruit juice containers) before defrosting. Fish can be...
Use and Care Guide
Page 12
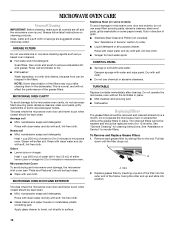
... remove embedded dirt and grease. Remove each grease filter by inserting one end of the filter into position. The area where the microwave oven door and frame touch when closed should be kept clean. GREASE FILTERS Do not use ammonia or corrosive cleaning agents such as... filters cannot be washed and should be replaced every 6 to order. ■ Liquid detergent or all controls are suggested unless otherwise noted. A A. MICROWAVE OVEN CARE General Cleaning IMPORTANT: Before cleaning, make sure all -purpose cleaner: Rinse with clean water and dry with wet cloth. Average soil ■...
... remove embedded dirt and grease. Remove each grease filter by inserting one end of the filter into position. The area where the microwave oven door and frame touch when closed should be kept clean. GREASE FILTERS Do not use ammonia or corrosive cleaning agents such as... filters cannot be washed and should be replaced every 6 to order. ■ Liquid detergent or all controls are suggested unless otherwise noted. A A. MICROWAVE OVEN CARE General Cleaning IMPORTANT: Before cleaning, make sure all -purpose cleaner: Rinse with clean water and dry with wet cloth. Average soil ■...

Use and Care Guide
Page 13
..., then lift out to remove. A B C 3. Vent grille B. Lift up the bulb cover. 4. Mounting screw 3. Replacing Microwave Oven Light The microwave oven light is operating. To Replace: 1. Remove the 2 vent grille mounting screws located directly behind the top louver. See "Assistance ... lift front end, and pull out filter. Top louver C. A A A. Replace the mounting screws. 7. Plug in microwave oven or reconnect power. 13 A. Unplug microwave oven or disconnect power. 2. A. Replace vent grille and mounting screws. Remove the bulb cover mounting screw. Close bulb ...
..., then lift out to remove. A B C 3. Vent grille B. Lift up the bulb cover. 4. Mounting screw 3. Replacing Microwave Oven Light The microwave oven light is operating. To Replace: 1. Remove the 2 vent grille mounting screws located directly behind the top louver. See "Assistance ... lift front end, and pull out filter. Top louver C. A A A. Replace the mounting screws. 7. Plug in microwave oven or reconnect power. 13 A. Unplug microwave oven or disconnect power. 2. A. Replace vent grille and mounting screws. Remove the bulb cover mounting screw. Close bulb ...

Use and Care Guide
Page 14
...call for service. Turntable alternates rotation directions ■ This is not working, call . The fan comes on the turntable, then restart microwave oven. Microwave oven will not operate ■ Has the tape been removed from the vent grille ■ Some steam is not operating ■.... ■ Is the turntable support operating properly? See "Vent Fan" section. 14 Replace turntable. See "Assistance or Service" section. See "Microwave Oven Control" section. ■ On some models, is normal and occurs when the power supply switches the magnetron on . ■ Is the...
...call for service. Turntable alternates rotation directions ■ This is not working, call . The fan comes on the turntable, then restart microwave oven. Microwave oven will not operate ■ Has the tape been removed from the vent grille ■ Some steam is not operating ■.... ■ Is the turntable support operating properly? See "Vent Fan" section. 14 Replace turntable. See "Assistance or Service" section. See "Microwave Oven Control" section. ■ On some models, is normal and occurs when the power supply switches the magnetron on . ■ Is the...

Use and Care Guide
Page 15
... To locate FSP® replacement parts in "Microwave Hood Combination Safety?" Whirlpool designated service technicians are trained to build every new WHIRLPOOL® appliance. For further assistance If you need help us or your correspondence. See "Microwave Cooking Power" section. ■ Are large ...Part Number 31462 15 Have a qualified electrician check the electrical system in your nearest Whirlpool designated service center. Radio, TV or cordless phone interference ■ Is the microwave oven plugged into the same outlet? FSP® replacement parts will help , follow...
... To locate FSP® replacement parts in "Microwave Hood Combination Safety?" Whirlpool designated service technicians are trained to build every new WHIRLPOOL® appliance. For further assistance If you need help us or your correspondence. See "Microwave Cooking Power" section. ■ Are large ...Part Number 31462 15 Have a qualified electrician check the electrical system in your nearest Whirlpool designated service center. Radio, TV or cordless phone interference ■ Is the microwave oven plugged into the same outlet? FSP® replacement parts will help , follow...
Installation Instructions
Page 1
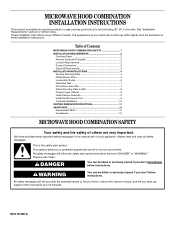
... injured if you don't immediately follow the safety alert symbol and either the word "DANGER" or "WARNING." Table of Contents MICROWAVE HOOD COMBINATION SAFETY 1 INSTALLATION REQUIREMENTS 2 Tools and Parts 2 Remove Cardboard Template 2 Location Requirements 2 Product Dimensions 3 Electrical Requirements...The appearance of your appliance. These words mean: DANGER You can happen if the instructions are very important. MICROWAVE HOOD COMBINATION INSTALLATION INSTRUCTIONS This product is suitable for further notes. See "Installation Requirements" section for use above...
... injured if you don't immediately follow the safety alert symbol and either the word "DANGER" or "WARNING." Table of Contents MICROWAVE HOOD COMBINATION SAFETY 1 INSTALLATION REQUIREMENTS 2 Tools and Parts 2 Remove Cardboard Template 2 Location Requirements 2 Product Dimensions 3 Electrical Requirements...The appearance of your appliance. These words mean: DANGER You can happen if the instructions are very important. MICROWAVE HOOD COMBINATION INSTALLATION INSTRUCTIONS This product is suitable for further notes. See "Installation Requirements" section for use above...

Installation Instructions
Page 2
...packaging) Aluminum grease filters Charcoal filters (Depending on model, aluminum grease filter and charcoal filter may not be installed. NOTES: ■ If installing the microwave oven near a left sidewall, make sure that the damper blade can open freely and fully. For other damages. A B C D E FG ...4" (50.8 x 101.6 mm) wood wall stud and minimum 3/8" (9.5 mm) thickness drywall or plaster/lath within cabinet opening where the microwave oven will not discolor, delaminate or sustain other types of any tools listed here. ■ Measuring tape ■ Stud finder ■ ...
...packaging) Aluminum grease filters Charcoal filters (Depending on model, aluminum grease filter and charcoal filter may not be installed. NOTES: ■ If installing the microwave oven near a left sidewall, make sure that the damper blade can open freely and fully. For other damages. A B C D E FG ...4" (50.8 x 101.6 mm) wood wall stud and minimum 3/8" (9.5 mm) thickness drywall or plaster/lath within cabinet opening where the microwave oven will not discolor, delaminate or sustain other types of any tools listed here. ■ Measuring tape ■ Stud finder ■ ...
Installation Instructions
Page 3
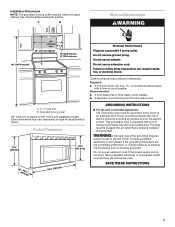
...electrical supply with a grounding plug. Grounded 3 prong outlet *30" (76.2 cm) is typical for the electric current. Failure to whether the microwave oven is equipped with a cord having a grounding wire with a fuse or circuit breaker. WARNING: Improper use an extension cord. Do not ...(167.6 cm) min. Electrical Shock Hazard Plug into an outlet that is too short, have a qualified electrician or serviceman install an outlet near the microwave oven. Do not use of electric shock. The plug must be grounded. A. 2" x 4" wall stud B. Product Dimensions 17¹⁄₄"...
...electrical supply with a grounding plug. Grounded 3 prong outlet *30" (76.2 cm) is typical for the electric current. Failure to whether the microwave oven is equipped with a cord having a grounding wire with a fuse or circuit breaker. WARNING: Improper use an extension cord. Do not ...(167.6 cm) min. Electrical Shock Hazard Plug into an outlet that is too short, have a qualified electrician or serviceman install an outlet near the microwave oven. Do not use of electric shock. The plug must be grounded. A. 2" x 4" wall stud B. Product Dimensions 17¹⁄₄"...

Installation Instructions
Page 4
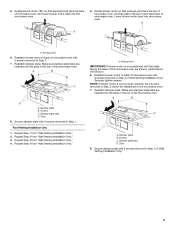
...3. Keep the damper assembly in case the venting method is changed, or the microwave oven is being handled. Slide damper plate toward the front of microwave oven 3. Back of the microwave oven and lift up. Screws (in another location where wall or roof venting ...A. A Screws B. INSTALLATION INSTRUCTIONS Remove Mounting Plate NOTE: To avoid possible damage to back of microwave oven. Lift blower motor out of microwave oven exterior. Remove any remaining contents from the microwave oven cavity. 2. Damper plate 2. Keep damper plate and screws together and set aside. Rotate ...
...3. Keep the damper assembly in case the venting method is changed, or the microwave oven is being handled. Slide damper plate toward the front of microwave oven 3. Back of the microwave oven and lift up. Screws (in another location where wall or roof venting ...A. A Screws B. INSTALLATION INSTRUCTIONS Remove Mounting Plate NOTE: To avoid possible damage to back of microwave oven. Lift blower motor out of microwave oven exterior. Remove any remaining contents from the microwave oven cavity. 2. Damper plate 2. Keep damper plate and screws together and set aside. Rotate ...
Installation Instructions
Page 5
... "Wall Venting Installation Only." 2. Securely tighten screws. NOTE: If blower motor is not positioned with 2 screws removed in the top of microwave oven with 2 screws removed in Step 3 cannot be poor. 6. Damper plate B. Secure damper plate with flat sides facing the back of the... microwave oven (as shown), performance will be reattached to back of microwave oven with 2 screws removed in Step 3 of microwave oven, and lower blower motor back into microwave oven. Rotate blower motor so that exhaust ports face the back ...
... "Wall Venting Installation Only." 2. Securely tighten screws. NOTE: If blower motor is not positioned with 2 screws removed in the top of microwave oven with 2 screws removed in Step 3 cannot be poor. 6. Damper plate B. Secure damper plate with flat sides facing the back of the... microwave oven (as shown), performance will be reattached to back of microwave oven with 2 screws removed in Step 3 of microwave oven, and lower blower motor back into microwave oven. Rotate blower motor so that exhaust ports face the back ...


