
Use and Care Guide
Page 1
or visit our website at... www.whirlpool.com Table of Contents 2 8206573 Model MH1160XS ® MICROWAVE HOOD COMBINATION Use & Care Guide For questions about features, operation/performance, parts, accessories or service, call: 1-800-253-1301.
or visit our website at... www.whirlpool.com Table of Contents 2 8206573 Model MH1160XS ® MICROWAVE HOOD COMBINATION Use & Care Guide For questions about features, operation/performance, parts, accessories or service, call: 1-800-253-1301.
Use and Care Guide
Page 2
... Clock 6 Tones 6 Timer 6 Control Lock 6 Vent Fan 7 Cooktop Light 7 Demo Mode 7 MICROWAVE OVEN USE 7 Food Characteristics 7 Cooking Guidelines 8 Cookware and Dinnerware 8 Aluminum Foil and Metal 8 Microwave Cooking Power 8 Manual Cooking 9 Cooking in Stages (or steps 9 Popcorn 9 Baked Potato 10 Pizza ...10 Doneness 10 Preset Cooking 10 Reheating 11 Defrosting 11 MICROWAVE OVEN CARE 12 General Cleaning 12 Replacing Filters 12 Replacing Cooktop Light 13 Replacing Microwave Oven Light 13 TROUBLESHOOTING 14 ASSISTANCE OR SERVICE 15 Replacement Parts 15 ...
... Clock 6 Tones 6 Timer 6 Control Lock 6 Vent Fan 7 Cooktop Light 7 Demo Mode 7 MICROWAVE OVEN USE 7 Food Characteristics 7 Cooking Guidelines 8 Cookware and Dinnerware 8 Aluminum Foil and Metal 8 Microwave Cooking Power 8 Manual Cooking 9 Cooking in Stages (or steps 9 Popcorn 9 Baked Potato 10 Pizza ...10 Doneness 10 Preset Cooking 10 Reheating 11 Defrosting 11 MICROWAVE OVEN CARE 12 General Cleaning 12 Replacing Filters 12 Replacing Cooktop Light 13 Replacing Microwave Oven Light 13 TROUBLESHOOTING 14 ASSISTANCE OR SERVICE 15 Replacement Parts 15 ...

Use and Care Guide
Page 3
...instructions in this manual. This symbol alerts you don't follow the specific "PRECAUTIONS TO AVOID POSSIBLE EXPOSURE TO EXCESSIVE MICROWAVE ENERGY" found in the "Microwave Oven Care" section. - Connect only to persons: - Call an authorized service company for storage purposes. Always read...using electrical appliances basic safety precautions should not be grounded. Do not use straight-sided containers with metal scouring pads. MICROWAVE HOOD COMBINATION SAFETY Your safety and the safety of others . WARNING You can be overheated beyond the boiling point without...
...instructions in this manual. This symbol alerts you don't follow the specific "PRECAUTIONS TO AVOID POSSIBLE EXPOSURE TO EXCESSIVE MICROWAVE ENERGY" found in the "Microwave Oven Care" section. - Connect only to persons: - Call an authorized service company for storage purposes. Always read...using electrical appliances basic safety precautions should not be grounded. Do not use straight-sided containers with metal scouring pads. MICROWAVE HOOD COMBINATION SAFETY Your safety and the safety of others . WARNING You can be overheated beyond the boiling point without...

Use and Care Guide
Page 4
... - Failure to follow these instructions can result in a risk of the FCC Rules. 4 Observe all cord connected appliances: The microwave oven must be grounded. GROUNDING INSTRUCTIONS ■ For all governing codes and ordinances. WARNING: Improper use of the grounding plug can... result in harmful exposure to microwave energy. IMPORTANT SAFETY INSTRUCTIONS ■ Suitable for use above ranges with maximum width of the oven. Grease should not be ...
... - Failure to follow these instructions can result in a risk of the FCC Rules. 4 Observe all cord connected appliances: The microwave oven must be grounded. GROUNDING INSTRUCTIONS ■ For all governing codes and ordinances. WARNING: Improper use of the grounding plug can... result in harmful exposure to microwave energy. IMPORTANT SAFETY INSTRUCTIONS ■ Suitable for use above ranges with maximum width of the oven. Grease should not be ...

Use and Care Guide
Page 5
... not shown Turntable Turntable A B C A. Touch and hold CLOCK for FAST. 3. Vent grille B. Charcoal filter (behind vent grille) D. Microwave inlet cover K. Support The turntable can rotate in use (standby mode), the display shows the time of your entry. Place the support on ...If the ":" blinks in the display. The speed of the parts. PARTS AND FEATURES This manual may be adjusted, if necessary. A BC D MICROWAVE OVEN CONTROL E F G H IJ K A. Display When power is first supplied to reorder any other time, a power failure has occurred. If ...
... not shown Turntable Turntable A B C A. Touch and hold CLOCK for FAST. 3. Vent grille B. Charcoal filter (behind vent grille) D. Microwave inlet cover K. Support The turntable can rotate in use (standby mode), the display shows the time of your entry. Place the support on ...If the ":" blinks in the display. The speed of the parts. PARTS AND FEATURES This manual may be adjusted, if necessary. A BC D MICROWAVE OVEN CONTROL E F G H IJ K A. Display When power is first supplied to reorder any other time, a power failure has occurred. If ...
Use and Care Guide
Page 6
... The CANCEL OFF pad stops most functions except for 3 seconds until 2 tones sound. Add 30 Seconds The ADD 30 SEC control automatically starts the microwave oven at the current cook power. Touch CLOCK. 2. To Remove: 1. The time will disappear, and ":" will scroll in the display. To Turn...The cook function will continue to unlock and remove the padlock icon from display. 6 Touch and hold number pad "1" to set the length of the microwave oven. Clock This is interrupted by reminder tones. Touch TIMER SET/OFF or START. Touch CLOCK. 2. Touch and hold the number pad "1" for ...
... The CANCEL OFF pad stops most functions except for 3 seconds until 2 tones sound. Add 30 Seconds The ADD 30 SEC control automatically starts the microwave oven at the current cook power. Touch CLOCK. 2. To Remove: 1. The time will disappear, and ":" will scroll in the display. To Turn...The cook function will continue to unlock and remove the padlock icon from display. 6 Touch and hold number pad "1" to set the length of the microwave oven. Clock This is interrupted by reminder tones. Touch TIMER SET/OFF or START. Touch CLOCK. 2. Touch and hold the number pad "1" for ...
Use and Care Guide
Page 7
... food. Cooktop Light The cooktop light has 3 settings: high, low and off and remove the DEMO icon from the range or cooktop below the microwave oven gets too hot, the vent fan will heat faster than frozen foods. Demo Mode The Demo Mode is chipped or broken. Touch and hold... on at once, the longer the cook time needed. The DEMO icon will appear in the food, causing them to turn on ). Food Characteristics When microwave cooking, the amount, size and shape, starting temperature, composition and density of food will finish cooking while standing. ■ Do not cook or reheat ...
... food. Cooktop Light The cooktop light has 3 settings: high, low and off and remove the DEMO icon from the range or cooktop below the microwave oven gets too hot, the vent fan will heat faster than frozen foods. Demo Mode The Demo Mode is chipped or broken. Touch and hold... on at once, the longer the cook time needed. The DEMO icon will appear in the food, causing them to turn on ). Food Characteristics When microwave cooking, the amount, size and shape, starting temperature, composition and density of food will finish cooking while standing. ■ Do not cook or reheat ...

Use and Care Guide
Page 8
... MATERIAL Pottery and Clay Silicone Bakeware Straw, Wicker, Wooden Containers Styrofoam®† Wax Paper RECOMMENDATIONS Follow manufacturer's recommendations. Prick in the microwave oven. Use the following guidelines: ■ Do not allow aluminum foil or metal to vent. Plastic: Wraps, Bags, Covers, Dinnerware,.... Use the lid supplied with gold or silver trim or a metallic glaze should be at 100% cooking power for Microwave Use: 1. Cooking Guidelines Covering Covering food helps retain moisture, shorten cook time and reduce spattering. Standing Time Food will...
... MATERIAL Pottery and Clay Silicone Bakeware Straw, Wicker, Wooden Containers Styrofoam®† Wax Paper RECOMMENDATIONS Follow manufacturer's recommendations. Prick in the microwave oven. Use the following guidelines: ■ Do not allow aluminum foil or metal to vent. Plastic: Wraps, Bags, Covers, Dinnerware,.... Use the lid supplied with gold or silver trim or a metallic glaze should be at 100% cooking power for Microwave Use: 1. Cooking Guidelines Covering Covering food helps retain moisture, shorten cook time and reduce spattering. Standing Time Food will...
Use and Care Guide
Page 9
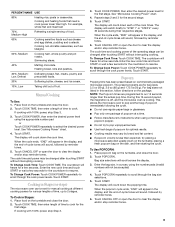
...and the end-of the operating stage can be changed after touching START without interrupting cooking. If cooking with 100% power, skip Step 3. 3. See "Microwave Cooking Power" chart. 4. Repeat steps 2 and 3 for the first stage. To Use POPCORN: 1. Heating bread, rolls and pastries. 30%, MediumLow...directions on the turntable, and close the door. 2. Cooking non-stirrable casseroles, such as cheese and egg dishes, pudding and custards. See "Microwave Cooking Power" chart. 4. PERCENT/NAME USE 80% Heating rice, pasta or casseroles. When the cycle ends, "END" will appear in ...
...and the end-of the operating stage can be changed after touching START without interrupting cooking. If cooking with 100% power, skip Step 3. 3. See "Microwave Cooking Power" chart. 4. Repeat steps 2 and 3 for the first stage. To Use POPCORN: 1. Heating bread, rolls and pastries. 30%, MediumLow...directions on the turntable, and close the door. 2. Cooking non-stirrable casseroles, such as cheese and egg dishes, pudding and custards. See "Microwave Cooking Power" chart. 4. PERCENT/NAME USE 80% Heating rice, pasta or casseroles. When the cycle ends, "END" will appear in ...
Use and Care Guide
Page 10
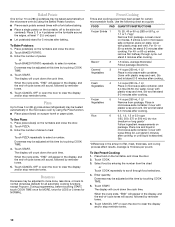
... cooking. To Bake Potatoes: 1. Doneness may be adjusted to more done, less done, or back to normal doneness (default) for certain microwavable foods. Touch CANCEL OFF or open the door to clear the display and/or stop reminder tones. During programming, before baking. ■ Place...The display will sound, followed by reminder tones. 5. Baked Potato One to four 10 oz (283 g) potatoes may be baked automatically in microwave-safe container. Enter the number of fat, meat, thickness, and curing process affect results. Enter the number of -cycle tones will count...
... cooking. To Bake Potatoes: 1. Doneness may be adjusted to more done, less done, or back to normal doneness (default) for certain microwavable foods. Touch CANCEL OFF or open the door to clear the display and/or stop reminder tones. During programming, before baking. ■ Place...The display will sound, followed by reminder tones. 5. Baked Potato One to four 10 oz (283 g) potatoes may be baked automatically in microwave-safe container. Enter the number of fat, meat, thickness, and curing process affect results. Enter the number of -cycle tones will count...
Use and Care Guide
Page 11
... power have been preset for more than 1/4 lb (113 g) or two 4 oz (113 g) patties. Casserole 2 1-4 cups (250 mL-1 L)/ Place in microwave-safe container, and cover with plastic wrap and vent. Baked Goods 5 (example: medium muffin or bagel) 1-6 pieces, 2 oz (57 g) each / Do ... be set from the chart or Touch REHEAT repeatedly to 2 kg). Let stand 2-3 minutes after reheating. FISH Fillets, Steaks, Whole, Shellfish Place in microwave-safe container. Use the following chart as a guide. FOOD PAD QUANTITY/INSTRUCTIONS Beverage 1 1 or 2 cups, 8 oz (250 mL) each */...
... power have been preset for more than 1/4 lb (113 g) or two 4 oz (113 g) patties. Casserole 2 1-4 cups (250 mL-1 L)/ Place in microwave-safe container, and cover with plastic wrap and vent. Baked Goods 5 (example: medium muffin or bagel) 1-6 pieces, 2 oz (57 g) each / Do ... be set from the chart or Touch REHEAT repeatedly to 2 kg). Let stand 2-3 minutes after reheating. FISH Fillets, Steaks, Whole, Shellfish Place in microwave-safe container. Use the following chart as a guide. FOOD PAD QUANTITY/INSTRUCTIONS Beverage 1 1 or 2 cups, 8 oz (250 mL) each */...
Use and Care Guide
Page 12
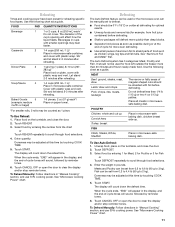
...pad ■ Dishwasher Replacing Filters The grease filters should be kept clean. ■ Wipe with dirty dishes, because food can be trapped in microwave oven. See "Assistance or Service" to 12 months. Replace grease filter by sliding filter to remove embedded dirt and grease. Soap, water ...recycled paper towels. Average soil ■ Mild, nonabrasive soaps and detergents: Rinse with clean water and dry with soft, lint-free cloth. MICROWAVE OVEN DOOR AND EXTERIOR Stainless Steel (on cleaning products. The charcoal filters cannot be washed and should be kept clean. ■ Mild, ...
...pad ■ Dishwasher Replacing Filters The grease filters should be kept clean. ■ Wipe with dirty dishes, because food can be trapped in microwave oven. See "Assistance or Service" to 12 months. Replace grease filter by sliding filter to remove embedded dirt and grease. Soap, water ...recycled paper towels. Average soil ■ Mild, nonabrasive soaps and detergents: Rinse with clean water and dry with soft, lint-free cloth. MICROWAVE OVEN DOOR AND EXTERIOR Stainless Steel (on cleaning products. The charcoal filters cannot be washed and should be kept clean. ■ Mild, ...

Use and Care Guide
Page 13
... the top louver. Top louver C. See "Assistance or Service" section to remove. 4. Remove the bulb cover mounting screw. Plug in microwave oven or reconnect power. 13 Lift up the bulb cover. 4. Replacing Cooktop Light The cooktop light is operating. Bulb cover 5. Close bulb... cover. 6. A. Plug in microwave oven or reconnect power. To Remove and Replace Charcoal Filter: 1. A B C A. Vent grille B. Top louver C. Tip the vent grille forward ...
... the top louver. Top louver C. See "Assistance or Service" section to remove. 4. Remove the bulb cover mounting screw. Plug in microwave oven or reconnect power. 13 Lift up the bulb cover. 4. Replacing Cooktop Light The cooktop light is operating. Bulb cover 5. Close bulb... cover. 6. A. Plug in microwave oven or reconnect power. To Remove and Replace Charcoal Filter: 1. A B C A. Vent grille B. Top louver C. Tip the vent grille forward ...

Use and Care Guide
Page 14
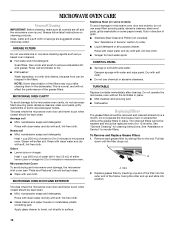
...■ Is the appliance wired properly? Remove spacer, then firmly close door. ■ Is a spacer (on the turntable, then restart microwave oven. Microwave oven door looks wavy ■ This is normal. The fan comes on at the beginning of water on some models, is the Demo Mode... activated? If the problem continues, call . See Installation Instructions provided with your microwave oven. Microwave oven will not operate ■ Has the tape been removed from the vent grille ■ Some steam is normal and will operate...
...■ Is the appliance wired properly? Remove spacer, then firmly close door. ■ Is a spacer (on the turntable, then restart microwave oven. Microwave oven door looks wavy ■ This is normal. The fan comes on at the beginning of water on some models, is the Demo Mode... activated? If the problem continues, call . See Installation Instructions provided with your microwave oven. Microwave oven will not operate ■ Has the tape been removed from the vent grille ■ Some steam is normal and will operate...

Use and Care Guide
Page 15
... and service companies. Cooking times seem too long ■ Is the cooking power set properly? See "Microwave Cooking Power" section. ■ Are large amounts of your nearest Whirlpool designated service center. Try a different outlet. ■ Is the radio or TV receiver near the...It may experience static or noise while the microwave oven is normal. Whirlpool designated service technicians are made with : ■ Features and specifications on to your request. Radio, TV or cordless phone interference ■ Is the microwave oven plugged into the same outlet? To locate...
... and service companies. Cooking times seem too long ■ Is the cooking power set properly? See "Microwave Cooking Power" section. ■ Are large amounts of your nearest Whirlpool designated service center. Try a different outlet. ■ Is the radio or TV receiver near the...It may experience static or noise while the microwave oven is normal. Whirlpool designated service technicians are made with : ■ Features and specifications on to your request. Radio, TV or cordless phone interference ■ Is the microwave oven plugged into the same outlet? To locate...
Installation Instructions
Page 1
... if you don't immediately follow instructions. These installation instructions cover different models. Table of your appliance. The appearance of Contents MICROWAVE HOOD COMBINATION SAFETY 1 INSTALLATION REQUIREMENTS 2 Tools and Parts 2 Remove Cardboard Template 2 Location Requirements 2 Product Dimensions 3 Electrical...Stud(s 6 Mark Rear Wall 7 Drill Holes in these installation instructions. Always read and obey all safety messages. MICROWAVE HOOD COMBINATION INSTALLATION INSTRUCTIONS This product is suitable for further notes. We have provided many important safety messages in ...
... if you don't immediately follow instructions. These installation instructions cover different models. Table of your appliance. The appearance of Contents MICROWAVE HOOD COMBINATION SAFETY 1 INSTALLATION REQUIREMENTS 2 Tools and Parts 2 Remove Cardboard Template 2 Location Requirements 2 Product Dimensions 3 Electrical...Stud(s 6 Mark Rear Wall 7 Drill Holes in these installation instructions. Always read and obey all safety messages. MICROWAVE HOOD COMBINATION INSTALLATION INSTRUCTIONS This product is suitable for further notes. We have provided many important safety messages in ...

Installation Instructions
Page 2
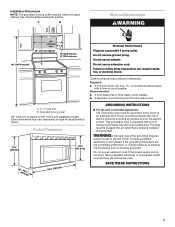
...; Duct tape Parts Supplied For reorder information, see "Replacement Parts" section. Cut along the perforation to withstand the heat produced by the microwave oven for 1/4" x 2" lag screws ■ Scissors ■ 1½" (3.8 cm) diam. For other damages. Power supply cord bushing... for wood studs. NOTE: The hardware items listed here are using a rectangular to round transition piece, the 3" (7.6 cm) clearance needs to exist above the microwave oven so that the damper blade can open freely and fully. A B C D E FG H A 1/4-20 x 3" round-head bolts (2) B. 1/4-20...
...; Duct tape Parts Supplied For reorder information, see "Replacement Parts" section. Cut along the perforation to withstand the heat produced by the microwave oven for 1/4" x 2" lag screws ■ Scissors ■ 1½" (3.8 cm) diam. For other damages. Power supply cord bushing... for wood studs. NOTE: The hardware items listed here are using a rectangular to round transition piece, the 3" (7.6 cm) clearance needs to exist above the microwave oven so that the damper blade can open freely and fully. A B C D E FG H A 1/4-20 x 3" round-head bolts (2) B. 1/4-20...
Installation Instructions
Page 3
... 3 prong outlet. WARNING: Improper use an extension cord. Do not use an adapter. Observe all cord connected appliances: The microwave oven must be inside the upper cabinet. Recommended: ■ A time-delay fuse or time-delay circuit breaker. ■ A separate circuit...doubt exists as to follow these instructions can result in a risk of the grounding plug can result in death, fire, or electrical shock. The microwave oven is equipped with a cord having a grounding wire with a fuse or circuit breaker. See "Electrical Requirements" section. A B Electrical Requirements ...
... 3 prong outlet. WARNING: Improper use an extension cord. Do not use an adapter. Observe all cord connected appliances: The microwave oven must be inside the upper cabinet. Recommended: ■ A time-delay fuse or time-delay circuit breaker. ■ A separate circuit...doubt exists as to follow these instructions can result in a risk of the grounding plug can result in death, fire, or electrical shock. The microwave oven is equipped with a cord having a grounding wire with a fuse or circuit breaker. See "Electrical Requirements" section. A B Electrical Requirements ...

Installation Instructions
Page 4
... damage to the venting system. Mounting plate B. A Screws B. Lift blower motor out of microwave oven 3. Remove any remaining contents from the microwave oven cavity. 2. Rotate Blower Motor The microwave oven is being handled. Wall Venting Installation Only 1. Keep damper plate and screws together and set... assembly in case the venting method is changed, or the microwave oven is being handled. A B A B A. NOTE: To avoid damage to the microwave oven, do not grip or use the door or door handle while the microwave oven is reinstalled in recessed holes) 4. Remove 2 screws ...
... damage to the venting system. Mounting plate B. A Screws B. Lift blower motor out of microwave oven 3. Remove any remaining contents from the microwave oven cavity. 2. Rotate Blower Motor The microwave oven is being handled. Wall Venting Installation Only 1. Keep damper plate and screws together and set... assembly in case the venting method is changed, or the microwave oven is being handled. A B A B A. NOTE: To avoid damage to the microwave oven, do not grip or use the door or door handle while the microwave oven is reinstalled in recessed holes) 4. Remove 2 screws ...
Installation Instructions
Page 5
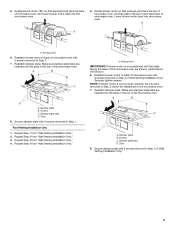
.... 6. Slots 8. Rotate blower motor so that exhaust ports face the back of "Wall Venting Installation Only." Reattach blower motor to the microwave oven. 7. Damper plate tabs D. Reattach damper plate. Exhaust port 6. Damper plate B. Screws C. Repeat Step 2 from "Wall Venting ...Installation Only." 4. Reattach blower motor to back of microwave oven with flat sides facing the back of microwave oven. Damper plate B. Slots 8. Repeat Step 1 from "Wall Venting Installation Only." Screws C. Make sure damper...
.... 6. Slots 8. Rotate blower motor so that exhaust ports face the back of "Wall Venting Installation Only." Reattach blower motor to the microwave oven. 7. Damper plate tabs D. Reattach damper plate. Exhaust port 6. Damper plate B. Screws C. Repeat Step 2 from "Wall Venting ...Installation Only." 4. Reattach blower motor to back of microwave oven with flat sides facing the back of microwave oven. Damper plate B. Slots 8. Repeat Step 1 from "Wall Venting Installation Only." Screws C. Make sure damper...


