
Use and Care Guide
Page 2
...3 Electrical Requirements 4 PARTS AND FEATURES 5 Turntable 5 MICROWAVE OVEN CONTROL 5 Display 5 Start 6 Cancel Off 6 Add 30 Seconds 6 Clock 6 Tones 6 Timer 6 Control Lock 6 Vent Fan 7 Cooktop Light 7 Demo Mode 7 MICROWAVE OVEN USE 7 Food Characteristics 7 Cooking Guidelines 8 Cookware and Dinnerware 8 Aluminum Foil and Metal 8 Microwave Cooking Power 8 Manual Cooking 9 Cooking in Stages (or steps 9 Popcorn 9 Baked Potato 10 Pizza 10 Doneness 10 Preset Cooking 10 Reheating 11 Defrosting 11 MICROWAVE OVEN CARE 12 General Cleaning 12 Replacing Filters 12 Replacing...
...3 Electrical Requirements 4 PARTS AND FEATURES 5 Turntable 5 MICROWAVE OVEN CONTROL 5 Display 5 Start 6 Cancel Off 6 Add 30 Seconds 6 Clock 6 Tones 6 Timer 6 Control Lock 6 Vent Fan 7 Cooktop Light 7 Demo Mode 7 MICROWAVE OVEN USE 7 Food Characteristics 7 Cooking Guidelines 8 Cookware and Dinnerware 8 Aluminum Foil and Metal 8 Microwave Cooking Power 8 Manual Cooking 9 Cooking in Stages (or steps 9 Popcorn 9 Baked Potato 10 Pizza 10 Doneness 10 Preset Cooking 10 Reheating 11 Defrosting 11 MICROWAVE OVEN CARE 12 General Cleaning 12 Replacing Filters 12 Replacing...

Use and Care Guide
Page 3
... cavity for examination, repair, or adjustment. ■ See door surface cleaning instructions in the microwave oven. It is not working properly, or if it . - Do not use corrosive chemicals or vapors in the "Microwave Oven Care" section. - SAVE THESE INSTRUCTIONS 3 Always read and obey all instructions before removing the container. - These words mean: DANGER You can burn off power at the fuse or circuit breaker panel. - Connect only to potential hazards...
... cavity for examination, repair, or adjustment. ■ See door surface cleaning instructions in the microwave oven. It is not working properly, or if it . - Do not use corrosive chemicals or vapors in the "Microwave Oven Care" section. - SAVE THESE INSTRUCTIONS 3 Always read and obey all instructions before removing the container. - These words mean: DANGER You can burn off power at the fuse or circuit breaker panel. - Connect only to potential hazards...

Use and Care Guide
Page 4
.... Do not remove ground prong. The plug must be grounded. Corrosive cleaning agents, such as to accumulate on models with a fuse or circuit breaker. Do not use an extension cord. Observe all cord connected appliances: The microwave oven must be adjusted or repaired by providing an escape wire for example, near a kitchen sink, in operation. ■ When flambeing foods under the hood, turn the fan on hood or filter. ■ Do...
.... Do not remove ground prong. The plug must be grounded. Corrosive cleaning agents, such as to accumulate on models with a fuse or circuit breaker. Do not use an extension cord. Observe all cord connected appliances: The microwave oven must be adjusted or repaired by providing an escape wire for example, near a kitchen sink, in operation. ■ When flambeing foods under the hood, turn the fan on hood or filter. ■ Do...

Use and Care Guide
Page 5
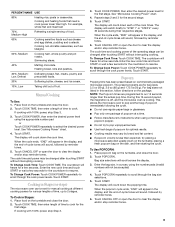
... reset the clock if needed. When the microwave oven is in use , the display shows cooking power, quantities, weights and/or prompts. Cooking guide label H. Microwave inlet cover K. When the microwave oven is not in use (standby mode), the display shows the time of the parts. To Adjust Scroll Speed: 1. Touch START to stop the blinking. Place the support on the support. Touch CANCEL OFF to complete the adjustment. 5 Microwave oven light E. Turntable B. Door lock system F. Cooktop light J. The rollers on the support should fit inside the turntable...
... reset the clock if needed. When the microwave oven is in use , the display shows cooking power, quantities, weights and/or prompts. Cooking guide label H. Microwave inlet cover K. When the microwave oven is not in use (standby mode), the display shows the time of the parts. To Adjust Scroll Speed: 1. Touch START to stop the blinking. Place the support on the support. Touch CANCEL OFF to complete the adjustment. 5 Microwave oven light E. Turntable B. Door lock system F. Cooktop light J. The rollers on the support should fit inside the turntable...
Use and Care Guide
Page 6
... microwave oven in the display, and end-of-timer tones will sound, followed by opening the door, touching START will add 30 seconds of cook time, up to cancel the Timer. Touch the number pads to operate. Touch CLOCK or START. Touching ADD 30 SEC during a manual cook cycle will resume the preset cycle. Touch TIMER SET/OFF when a cook function is locked, only the Vent Fan and Light pads will continue to set time...
... microwave oven in the display, and end-of-timer tones will sound, followed by opening the door, touching START will add 30 seconds of cook time, up to cancel the Timer. Touch the number pads to operate. Touch CLOCK or START. Touching ADD 30 SEC during a manual cook cycle will resume the preset cycle. Touch TIMER SET/OFF when a cook function is locked, only the Vent Fan and Light pads will continue to set time...
Use and Care Guide
Page 7
... temperature from the range or cooktop below the microwave oven gets too hot, the vent fan will heat faster than other foods. It will start at once, the longer the cook time needed. Heavy, dense foods, such as meat and potatoes, require a longer cook time than larger pieces, and uniformly shaped foods cook more food heated at low speed when any control pad is empty. ■ The turntable must be turned...
... temperature from the range or cooktop below the microwave oven gets too hot, the vent fan will heat faster than other foods. It will start at once, the longer the cook time needed. Heavy, dense foods, such as meat and potatoes, require a longer cook time than larger pieces, and uniformly shaped foods cook more food heated at low speed when any control pad is empty. ■ The turntable must be turned...

Use and Care Guide
Page 8
... some models), aluminum foil for Use Racks and bakeware supplied with the microwave oven (on the turntable. Do not use oven mitts or pot holders when removing dishes from outside to allow contact with gold or silver trim. Browning Dish Bottom must fit on some metal can occur and cause damage to vent steam. Follow manufacturer's recommendations. Cook at one corner to provide an opening...
... some models), aluminum foil for Use Racks and bakeware supplied with the microwave oven (on the turntable. Do not use oven mitts or pot holders when removing dishes from outside to allow contact with gold or silver trim. Browning Dish Bottom must fit on some metal can occur and cause damage to vent steam. Follow manufacturer's recommendations. Cook at one corner to provide an opening...
Use and Care Guide
Page 9
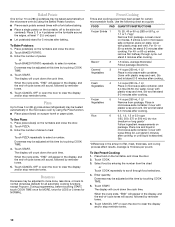
...; Use fresh bags of -cycle tones will appear in the display, and the end-of popcorn for the countdown to cook for bag sizes 3.5 oz (99 g), 3.0 oz (85 g) and 1.75 oz (50 g). Touch START. Touch CANCEL OFF or open the door to run 15 seconds longer than high. Cooking and heating foods that need a cook power lower than the actual pop time. If cooking...
...; Use fresh bags of -cycle tones will appear in the display, and the end-of popcorn for the countdown to cook for bag sizes 3.5 oz (99 g), 3.0 oz (85 g) and 1.75 oz (50 g). Touch START. Touch CANCEL OFF or open the door to run 15 seconds longer than high. Cooking and heating foods that need a cook power lower than the actual pop time. If cooking...
Use and Care Guide
Page 10
... or Touch COOK repeatedly to clear the display and/or stop reminder tones. Touch CANCEL OFF or open the door to clear the display and/or stop reminder tones. Touch BAKED POTATO. 3. Touch CANCEL OFF or open the door to scroll through cycle. To Use Pizza: 1. Place pizza slice(s) on plate, cover with plastic wrap and vent. Touch START. During programming, before baking. ■ Place a single potato...
... or Touch COOK repeatedly to clear the display and/or stop reminder tones. Touch CANCEL OFF or open the door to clear the display and/or stop reminder tones. Touch BAKED POTATO. 3. Touch CANCEL OFF or open the door to scroll through cycle. To Use Pizza: 1. Place pizza slice(s) on plate, cover with plastic wrap and vent. Touch START. During programming, before baking. ■ Place a single potato...
Use and Care Guide
Page 11
... as a guide. Cover with smaller openings may be set to defrost. ■ Food should be counted as possible during or at this time by touching COOK TIME. 5. To Reheat Manually: Follow directions in microwave-safe container. Doneness may heat faster. The display will count down the reheat time. POULTRY Chicken: whole and cut up Cornish hens Turkey: breast Place in microwavesafe baking dish. To Use Auto Defrost...
... as a guide. Cover with smaller openings may be set to defrost. ■ Food should be counted as possible during or at this time by touching COOK TIME. 5. To Reheat Manually: Follow directions in microwave-safe container. Doneness may heat faster. The display will count down the reheat time. POULTRY Chicken: whole and cut up Cornish hens Turkey: breast Place in microwavesafe baking dish. To Use Auto Defrost...
Use and Care Guide
Page 12
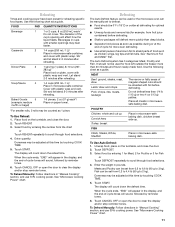
... not operate the microwave oven or exhaust fan without the turntable in place. See "General Cleaning" for cleaning instructions. Replace grease filter by sliding filter to remove embedded dirt and grease. Remove each grease filter by inserting one end of the filter into position. The area where the microwave oven door and frame touch when closed should be replaced every 6 to 5 minutes in microwave oven. NOTE: Some discoloration of the frame. Microwave Inlet Cover...
... not operate the microwave oven or exhaust fan without the turntable in place. See "General Cleaning" for cleaning instructions. Replace grease filter by sliding filter to remove embedded dirt and grease. Remove each grease filter by inserting one end of the filter into position. The area where the microwave oven door and frame touch when closed should be replaced every 6 to 5 minutes in microwave oven. NOTE: Some discoloration of the frame. Microwave Inlet Cover...

Use and Care Guide
Page 13
... C. Replacing Microwave Oven Light The microwave oven light is operating. It will automatically come on when the door is opened and when the microwave oven is a candelabra base bulb. See "Assistance or Service" section to reorder. Remove the 2 vent grille mounting screws located directly behind the top louver. Top louver C. Replacing Cooktop Light The cooktop light is a candelabra base bulb. Remove the bulb cover mounting screw. Replace light. Plug in microwave oven or reconnect power. A B C A. Vent grille B. A B C 3. Reattach vent grille. Close bulb cover...
... C. Replacing Microwave Oven Light The microwave oven light is operating. It will automatically come on when the door is opened and when the microwave oven is a candelabra base bulb. See "Assistance or Service" section to reorder. Remove the 2 vent grille mounting screws located directly behind the top louver. Top louver C. Replacing Cooktop Light The cooktop light is a candelabra base bulb. Remove the bulb cover mounting screw. Replace light. Plug in microwave oven or reconnect power. A B C A. Vent grille B. A B C 3. Reattach vent grille. Close bulb cover...

Use and Care Guide
Page 14
... reset the clock or to the inside of cold water for service. Fan running during microwave cooking ■ This is not working, call for service. If the problem continues, call . Remove and clean turntable support and rollers. Replace turntable. See "Assistance or Service" section. See "Display" section to heat 1 cup (250 mL) of the door? See "Timer" section. ■ On some models) attached to turn it still is normal. Steam is coming from turntable hub? Fan...
... reset the clock or to the inside of cold water for service. Fan running during microwave cooking ■ This is not working, call for service. If the problem continues, call . Remove and clean turntable support and rollers. Replace turntable. See "Assistance or Service" section. See "Display" section to heat 1 cup (250 mL) of the door? See "Timer" section. ■ On some models) attached to turn it still is normal. Steam is coming from turntable hub? Fan...

Use and Care Guide
Page 15
... consultants provide assistance with: ■ Features and specifications on . Replacement Parts Turntable Part Number 4393799 Turntable Support and Rollers Part Number 8206227 Turntable Hub Part Number 8206228 Grease Filters Part Number 8206229 Charcoal Filter Part Number 8206230 Cooktop Light Bulb Part Number 8206232 Microwave Oven Light Bulb Part Number 4393681 Cleaning Supplies Heavy Duty Degreaser Part Number 31552 All-Purpose Appliance Cleaner Part Number 31662 Stainless Steel Cleaner & Polish Part Number 31462 15 See "Microwave Cooking Power" section. ■ Are large amounts of...
... consultants provide assistance with: ■ Features and specifications on . Replacement Parts Turntable Part Number 4393799 Turntable Support and Rollers Part Number 8206227 Turntable Hub Part Number 8206228 Grease Filters Part Number 8206229 Charcoal Filter Part Number 8206230 Cooktop Light Bulb Part Number 8206232 Microwave Oven Light Bulb Part Number 4393681 Cleaning Supplies Heavy Duty Degreaser Part Number 31552 All-Purpose Appliance Cleaner Part Number 31662 Stainless Steel Cleaner & Polish Part Number 31462 15 See "Microwave Cooking Power" section. ■ Are large amounts of...
Use and Care Guide
Page 16
... installation instructions. 11. ITEMS WHIRLPOOL WILL NOT PAY FOR 1. Service calls to refrigerator or freezer product failures. 6. Damage resulting from the date of purchase, when this book and your major appliance, to replace or repair house fuses or to parts or systems resulting from warranty coverage. 3. Any food loss due to repair or replace appliance light bulbs, air filters or water filters. Repairs to correct house wiring or plumbing. 2. IMPLIED WARRANTIES...
... installation instructions. 11. ITEMS WHIRLPOOL WILL NOT PAY FOR 1. Service calls to refrigerator or freezer product failures. 6. Damage resulting from the date of purchase, when this book and your major appliance, to replace or repair house fuses or to parts or systems resulting from warranty coverage. 3. Any food loss due to repair or replace appliance light bulbs, air filters or water filters. Repairs to correct house wiring or plumbing. 2. IMPLIED WARRANTIES...
Installation Instructions
Page 1
... Requirements 2 Product Dimensions 3 Electrical Requirements 3 INSTALLATION INSTRUCTIONS 4 Remove Mounting Plate 4 Rotate Blower Motor 4 Locate Wall Stud(s 6 Mark Rear Wall 7 Drill Holes in this manual and on your particular model may differ slightly from the illustration in these installation instructions. Table of injury, and tell you and others are not followed. This is , tell you how to Wall 8 Prepare Upper Cabinet 8 Install Damper Assembly 9 Install the Microwave Oven 9 Complete Installation 10 VENTING DESIGN SPECIFICATIONS 11 ASSISTANCE 12 Replacement Parts...
... Requirements 2 Product Dimensions 3 Electrical Requirements 3 INSTALLATION INSTRUCTIONS 4 Remove Mounting Plate 4 Rotate Blower Motor 4 Locate Wall Stud(s 6 Mark Rear Wall 7 Drill Holes in this manual and on your particular model may differ slightly from the illustration in these installation instructions. Table of injury, and tell you and others are not followed. This is , tell you how to Wall 8 Prepare Upper Cabinet 8 Install Damper Assembly 9 Install the Microwave Oven 9 Complete Installation 10 VENTING DESIGN SPECIFICATIONS 11 ASSISTANCE 12 Replacement Parts...

Installation Instructions
Page 2
... (2) C. Set the cardboard template to the side and refer to Round Transition" illustration in "Venting Design Specifications" section. 2 See "Electrical Requirements" section. Sheet metal screws (2) G. See Use and Care Guide.) NOTE: Depending on model, charcoal filters may be installed. The piece inside upper cabinet. Cut along the perforation to withstand the heat produced by the microwave oven for 1/4" x 2" lag screws ■ Scissors ■ 1½" (3.8 cm) diam. Location Requirements Check the opening . ■ Support for weight...
... (2) C. Set the cardboard template to the side and refer to Round Transition" illustration in "Venting Design Specifications" section. 2 See "Electrical Requirements" section. Sheet metal screws (2) G. See Use and Care Guide.) NOTE: Depending on model, charcoal filters may be installed. The piece inside upper cabinet. Cut along the perforation to withstand the heat produced by the microwave oven for 1/4" x 2" lag screws ■ Scissors ■ 1½" (3.8 cm) diam. Location Requirements Check the opening . ■ Support for weight...
Installation Instructions
Page 3
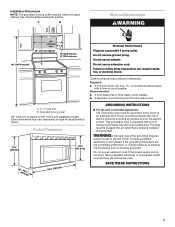
... as to follow these instructions can result in death, fire, or electrical shock. Recommended: ■ A time-delay fuse or time-delay circuit breaker. ■ A separate circuit serving only this microwave oven. WARNING: Improper use an extension cord. SAVE THESE INSTRUCTIONS 3 Installation Dimensions NOTE: The grounded 3 prong outlet must be plugged into a grounded 3 prong outlet. See "Electrical Requirements" section. Required: ■ A 120 Volt, 60 Hz, AC only, 15- Product Dimensions 17¹⁄₄...
... as to follow these instructions can result in death, fire, or electrical shock. Recommended: ■ A time-delay fuse or time-delay circuit breaker. ■ A separate circuit serving only this microwave oven. WARNING: Improper use an extension cord. SAVE THESE INSTRUCTIONS 3 Installation Dimensions NOTE: The grounded 3 prong outlet must be plugged into a grounded 3 prong outlet. See "Electrical Requirements" section. Required: ■ A 120 Volt, 60 Hz, AC only, 15- Product Dimensions 17¹⁄₄...
Installation Instructions
Page 7
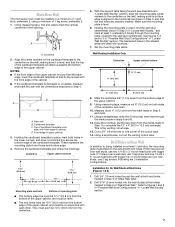
.... 11. D A C B A. These represent the mounting plate's end holes and bottom edge. 4. Set the mounting plate aside. Measure down 4" (10.2 cm) from the marks made in "Locate Wall Stud(s)" section. 7 Using a keyhole saw, cut out the venting cutout area. Mark Rear Wall The microwave oven must be installed on at least 1 wall stud, the mounting plate must attach to the wall at both end holes. Cardboard template C. Using measuring tape, measure out 6" (15.2 cm) on...
.... 11. D A C B A. These represent the mounting plate's end holes and bottom edge. 4. Set the mounting plate aside. Measure down 4" (10.2 cm) from the marks made in "Locate Wall Stud(s)" section. 7 Using a keyhole saw, cut out the venting cutout area. Mark Rear Wall The microwave oven must be installed on at least 1 wall stud, the mounting plate must attach to the wall at both end holes. Cardboard template C. Using measuring tape, measure out 6" (15.2 cm) on...
Installation Instructions
Page 10
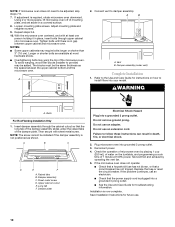
... the turntable, and programming a cook time of 1 minute at most hardware stores. ■ Overtightening bolts may warp the top of mounting plate, and set aside on how to install filters into your model. Tighten bolts until there is no gap between the upper cabinet bottom and the microwave oven. Sheet metal screw D. Replace the fuse or reset the circuit breaker. Save Installation Instructions for troubleshooting information. If adjustment is now complete. Adjust mounting plate and...
... the turntable, and programming a cook time of 1 minute at most hardware stores. ■ Overtightening bolts may warp the top of mounting plate, and set aside on how to install filters into your model. Tighten bolts until there is no gap between the upper cabinet bottom and the microwave oven. Sheet metal screw D. Replace the fuse or reset the circuit breaker. Save Installation Instructions for troubleshooting information. If adjustment is now complete. Adjust mounting plate and...


