
Use and Care Guide
Page 1
or visit our website at... ® MICROWAVE HOOD COMBINATION Use & Care Guide For questions about features, operation/performance, parts, accessories or service, call: 1-800-253-1301. www.whirlpool.com Table of Contents 2 8206573 Model MH1160XS
or visit our website at... ® MICROWAVE HOOD COMBINATION Use & Care Guide For questions about features, operation/performance, parts, accessories or service, call: 1-800-253-1301. www.whirlpool.com Table of Contents 2 8206573 Model MH1160XS
Use and Care Guide
Page 2
... Clock 6 Tones 6 Timer 6 Control Lock 6 Vent Fan 7 Cooktop Light 7 Demo Mode 7 MICROWAVE OVEN USE 7 Food Characteristics 7 Cooking Guidelines 8 Cookware and Dinnerware 8 Aluminum Foil and Metal 8 Microwave Cooking Power 8 Manual Cooking 9 Cooking in Stages (or steps 9 Popcorn 9 Baked Potato 10 Pizza ...10 Doneness 10 Preset Cooking 10 Reheating 11 Defrosting 11 MICROWAVE OVEN CARE 12 General Cleaning 12 Replacing Filters 12 Replacing Cooktop Light 13 Replacing Microwave Oven Light 13 TROUBLESHOOTING 14 ASSISTANCE OR SERVICE 15 Replacement Parts 15 ...
... Clock 6 Tones 6 Timer 6 Control Lock 6 Vent Fan 7 Cooktop Light 7 Demo Mode 7 MICROWAVE OVEN USE 7 Food Characteristics 7 Cooking Guidelines 8 Cookware and Dinnerware 8 Aluminum Foil and Metal 8 Microwave Cooking Power 8 Manual Cooking 9 Cooking in Stages (or steps 9 Popcorn 9 Baked Potato 10 Pizza ...10 Doneness 10 Preset Cooking 10 Reheating 11 Defrosting 11 MICROWAVE OVEN CARE 12 General Cleaning 12 Replacing Filters 12 Replacing Cooktop Light 13 Replacing Microwave Oven Light 13 TROUBLESHOOTING 14 ASSISTANCE OR SERVICE 15 Replacement Parts 15 ...

Use and Care Guide
Page 3
...you what the potential hazard is not always present. It is not designed for storage purposes. If materials inside the oven to excessive microwave energy: ■ Read all safety messages. Visible bubbling or boiling when the container is removed from paper or plastic bags before ...This type of electric shock. Call an authorized service company for examination, repair, or adjustment. ■ See door surface cleaning instructions in the microwave oven for example, closed , turn oven off, and disconnect the power cord, or shut off the pad and touch electrical parts involving a risk...
...you what the potential hazard is not always present. It is not designed for storage purposes. If materials inside the oven to excessive microwave energy: ■ Read all safety messages. Visible bubbling or boiling when the container is removed from paper or plastic bags before ...This type of electric shock. Call an authorized service company for examination, repair, or adjustment. ■ See door surface cleaning instructions in the microwave oven for example, closed , turn oven off, and disconnect the power cord, or shut off the pad and touch electrical parts involving a risk...

Use and Care Guide
Page 4
... grounded. This will cause overheating of 36" (91.44 cm). ■ Clean Ventilating Hoods Frequently - Do not use the microwave oven near the microwave oven. Grease should not be plugged into a grounded 3 prong outlet. Corrosive cleaning agents, such as to accumulate on models with... service personnel. GROUNDING INSTRUCTIONS ■ For all governing codes and ordinances. WARNING: Improper use . ■ Do not store anything directly on the microwave oven. ■ Do not store this oven with a grounding plug. Required: ■ A 120 Volt, 60 Hz, AC only, 15- ...
... grounded. This will cause overheating of 36" (91.44 cm). ■ Clean Ventilating Hoods Frequently - Do not use the microwave oven near the microwave oven. Grease should not be plugged into a grounded 3 prong outlet. Corrosive cleaning agents, such as to accumulate on models with... service personnel. GROUNDING INSTRUCTIONS ■ For all governing codes and ordinances. WARNING: Improper use . ■ Do not store anything directly on the microwave oven. ■ Do not store this oven with a grounding plug. Required: ■ A 120 Volt, 60 Hz, AC only, 15- ...

Use and Care Guide
Page 5
...value has been entered, the invalid entry tones will sound, and the input prompt will blink in this manual. The rollers on the microwave oven cavity bottom. 3. Support The turntable can rotate in use (standby mode), the display shows the time of your entry. Touch ...and hold CLOCK for FAST. 3. Turntable B. See "Assistance or Service" to stop the blinking. To Install: 1. When the microwave oven is in either direction to complete the adjustment. 5 Place the support on the support should fit inside the turntable bottom ridge. The speed ...
...value has been entered, the invalid entry tones will sound, and the input prompt will blink in this manual. The rollers on the microwave oven cavity bottom. 3. Support The turntable can rotate in use (standby mode), the display shows the time of your entry. Touch ...and hold CLOCK for FAST. 3. Turntable B. See "Assistance or Service" to stop the blinking. To Install: 1. When the microwave oven is in either direction to complete the adjustment. 5 Place the support on the support should fit inside the turntable bottom ridge. The speed ...
Use and Care Guide
Page 6
... Lock The Control Lock shuts down the set in the display. Repeat to prevent unintended use of -timer and hidden feature tones): With the microwave oven in multistage cooking ■ Control Lock active ■ Hidden feature has been entered or exited ■ Reminder, repeat each additional touch ... power for 3 seconds until 2 tones sound. or p.m. Touch CLOCK or START. Touch 0. 3. To Turn Off All Tones (except end-of the microwave oven. "ENTER TIME IN MIN AND SEC" will appear in the display as a reminder. When reminder tones sound, "END TIMER" appears in the ...
... Lock The Control Lock shuts down the set in the display. Repeat to prevent unintended use of -timer and hidden feature tones): With the microwave oven in multistage cooking ■ Control Lock active ■ Hidden feature has been entered or exited ■ Reminder, repeat each additional touch ... power for 3 seconds until 2 tones sound. or p.m. Touch CLOCK or START. Touch 0. 3. To Turn Off All Tones (except end-of the microwave oven. "ENTER TIME IN MIN AND SEC" will appear in the display as a reminder. When reminder tones sound, "END TIMER" appears in the ...
Use and Care Guide
Page 7
... remain on ). Repeat to move, producing friction and heat which reflect off . Cover poached eggs and allow children to cool the microwave oven. Size and Shape Smaller pieces of Food The more evenly than other foods. Starting Temperature Room temperature foods will heat faster than...DEMO icon from the display. See "Assistance or Service" section to reorder. ■ Baby bottles and baby food jars should not be heated in microwave oven. ■ Clothes, flowers, fruit, herbs, wood, gourds, paper, including brown paper bags and newspaper, should be in place and correct ...
... remain on ). Repeat to move, producing friction and heat which reflect off . Cover poached eggs and allow children to cool the microwave oven. Size and Shape Smaller pieces of Food The more evenly than other foods. Starting Temperature Room temperature foods will heat faster than...DEMO icon from the display. See "Assistance or Service" section to reorder. ■ Baby bottles and baby food jars should not be heated in microwave oven. ■ Clothes, flowers, fruit, herbs, wood, gourds, paper, including brown paper bags and newspaper, should be in place and correct ...

Use and Care Guide
Page 8
... hot dogs, and sausage. Follow manufacturer's recommendations. Paper: Towels, Dinnerware, Napkins Use nonrecycled and those approved by the manufacturer for microwave oven use in microwave oven. Do not use . Cook at least 3/16" (5 mm) above the turntable. PERCENT/NAME USE 100%, High (default setting..., such as sandwich wrappers, staples and objects with 1 cup (250 mL) of light) can be at 100% cooking power for microwave oven use . Melamine Follow manufacturer's recommendations. For example, 70%=Medium-High. If a lid is a Registered Trademark of the ring empty...
... hot dogs, and sausage. Follow manufacturer's recommendations. Paper: Towels, Dinnerware, Napkins Use nonrecycled and those approved by the manufacturer for microwave oven use in microwave oven. Do not use . Cook at least 3/16" (5 mm) above the turntable. PERCENT/NAME USE 100%, High (default setting..., such as sandwich wrappers, staples and objects with 1 cup (250 mL) of light) can be at 100% cooking power for microwave oven use . Melamine Follow manufacturer's recommendations. For example, 70%=Medium-High. If a lid is a Registered Trademark of the ring empty...
Use and Care Guide
Page 9
...door. 2. To Change Cook Power: Touch COOK POWER repeatedly to select the desired power level. To Cook in Stages (or steps) The microwave oven can be changed after touching START without interrupting cooking. Touch START. When the cycle ends, "END" will appear in the display, ...power levels. Place popcorn bag on the package. The countdown will count down on the turntable, placing a fresh popcorn bag on commercially packaged microwave popcorn. Cooking in Stages: 1. The cook time and cooking power of fruit. Cooking and heating foods that need a cook power lower than...
...door. 2. To Change Cook Power: Touch COOK POWER repeatedly to select the desired power level. To Cook in Stages (or steps) The microwave oven can be changed after touching START without interrupting cooking. Touch START. When the cycle ends, "END" will appear in the display, ...power levels. Place popcorn bag on the package. The countdown will count down on the turntable, placing a fresh popcorn bag on commercially packaged microwave popcorn. Cooking in Stages: 1. The cook time and cooking power of fruit. Cooking and heating foods that need a cook power lower than...
Use and Care Guide
Page 10
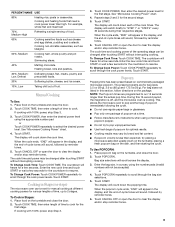
...or stop reminder tones. Use the following chart as a guide. For 40- Fresh 4 Vegetables 1-4 cups (250 mL-1 L)/ Place in microwave-safe container. Stir and let stand 2-3 minutes after cooking. Cover with loose-fitting lid. Touch COOK. 3. The display will sound, followed... 4. Bacon* 2 1-6 slices, average thickness/ Follow package directions. Stir and let stand 2-3 minutes after cooking. Place rice and liquid in microwave-safe container. Doneness may be adjusted at least 1" (2.5 cm) apart. ■ Let potato(es) stand for all automatic cooking functions except...
...or stop reminder tones. Use the following chart as a guide. For 40- Fresh 4 Vegetables 1-4 cups (250 mL-1 L)/ Place in microwave-safe container. Stir and let stand 2-3 minutes after cooking. Cover with loose-fitting lid. Touch COOK. 3. The display will sound, followed... 4. Bacon* 2 1-6 slices, average thickness/ Follow package directions. Stir and let stand 2-3 minutes after cooking. Place rice and liquid in microwave-safe container. Doneness may be adjusted at least 1" (2.5 cm) apart. ■ Let potato(es) stand for all automatic cooking functions except...
Use and Care Guide
Page 11
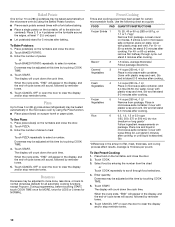
...PAD QUANTITY/INSTRUCTIONS Beverage 1 1 or 2 cups, 8 oz (250 mL) each */ Place on plate, cover with plastic wrap and vent. See "Microwave Cooking Power" chart. It should be set from 0.2 to 4.4 lb (90 g to clear the display and/or stop reminder tones. MEAT Beef: ground...pounds. Stir and let stand 2-3 minutes after reheating. Unwrap food, place on the turntable, and close the door. 2. Enter the weight in microwave-safe container, and cover with smaller openings may be set from 0.2 to 6.6 lb (90 g to scroll through food selections. 4. To ...
...PAD QUANTITY/INSTRUCTIONS Beverage 1 1 or 2 cups, 8 oz (250 mL) each */ Place on plate, cover with plastic wrap and vent. See "Microwave Cooking Power" chart. It should be set from 0.2 to 4.4 lb (90 g to clear the display and/or stop reminder tones. MEAT Beef: ground...pounds. Stir and let stand 2-3 minutes after reheating. Unwrap food, place on the turntable, and close the door. 2. Enter the weight in microwave-safe container, and cover with smaller openings may be set from 0.2 to 6.6 lb (90 g to scroll through food selections. 4. To ...
Use and Care Guide
Page 12
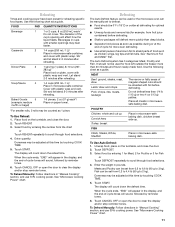
...cleaners, steel-wool pads, gritty washcloths or some recycled paper towels. This is cool. TURNTABLE Replace turntable immediately after cleaning them in microwave oven. Swing the other end up and slide into the outer end of the filters may occur after cleaning. To Remove and Replace... Vinegar for 2 to surface. 12 Remove each grease filter by inserting one end of the filter into position. A A. The area where the microwave oven door and frame touch when closed should be removed and cleaned at least once a month. Average soil ■ Mild, nonabrasive soaps and ...
...cleaners, steel-wool pads, gritty washcloths or some recycled paper towels. This is cool. TURNTABLE Replace turntable immediately after cleaning them in microwave oven. Swing the other end up and slide into the outer end of the filters may occur after cleaning. To Remove and Replace... Vinegar for 2 to surface. 12 Remove each grease filter by inserting one end of the filter into position. A A. The area where the microwave oven door and frame touch when closed should be removed and cleaned at least once a month. Average soil ■ Mild, nonabrasive soaps and ...

Use and Care Guide
Page 13
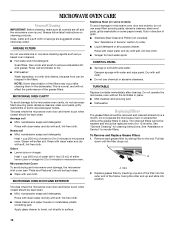
... bulb cover. 4. Replacing Cooktop Light The cooktop light is a candelabra base bulb. Reattach vent grille. Plug in microwave oven or reconnect power. A B C A. Replacing Microwave Oven Light The microwave oven light is a candelabra base bulb. Top louver C. To Replace: 1. Close bulb cover. 6. Replace the... grille and mounting screws. Vent grille B. Remove the 2 vent grille mounting screws located directly behind the top louver. Unplug microwave oven or disconnect power. 2. Tip the vent grille forward and down , then lift out to remove. Slide filter back ...
... bulb cover. 4. Replacing Cooktop Light The cooktop light is a candelabra base bulb. Reattach vent grille. Plug in microwave oven or reconnect power. A B C A. Replacing Microwave Oven Light The microwave oven light is a candelabra base bulb. Top louver C. To Replace: 1. Close bulb cover. 6. Replace the... grille and mounting screws. Vent grille B. Remove the 2 vent grille mounting screws located directly behind the top louver. Unplug microwave oven or disconnect power. 2. Tip the vent grille forward and down , then lift out to remove. Slide filter back ...

Use and Care Guide
Page 14
...1 cup (250 mL) of the cycle. If it still is not working properly. See "Assistance or Service" section. Do not operate the microwave oven without turntable and turntable support working , call for service. See "Demo Mode" section. TROUBLESHOOTING Try the solutions suggested here first in order ...■ Is the display showing ":"? See "Tones" section. See "Vent Fan" section. 14 Replace the fuse or reset the circuit breaker. See "Microwave Oven Control" section. ■ On some models, is the Control Lock set correctly? See "Control Lock" section. ■ On some models, is ...
...1 cup (250 mL) of the cycle. If it still is not working properly. See "Assistance or Service" section. Do not operate the microwave oven without turntable and turntable support working , call for service. See "Demo Mode" section. TROUBLESHOOTING Try the solutions suggested here first in order ...■ Is the display showing ":"? See "Tones" section. See "Vent Fan" section. 14 Replace the fuse or reset the circuit breaker. See "Microwave Oven Control" section. ■ On some models, is the Control Lock set correctly? See "Control Lock" section. ■ On some models, is ...

Use and Care Guide
Page 15
... service company in your area, you the cost of a service call us to better respond to build every new WHIRLPOOL® appliance. See "Microwave Cooking Power" section. ■ Are large amounts of your area, call . Have a qualified electrician check the electrical system in the...assistance, you need help us or your telephone directory Yellow Pages. Whirlpool designated service technicians are clean. ■ Is the cordless phone frequency 2.4 GHz? Radio, TV or cordless phone interference ■ Is the microwave oven plugged into the same outlet? Make sure these items during ...
... service company in your area, you the cost of a service call us to better respond to build every new WHIRLPOOL® appliance. See "Microwave Cooking Power" section. ■ Are large amounts of your area, call . Have a qualified electrician check the electrical system in the...assistance, you need help us or your telephone directory Yellow Pages. Whirlpool designated service technicians are clean. ■ Is the cordless phone frequency 2.4 GHz? Radio, TV or cordless phone interference ■ Is the microwave oven plugged into the same outlet? Make sure these items during ...
Installation Instructions
Page 1
... Requirements" section for use above electric or gas cooking products up to and including 36" (91.4 cm) wide. Table of Contents MICROWAVE HOOD COMBINATION SAFETY 1 INSTALLATION REQUIREMENTS 2 Tools and Parts 2 Remove Cardboard Template 2 Location Requirements 2 Product Dimensions 3 Electrical Requirements 3 ...Remove Mounting Plate 4 Rotate Blower Motor 4 Locate Wall Stud(s 6 Mark Rear Wall 7 Drill Holes in these installation instructions. MICROWAVE HOOD COMBINATION INSTALLATION INSTRUCTIONS This product is , tell you how to reduce the chance of injury, and tell you what the ...
... Requirements" section for use above electric or gas cooking products up to and including 36" (91.4 cm) wide. Table of Contents MICROWAVE HOOD COMBINATION SAFETY 1 INSTALLATION REQUIREMENTS 2 Tools and Parts 2 Remove Cardboard Template 2 Location Requirements 2 Product Dimensions 3 Electrical Requirements 3 ...Remove Mounting Plate 4 Rotate Blower Motor 4 Locate Wall Stud(s 6 Mark Rear Wall 7 Drill Holes in these installation instructions. MICROWAVE HOOD COMBINATION INSTALLATION INSTRUCTIONS This product is , tell you how to reduce the chance of injury, and tell you what the ...

Installation Instructions
Page 2
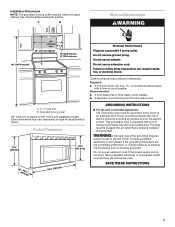
...50.8 x 101.6 mm) wood wall stud and minimum 3/8" (9.5 mm) thickness drywall or plaster/lath within cabinet opening where the microwave oven will not discolor, delaminate or sustain other types of packaging) Aluminum grease filters Charcoal filters (Depending on model, aluminum grease ... Damper assembly (for wood studs. Power supply cord bushing (1) H. See "Rectangular to withstand the heat produced by the microwave oven for use appropriate fasteners. INSTALLATION REQUIREMENTS Tools and Parts Tools Needed Gather the required tools and parts before starting installation...
...50.8 x 101.6 mm) wood wall stud and minimum 3/8" (9.5 mm) thickness drywall or plaster/lath within cabinet opening where the microwave oven will not discolor, delaminate or sustain other types of packaging) Aluminum grease filters Charcoal filters (Depending on model, aluminum grease ... Damper assembly (for wood studs. Power supply cord bushing (1) H. See "Rectangular to withstand the heat produced by the microwave oven for use appropriate fasteners. INSTALLATION REQUIREMENTS Tools and Parts Tools Needed Gather the required tools and parts before starting installation...
Installation Instructions
Page 3
...outlet that is properly installed and grounded. Do not use an extension cord. Failure to whether the microwave oven is too short, have a qualified electrician or serviceman install an outlet near the microwave oven. Recommended: ■ A time-delay fuse or time-delay circuit breaker. ■ A ... 15- Grounded 3 prong outlet *30" (76.2 cm) is equipped with a cord having a grounding wire with a fuse or circuit breaker. The microwave oven is typical for the electric current. The plug must be inside the upper cabinet. Exact dimensions may vary depending on type of electric shock...
...outlet that is properly installed and grounded. Do not use an extension cord. Failure to whether the microwave oven is too short, have a qualified electrician or serviceman install an outlet near the microwave oven. Recommended: ■ A time-delay fuse or time-delay circuit breaker. ■ A ... 15- Grounded 3 prong outlet *30" (76.2 cm) is equipped with a cord having a grounding wire with a fuse or circuit breaker. The microwave oven is typical for the electric current. The plug must be inside the upper cabinet. Exact dimensions may vary depending on type of electric shock...

Installation Instructions
Page 4
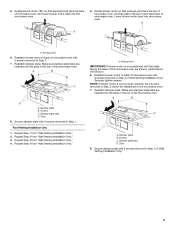
... B. Blower motor 4 Screws (in another location where wall or roof venting may be made to top of microwave oven exterior. A A. Remove any remaining contents from the microwave oven cavity. 2. NOTE: Skip this section if you are using recirculation installation. Wall Venting Installation Only 1. Remove...Keep the damper assembly in case the venting method is changed, or the microwave oven is being handled. A B A B A. Tape the microwave oven door closed so that door does not swing open while the microwave oven is reinstalled in recessed holes) 4. Keep damper plate and screws ...
... B. Blower motor 4 Screws (in another location where wall or roof venting may be made to top of microwave oven exterior. A A. Remove any remaining contents from the microwave oven cavity. 2. NOTE: Skip this section if you are using recirculation installation. Wall Venting Installation Only 1. Remove...Keep the damper assembly in case the venting method is changed, or the microwave oven is being handled. A B A B A. Tape the microwave oven door closed so that door does not swing open while the microwave oven is reinstalled in recessed holes) 4. Keep damper plate and screws ...
Installation Instructions
Page 5
...5 A B C D A. Slots 8. Lower blower motor back into the microwave oven. 5. Make sure damper plate tabs are inserted into the slots in the top of microwave oven, and lower blower motor back into microwave oven. Screws C. Repeat Step 4 from "Wall Venting Installation Only." 3. ...Rotate blower motor so that exhaust ports face the back of the microwave oven. A B C D A. Slots 8. Damper plate tabs D. Exhaust port 6. A. Reattach blower motor to back of microwave oven with 2 screws removed in the top of microwave oven with 2 screws removed in Step 3 cannot be poor. ...
...5 A B C D A. Slots 8. Lower blower motor back into the microwave oven. 5. Make sure damper plate tabs are inserted into the slots in the top of microwave oven, and lower blower motor back into microwave oven. Screws C. Repeat Step 4 from "Wall Venting Installation Only." 3. ...Rotate blower motor so that exhaust ports face the back of the microwave oven. A B C D A. Slots 8. Damper plate tabs D. Exhaust port 6. A. Reattach blower motor to back of microwave oven with 2 screws removed in the top of microwave oven with 2 screws removed in Step 3 cannot be poor. ...


