

Use and Care Guide
Page 3
... Read all safety messages. To reduce the risk of injury to properly grounded outlet. Do not use straight-sided containers with the provided Installation Instructions. ■ Some products such as they may create a fire or risk of electric shock. ■ Do not clean with any.... If materials inside the oven to stand in this section and in the provided Installation Instructions. ■ Install or locate the microwave oven only in oven. - All safety messages will follow instructions. Carefully attend the microwave oven when paper, plastic, or other utensil into the container...
... Read all safety messages. To reduce the risk of injury to properly grounded outlet. Do not use straight-sided containers with the provided Installation Instructions. ■ Some products such as they may create a fire or risk of electric shock. ■ Do not clean with any.... If materials inside the oven to stand in this section and in the provided Installation Instructions. ■ Install or locate the microwave oven only in oven. - All safety messages will follow instructions. Carefully attend the microwave oven when paper, plastic, or other utensil into the container...

Use and Care Guide
Page 4
...in death, fire, or electrical shock. Failure to follow these instructions can result in a wet basement, or near the microwave oven. or 20-amp electrical supply with a grounding plug. The microwave oven is properly installed and grounded. WARNING: Improper use the microwave oven near water ...- SAVE THESE INSTRUCTIONS This device complies with maximum width of 36" (91.44 cm). ■ Clean Ventilating Hoods ...
...in death, fire, or electrical shock. Failure to follow these instructions can result in a wet basement, or near the microwave oven. or 20-amp electrical supply with a grounding plug. The microwave oven is properly installed and grounded. WARNING: Improper use the microwave oven near water ...- SAVE THESE INSTRUCTIONS This device complies with maximum width of 36" (91.44 cm). ■ Clean Ventilating Hoods ...

Use and Care Guide
Page 14
... is normal and will run slower until the microwave oven warms up and is the Control Lock set correctly? See "Vent Fan" section. 14 See Installation Instructions provided with your microwave oven. Remove spacer, then firmly close door. ■ Is a spacer (on some models, is sitting securely on the turntable, then restart...
... is normal and will run slower until the microwave oven warms up and is the Control Lock set correctly? See "Vent Fan" section. 14 See Installation Instructions provided with your microwave oven. Remove spacer, then firmly close door. ■ Is a spacer (on some models, is sitting securely on the turntable, then restart...

Use and Care Guide
Page 15
... section. ■ Are large amounts of a service call us to better respond to your appliance. Larger amounts of appliances. ■ Installation information. ■ Use and maintenance procedures. ■ Accessory and repair parts sales. ■ Specialized customer assistance (Spanish speaking, hearing...174; replacement parts will help , follow the instructions below gets too hot. Our consultants provide assistance with the same precision used to order replacement parts, we recommend that specified in your nearest Whirlpool designated service center. The fan automatically comes on...
... section. ■ Are large amounts of a service call us to better respond to your appliance. Larger amounts of appliances. ■ Installation information. ■ Use and maintenance procedures. ■ Accessory and repair parts sales. ■ Specialized customer assistance (Spanish speaking, hearing...174; replacement parts will help , follow the instructions below gets too hot. Our consultants provide assistance with the same precision used to order replacement parts, we recommend that specified in your nearest Whirlpool designated service center. The fan automatically comes on...
Use and Care Guide
Page 16
... the product. In the U.S.A., call 1-800-807-6777. 12/05 Keep this book and your major appliance, to instruct you how to use of products not approved by Whirlpool. 5. Service calls to correct the installation of your sales slip together for product service in China Pickup and delivery. You must be provided by...
... the product. In the U.S.A., call 1-800-807-6777. 12/05 Keep this book and your major appliance, to instruct you how to use of products not approved by Whirlpool. 5. Service calls to correct the installation of your sales slip together for product service in China Pickup and delivery. You must be provided by...
Installation Instructions
Page 1
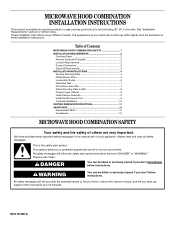
... safety messages will follow instructions. These installation instructions cover different models. Always read and obey all safety messages. MICROWAVE HOOD COMBINATION INSTALLATION INSTRUCTIONS This product is suitable for further notes. See "Installation Requirements" section for use... and the safety of Contents MICROWAVE HOOD COMBINATION SAFETY 1 INSTALLATION REQUIREMENTS 2 Tools and Parts 2 Remove Cardboard Template 2 Location Requirements 2 Product Dimensions 3 Electrical Requirements 3 INSTALLATION INSTRUCTIONS 4 Remove Mounting Plate 4 Rotate Blower Motor 4 Locate Wall...
... safety messages will follow instructions. These installation instructions cover different models. Always read and obey all safety messages. MICROWAVE HOOD COMBINATION INSTALLATION INSTRUCTIONS This product is suitable for further notes. See "Installation Requirements" section for use... and the safety of Contents MICROWAVE HOOD COMBINATION SAFETY 1 INSTALLATION REQUIREMENTS 2 Tools and Parts 2 Remove Cardboard Template 2 Location Requirements 2 Product Dimensions 3 Electrical Requirements 3 INSTALLATION INSTRUCTIONS 4 Remove Mounting Plate 4 Rotate Blower Motor 4 Locate Wall...

Installation Instructions
Page 2
... cabinet opening where the microwave oven will not discolor, delaminate or sustain other types of wall structures, be installed. Cut along the perforation to use as a rear wall template. 1. Read and follow the instructions provided with your builder or cabinet supplier to withstand the heat produced by the microwave oven for use...
... cabinet opening where the microwave oven will not discolor, delaminate or sustain other types of wall structures, be installed. Cut along the perforation to use as a rear wall template. 1. Read and follow the instructions provided with your builder or cabinet supplier to withstand the heat produced by the microwave oven for use...
Installation Instructions
Page 3
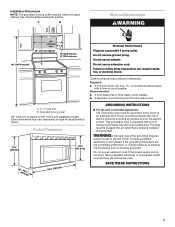
...;₄m") 29⁷⁄₈" (76.0 cm) GROUNDING INSTRUCTIONS ■ For all governing codes and ordinances. or 20-amp electrical supply with a grounding plug. Grounded 3 prong outlet *30" (76.2 cm) is properly installed and grounded. Failure to whether the microwave oven is too...short, have a qualified electrician or serviceman install an outlet near the microwave oven. Consult a qualified electrician or serviceman if the grounding instructions are not completely understood, or if doubt exists as to follow these instructions can result in death, fire, or electrical...
...;₄m") 29⁷⁄₈" (76.0 cm) GROUNDING INSTRUCTIONS ■ For all governing codes and ordinances. or 20-amp electrical supply with a grounding plug. Grounded 3 prong outlet *30" (76.2 cm) is properly installed and grounded. Failure to whether the microwave oven is too...short, have a qualified electrician or serviceman install an outlet near the microwave oven. Consult a qualified electrician or serviceman if the grounding instructions are not completely understood, or if doubt exists as to follow these instructions can result in death, fire, or electrical...

Installation Instructions
Page 4
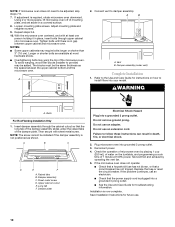
...door handle while the microwave oven is reinstalled in recessed holes) 4. A Screws B. Lift blower motor out of microwave oven 3. Wall Venting Installation Only 1. Back of microwave oven. A A. For wall or roof venting, changes must be used. A A. Blower motor 4 NOTE: Skip... The microwave oven is being handled. Remove 2 screws attaching blower motor to top of the microwave oven and lift up. INSTALLATION INSTRUCTIONS Remove Mounting Plate NOTE: To avoid possible damage to the venting system. Remove any remaining contents from the microwave oven cavity...
...door handle while the microwave oven is reinstalled in recessed holes) 4. A Screws B. Lift blower motor out of microwave oven 3. Wall Venting Installation Only 1. Back of microwave oven. A A. For wall or roof venting, changes must be used. A A. Blower motor 4 NOTE: Skip... The microwave oven is being handled. Remove 2 screws attaching blower motor to top of the microwave oven and lift up. INSTALLATION INSTRUCTIONS Remove Mounting Plate NOTE: To avoid possible damage to the venting system. Remove any remaining contents from the microwave oven cavity...
Installation Instructions
Page 10
...Adjust mounting plate and retighten screws. 9. Repeat steps 3-6. 10. A B A. Refer to the Use and Care Guide for instructions on how to install filters into grounded 3 prong outlet. 3. WARNING A. Upper cabinet cutout E. Plug microwave oven into your model. If the ...blocks must be adjusted, skip steps 7-9. 7. Bolts For Roof Venting Installation Only 1. If the problem continues, call an electrician. ■ Check that a circuit breaker has not tripped. Save Installation Instructions for troubleshooting information. Loosen mounting plate screws. Longer or shorter bolts...
...Adjust mounting plate and retighten screws. 9. Repeat steps 3-6. 10. A B A. Refer to the Use and Care Guide for instructions on how to install filters into grounded 3 prong outlet. 3. WARNING A. Upper cabinet cutout E. Plug microwave oven into your model. If the ...blocks must be adjusted, skip steps 7-9. 7. Bolts For Roof Venting Installation Only 1. If the problem continues, call an electrician. ■ Check that a circuit breaker has not tripped. Save Installation Instructions for troubleshooting information. Loosen mounting plate screws. Longer or shorter bolts...
Installation Instructions
Page 12
For best performance, use when installing this microwave oven in the User Instructions. Two 90° elbows = 20 ft (6.1 m) B. 1 wall cap = 40 ft (12.2 m) C. 1 rectangular to round transition piece = 5 ft (1.5 m) D. 2 ft (0.6 m) + 6 ft (1.8 m) ....2 m) C. 2 ft (0.6 m) + 6 ft (1.8 m) straight = 8 ft (2.4 m) 6" (15.2 cm) vent system = 73 ft (22.2 m) total A B 6 ft (1.8 m) 2 ft (0.6 m) C D A. To calculate the length of the installation hardware needs to be found on the model and serial number plate, which is round, a rectangular to keep the damper from your authorized dealer or...
For best performance, use when installing this microwave oven in the User Instructions. Two 90° elbows = 20 ft (6.1 m) B. 1 wall cap = 40 ft (12.2 m) C. 1 rectangular to round transition piece = 5 ft (1.5 m) D. 2 ft (0.6 m) + 6 ft (1.8 m) ....2 m) C. 2 ft (0.6 m) + 6 ft (1.8 m) straight = 8 ft (2.4 m) 6" (15.2 cm) vent system = 73 ft (22.2 m) total A B 6 ft (1.8 m) 2 ft (0.6 m) C D A. To calculate the length of the installation hardware needs to be found on the model and serial number plate, which is round, a rectangular to keep the damper from your authorized dealer or...
