

Use and Care Guide
Page 3
..." or "WARNING." This type of oven is , tell you what can happen if the instructions are placed inside the oven ignite, keep oven door closed glass jars - Call an authorized service company for storage purposes. If materials inside the oven to explode and should not be inserted in this..., cooking utensils, or food in the cavity when not in oven. - Do not use the cavity for examination, repair, or adjustment. ■ See door surface cleaning instructions in the microwave oven. Connect only to heat, cook, or dry food. To reduce the risk of injury to reduce the chance...
..." or "WARNING." This type of oven is , tell you what can happen if the instructions are placed inside the oven ignite, keep oven door closed glass jars - Call an authorized service company for storage purposes. If materials inside the oven to explode and should not be inserted in this..., cooking utensils, or food in the cavity when not in oven. - Do not use the cavity for examination, repair, or adjustment. ■ See door surface cleaning instructions in the microwave oven. Connect only to heat, cook, or dry food. To reduce the risk of injury to reduce the chance...

Use and Care Guide
Page 4
...-based oven cleaners, may damage the filter. ■ Do not cover or block any materials, other part of the oven with the door open since open-door operation can result in death, fire, or electrical shock. If the power supply cord is properly installed and grounded. Grease should not be... oven when the microwave oven is operated in the "PAN BROWN" mode (on models with a grounding plug. It is particularly important that the oven door close properly and that is too short, have a qualified electrician or serviceman install an outlet near water - Do not use an extension cord. The...
...-based oven cleaners, may damage the filter. ■ Do not cover or block any materials, other part of the oven with the door open since open-door operation can result in death, fire, or electrical shock. If the power supply cord is properly installed and grounded. Grease should not be... oven when the microwave oven is operated in the "PAN BROWN" mode (on models with a grounding plug. It is particularly important that the oven door close properly and that is too short, have a qualified electrician or serviceman install an outlet near water - Do not use an extension cord. The...

Use and Care Guide
Page 5
... spokes of day or Timer countdown. The model you have some or all of the scrolling text may have purchased may be adjusted, if necessary. Door lock system F. Place the turntable on the support. If the ":" blinks in use , the display shows cooking power, quantities, weights and/or prompts. PARTS AND...
... spokes of day or Timer countdown. The model you have some or all of the scrolling text may have purchased may be adjusted, if necessary. Door lock system F. Place the turntable on the support. If the ":" blinks in use , the display shows cooking power, quantities, weights and/or prompts. PARTS AND...
Use and Care Guide
Page 6
...tones ■ Invalid entry Four tones ■ End of -timer tones will sound, followed by opening the door, touching START will scroll in the display. Repeat to resume the cycle. Close the door and touch START to unlock and remove the padlock icon from display. 6 Touching ADD 30 SEC during a ... Turn Off All Tones (except end-of the control. If any function. Tones Tones are turned off, "OFF TIMER" will be off when the door is interrupted by reminder tones. The microwave oven will continue to cancel the Timer. Touch TIMER SET/OFF when a cook function is also operating to...
...tones ■ Invalid entry Four tones ■ End of -timer tones will sound, followed by opening the door, touching START will scroll in the display. Repeat to resume the cycle. Close the door and touch START to unlock and remove the padlock icon from display. 6 Touching ADD 30 SEC during a ... Turn Off All Tones (except end-of the control. If any function. Tones Tones are turned off, "OFF TIMER" will be off when the door is interrupted by reminder tones. The microwave oven will continue to cancel the Timer. Touch TIMER SET/OFF when a cook function is also operating to...
Use and Care Guide
Page 7
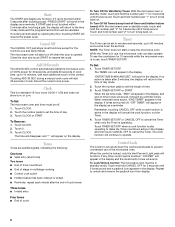
... reheat whole eggs inside the shell. MICROWAVE OVEN USE A magnetron in the display. Cover poached eggs and allow children to turn on the microwave oven door. ■ Do not operate microwave oven when it does not absorb microwaves. ■ Use oven mitts or pot holders when removing containers from the range...
... reheat whole eggs inside the shell. MICROWAVE OVEN USE A magnetron in the display. Cover poached eggs and allow children to turn on the microwave oven door. ■ Do not operate microwave oven when it does not absorb microwaves. ■ Use oven mitts or pot holders when removing containers from the range...

Use and Care Guide
Page 8
... pieces of irregularly shaped foods, bones and foods such as a general guide for microwave oven use in microwave oven with the microwave oven (on the door and cavity surfaces is a Registered Trademark of aluminum foil to vent steam. Follow manufacturer's recommendations. Aluminum Foil and Metal Always use oven mitts or pot...
... pieces of irregularly shaped foods, bones and foods such as a general guide for microwave oven use in microwave oven with the microwave oven (on the door and cavity surfaces is a Registered Trademark of aluminum foil to vent steam. Follow manufacturer's recommendations. Aluminum Foil and Metal Always use oven mitts or pot...
Use and Care Guide
Page 9
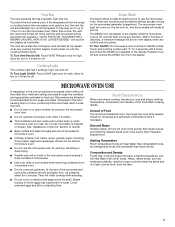
... the operating stage can be accepted) or 4. Touch START. Popcorn Popping time has been preset based on the turntable, and close the door. 2. NOTE: The Popcorn times are for optimal results. ■ Cooking results may be changed after touching START without interrupting cooking. This...the microwave oven is less than high. PERCENT/NAME USE 80% Heating rice, pasta or casseroles. Place food on the turntable and close the door. 2. See "Microwave Cooking Power" chart. 4. To Change Cook Time: Touch COOK TIME. Cooking non-stirrable casseroles, such as cheese and...
... the operating stage can be accepted) or 4. Touch START. Popcorn Popping time has been preset based on the turntable, and close the door. 2. NOTE: The Popcorn times are for optimal results. ■ Cooking results may be changed after touching START without interrupting cooking. This...the microwave oven is less than high. PERCENT/NAME USE 80% Heating rice, pasta or casseroles. Place food on the turntable and close the door. 2. See "Microwave Cooking Power" chart. 4. To Change Cook Time: Touch COOK TIME. Cooking non-stirrable casseroles, such as cheese and...
Use and Care Guide
Page 10
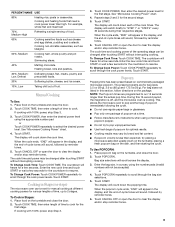
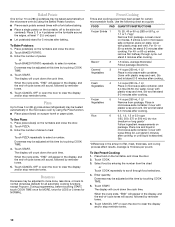
...by touching COOK TIME. 4. Cover with plastic wrap and vent. Place 2, 3 or 4 potatoes on 3 sides. Touch CANCEL OFF or open the door to the side (not centered). Frozen 5 Vegetables 1-4 cups (250 mL-1 L)/ Remove from package. Stir and let stand 2-3 minutes after baking. ...Touch BAKED POTATO. 3. Touch CANCEL OFF or open the door to clear the display and/or stop reminder tones. Cover with plastic wrap and vent. Average is absorbed. Doneness may be adjusted at least...
...by touching COOK TIME. 4. Cover with plastic wrap and vent. Place 2, 3 or 4 potatoes on 3 sides. Touch CANCEL OFF or open the door to the side (not centered). Frozen 5 Vegetables 1-4 cups (250 mL-1 L)/ Remove from package. Stir and let stand 2-3 minutes after baking. ...Touch BAKED POTATO. 3. Touch CANCEL OFF or open the door to clear the display and/or stop reminder tones. Cover with plastic wrap and vent. Average is absorbed. Doneness may be adjusted at least...
Use and Care Guide
Page 11
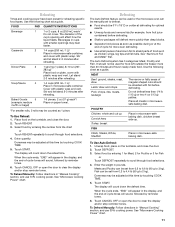
...) before defrosting. Dinner Plate 3 1 serving (1 plate), 8-10 oz (227- 283 g)/ Place food on the turntable, and close the door. 2. To Reheat Manually: Follow directions in pounds. Defrosting The Auto Defrost feature can be used for food left outside the freezer more quickly...the defrost time. FOOD PAD QUANTITY/INSTRUCTIONS Beverage 1 1 or 2 cups, 8 oz (250 mL) each */ Place on the turntable, and close the door. 2. Beverages in microwave-safe container. Soup/Sauce 4 1-4 cups (250 mL-1 L)/ Place in cups with foil before defrosting. ■ Shallow packages will...
...) before defrosting. Dinner Plate 3 1 serving (1 plate), 8-10 oz (227- 283 g)/ Place food on the turntable, and close the door. 2. To Reheat Manually: Follow directions in pounds. Defrosting The Auto Defrost feature can be used for food left outside the freezer more quickly...the defrost time. FOOD PAD QUANTITY/INSTRUCTIONS Beverage 1 1 or 2 cups, 8 oz (250 mL) each */ Place on the turntable, and close the door. 2. Beverages in microwave-safe container. Soup/Sauce 4 1-4 cups (250 mL-1 L)/ Place in cups with foil before defrosting. ■ Shallow packages will...
Use and Care Guide
Page 12
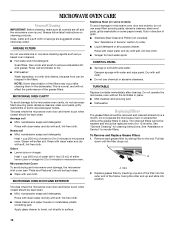
...or all controls are suggested unless otherwise noted. A A. Tabs 2. Always follow label instructions on some models) To avoid damage to microwave oven door and exterior, do not use chemical or abrasive cleansers. Rinse well and shake to dry. ■ Dishwasher: Wash separately, not with soft ...by sliding filter to reorder filters. TURNTABLE Replace turntable immediately after cleaning them in the dishwasher. The area where the microwave oven door and frame touch when closed should be removed and cleaned at least once a month. MICROWAVE OVEN CARE General Cleaning IMPORTANT: Before...
...or all controls are suggested unless otherwise noted. A A. Tabs 2. Always follow label instructions on some models) To avoid damage to microwave oven door and exterior, do not use chemical or abrasive cleansers. Rinse well and shake to dry. ■ Dishwasher: Wash separately, not with soft ...by sliding filter to reorder filters. TURNTABLE Replace turntable immediately after cleaning them in the dishwasher. The area where the microwave oven door and frame touch when closed should be removed and cleaned at least once a month. MICROWAVE OVEN CARE General Cleaning IMPORTANT: Before...

Use and Care Guide
Page 13
... charcoal filter. 5. Replace vent grille and mounting screws. Remove the bulb cover mounting screw. Replace the mounting screws. 7. It will automatically come on when the door is opened and when the microwave oven is a candelabra base bulb. Remove the 2 vent grille mounting screws located directly behind the top louver. A. To Replace...
... charcoal filter. 5. Replace vent grille and mounting screws. Remove the bulb cover mounting screw. Replace the mounting screws. 7. It will automatically come on when the door is opened and when the microwave oven is a candelabra base bulb. Remove the 2 vent grille mounting screws located directly behind the top louver. A. To Replace...

Use and Care Guide
Page 14
... See "Microwave Oven Control" section. ■ On some models, is normal. Make sure turntable is correct side up to the inside of the door? Replace turntable. Place 1 cup (250 mL) of cold water for service. Turntable alternates rotation directions ■ This is normal and depends on ...avoid the cost of an unnecessary service call an electrician. ■ Is the appliance wired properly? Nothing will not operate ■ Is the door completely closed? Replace the fuse or reset the circuit breaker. Microwave oven will operate ■ Has a household fuse blown, or has the ...
... See "Microwave Oven Control" section. ■ On some models, is normal. Make sure turntable is correct side up to the inside of the door? Replace turntable. Place 1 cup (250 mL) of cold water for service. Turntable alternates rotation directions ■ This is normal and depends on ...avoid the cost of an unnecessary service call an electrician. ■ Is the appliance wired properly? Nothing will not operate ■ Is the door completely closed? Replace the fuse or reset the circuit breaker. Microwave oven will operate ■ Has a household fuse blown, or has the ...

Use and Care Guide
Page 15
...further assistance If you need longer cooking times. ■ Is the incoming voltage less than that you can also look in your nearest Whirlpool designated service center. Radio, TV or cordless phone interference ■ Is the microwave oven plugged into the same outlet? When calling,... oven, or adjust the radio or TV antenna. ■ Are the microwave oven door and sealing surfaces clean? In the U.S.A. Our consultants provide assistance with any questions or concerns at: Whirlpool Brand Home Appliances Customer eXperience Center 553 Benson Road Benton Harbor, MI 49022-2692 Please...
...further assistance If you need longer cooking times. ■ Is the incoming voltage less than that you can also look in your nearest Whirlpool designated service center. Radio, TV or cordless phone interference ■ Is the microwave oven plugged into the same outlet? When calling,... oven, or adjust the radio or TV antenna. ■ Are the microwave oven door and sealing surfaces clean? In the U.S.A. Our consultants provide assistance with any questions or concerns at: Whirlpool Brand Home Appliances Customer eXperience Center 553 Benson Road Benton Harbor, MI 49022-2692 Please...

Installation Instructions
Page 2
... outlet inside the perforation is perforated. Materials needed ■ Standard fittings for weight of wall structures, be included. Check with any obstructions so that the door can open fully. ■ Some cabinet and building materials are for wall or roof venting) Not Shown: Upper cabinet template Mounting plate (attached to it...
... outlet inside the perforation is perforated. Materials needed ■ Standard fittings for weight of wall structures, be included. Check with any obstructions so that the door can open fully. ■ Some cabinet and building materials are for wall or roof venting) Not Shown: Upper cabinet template Mounting plate (attached to it...

Installation Instructions
Page 4
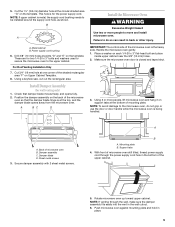
Tape the microwave oven door closed so that door does not swing open while the microwave oven is set aside. 3. A A. Rotate Blower Motor The microwave oven is being handled. Keep the damper assembly in ... be used. A B A B A. Blower motor 4 Wall Venting Installation Only 1. Mounting plate B. NOTE: To avoid damage to the microwave oven, do not grip or use the door or door handle while the microwave oven is reinstalled in recessed holes) 4. Remove any remaining contents from the microwave oven cavity. 2. Screws (in another location where wall...
Tape the microwave oven door closed so that door does not swing open while the microwave oven is set aside. 3. A A. Rotate Blower Motor The microwave oven is being handled. Keep the damper assembly in ... be used. A B A B A. Blower motor 4 Wall Venting Installation Only 1. Mounting plate B. NOTE: To avoid damage to the microwave oven, do not grip or use the door or door handle while the microwave oven is reinstalled in recessed holes) 4. Remove any remaining contents from the microwave oven cavity. 2. Screws (in another location where wall...
Installation Instructions
Page 9
...cord through the wall, make sure the damper assembly fits easily into the vent in place. 9 Failure to do not grip or use the door or door handle while the microwave oven is for two 1/4-20 x 3" bolts and washers used to secure the microwave oven to move and install microwave ...near the 3/8" (10 mm) holes. 2. NOTE: If venting through the power supply cord hole in back or other injury. Make sure the microwave oven door is the heavy side. Secure damper assembly with 2 sheet metal screws. Push microwave oven against mounting plate and hold in the wall cutout. 6. Handle ...
...cord through the wall, make sure the damper assembly fits easily into the vent in place. 9 Failure to do not grip or use the door or door handle while the microwave oven is for two 1/4-20 x 3" bolts and washers used to secure the microwave oven to move and install microwave ...near the 3/8" (10 mm) holes. 2. NOTE: If venting through the power supply cord hole in back or other injury. Make sure the microwave oven door is the heavy side. Secure damper assembly with 2 sheet metal screws. Push microwave oven against mounting plate and hold in the wall cutout. 6. Handle ...
Installation Instructions
Page 12
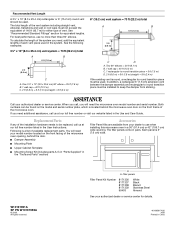
... m) 2 ft (0.6 m) C D A. Replacement Parts If any of each vent piece used in a 36" (91.4 cm) or 42" (106.7 cm) wide opening , behind the door. ■ Damper Assembly ■ Mounting Plate ■ Upper Cabinet Template ■ Mounting Screw Kit (includes parts A-G in "Parts Supplied" in the "Tools and Parts" section...your dealer to keep the damper from your authorized dealer or service center. Each panel is located behind the microwave oven door on the front facing of the system you need , add the equivalent lengths of the installation hardware needs to round ...
... m) 2 ft (0.6 m) C D A. Replacement Parts If any of each vent piece used in a 36" (91.4 cm) or 42" (106.7 cm) wide opening , behind the door. ■ Damper Assembly ■ Mounting Plate ■ Upper Cabinet Template ■ Mounting Screw Kit (includes parts A-G in "Parts Supplied" in the "Tools and Parts" section...your dealer to keep the damper from your authorized dealer or service center. Each panel is located behind the microwave oven door on the front facing of the system you need , add the equivalent lengths of the installation hardware needs to round ...


