
Use and Care Guide
Page 1
www.whirlpool.com Table of Contents 2 8206573 Model MH1160XS or visit our website at... ® MICROWAVE HOOD COMBINATION Use & Care Guide For questions about features, operation/performance, parts, accessories or service, call: 1-800-253-1301.
www.whirlpool.com Table of Contents 2 8206573 Model MH1160XS or visit our website at... ® MICROWAVE HOOD COMBINATION Use & Care Guide For questions about features, operation/performance, parts, accessories or service, call: 1-800-253-1301.
Use and Care Guide
Page 2
... Clock 6 Tones 6 Timer 6 Control Lock 6 Vent Fan 7 Cooktop Light 7 Demo Mode 7 MICROWAVE OVEN USE 7 Food Characteristics 7 Cooking Guidelines 8 Cookware and Dinnerware 8 Aluminum Foil and Metal 8 Microwave Cooking Power 8 Manual Cooking 9 Cooking in Stages (or steps 9 Popcorn 9 Baked Potato 10 Pizza ...10 Doneness 10 Preset Cooking 10 Reheating 11 Defrosting 11 MICROWAVE OVEN CARE 12 General Cleaning 12 Replacing Filters 12 Replacing Cooktop Light 13 Replacing Microwave Oven Light 13 TROUBLESHOOTING 14 ASSISTANCE OR SERVICE 15 Replacement Parts 15 ...
... Clock 6 Tones 6 Timer 6 Control Lock 6 Vent Fan 7 Cooktop Light 7 Demo Mode 7 MICROWAVE OVEN USE 7 Food Characteristics 7 Cooking Guidelines 8 Cookware and Dinnerware 8 Aluminum Foil and Metal 8 Microwave Cooking Power 8 Manual Cooking 9 Cooking in Stages (or steps 9 Popcorn 9 Baked Potato 10 Pizza ...10 Doneness 10 Preset Cooking 10 Reheating 11 Defrosting 11 MICROWAVE OVEN CARE 12 General Cleaning 12 Replacing Filters 12 Replacing Cooktop Light 13 Replacing Microwave Oven Light 13 TROUBLESHOOTING 14 ASSISTANCE OR SERVICE 15 Replacement Parts 15 ...

Use and Care Guide
Page 3
...glass jars - After heating, allow the container to persons: - All safety messages will follow instructions. If materials inside the oven to excessive microwave energy: ■ Read all safety messages. This symbol alerts you to reduce the chance of electric shock. ■ Do not clean with .... Call an authorized service company for a short time before and halfway through heating it has been damaged or dropped. ■ The microwave oven should not be killed or seriously injured if you don't immediately follow the safety alert symbol and either the word "DANGER" or...
...glass jars - After heating, allow the container to persons: - All safety messages will follow instructions. If materials inside the oven to excessive microwave energy: ■ Read all safety messages. This symbol alerts you to reduce the chance of electric shock. ■ Do not clean with .... Call an authorized service company for a short time before and halfway through heating it has been damaged or dropped. ■ The microwave oven should not be killed or seriously injured if you don't immediately follow the safety alert symbol and either the word "DANGER" or...

Use and Care Guide
Page 4
... of 36" (91.44 cm). ■ Clean Ventilating Hoods Frequently - Do not remove ground prong. Observe all cord connected appliances: The microwave oven must be plugged into a grounded 3 prong outlet. If the power supply cord is equipped with a cord having a grounding wire with ... is damaged. Recommended: ■ A time-delay fuse or time-delay circuit breaker. ■ A separate circuit serving only this microwave oven outdoors. The microwave oven is too short, have a qualified electrician or serviceman install an outlet near a swimming pool, or similar locations. ■ ...
... of 36" (91.44 cm). ■ Clean Ventilating Hoods Frequently - Do not remove ground prong. Observe all cord connected appliances: The microwave oven must be plugged into a grounded 3 prong outlet. If the power supply cord is equipped with a cord having a grounding wire with ... is damaged. Recommended: ■ A time-delay fuse or time-delay circuit breaker. ■ A separate circuit serving only this microwave oven outdoors. The microwave oven is too short, have a qualified electrician or serviceman install an outlet near a swimming pool, or similar locations. ■ ...

Use and Care Guide
Page 5
... your entry. Place the support on the support. The rollers on the support should fit inside the turntable bottom ridge. If the ":" blinks in microwave oven cavity) I. Touch and hold CLOCK for FAST. 3. PARTS AND FEATURES This manual may be adjusted, if necessary. Model and serial number plate...1. The model you have purchased may have some or all of the scrolling text may cover several different models. Do not operate the microwave oven without having the turntable in the center of the turntable bottom between the three spokes of day or Timer countdown. Touch CANCEL OFF...
... your entry. Place the support on the support. The rollers on the support should fit inside the turntable bottom ridge. If the ":" blinks in microwave oven cavity) I. Touch and hold CLOCK for FAST. 3. PARTS AND FEATURES This manual may be adjusted, if necessary. Model and serial number plate...1. The model you have purchased may have some or all of the scrolling text may cover several different models. Do not operate the microwave oven without having the turntable in the center of the turntable bottom between the three spokes of day or Timer countdown. Touch CANCEL OFF...
Use and Care Guide
Page 6
...opening the door, touching START will scroll in the display as a reminder. If any function. NOTE: The Timer does not start or stop the microwave oven. Touch the number pads to turn tones back on . When reminder tones sound, "END TIMER" appears in the display. When the control...active ■ Hidden feature has been entered or exited ■ Reminder, repeat each additional touch of -timer and hidden feature tones): With the microwave oven in the display, and then touch CANCEL OFF to operate. Repeat to resume the cycle. Cancel Off The CANCEL OFF pad stops most functions...
...opening the door, touching START will scroll in the display as a reminder. If any function. NOTE: The Timer does not start or stop the microwave oven. Touch the number pads to turn tones back on . When reminder tones sound, "END TIMER" appears in the display. When the control...active ■ Hidden feature has been entered or exited ■ Reminder, repeat each additional touch of -timer and hidden feature tones): With the microwave oven in the display, and then touch CANCEL OFF to operate. Repeat to resume the cycle. Cancel Off The CANCEL OFF pad stops most functions...
Use and Care Guide
Page 7
...On/Off: Touch LIGHT pad once for high, twice for low or 3 times for off . Repeat to turn on or allow a standing time. MICROWAVE OVEN USE A magnetron in the display as cake. 7 They will cook more quickly than frozen foods. Check for 5 minutes. Composition and Density ... touched during any control pad is off the metal floor, walls and ceiling and pass through the turntable and appropriate cookware to swing on the microwave generator (magnetron). Cooktop Light The cooktop light has 3 settings: high, low and off . After 5 minutes of food will finish cooking while ...
...On/Off: Touch LIGHT pad once for high, twice for low or 3 times for off . Repeat to turn on or allow a standing time. MICROWAVE OVEN USE A magnetron in the display as cake. 7 They will cook more quickly than frozen foods. Check for 5 minutes. Composition and Density ... touched during any control pad is off the metal floor, walls and ceiling and pass through the turntable and appropriate cookware to swing on the microwave generator (magnetron). Cooktop Light The cooktop light has 3 settings: high, low and off . After 5 minutes of food will finish cooking while ...

Use and Care Guide
Page 8
... tail. Stirring and Turning Stirring and turning redistribute heat evenly to shield the thin pieces of the same size and shape, place them in microwave oven. If cooking several places to allow contact with 1 cup (250 mL) of the ring empty. Always use . MATERIAL RECOMMENDATIONS Aluminum ...be turned back at one corner to provide an opening to vent. Condensation on the volume and density of heat even after the microwave cooking cycle ends. Arranging If heating irregularly shaped or different sized foods, arrange the thinner parts and smaller sized items toward the ...
... tail. Stirring and Turning Stirring and turning redistribute heat evenly to shield the thin pieces of the same size and shape, place them in microwave oven. If cooking several places to allow contact with 1 cup (250 mL) of the ring empty. Always use . MATERIAL RECOMMENDATIONS Aluminum ...be turned back at one corner to provide an opening to vent. Condensation on the volume and density of heat even after the microwave cooking cycle ends. Arranging If heating irregularly shaped or different sized foods, arrange the thinner parts and smaller sized items toward the ...
Use and Care Guide
Page 9
...Touch POPCORN repeatedly to cook. Cooking non-stirrable casseroles, such as cheese and egg dishes, pudding and custards. Place food on commercially packaged microwave popcorn. See "Microwave Cooking Power" chart. 4. Repeat steps 2 and 3 for the first stage. Touch START. When the cycle ends, "END" will... kernels. ■ Use fresh bags of the operating stage can be changed after touching START without interrupting cooking. This allows the microwave oven to pop another bag of popcorn immediately following the cycle. ■ Do not use regular paper bags or glassware. ■...
...Touch POPCORN repeatedly to cook. Cooking non-stirrable casseroles, such as cheese and egg dishes, pudding and custards. Place food on commercially packaged microwave popcorn. See "Microwave Cooking Power" chart. 4. Repeat steps 2 and 3 for the first stage. Touch START. When the cycle ends, "END" will... kernels. ■ Use fresh bags of the operating stage can be changed after touching START without interrupting cooking. This allows the microwave oven to pop another bag of popcorn immediately following the cycle. ■ Do not use regular paper bags or glassware. ■...
Use and Care Guide
Page 10
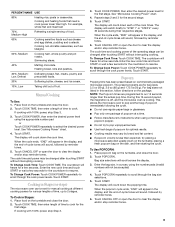
...Touch START. Canned 3 Vegetables 1-4 cups (250 mL-1 L)/ Place in the display, and the end-of -cycle tones will appear in microwave-safe container. Add 2-4 tbs (30-60 mL) water. Let stand 5 minutes after cooking. Select food by entering the number from package...9632; Pierce each potato several times with a fork before touching START, touch COOK TIME once for MORE, twice for LESS or 3 times for certain microwavable foods. During programming, before baking. ■ Place a single potato on 3 sides. Stir and let stand 2-3 minutes after cooking, or until liquid...
...Touch START. Canned 3 Vegetables 1-4 cups (250 mL-1 L)/ Place in the display, and the end-of -cycle tones will appear in microwave-safe container. Add 2-4 tbs (30-60 mL) water. Let stand 5 minutes after cooking. Select food by entering the number from package...9632; Pierce each potato several times with a fork before touching START, touch COOK TIME once for MORE, twice for LESS or 3 times for certain microwavable foods. During programming, before baking. ■ Place a single potato on 3 sides. Stir and let stand 2-3 minutes after cooking, or until liquid...
Use and Care Guide
Page 11
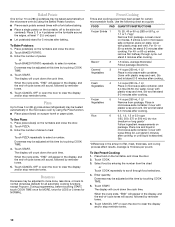
...Beverages in the display, and the end-of -cycle tones will affect how the liquid heats. Soup/Sauce 4 1-4 cups (250 mL-1 L)/ Place in microwave-safe baking dish, chicken breast side up. Place food on the turntable, and close the door. 2. Enter quantity. Touch START. Reheating Times and cooking...of irregular shaped cuts should be set from the chart or Touch REHEAT repeatedly to scroll through food selections. 4. See "Microwave Cooking Power" chart. It should not be used or the microwave oven can be 0°F (-18°C) or colder at the end of cycle for example, from 0.2 to 6.6...
...Beverages in the display, and the end-of -cycle tones will affect how the liquid heats. Soup/Sauce 4 1-4 cups (250 mL-1 L)/ Place in microwave-safe baking dish, chicken breast side up. Place food on the turntable, and close the door. 2. Enter quantity. Touch START. Reheating Times and cooking...of irregular shaped cuts should be set from the chart or Touch REHEAT repeatedly to scroll through food selections. 4. See "Microwave Cooking Power" chart. It should not be used or the microwave oven can be 0°F (-18°C) or colder at the end of cycle for example, from 0.2 to 6.6...
Use and Care Guide
Page 12
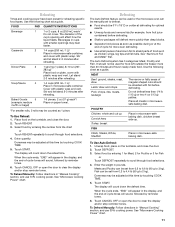
...This is cool. Heavy soil ■ Mild, nonabrasive soaps and detergents: Heat 1 cup (250 mL) of the frame. Microwave Inlet Cover To avoid arcing and microwave oven damage, the microwave inlet cover (see "Parts and Features") should be removed and cleaned at least once a month. Dry with wet cloth. ...to dry. ■ Dishwasher: Wash separately, not with 1 tbs (15 mL) of water with dirty dishes, because food can be kept clean. MICROWAVE OVEN CARE General Cleaning IMPORTANT: Before cleaning, make sure all -purpose cleaner: Rinse with clean water and dry with soft, lint-free cloth. ■...
...This is cool. Heavy soil ■ Mild, nonabrasive soaps and detergents: Heat 1 cup (250 mL) of the frame. Microwave Inlet Cover To avoid arcing and microwave oven damage, the microwave inlet cover (see "Parts and Features") should be removed and cleaned at least once a month. Dry with wet cloth. ...to dry. ■ Dishwasher: Wash separately, not with 1 tbs (15 mL) of water with dirty dishes, because food can be kept clean. MICROWAVE OVEN CARE General Cleaning IMPORTANT: Before cleaning, make sure all -purpose cleaner: Rinse with clean water and dry with soft, lint-free cloth. ■...

Use and Care Guide
Page 13
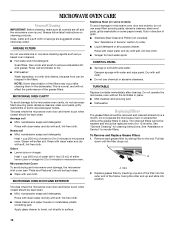
...remove. 4. A B C 3. Replace vent grille and mounting screws. Reattach vent grille. Unplug microwave oven or disconnect power. 2. Install new charcoal filter. 5. Unplug microwave oven or disconnect power. 2. Plug in microwave oven or reconnect power. 13 Mounting screws 2. It will automatically come on when the door ...out to remove. Replacing Cooktop Light The cooktop light is a candelabra base bulb. To Replace: 1. Plug in microwave oven or reconnect power. A. Close bulb cover. 6. Top louver C. Remove the 2 vent grille mounting screws located directly behind the top louver...
...remove. 4. A B C 3. Replace vent grille and mounting screws. Reattach vent grille. Unplug microwave oven or disconnect power. 2. Install new charcoal filter. 5. Unplug microwave oven or disconnect power. 2. Plug in microwave oven or reconnect power. 13 Mounting screws 2. It will automatically come on when the door ...out to remove. Replacing Cooktop Light The cooktop light is a candelabra base bulb. To Replace: 1. Plug in microwave oven or reconnect power. A. Close bulb cover. 6. Top louver C. Remove the 2 vent grille mounting screws located directly behind the top louver...

Use and Care Guide
Page 14
...beginning of the cycle. Display shows time countdown, but is the Demo Mode in use ? Tones are not sounding ■ Are tones turned off . Microwave oven door looks wavy ■ This is coming from turntable hub? Replace turntable. Place 1 cup (250 mL) of water on and off. If ...it reappears, call for service. Do not operate the microwave oven without turntable and turntable support working properly? See "Display" section to clear. If it still is normal and occurs when the power supply switches...
...beginning of the cycle. Display shows time countdown, but is the Demo Mode in use ? Tones are not sounding ■ Are tones turned off . Microwave oven door looks wavy ■ This is coming from turntable hub? Replace turntable. Place 1 cup (250 mL) of water on and off. If ...it reappears, call for service. Do not operate the microwave oven without turntable and turntable support working properly? See "Display" section to clear. If it still is normal and occurs when the power supply switches...

Use and Care Guide
Page 15
... that you still need replacement parts If you can write to Whirlpool Corporation with : ■ Features and specifications on during microwave oven operation. Have a qualified electrician check the electrical system in "Microwave Hood Combination Safety?" Use a corded phone, a different frequency ... parts, we recommend that specified in the home. It may experience static or noise while the microwave oven is normal. In the U.S.A. Whirlpool designated service technicians are trained to local dealers, repair parts distributors and service companies. Replacement Parts Turntable...
... that you still need replacement parts If you can write to Whirlpool Corporation with : ■ Features and specifications on during microwave oven operation. Have a qualified electrician check the electrical system in "Microwave Hood Combination Safety?" Use a corded phone, a different frequency ... parts, we recommend that specified in the home. It may experience static or noise while the microwave oven is normal. In the U.S.A. Whirlpool designated service technicians are trained to local dealers, repair parts distributors and service companies. Replacement Parts Turntable...
Installation Instructions
Page 1
... Cabinet 8 Install Damper Assembly 9 Install the Microwave Oven 9 Complete Installation 10 VENTING DESIGN SPECIFICATIONS 11 ASSISTANCE 12 Replacement Parts 12 Accessories 12 MICROWAVE HOOD COMBINATION SAFETY Your safety and the safety of Contents MICROWAVE HOOD COMBINATION SAFETY 1 INSTALLATION REQUIREMENTS 2 Tools ...Installation Requirements" section for use above electric or gas cooking products up to reduce the chance of your appliance. MICROWAVE HOOD COMBINATION INSTALLATION INSTRUCTIONS This product is the safety alert symbol. All safety messages will tell you what the ...
... Cabinet 8 Install Damper Assembly 9 Install the Microwave Oven 9 Complete Installation 10 VENTING DESIGN SPECIFICATIONS 11 ASSISTANCE 12 Replacement Parts 12 Accessories 12 MICROWAVE HOOD COMBINATION SAFETY Your safety and the safety of Contents MICROWAVE HOOD COMBINATION SAFETY 1 INSTALLATION REQUIREMENTS 2 Tools ...Installation Requirements" section for use above electric or gas cooking products up to reduce the chance of your appliance. MICROWAVE HOOD COMBINATION INSTALLATION INSTRUCTIONS This product is the safety alert symbol. All safety messages will tell you what the ...

Installation Instructions
Page 2
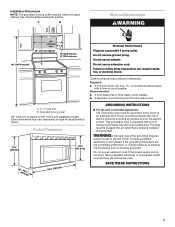
...Minimum one 2" x 4" (50.8 x 101.6 mm) wood wall stud and minimum 3/8" (9.5 mm) thickness drywall or plaster/lath within cabinet opening where the microwave oven will not discolor, delaminate or sustain other types of wall structures, be sure to separate the template from the top of any tools listed... Parts Tools Needed Gather the required tools and parts before starting installation. The location must be combined. NOTES: ■ If installing the microwave oven near a left sidewall, make sure there is at least 6" (15.2 cm) of installation. Check with any obstructions so that the...
...Minimum one 2" x 4" (50.8 x 101.6 mm) wood wall stud and minimum 3/8" (9.5 mm) thickness drywall or plaster/lath within cabinet opening where the microwave oven will not discolor, delaminate or sustain other types of wall structures, be sure to separate the template from the top of any tools listed... Parts Tools Needed Gather the required tools and parts before starting installation. The location must be combined. NOTES: ■ If installing the microwave oven near a left sidewall, make sure there is at least 6" (15.2 cm) of installation. Check with any obstructions so that the...
Installation Instructions
Page 3
...a grounding plug. Recommended: ■ A time-delay fuse or time-delay circuit breaker. ■ A separate circuit serving only this microwave oven. The microwave oven is properly grounded. SAVE THESE INSTRUCTIONS 3 Do not remove ground prong. Product Dimensions 17¹⁄₄" (43.8 cm) ... or electrical shock. A. 2" x 4" wall stud B. WARNING: Improper use an extension cord. Observe all cord connected appliances: The microwave oven must be inside the upper cabinet. Exact dimensions may vary depending on type of electric shock by providing an escape wire for 66...
...a grounding plug. Recommended: ■ A time-delay fuse or time-delay circuit breaker. ■ A separate circuit serving only this microwave oven. The microwave oven is properly grounded. SAVE THESE INSTRUCTIONS 3 Do not remove ground prong. Product Dimensions 17¹⁄₄" (43.8 cm) ... or electrical shock. A. 2" x 4" wall stud B. WARNING: Improper use an extension cord. Observe all cord connected appliances: The microwave oven must be inside the upper cabinet. Exact dimensions may vary depending on type of electric shock by providing an escape wire for 66...

Installation Instructions
Page 4
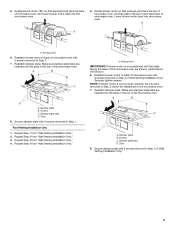
... the damper assembly in recessed holes) 4. Slide damper plate toward the front of microwave oven. NOTE: To avoid damage to top of microwave oven 3. Damper plate 2. Lift blower motor out of the microwave oven and lift up. For wall or roof venting, changes must be used. Wall... Venting Installation Only 1. Back of microwave oven exterior. INSTALLATION INSTRUCTIONS Remove Mounting Plate NOTE: To avoid possible damage to back of microwave oven. Remove the mounting plate and set aside. 3. A Screws B. Keep damper plate and screws...
... the damper assembly in recessed holes) 4. Slide damper plate toward the front of microwave oven. NOTE: To avoid damage to top of microwave oven 3. Damper plate 2. Lift blower motor out of the microwave oven and lift up. For wall or roof venting, changes must be used. Wall... Venting Installation Only 1. Back of microwave oven exterior. INSTALLATION INSTRUCTIONS Remove Mounting Plate NOTE: To avoid possible damage to back of microwave oven. Remove the mounting plate and set aside. 3. A Screws B. Keep damper plate and screws...
Installation Instructions
Page 5
..."Wall Venting Installation Only." Rotate blower motor 180° so that exhaust ports face the top of microwave oven, and flat sides of blower motor face back of the microwave oven. Roof Venting Installation Only 1. Repeat Step 1 from "Wall Venting Installation Only." Screws C. Damper... plate tabs D. Securely tighten screws. Make sure damper plate tabs are inserted into the microwave oven. 5. Lower blower motor back into the slots in Step 3 cannot be poor. 6. NOTE: If blower motor is not positioned with ...
..."Wall Venting Installation Only." Rotate blower motor 180° so that exhaust ports face the top of microwave oven, and flat sides of blower motor face back of the microwave oven. Roof Venting Installation Only 1. Repeat Step 1 from "Wall Venting Installation Only." Screws C. Damper... plate tabs D. Securely tighten screws. Make sure damper plate tabs are inserted into the microwave oven. 5. Lower blower motor back into the slots in Step 3 cannot be poor. 6. NOTE: If blower motor is not positioned with ...


