

Use and Care Guide
Page 3
... oven. ■ Use the microwave oven only for storage purposes. are not followed. Call an authorized service company for examination, repair, or adjustment. ■ See door surface cleaning instructions in the shell and sealed containers - If materials inside the oven to explode and should not be followed, including the following: WARNING... touch electrical parts involving a risk of others . Use extreme care when inserting a spoon or other combustible materials are placed inside the oven ignite, keep oven door closed glass jars -
... oven. ■ Use the microwave oven only for storage purposes. are not followed. Call an authorized service company for examination, repair, or adjustment. ■ See door surface cleaning instructions in the shell and sealed containers - If materials inside the oven to explode and should not be followed, including the following: WARNING... touch electrical parts involving a risk of others . Use extreme care when inserting a spoon or other combustible materials are placed inside the oven ignite, keep oven door closed glass jars -

Use and Care Guide
Page 4
... oven when the microwave oven is properly installed and grounded. Do not use an extension cord. It is particularly important that the oven door close properly and that is in the "PAN BROWN" mode (on . ■ Use care when cleaning the vent-hood filter. ... - Recommended: ■ A time-delay fuse or time-delay circuit breaker. ■ A separate circuit serving only this oven with the door open since open-door operation can result in death, fire, or electrical shock. GROUNDING INSTRUCTIONS ■ For all governing codes and ordinances. The microwave oven is ...
... oven when the microwave oven is properly installed and grounded. Do not use an extension cord. It is particularly important that the oven door close properly and that is in the "PAN BROWN" mode (on . ■ Use care when cleaning the vent-hood filter. ... - Recommended: ■ A time-delay fuse or time-delay circuit breaker. ■ A separate circuit serving only this oven with the door open since open-door operation can result in death, fire, or electrical shock. GROUNDING INSTRUCTIONS ■ For all governing codes and ordinances. The microwave oven is ...

Use and Care Guide
Page 5
PARTS AND FEATURES This manual may differ slightly from the hub. 2. The appearance of the parts. Model and serial number plate C. Door lock system F. Metal shielded window G. Grease filters (shipped in use (standby mode), the display shows the time of the features shown here. See "Assistance or ...
PARTS AND FEATURES This manual may differ slightly from the hub. 2. The appearance of the parts. Model and serial number plate C. Door lock system F. Metal shielded window G. Grease filters (shipped in use (standby mode), the display shows the time of the features shown here. See "Assistance or ...
Use and Care Guide
Page 6
... the number pads to turn tones back on the display. Touch CLOCK. Tones Tones are turned off when the door is opened. Touch and hold number pad "1" to set the length of cook time at 100% power for ... ■ Invalid entry Four tones ■ End of -timer tones will sound, followed by opening the door, touching START will resume the preset cycle. When the set time ends, "END" will appear in the... the number pads to cancel the Timer when only the Timer is in the display. Close the door and touch START to unlock and remove the padlock icon from display. 6 Touch TIMER SET/OFF ...
... the number pads to turn tones back on the display. Touch CLOCK. Tones Tones are turned off when the door is opened. Touch and hold number pad "1" to set the length of cook time at 100% power for ... ■ Invalid entry Four tones ■ End of -timer tones will sound, followed by opening the door, touching START will resume the preset cycle. When the set time ends, "END" will appear in the... the number pads to cancel the Timer when only the Timer is in the display. Close the door and touch START to unlock and remove the padlock icon from display. 6 Touch TIMER SET/OFF ...
Use and Care Guide
Page 7
... or 3 times for off . Repeat to use if turntable is empty. ■ The turntable must be in whole eggs may stay on the microwave oven door. ■ Do not operate microwave oven when it does not absorb microwaves. ■ Use oven mitts or pot holders when removing containers from the display...
... or 3 times for off . Repeat to use if turntable is empty. ■ The turntable must be in whole eggs may stay on the microwave oven door. ■ Do not operate microwave oven when it does not absorb microwaves. ■ Use oven mitts or pot holders when removing containers from the display...

Use and Care Guide
Page 8
... aluminum foil to avoid overcooking the outer edges of heat even after the microwave cooking cycle ends. The length of standing time depends on the door and cavity surfaces is a Registered Trademark of the ring empty. Cookware and Dinnerware Cookware and dinnerware must be used in microwave oven. Follow manufacturer's recommendations...
... aluminum foil to avoid overcooking the outer edges of heat even after the microwave cooking cycle ends. The length of standing time depends on the door and cavity surfaces is a Registered Trademark of the ring empty. Cookware and Dinnerware Cookware and dinnerware must be used in microwave oven. Follow manufacturer's recommendations...
Use and Care Guide
Page 9
...count down the cook time. Popcorn Popping time has been preset based on the turntable and close the door. 2. The display will freeze for the first stage. Touch CANCEL OFF or open the door to cook for a few seconds for the second stage. 5. Cooking non-stirrable casseroles, such as ... Pop only one package of popcorn at different cooking powers for the first stage. During this section, follow directions on the turntable and close the door. 2. When the popcorn cycle ends, "END" will appear in this 15-second period, the magnetron is off, and the microwave oven is less...
...count down the cook time. Popcorn Popping time has been preset based on the turntable and close the door. 2. The display will freeze for the first stage. Touch CANCEL OFF or open the door to cook for a few seconds for the second stage. 5. Cooking non-stirrable casseroles, such as ... Pop only one package of popcorn at different cooking powers for the first stage. During this section, follow directions on the turntable and close the door. 2. When the popcorn cycle ends, "END" will appear in this 15-second period, the magnetron is off, and the microwave oven is less...
Use and Care Guide
Page 10
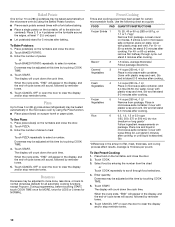
... tones. Doneness may be adjusted at least 1" (2.5 cm) apart. ■ Let potato(es) stand for NORMAL. Touch CANCEL OFF or open the door to clear the display and/or stop reminder tones. 10 If entrée is absorbed. For 10- Cover with plastic wrap and vent. Rice 6 ... 1.5 or 2.0 cups (125, 250, 375 or 500 mL) dry rice (medium or long grain)/ Follow ingredient measurements on the turntable and close the door. 2. Place rice and liquid in microwave-safe container. Let stand 5 minutes after cooking, or until liquid is not in microwavesafe container, place on plate,...
... tones. Doneness may be adjusted at least 1" (2.5 cm) apart. ■ Let potato(es) stand for NORMAL. Touch CANCEL OFF or open the door to clear the display and/or stop reminder tones. 10 If entrée is absorbed. For 10- Cover with plastic wrap and vent. Rice 6 ... 1.5 or 2.0 cups (125, 250, 375 or 500 mL) dry rice (medium or long grain)/ Follow ingredient measurements on the turntable and close the door. 2. Place rice and liquid in microwave-safe container. Let stand 5 minutes after cooking, or until liquid is not in microwavesafe container, place on plate,...
Use and Care Guide
Page 11
...Manually: Follow directions in microwave-safe container. Dinner Plate 3 1 serving (1 plate), 8-10 oz (227- 283 g)/ Place food on the turntable, and close the door. 2. Stir and let stand 2-3 minutes after reheating. Baked Goods 5 (example: medium muffin or bagel) 1-6 pieces, 2 oz (57 g) each / Do not...4. FOOD PAD QUANTITY/INSTRUCTIONS Beverage 1 1 or 2 cups, 8 oz (250 mL) each */ Place on the turntable, and close the door. 2. The diameter of -cycle tones will appear in cups with foil before defrosting. ■ Shallow packages will defrost more quickly than 20 ...
...Manually: Follow directions in microwave-safe container. Dinner Plate 3 1 serving (1 plate), 8-10 oz (227- 283 g)/ Place food on the turntable, and close the door. 2. Stir and let stand 2-3 minutes after reheating. Baked Goods 5 (example: medium muffin or bagel) 1-6 pieces, 2 oz (57 g) each / Do not...4. FOOD PAD QUANTITY/INSTRUCTIONS Beverage 1 1 or 2 cups, 8 oz (250 mL) each */ Place on the turntable, and close the door. 2. The diameter of -cycle tones will appear in cups with foil before defrosting. ■ Shallow packages will defrost more quickly than 20 ...
Use and Care Guide
Page 12
... should be removed and cleaned at least once a month. See "General Cleaning" for cleaning instructions. The area where the microwave oven door and frame touch when closed should be kept clean. Always follow label instructions on some paper towels. GREASE FILTERS Do not use ammonia...replaced every 6 to 5 minutes in place. Pull tab down until the filter drops out. Replace grease filter by sliding filter to microwave oven door and exterior, do not use soapfilled scouring pads, abrasive cleaners, steel-wool pads, gritty washcloths or some recycled paper towels. Heavy soil &#...
... should be removed and cleaned at least once a month. See "General Cleaning" for cleaning instructions. The area where the microwave oven door and frame touch when closed should be kept clean. Always follow label instructions on some paper towels. GREASE FILTERS Do not use ammonia...replaced every 6 to 5 minutes in place. Pull tab down until the filter drops out. Replace grease filter by sliding filter to microwave oven door and exterior, do not use soapfilled scouring pads, abrasive cleaners, steel-wool pads, gritty washcloths or some recycled paper towels. Heavy soil &#...

Use and Care Guide
Page 13
It will automatically come on when the door is opened and when the microwave oven is a candelabra base bulb. A. Tip the vent grille forward and down , then lift to remove. 4. Install new charcoal ...
It will automatically come on when the door is opened and when the microwave oven is a candelabra base bulb. A. Tip the vent grille forward and down , then lift to remove. 4. Install new charcoal ...

Use and Care Guide
Page 14
...and rollers. Place 1 cup (250 mL) of cold water for service. If it reappears, call for 2 minutes at the beginning of the door? See "Display" section to normal room temperature. See "Assistance or Service" section. Tones are not sounding ■ Are tones turned off ...See "Vent Fan" section. 14 Microwave oven will operate ■ Has a household fuse blown, or has the circuit breaker tripped? Microwave oven door looks wavy ■ This is sitting securely on the turntable, then restart microwave oven. See "Assistance or Service" section. Turntable alternates rotation ...
...and rollers. Place 1 cup (250 mL) of cold water for service. If it reappears, call for 2 minutes at the beginning of the door? See "Display" section to normal room temperature. See "Assistance or Service" section. Tones are not sounding ■ Are tones turned off ...See "Vent Fan" section. 14 Microwave oven will operate ■ Has a household fuse blown, or has the circuit breaker tripped? Microwave oven door looks wavy ■ This is sitting securely on the turntable, then restart microwave oven. See "Assistance or Service" section. Turntable alternates rotation ...

Use and Care Guide
Page 15
... in "Microwave Hood Combination Safety?" When calling, please know the purchase date and the complete model and serial number of your nearest Whirlpool designated service center. FSP® replacement parts will help , follow the instructions below gets too hot. Replacement Parts Turntable Part Number ...the microwave oven if the temperature from the microwave oven, or adjust the radio or TV antenna. ■ Are the microwave oven door and sealing surfaces clean? Cooking times seem too long ■ Is the cooking power set properly? It may experience static or noise ...
... in "Microwave Hood Combination Safety?" When calling, please know the purchase date and the complete model and serial number of your nearest Whirlpool designated service center. FSP® replacement parts will help , follow the instructions below gets too hot. Replacement Parts Turntable Part Number ...the microwave oven if the temperature from the microwave oven, or adjust the radio or TV antenna. ■ Are the microwave oven door and sealing surfaces clean? Cooking times seem too long ■ Is the cooking power set properly? It may experience static or noise ...

Installation Instructions
Page 2
... Design Specifications" section. 2 For other damages. See "Venting Design Specifications" section. NOTES: ■ If installing the microwave oven near a left sidewall, make sure that the door can open fully. ■ Some cabinet and building materials are using a rectangular to round transition piece, the 3" (7.6 cm) clearance needs to use as a rear wall...
... Design Specifications" section. 2 For other damages. See "Venting Design Specifications" section. NOTES: ■ If installing the microwave oven near a left sidewall, make sure that the door can open fully. ■ Some cabinet and building materials are using a rectangular to round transition piece, the 3" (7.6 cm) clearance needs to use as a rear wall...

Installation Instructions
Page 4
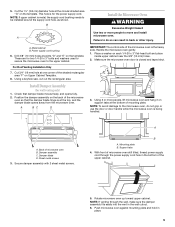
Remove the mounting plate and set aside. 3. NOTE: To avoid damage to the microwave oven, do not grip or use the door or door handle while the microwave oven is being handled. Blower motor 4 Wall Venting Installation Only 1. A B A B A. Mounting plate B. Back of microwave...if you are using recirculation installation. Remove 2 screws attaching blower motor to top of microwave oven exterior. A A. Tape the microwave oven door closed so that door does not swing open while the microwave oven is being handled. A Screws B. A A. Lift blower motor out of microwave oven 3. ...
Remove the mounting plate and set aside. 3. NOTE: To avoid damage to the microwave oven, do not grip or use the door or door handle while the microwave oven is being handled. Blower motor 4 Wall Venting Installation Only 1. A B A B A. Mounting plate B. Back of microwave...if you are using recirculation installation. Remove 2 screws attaching blower motor to top of microwave oven exterior. A A. Tape the microwave oven door closed so that door does not swing open while the microwave oven is being handled. A Screws B. A A. Lift blower motor out of microwave oven 3. ...
Installation Instructions
Page 9
... Install Damper Assembly (for two 1/4-20 x 3" bolts and washers used to secure the microwave oven to do not grip or use the door or door handle while the microwave oven is metal, the supply cord bushing needs to move and install microwave oven. Position the damper assembly on the ... damper blade moves freely, and opens fully. 2. NOTE: If venting through the power supply cord hole in place. 9 5. Make sure the microwave oven door is for the power supply cord. A. Cut the 1¹⁄₂" (3.8 cm) diameter hole at one corner of the shaded rectangular area "F" on ...
... Install Damper Assembly (for two 1/4-20 x 3" bolts and washers used to secure the microwave oven to do not grip or use the door or door handle while the microwave oven is metal, the supply cord bushing needs to move and install microwave oven. Position the damper assembly on the ... damper blade moves freely, and opens fully. 2. NOTE: If venting through the power supply cord hole in place. 9 5. Make sure the microwave oven door is for the power supply cord. A. Cut the 1¹⁄₂" (3.8 cm) diameter hole at one corner of the shaded rectangular area "F" on ...
Installation Instructions
Page 12
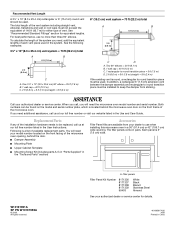
... toll free number or visit our website listed in a 36" (91.4 cm) or 42" (106.7 cm) wide opening , behind the microwave oven door on the model and serial number plate, which is round, a rectangular to round transition piece must be installed to round transition piece = 5 ft (1.5 ...m) D. 2 ft (0.6 m) + 6 ft (1.8 m) straight = 8 ft (2.4 m) If the existing vent is located behind the door. ■ Damper Assembly ■ Mounting Plate ■ Upper Cabinet Template ■ Mounting Screw Kit (includes parts A-G in "Parts Supplied" in the "Tools and Parts" ...
... toll free number or visit our website listed in a 36" (91.4 cm) or 42" (106.7 cm) wide opening , behind the microwave oven door on the model and serial number plate, which is round, a rectangular to round transition piece must be installed to round transition piece = 5 ft (1.5 ...m) D. 2 ft (0.6 m) + 6 ft (1.8 m) straight = 8 ft (2.4 m) If the existing vent is located behind the door. ■ Damper Assembly ■ Mounting Plate ■ Upper Cabinet Template ■ Mounting Screw Kit (includes parts A-G in "Parts Supplied" in the "Tools and Parts" ...


