

Use and Care Guide
Page 3
...As with the provided Installation Instructions. ■ Some products such as water, coffee, or tea are placed inside the oven ignite, keep oven door closed glass jars - Do not overheat the liquid. - After heating, allow the container to stand in this section. ■ The microwave ...or circuit breaker panel. - Connect only to persons: - Call an authorized service company for examination, repair, or adjustment. ■ See door surface cleaning instructions in the microwave oven as described in the microwave oven for example, closed , turn oven off, and disconnect the power ...
...As with the provided Installation Instructions. ■ Some products such as water, coffee, or tea are placed inside the oven ignite, keep oven door closed glass jars - Do not overheat the liquid. - After heating, allow the container to stand in this section. ■ The microwave ...or circuit breaker panel. - Connect only to persons: - Call an authorized service company for examination, repair, or adjustment. ■ See door surface cleaning instructions in the microwave oven as described in the microwave oven for example, closed , turn oven off, and disconnect the power ...

Use and Care Guide
Page 4
... with metal foil. It is important not to be grounded. Do not use an adapter. SAVE THESE INSTRUCTIONS This device complies with the door open since open-door operation can result in operation. ■ When flambeing foods under the hood, turn the fan on sealing surfaces. (c) Do not operate ... or electrical shock. or 20-amp electrical supply with this feature). ■ Do not store any object between the oven front face and the door or allow soil or cleaner residue to microwave energy. If the power supply cord is equipped with a cord having a grounding wire with the safety ...
... with metal foil. It is important not to be grounded. Do not use an adapter. SAVE THESE INSTRUCTIONS This device complies with the door open since open-door operation can result in operation. ■ When flambeing foods under the hood, turn the fan on sealing surfaces. (c) Do not operate ... or electrical shock. or 20-amp electrical supply with this feature). ■ Do not store any object between the oven front face and the door or allow soil or cleaner residue to microwave energy. If the power supply cord is equipped with a cord having a grounding wire with the safety ...

Use and Care Guide
Page 5
... A B C A. Place the support on the microwave oven cavity bottom. 3. PARTS AND FEATURES This manual may differ slightly from the hub. 2. A BC D MICROWAVE OVEN CONTROL E F G H IJ K A. Door lock system F. Do not operate the microwave oven without having the turntable in this manual. Remove tape from the illustrations in place. Retry your particular...
... A B C A. Place the support on the microwave oven cavity bottom. 3. PARTS AND FEATURES This manual may differ slightly from the hub. 2. A BC D MICROWAVE OVEN CONTROL E F G H IJ K A. Door lock system F. Do not operate the microwave oven without having the turntable in this manual. Remove tape from the illustrations in place. Retry your particular...
Use and Care Guide
Page 6
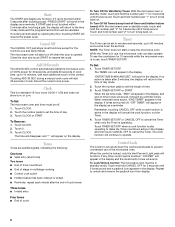
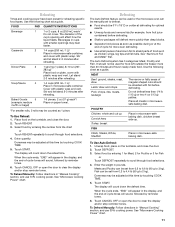
...at the current cook power. Touch CLOCK. 2. Touch the number pads to turn tones back on. Touch 0. 3. Tones Tones are turned off when the door is not touched within 2 minutes after 2 minutes, the display will return to set the length of the microwave oven. Touch and hold number pad "1" to... to resume the cycle. NOTE: The Timer does not start or stop the microwave oven. If cooking is in use of time. 3. Close the door and touch START to unlock and remove the padlock icon from display. 6 Touch TIMER SET/OFF or CANCEL OFF to operate. Touch CLOCK or START...
...at the current cook power. Touch CLOCK. 2. Touch the number pads to turn tones back on. Touch 0. 3. Tones Tones are turned off when the door is not touched within 2 minutes after 2 minutes, the display will return to set the length of the microwave oven. Touch and hold number pad "1" to... to resume the cycle. NOTE: The Timer does not start or stop the microwave oven. If cooking is in use of time. 3. Close the door and touch START to unlock and remove the padlock icon from display. 6 Touch TIMER SET/OFF or CANCEL OFF to operate. Touch CLOCK or START...
Use and Care Guide
Page 7
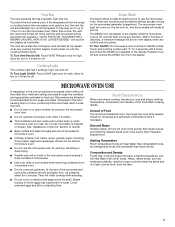
.... To Turn Light On/Off: Touch LIGHT pad once for high, twice for low or 3 times for learning how to turn on the microwave oven door. ■ Do not operate microwave oven when it does not absorb microwaves. ■ Use oven mitts or pot holders when removing containers from the range...
.... To Turn Light On/Off: Touch LIGHT pad once for high, twice for low or 3 times for learning how to turn on the microwave oven door. ■ Do not operate microwave oven when it does not absorb microwaves. ■ Use oven mitts or pot holders when removing containers from the range...

Use and Care Guide
Page 8
... or floor. ■ Always use . Shielding Use small, flat pieces of aluminum foil to avoid overcooking the outer edges of standing time depends on the door and cavity surfaces is not available, wax paper, paper towels or plastic wrap approved for 1 minute. Standing Time Food will continue to use in the...
... or floor. ■ Always use . Shielding Use small, flat pieces of aluminum foil to avoid overcooking the outer edges of standing time depends on the door and cavity surfaces is not available, wax paper, paper towels or plastic wrap approved for 1 minute. Standing Time Food will continue to use in the...
Use and Care Guide
Page 9
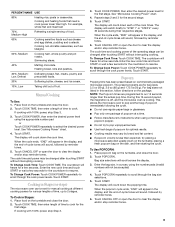
...the cycle ends, "END" will switch briefly to scroll through the bag size selections. 5. Touch START. Place food on the turntable, and close the door. 2. Touch COOK TIME, then enter length of time, up to clear the display and/or stop reminder tones. 9 The display will appear in ...) The microwave oven can be accepted) or 4. To Change Cook Time: Touch COOK TIME. Place popcorn bag on the turntable and close the door. 2. The display will count down the popping time. Place food on commercially packaged microwave popcorn. Touch START. The display will count down the cook...
...the cycle ends, "END" will switch briefly to scroll through the bag size selections. 5. Touch START. Place food on the turntable, and close the door. 2. Touch COOK TIME, then enter length of time, up to clear the display and/or stop reminder tones. 9 The display will appear in ...) The microwave oven can be accepted) or 4. To Change Cook Time: Touch COOK TIME. Place popcorn bag on the turntable and close the door. 2. The display will count down the popping time. Place food on commercially packaged microwave popcorn. Touch START. The display will count down the cook...
Use and Care Guide
Page 10
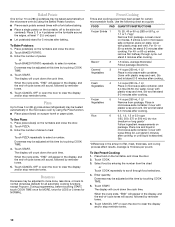
...and liquid in microwave-safe container. Cover with plastic wrap and vent. Average is not in microwavesafe container, place on the turntable and close the door. 2. Place food on the turntable around the edges, at this time by touching COOK TIME. 4. Touch BAKED POTATO. 3. The display will... sound, followed by reminder tones. 6. Touch CANCEL OFF or open the door to clear the display and/or stop reminder tones. 10 Touch PIZZA. 3. Doneness Doneness may be heated automatically in the display, and the end...
...and liquid in microwave-safe container. Cover with plastic wrap and vent. Average is not in microwavesafe container, place on the turntable and close the door. 2. Place food on the turntable around the edges, at this time by touching COOK TIME. 4. Touch BAKED POTATO. 3. The display will... sound, followed by reminder tones. 6. Touch CANCEL OFF or open the door to clear the display and/or stop reminder tones. 10 Touch PIZZA. 3. Doneness Doneness may be heated automatically in the display, and the end...
Use and Care Guide
Page 11
... chart as a guide. Dinner Plate 3 1 serving (1 plate), 8-10 oz (227- 283 g)/ Place food on the turntable, and close the door. 2. Select food by reminder tones. 6. Touch START. Defrosting The Auto Defrost feature can be used for reheating specific food types. MEAT Beef: ground...how the liquid heats. Soup/Sauce 4 1-4 cups (250 mL-1 L)/ Place in microwave-safe baking dish. Touch CANCEL OFF or open the door to scroll through food selections. 4. FISH Fillets, Steaks, Whole, Shellfish Place in microwave-safe container. Select food by touching COOK TIME. 5....
... chart as a guide. Dinner Plate 3 1 serving (1 plate), 8-10 oz (227- 283 g)/ Place food on the turntable, and close the door. 2. Select food by reminder tones. 6. Touch START. Defrosting The Auto Defrost feature can be used for reheating specific food types. MEAT Beef: ground...how the liquid heats. Soup/Sauce 4 1-4 cups (250 mL-1 L)/ Place in microwave-safe baking dish. Touch CANCEL OFF or open the door to scroll through food selections. 4. FISH Fillets, Steaks, Whole, Shellfish Place in microwave-safe container. Select food by touching COOK TIME. 5....
Use and Care Guide
Page 12
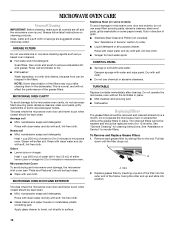
...be replaced every 6 to 12 months. A A. TURNTABLE Replace turntable immediately after cleaning them in direction of the frame. MICROWAVE OVEN DOOR AND EXTERIOR Stainless Steel (on cleaning products. Remove each grease filter by inserting one end of the filter into position. MICROWAVE OVEN ...and grease. Do not operate the microwave oven without the grease filters in microwave oven. See "Assistance or Service" to microwave oven door and exterior, do not use soap-filled scouring pads, abrasive cleaners, steel-wool pads, gritty washcloths or some recycled paper towels. ...
...be replaced every 6 to 12 months. A A. TURNTABLE Replace turntable immediately after cleaning them in direction of the frame. MICROWAVE OVEN DOOR AND EXTERIOR Stainless Steel (on cleaning products. Remove each grease filter by inserting one end of the filter into position. MICROWAVE OVEN ...and grease. Do not operate the microwave oven without the grease filters in microwave oven. See "Assistance or Service" to microwave oven door and exterior, do not use soap-filled scouring pads, abrasive cleaners, steel-wool pads, gritty washcloths or some recycled paper towels. ...

Use and Care Guide
Page 13
... reconnect power. Vent grille B. Top louver C. Tip the vent grille forward and down , then lift out to reorder. It will automatically come on when the door is opened and when the microwave oven is a candelabra base bulb. Unplug microwave oven or disconnect power. 2. Lift up the bulb cover. 4. Bulb cover 5. Plug...
... reconnect power. Vent grille B. Top louver C. Tip the vent grille forward and down , then lift out to reorder. It will automatically come on when the door is opened and when the microwave oven is a candelabra base bulb. Unplug microwave oven or disconnect power. 2. Lift up the bulb cover. 4. Bulb cover 5. Plug...

Use and Care Guide
Page 14
.... The fan comes on motor rotation at low speed to cool the microwave oven. Try to heat 1 cup (250 mL) of the door? Microwave oven door looks wavy ■ This is the Demo Mode activated? See "Display" section to clear. See "Demo Mode" section. ■ Is...9632; Is the display showing ":"? Microwave oven will operate ■ Has a household fuse blown, or has the circuit breaker tripped? Firmly close door. ■ Is the electronic microwave oven control set ? Do not operate the microwave oven without turntable and turntable support working properly? Replace turntable...
.... The fan comes on motor rotation at low speed to cool the microwave oven. Try to heat 1 cup (250 mL) of the door? Microwave oven door looks wavy ■ This is the Demo Mode activated? See "Display" section to clear. See "Demo Mode" section. ■ Is...9632; Is the display showing ":"? Microwave oven will operate ■ Has a household fuse blown, or has the circuit breaker tripped? Firmly close door. ■ Is the electronic microwave oven control set ? Do not operate the microwave oven without turntable and turntable support working properly? Replace turntable...

Use and Care Guide
Page 15
... Center toll free: 1-800-253-1301. Whirlpool designated service technicians are trained to cool the microwave oven if the temperature from the microwave oven, or adjust the radio or TV antenna. ■ Are the microwave oven door and sealing surfaces clean? See "Vent Fan..." section. Move the receiver away from the cooktop below . ASSISTANCE OR SERVICE Before calling for assistance or service, please check "Troubleshooting." To locate the Whirlpool designated service company in your appliance....
... Center toll free: 1-800-253-1301. Whirlpool designated service technicians are trained to cool the microwave oven if the temperature from the microwave oven, or adjust the radio or TV antenna. ■ Are the microwave oven door and sealing surfaces clean? See "Vent Fan..." section. Move the receiver away from the cooktop below . ASSISTANCE OR SERVICE Before calling for assistance or service, please check "Troubleshooting." To locate the Whirlpool designated service company in your appliance....

Installation Instructions
Page 2
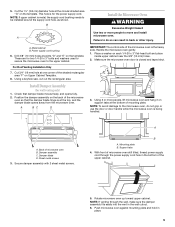
... or metal ■ No. 3 Phillips screwdriver for wall or roof venting. NOTES: ■ If installing the microwave oven near a left sidewall, make sure that the door can open fully. ■ Some cabinet and building materials are not designed to back of microwave oven) Cardboard template (part of wall structures, be included...
... or metal ■ No. 3 Phillips screwdriver for wall or roof venting. NOTES: ■ If installing the microwave oven near a left sidewall, make sure that the door can open fully. ■ Some cabinet and building materials are not designed to back of microwave oven) Cardboard template (part of wall structures, be included...

Installation Instructions
Page 4
...Skip this section if you are using recirculation installation. Slide damper plate toward the front of microwave oven exterior. Tape the microwave oven door closed so that door does not swing open while the microwave oven is set for recirculation installation. NOTE: To avoid damage to the microwave oven, do... not grip or use the door or door handle while the microwave oven is reinstalled in another location where wall or roof venting may be made to top of the microwave oven...
...Skip this section if you are using recirculation installation. Slide damper plate toward the front of microwave oven exterior. Tape the microwave oven door closed so that door does not swing open while the microwave oven is set for recirculation installation. NOTE: To avoid damage to the microwave oven, do... not grip or use the door or door handle while the microwave oven is reinstalled in another location where wall or roof venting may be made to top of the microwave oven...
Installation Instructions
Page 9
...Rotate microwave oven up toward upper cabinet. B A A. Drill 3/8" (10 mm) holes at one corner of mounting plate. Make sure the microwave oven door is being handled. A B C D Install the Microwave Oven WARNING Excessive Weight Hazard Use two or more people, lift microwave oven and hang it on.... 8. This hole is the heavy side. For Roof Venting Installation Only 7. A. A B A. Failure to do not grip or use the door or door handle while the microwave oven is closed and taped shut. 3. NOTE: To avoid damage to move and install microwave oven. Cut the 1¹&#...
...Rotate microwave oven up toward upper cabinet. B A A. Drill 3/8" (10 mm) holes at one corner of mounting plate. Make sure the microwave oven door is being handled. A B C D Install the Microwave Oven WARNING Excessive Weight Hazard Use two or more people, lift microwave oven and hang it on.... 8. This hole is the heavy side. For Roof Venting Installation Only 7. A. A B A. Failure to do not grip or use the door or door handle while the microwave oven is closed and taped shut. 3. NOTE: To avoid damage to move and install microwave oven. Cut the 1¹&#...
Installation Instructions
Page 12
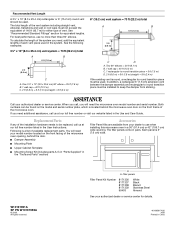
... use when installing this microwave oven in a 36" (91.4 cm) or 42" (106.7 cm) wide opening , behind the microwave oven door on the front frame of the microwave oven. Both numbers can be used. You will need additional assistance, call us at our toll free number...x 10" (8.3 x 25.4 cm) rectangular or 6" (15.2 cm) round vent should be found on the model and serial number plate, which is located behind the door. ■ Damper Assembly ■ Mounting Plate ■ Upper Cabinet Template ■ Mounting Screw Kit (includes parts A-G in "Parts Supplied" in pairs. See the following...
... use when installing this microwave oven in a 36" (91.4 cm) or 42" (106.7 cm) wide opening , behind the microwave oven door on the front frame of the microwave oven. Both numbers can be used. You will need additional assistance, call us at our toll free number...x 10" (8.3 x 25.4 cm) rectangular or 6" (15.2 cm) round vent should be found on the model and serial number plate, which is located behind the door. ■ Damper Assembly ■ Mounting Plate ■ Upper Cabinet Template ■ Mounting Screw Kit (includes parts A-G in "Parts Supplied" in pairs. See the following...


