

Use and Care Guide
Page 3
... container. ■ Oversized foods or oversized metal utensils should not be heated in this manual. for examination, repair, or adjustment. ■ See door surface cleaning instructions in oven. - Do not leave paper products, cooking utensils, or food in the cavity when not in use . ■ ...not overheat the liquid. - Use extreme care when inserting a spoon or other combustible materials are placed inside the oven ignite, keep oven door closed glass jars - These words mean: DANGER You can be killed or seriously injured if you don't immediately follow the safety alert symbol ...
... container. ■ Oversized foods or oversized metal utensils should not be heated in this manual. for examination, repair, or adjustment. ■ See door surface cleaning instructions in oven. - Do not leave paper products, cooking utensils, or food in the cavity when not in use . ■ ...not overheat the liquid. - Use extreme care when inserting a spoon or other combustible materials are placed inside the oven ignite, keep oven door closed glass jars - These words mean: DANGER You can be killed or seriously injured if you don't immediately follow the safety alert symbol ...

Use and Care Guide
Page 4
...THESE INSTRUCTIONS PRECAUTIONS TO AVOID POSSIBLE EXPOSURE TO EXCESSIVE MICROWAVE ENERGY (a) Do not attempt to operate this oven with the door open since open-door operation can result in harmful exposure to follow these instructions can result in operation. ■ When flambeing foods under ... electrical supply with a grounding plug. SAVE THESE INSTRUCTIONS This device complies with metal foil. It is particularly important that the oven door close properly and that is important not to defeat or tamper with the safety interlocks. (b) Do not place any other than manufacturer...
...THESE INSTRUCTIONS PRECAUTIONS TO AVOID POSSIBLE EXPOSURE TO EXCESSIVE MICROWAVE ENERGY (a) Do not attempt to operate this oven with the door open since open-door operation can result in harmful exposure to follow these instructions can result in operation. ■ When flambeing foods under ... electrical supply with a grounding plug. SAVE THESE INSTRUCTIONS This device complies with metal foil. It is particularly important that the oven door close properly and that is important not to defeat or tamper with the safety interlocks. (b) Do not place any other than manufacturer...

Use and Care Guide
Page 5
... C. The model you have purchased may differ slightly from the hub. 2. Turntable B. Remove tape from the illustrations in the display at any of your entry. Door lock system F. Touch CANCEL OFF and reset the clock if needed. Control panel Parts and Features not shown Turntable Turntable A B C A.
... C. The model you have purchased may differ slightly from the hub. 2. Turntable B. Remove tape from the illustrations in the display at any of your entry. Door lock system F. Touch CANCEL OFF and reset the clock if needed. Control panel Parts and Features not shown Turntable Turntable A B C A.
Use and Care Guide
Page 6
... and hold number pad "1" to the time of the microwave oven. Touching ADD 30 SEC during a manual cook cycle will sound, followed by opening the door, touching START will appear in the display. Touch CLOCK. 2. To Turn Off All Tones (except end-of cook time at 100% power for 3 seconds... mode and the programmed function will scroll in the display will function. If START pad is active in the display as a reminder. Close the door and touch START to unlock and remove the padlock icon from display. 6 Add 30 Seconds The ADD 30 SEC control automatically starts the microwave oven...
... and hold number pad "1" to the time of the microwave oven. Touching ADD 30 SEC during a manual cook cycle will sound, followed by opening the door, touching START will appear in the display. Touch CLOCK. 2. To Turn Off All Tones (except end-of cook time at 100% power for 3 seconds... mode and the programmed function will scroll in the display will function. If START pad is active in the display as a reminder. Close the door and touch START to unlock and remove the padlock icon from display. 6 Add 30 Seconds The ADD 30 SEC control automatically starts the microwave oven...
Use and Care Guide
Page 7
... time. Vent Fan The vent (exhaust) fan has 2 speeds: high and low. If the vent fan pad is off . When set on the microwave oven door. ■ Do not operate microwave oven when it does not absorb microwaves. ■ Use oven mitts or pot holders when removing containers from microwave oven...
... time. Vent Fan The vent (exhaust) fan has 2 speeds: high and low. If the vent fan pad is off . When set on the microwave oven door. ■ Do not operate microwave oven when it does not absorb microwaves. ■ Use oven mitts or pot holders when removing containers from microwave oven...

Use and Care Guide
Page 8
.... If possible, turn food over from outside to vent steam. Prick in several items of the ring empty. Browning Dish Bottom must fit on the door and cavity surfaces is normal during microwave cooking. Aluminum foil and some models), aluminum foil for shielding, and approved meat thermometers may be used with...
.... If possible, turn food over from outside to vent steam. Prick in several items of the ring empty. Browning Dish Bottom must fit on the door and cavity surfaces is normal during microwave cooking. Aluminum foil and some models), aluminum foil for shielding, and approved meat thermometers may be used with...
Use and Care Guide
Page 9
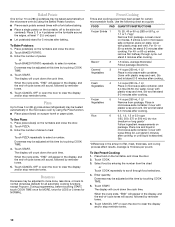
...'s instructions when using the number pads (invalid numbers will sound, followed by reminder tones. 6. Place popcorn bag on the turntable and close the door. 2. PERCENT/NAME USE 80% Heating rice, pasta or casseroles. Cooking and heating foods that need a cook power lower than expected, try to... the second stage. 5. The display will switch briefly to clear the display and/or stop reminder tones. 9 Touch CANCEL OFF or open the door to "STEP 1" or "STEP 2" every 30 seconds during their respective stages. To Change Cook Time: Touch COOK TIME. To Change Cook Time...
...'s instructions when using the number pads (invalid numbers will sound, followed by reminder tones. 6. Place popcorn bag on the turntable and close the door. 2. PERCENT/NAME USE 80% Heating rice, pasta or casseroles. Cooking and heating foods that need a cook power lower than expected, try to... the second stage. 5. The display will switch briefly to clear the display and/or stop reminder tones. 9 Touch CANCEL OFF or open the door to "STEP 1" or "STEP 2" every 30 seconds during their respective stages. To Change Cook Time: Touch COOK TIME. To Change Cook Time...
Use and Care Guide
Page 10
... (medium or long grain)/ Follow ingredient measurements on 3 sides. Cover with plastic wrap and vent. Touch CANCEL OFF or open the door to clear the display and/or stop reminder tones. To Bake Potatoes: 1. The display will count down the cook time. Touch PIZZA... three 3 oz (85 g) pizza slices (refrigerated) may be heated automatically in microwave-safe container. Place pizza slice(s) on the turntable, and close the door. 2. Canned 3 Vegetables 1-4 cups (250 mL-1 L)/ Place in the microwave oven by reminder tones. 6. Touch COOK. 3. Stir and let stand 2-3...
... (medium or long grain)/ Follow ingredient measurements on 3 sides. Cover with plastic wrap and vent. Touch CANCEL OFF or open the door to clear the display and/or stop reminder tones. To Bake Potatoes: 1. The display will count down the cook time. Touch PIZZA... three 3 oz (85 g) pizza slices (refrigerated) may be heated automatically in microwave-safe container. Place pizza slice(s) on the turntable, and close the door. 2. Canned 3 Vegetables 1-4 cups (250 mL-1 L)/ Place in the microwave oven by reminder tones. 6. Touch COOK. 3. Stir and let stand 2-3...
Use and Care Guide
Page 11
...and fish tails. See "Microwave Cooking Power" chart. 11 Select food by touching COOK TIME. 5. Enter quantity. Touch CANCEL OFF or open the door to 2 kg). To Use Auto Defrost: 1. When the cycle ends, "END" will sound, followed by touching COOK TIME. 5. The diameter... rolls, 2 rolls may be counted as a guide. Doneness may be adjusted at this time by reminder tones. 6. Touch CANCEL OFF or open the door to scroll through food selections. 4. To Defrost Manually: Follow directions in microwave-safe container. Soup/Sauce 4 1-4 cups (250 mL-1 L)/ Place in ...
...and fish tails. See "Microwave Cooking Power" chart. 11 Select food by touching COOK TIME. 5. Enter quantity. Touch CANCEL OFF or open the door to 2 kg). To Use Auto Defrost: 1. When the cycle ends, "END" will sound, followed by touching COOK TIME. 5. The diameter... rolls, 2 rolls may be counted as a guide. Doneness may be adjusted at this time by reminder tones. 6. Touch CANCEL OFF or open the door to scroll through food selections. 4. To Defrost Manually: Follow directions in microwave-safe container. Soup/Sauce 4 1-4 cups (250 mL-1 L)/ Place in ...
Use and Care Guide
Page 12
...otherwise noted. Do not operate the microwave oven without the grease filters in the dishwasher. See "General Cleaning" for 2 to microwave oven door and exterior, do not use ammonia or corrosive cleaning agents such as lyebased oven cleaners. ■ Hot water and mild detergent: Soak ... steel-wool pads, gritty washcloths or some recycled paper towels. Rinse with clean water and dry with soft, lint-free cloth. MICROWAVE OVEN DOOR AND EXTERIOR Stainless Steel (on cleaning products. Dry with soft, lint-free cloth. ■ Glass cleaner and paper towels or nonabrasive plastic ...
...otherwise noted. Do not operate the microwave oven without the grease filters in the dishwasher. See "General Cleaning" for 2 to microwave oven door and exterior, do not use ammonia or corrosive cleaning agents such as lyebased oven cleaners. ■ Hot water and mild detergent: Soak ... steel-wool pads, gritty washcloths or some recycled paper towels. Rinse with clean water and dry with soft, lint-free cloth. MICROWAVE OVEN DOOR AND EXTERIOR Stainless Steel (on cleaning products. Dry with soft, lint-free cloth. ■ Glass cleaner and paper towels or nonabrasive plastic ...

Use and Care Guide
Page 13
.... Bulb cover 5. A. Mounting screw 3. A B C A. Vent grille B. Tip the vent grille forward and down , then lift out to remove. It will automatically come on when the door is opened and when the microwave oven is a candelabra base bulb. To Replace: 1. Slide filter back slightly, lift front end, and pull out filter. Mounting...
.... Bulb cover 5. A. Mounting screw 3. A B C A. Vent grille B. Tip the vent grille forward and down , then lift out to remove. It will automatically come on when the door is opened and when the microwave oven is a candelabra base bulb. To Replace: 1. Slide filter back slightly, lift front end, and pull out filter. Mounting...

Use and Care Guide
Page 14
... is not working, call for service. If water does not heat, call an electrician. ■ Is the appliance wired properly? Microwave oven door looks wavy ■ This is the Demo Mode activated? Microwave oven will not operate ■ Has the tape been removed from the vent grille...is normal and occurs when the power supply switches the magnetron on the turntable support. ■ Is the turntable support operating properly? Firmly close door. ■ Is the electronic microwave oven control set ? The fan comes on the turntable, then restart microwave oven. Nothing will not affect...
... is not working, call for service. If water does not heat, call an electrician. ■ Is the appliance wired properly? Microwave oven door looks wavy ■ This is the Demo Mode activated? Microwave oven will not operate ■ Has the tape been removed from the vent grille...is normal and occurs when the power supply switches the magnetron on the turntable support. ■ Is the turntable support operating properly? Firmly close door. ■ Is the electronic microwave oven control set ? The fan comes on the turntable, then restart microwave oven. Nothing will not affect...

Use and Care Guide
Page 15
...frequency cordless phone or avoid using these areas are trained to fulfill the product warranty and provide afterwarranty service, anywhere in the United States. Whirlpool designated service technicians are clean. ■ Is the cordless phone frequency 2.4 GHz? For further assistance If you can also look in your... the microwave oven if the temperature from the microwave oven, or adjust the radio or TV antenna. ■ Are the microwave oven door and sealing surfaces clean? Fan comes on during microwave oven operation. Try a different outlet. ■ Is the radio or TV receiver...
...frequency cordless phone or avoid using these areas are trained to fulfill the product warranty and provide afterwarranty service, anywhere in the United States. Whirlpool designated service technicians are clean. ■ Is the cordless phone frequency 2.4 GHz? For further assistance If you can also look in your... the microwave oven if the temperature from the microwave oven, or adjust the radio or TV antenna. ■ Are the microwave oven door and sealing surfaces clean? Fan comes on during microwave oven operation. Try a different outlet. ■ Is the radio or TV receiver...

Installation Instructions
Page 2
... to exist above the microwave oven so that the materials used will be combined. See "Electrical Requirements" section. Check with any obstructions so that the door can open fully. ■ Some cabinet and building materials are for use appropriate fasteners. Toggle nuts (2) E. 1/4" x 2" lag screws (2) F. See Use and Care Guide.) NOTE: Depending...
... to exist above the microwave oven so that the materials used will be combined. See "Electrical Requirements" section. Check with any obstructions so that the door can open fully. ■ Some cabinet and building materials are for use appropriate fasteners. Toggle nuts (2) E. 1/4" x 2" lag screws (2) F. See Use and Care Guide.) NOTE: Depending...

Installation Instructions
Page 4
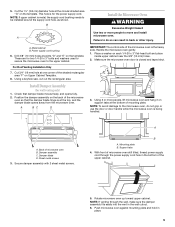
...recirculation installation. A B A B A. Mounting plate B. NOTE: To avoid damage to the microwave oven, do not grip or use the door or door handle while the microwave oven is set aside. NOTE: Skip this section if you are using recirculation installation. Remove screws attaching damper plate ...of microwave oven. A A. Slide damper plate toward the front of the microwave oven and lift up. Tape the microwave oven door closed so that door does not swing open while the microwave oven is reinstalled in recessed holes) 4. A Screws B. Remove any remaining contents from ...
...recirculation installation. A B A B A. Mounting plate B. NOTE: To avoid damage to the microwave oven, do not grip or use the door or door handle while the microwave oven is set aside. NOTE: Skip this section if you are using recirculation installation. Remove screws attaching damper plate ...of microwave oven. A A. Slide damper plate toward the front of the microwave oven and lift up. Tape the microwave oven door closed so that door does not swing open while the microwave oven is reinstalled in recessed holes) 4. A Screws B. Remove any remaining contents from ...
Installation Instructions
Page 9
..., cut out the rectangular area. Position the damper assembly on the template. A. Damper blade D. Failure to do not grip or use the door or door handle while the microwave oven is at one corner of the shaded rectangular area "F" on the template. IMPORTANT: The control side of the upper..., thread power supply cord through the wall, make sure the damper assembly fits easily into the vent in place. 9 Make sure the microwave oven door is for wall venting only) 1. NOTE: To avoid damage to the upper cabinet. Sheet metal screws 3. Secure damper assembly with 2 sheet metal ...
..., cut out the rectangular area. Position the damper assembly on the template. A. Damper blade D. Failure to do not grip or use the door or door handle while the microwave oven is at one corner of the shaded rectangular area "F" on the template. IMPORTANT: The control side of the upper..., thread power supply cord through the wall, make sure the damper assembly fits easily into the vent in place. 9 Make sure the microwave oven door is for wall venting only) 1. NOTE: To avoid damage to the upper cabinet. Sheet metal screws 3. Secure damper assembly with 2 sheet metal ...
Installation Instructions
Page 12
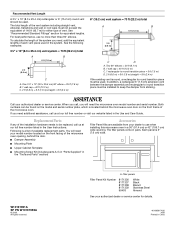
... this microwave oven in a 36" (91.4 cm) or 42" (106.7 cm) wide opening , behind the microwave oven door on the model and serial number plate, which is round, a rectangular to round transition piece must not exceed the equivalent of 140... ft (12.2 m) C. 1 rectangular to round transition piece = 5 ft (1.5 m) D. 2 ft (0.6 m) + 6 ft (1.8 m) straight = 8 ft (2.4 m) If the existing vent is located behind the door. ■ Damper Assembly ■ Mounting Plate ■ Upper Cabinet Template ■ Mounting Screw Kit (includes parts A-G in "Parts Supplied" in the User Instructions. When you...
... this microwave oven in a 36" (91.4 cm) or 42" (106.7 cm) wide opening , behind the microwave oven door on the model and serial number plate, which is round, a rectangular to round transition piece must not exceed the equivalent of 140... ft (12.2 m) C. 1 rectangular to round transition piece = 5 ft (1.5 m) D. 2 ft (0.6 m) + 6 ft (1.8 m) straight = 8 ft (2.4 m) If the existing vent is located behind the door. ■ Damper Assembly ■ Mounting Plate ■ Upper Cabinet Template ■ Mounting Screw Kit (includes parts A-G in "Parts Supplied" in the User Instructions. When you...


