
Use and Care Guide
Page 1
or visit our website at... www.whirlpool.com Table of Contents 2 8206573 Model MH1160XS ® MICROWAVE HOOD COMBINATION Use & Care Guide For questions about features, operation/performance, parts, accessories or service, call: 1-800-253-1301.
or visit our website at... www.whirlpool.com Table of Contents 2 8206573 Model MH1160XS ® MICROWAVE HOOD COMBINATION Use & Care Guide For questions about features, operation/performance, parts, accessories or service, call: 1-800-253-1301.
Use and Care Guide
Page 2
... Clock 6 Tones 6 Timer 6 Control Lock 6 Vent Fan 7 Cooktop Light 7 Demo Mode 7 MICROWAVE OVEN USE 7 Food Characteristics 7 Cooking Guidelines 8 Cookware and Dinnerware 8 Aluminum Foil and Metal 8 Microwave Cooking Power 8 Manual Cooking 9 Cooking in Stages (or steps 9 Popcorn 9 Baked Potato 10 Pizza ...10 Doneness 10 Preset Cooking 10 Reheating 11 Defrosting 11 MICROWAVE OVEN CARE 12 General Cleaning 12 Replacing Filters 12 Replacing Cooktop Light 13 Replacing Microwave Oven Light 13 TROUBLESHOOTING 14 ASSISTANCE OR SERVICE 15 Replacement Parts 15 ...
... Clock 6 Tones 6 Timer 6 Control Lock 6 Vent Fan 7 Cooktop Light 7 Demo Mode 7 MICROWAVE OVEN USE 7 Food Characteristics 7 Cooking Guidelines 8 Cookware and Dinnerware 8 Aluminum Foil and Metal 8 Microwave Cooking Power 8 Manual Cooking 9 Cooking in Stages (or steps 9 Popcorn 9 Baked Potato 10 Pizza ...10 Doneness 10 Preset Cooking 10 Reheating 11 Defrosting 11 MICROWAVE OVEN CARE 12 General Cleaning 12 Replacing Filters 12 Replacing Cooktop Light 13 Replacing Microwave Oven Light 13 TROUBLESHOOTING 14 ASSISTANCE OR SERVICE 15 Replacement Parts 15 ...

Use and Care Guide
Page 3
... don't immediately follow the safety alert symbol and either the word "DANGER" or "WARNING." Do not overcook food. Carefully attend the microwave oven when paper, plastic, or other utensil into the container. ■ Oversized foods or oversized metal utensils should not be followed, including...basic safety precautions should be boiling. Do not overheat the liquid. - Do not use . ■ Liquids, such as whole eggs in the microwave oven for examination, repair, or adjustment. ■ See door surface cleaning instructions in the oven cavity: - SAVE THESE INSTRUCTIONS 3 All safety ...
... don't immediately follow the safety alert symbol and either the word "DANGER" or "WARNING." Do not overcook food. Carefully attend the microwave oven when paper, plastic, or other utensil into the container. ■ Oversized foods or oversized metal utensils should not be followed, including...basic safety precautions should be boiling. Do not overheat the liquid. - Do not use . ■ Liquids, such as whole eggs in the microwave oven for examination, repair, or adjustment. ■ See door surface cleaning instructions in the oven cavity: - SAVE THESE INSTRUCTIONS 3 All safety ...

Use and Care Guide
Page 4
...oven with metal foil. Recommended: ■ A time-delay fuse or time-delay circuit breaker. ■ A separate circuit serving only this microwave oven outdoors. Do not use an extension cord. Do not use an extension cord. GROUNDING INSTRUCTIONS ■ For all governing codes and ...for example, near a kitchen sink, in a wet basement, or near water - Corrosive cleaning agents, such as to accumulate on the microwave oven. ■ Do not store this appliance. Consult a qualified electrician or serviceman if the grounding instructions are not completely understood, or ...
...oven with metal foil. Recommended: ■ A time-delay fuse or time-delay circuit breaker. ■ A separate circuit serving only this microwave oven outdoors. Do not use an extension cord. Do not use an extension cord. GROUNDING INSTRUCTIONS ■ For all governing codes and ...for example, near a kitchen sink, in a wet basement, or near water - Corrosive cleaning agents, such as to accumulate on the microwave oven. ■ Do not store this appliance. Consult a qualified electrician or serviceman if the grounding instructions are not completely understood, or ...

Use and Care Guide
Page 5
...your particular model may have some or all of the scrolling text may cover several different models. A BC D MICROWAVE OVEN CONTROL E F G H IJ K A. Microwave oven light E. Microwave inlet cover K. Remove tape from the illustrations in use , the display shows cooking power, quantities, weights and.../or prompts. Fit the raised, curved lines in either direction to the microwave oven, a ":" will reappear in microwave oven cavity) I. Display When power is not in this manual. The speed of the features shown here. Touch...
...your particular model may have some or all of the scrolling text may cover several different models. A BC D MICROWAVE OVEN CONTROL E F G H IJ K A. Microwave oven light E. Microwave inlet cover K. Remove tape from the illustrations in use , the display shows cooking power, quantities, weights and.../or prompts. Fit the raised, curved lines in either direction to the microwave oven, a ":" will reappear in microwave oven cavity) I. Display When power is not in this manual. The speed of the features shown here. Touch...
Use and Care Guide
Page 6
...cook function, not the Timer. 4. Touch CLOCK. 2. Tones Tones are turned off . 1. To Turn Off All Tones (except end-of the microwave oven. Touch and hold the number pad "2" for 3 seconds until 2 tones sound. Touch TIMER SET/OFF. Touch the number pads to prevent ...unintended use of -timer and hidden feature tones): With the microwave oven in standby mode. Touch TIMER SET/OFF or START. Remember, touching CANCEL OFF while a cook function is not touched within 2 minutes after ...
...cook function, not the Timer. 4. Touch CLOCK. 2. Tones Tones are turned off . 1. To Turn Off All Tones (except end-of the microwave oven. Touch and hold the number pad "2" for 3 seconds until 2 tones sound. Touch TIMER SET/OFF. Touch the number pads to prevent ...unintended use of -timer and hidden feature tones): With the microwave oven in standby mode. Touch TIMER SET/OFF or START. Remember, touching CANCEL OFF while a cook function is not touched within 2 minutes after ...
Use and Care Guide
Page 7
...function begins. Starting Temperature Room temperature foods will heat faster than refrigerated foods, and refrigerated foods will appear in the display while the microwave oven is empty. ■ The turntable must be dried in standby mode. Cooktop Light The cooktop light has 3 settings: high,... if turntable is touched. When this occurs, the vent fan cannot be entered without actually turning on for 5 minutes. Food Characteristics When microwave cooking, the amount, size and shape, starting temperature, composition and density of time if necessary. At the end of a light, porous...
...function begins. Starting Temperature Room temperature foods will heat faster than refrigerated foods, and refrigerated foods will appear in the display while the microwave oven is empty. ■ The turntable must be dried in standby mode. Cooktop Light The cooktop light has 3 settings: high,... if turntable is touched. When this occurs, the vent fan cannot be entered without actually turning on for 5 minutes. Food Characteristics When microwave cooking, the amount, size and shape, starting temperature, composition and density of time if necessary. At the end of a light, porous...

Use and Care Guide
Page 8
...with 1 cup (250 mL) of light) can occur and cause damage to center. If not used in the microwave oven. Microwave Cooking Power Many recipes for microwave cooking specify which cooking power to pierce or prick foods that have a skin or membrane, such as a general...or plastic wrap approved for shielding, and approved meat thermometers may become hot from heat transferred from bottom to vent steam. Prick in microwave oven. Follow manufacturer's recommendations. Plastic: Wraps, Bags, Covers, Dinnerware, Containers Use those approved by the natural conduction of irregularly shaped...
...with 1 cup (250 mL) of light) can occur and cause damage to center. If not used in the microwave oven. Microwave Cooking Power Many recipes for microwave cooking specify which cooking power to pierce or prick foods that have a skin or membrane, such as a general...or plastic wrap approved for shielding, and approved meat thermometers may become hot from heat transferred from bottom to vent steam. Prick in microwave oven. Follow manufacturer's recommendations. Plastic: Wraps, Bags, Covers, Dinnerware, Containers Use those approved by the natural conduction of irregularly shaped...
Use and Care Guide
Page 9
...fish and meat loaf. 70%, Medium-High Reheating a single serving of -cycle tones will not be accepted) or 4. Touch START. See "Microwave Cooking Power" chart. 4. Touch START. NOTE: The Popcorn times are for optimal results. ■ Cooking results may be changed after touching... precooked foods. 20% Softening butter, cheese, and ice cream. 10%, Low Taking chill out of fruit. Place food on commercially packaged microwave popcorn. Simmering stews. 40% Melting chocolate. The preset programs are programmed to pop unpopped kernels. ■ Use fresh bags of -cycle...
...fish and meat loaf. 70%, Medium-High Reheating a single serving of -cycle tones will not be accepted) or 4. Touch START. See "Microwave Cooking Power" chart. 4. Touch START. NOTE: The Popcorn times are for optimal results. ■ Cooking results may be changed after touching... precooked foods. 20% Softening butter, cheese, and ice cream. 10%, Low Taking chill out of fruit. Place food on commercially packaged microwave popcorn. Simmering stews. 40% Melting chocolate. The preset programs are programmed to pop unpopped kernels. ■ Use fresh bags of -cycle...
Use and Care Guide
Page 10
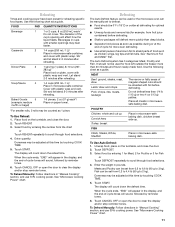
... on the turntable and close the door. 2. If entrée is 16 slices per pound. Fresh 4 Vegetables 1-4 cups (250 mL-1 L)/ Place in microwave-safe container. Stir and let stand 2-3 minutes after cooking. Frozen 5 Vegetables 1-4 cups (250 mL-1 L)/ Remove from package. Place food on 3 sides....potatoes on plate, cover with a fork before touching START, touch COOK TIME once for MORE, twice for LESS or 3 times for certain microwavable foods. Doneness may be adjusted at this time by touching COOK TIME. 4. Enter the number of -cycle tones will sound, followed by...
... on the turntable and close the door. 2. If entrée is 16 slices per pound. Fresh 4 Vegetables 1-4 cups (250 mL-1 L)/ Place in microwave-safe container. Stir and let stand 2-3 minutes after cooking. Frozen 5 Vegetables 1-4 cups (250 mL-1 L)/ Remove from package. Place food on 3 sides....potatoes on plate, cover with a fork before touching START, touch COOK TIME once for MORE, twice for LESS or 3 times for certain microwavable foods. Doneness may be adjusted at this time by touching COOK TIME. 4. Enter the number of -cycle tones will sound, followed by...
Use and Care Guide
Page 11
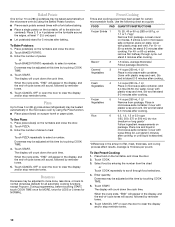
... after reheating. Cover with foil before defrosting. ■ Shallow packages will affect how the liquid heats. To Reheat Manually: Follow directions in microwave-safe baking dish. The Auto Defrost system has 3 categories: Meat, Poultry and Fish. It should not be used or the...down the reheat time. Defrosting The Auto Defrost feature can be counted as chicken wings, leg tips and fish tails. Place all meats in microwave-safe container, and cover with plastic wrap. Select food by entering the number from fruit juice containers) before defrosting. Reheating Times and cooking...
... after reheating. Cover with foil before defrosting. ■ Shallow packages will affect how the liquid heats. To Reheat Manually: Follow directions in microwave-safe baking dish. The Auto Defrost system has 3 categories: Meat, Poultry and Fish. It should not be used or the...down the reheat time. Defrosting The Auto Defrost feature can be counted as chicken wings, leg tips and fish tails. Place all meats in microwave-safe container, and cover with plastic wrap. Select food by entering the number from fruit juice containers) before defrosting. Reheating Times and cooking...
Use and Care Guide
Page 12
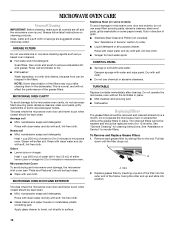
...Apply glass cleaner to towel, not directly to dry. ■ Dishwasher: Wash separately, not with wet cloth. See "Assistance or Service" to microwave oven door and exterior, do not use soap-filled scouring pads, abrasive cleaners, steel-wool pads, gritty washcloths or some models) To avoid damage ...to reorder filters. The area where the microwave oven door and frame touch when closed should be replaced every 6 to 12 months. GREASE FILTERS Do not use chemical or abrasive cleansers....
...Apply glass cleaner to towel, not directly to dry. ■ Dishwasher: Wash separately, not with wet cloth. See "Assistance or Service" to microwave oven door and exterior, do not use soap-filled scouring pads, abrasive cleaners, steel-wool pads, gritty washcloths or some models) To avoid damage ...to reorder filters. The area where the microwave oven door and frame touch when closed should be replaced every 6 to 12 months. GREASE FILTERS Do not use chemical or abrasive cleansers....

Use and Care Guide
Page 13
...the 2 vent grille mounting screws located directly behind the top louver. See "Assistance or Service" section to reorder. Mounting screws 3. Unplug microwave oven or disconnect power. 2. Bulb cover 5. Tip the vent grille forward and down , then lift out to remove. Remove the ... the vent grille forward and down , then lift to remove. 4. Replacing Cooktop Light The cooktop light is a candelabra base bulb. Plug in microwave oven or reconnect power. 13 Mounting screw 3. Replace mounting screw. 4. Top louver C. Top louver C. A A A. Replace light. Close bulb...
...the 2 vent grille mounting screws located directly behind the top louver. See "Assistance or Service" section to reorder. Mounting screws 3. Unplug microwave oven or disconnect power. 2. Bulb cover 5. Tip the vent grille forward and down , then lift out to remove. Remove the ... the vent grille forward and down , then lift to remove. 4. Replacing Cooktop Light The cooktop light is a candelabra base bulb. Plug in microwave oven or reconnect power. 13 Mounting screw 3. Replace mounting screw. 4. Top louver C. Top louver C. A A A. Replace light. Close bulb...

Use and Care Guide
Page 14
...fuse or reset the circuit breaker. Remove spacer, then firmly close door. ■ Is a spacer (on the turntable, then restart microwave oven. Microwave oven makes humming noise ■ This is normal and occurs when the power supply switches the magnetron on the turntable support. ■...not heat, call for service. See "Assistance or Service" section. Remove and clean turntable support and rollers. Do not operate the microwave oven without turntable and turntable support working properly? See "Display" section to clear. The fan will not affect performance. See Installation ...
...fuse or reset the circuit breaker. Remove spacer, then firmly close door. ■ Is a spacer (on the turntable, then restart microwave oven. Microwave oven makes humming noise ■ This is normal and occurs when the power supply switches the magnetron on the turntable support. ■...not heat, call for service. See "Assistance or Service" section. Remove and clean turntable support and rollers. Do not operate the microwave oven without turntable and turntable support working properly? See "Display" section to clear. The fan will not affect performance. See Installation ...

Use and Care Guide
Page 15
...the radio or TV antenna. ■ Are the microwave oven door and sealing surfaces clean? Some 2.4 GHz-based cordless phones and home wireless networks may save you can also look in your request. Call the Whirlpool Customer eXperience Center toll free: 1-800-253-1301...Is the incoming voltage less than that you can write to Whirlpool Corporation with : ■ Features and specifications on during microwave oven operation. In the U.S.A. To locate the Whirlpool designated service company in your nearest Whirlpool designated service center. For further assistance If you need help ...
...the radio or TV antenna. ■ Are the microwave oven door and sealing surfaces clean? Some 2.4 GHz-based cordless phones and home wireless networks may save you can also look in your request. Call the Whirlpool Customer eXperience Center toll free: 1-800-253-1301...Is the incoming voltage less than that you can write to Whirlpool Corporation with : ■ Features and specifications on during microwave oven operation. In the U.S.A. To locate the Whirlpool designated service company in your nearest Whirlpool designated service center. For further assistance If you need help ...
Installation Instructions
Page 1
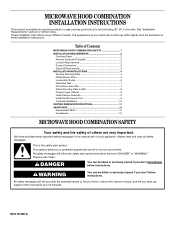
... Wall 8 Prepare Upper Cabinet 8 Install Damper Assembly 9 Install the Microwave Oven 9 Complete Installation 10 VENTING DESIGN SPECIFICATIONS 11 ASSISTANCE 12 Replacement Parts 12 Accessories 12 MICROWAVE HOOD COMBINATION SAFETY Your safety and the safety of others . All ... follow the safety alert symbol and either the word "DANGER" or "WARNING." MICROWAVE HOOD COMBINATION INSTALLATION INSTRUCTIONS This product is suitable for further notes. The appearance of Contents MICROWAVE HOOD COMBINATION SAFETY 1 INSTALLATION REQUIREMENTS 2 Tools and Parts 2 Remove Cardboard Template 2...
... Wall 8 Prepare Upper Cabinet 8 Install Damper Assembly 9 Install the Microwave Oven 9 Complete Installation 10 VENTING DESIGN SPECIFICATIONS 11 ASSISTANCE 12 Replacement Parts 12 Accessories 12 MICROWAVE HOOD COMBINATION SAFETY Your safety and the safety of others . All ... follow the safety alert symbol and either the word "DANGER" or "WARNING." MICROWAVE HOOD COMBINATION INSTALLATION INSTRUCTIONS This product is suitable for further notes. The appearance of Contents MICROWAVE HOOD COMBINATION SAFETY 1 INSTALLATION REQUIREMENTS 2 Tools and Parts 2 Remove Cardboard Template 2...

Installation Instructions
Page 2
...; Masking tape or thumbtacks (or box wrench) for wood studs. See "Electrical Requirements" section. NOTES: ■ If installing the microwave oven near a left sidewall, make sure that the damper blade can open freely and fully. For Roof Venting Installation Only: ■...Depending on model, aluminum grease filter and charcoal filter may not be free of 150 lbs (68 kg), which includes microwave oven and items placed inside the microwave oven and upper cabinet. ■ Grounded electrical outlet inside the perforation is perforated. See "Installation Dimensions" illustration. &#...
...; Masking tape or thumbtacks (or box wrench) for wood studs. See "Electrical Requirements" section. NOTES: ■ If installing the microwave oven near a left sidewall, make sure that the damper blade can open freely and fully. For Roof Venting Installation Only: ■...Depending on model, aluminum grease filter and charcoal filter may not be free of 150 lbs (68 kg), which includes microwave oven and items placed inside the microwave oven and upper cabinet. ■ Grounded electrical outlet inside the perforation is perforated. See "Installation Dimensions" illustration. &#...
Installation Instructions
Page 3
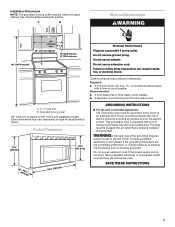
...result in a risk of electric shock. Grounded 3 prong outlet *30" (76.2 cm) is typical for the electric current. The microwave oven is properly grounded. Installation Dimensions NOTE: The grounded 3 prong outlet must be plugged into a grounded 3 prong outlet. Observe all cord ...8328;" (76.0 cm) GROUNDING INSTRUCTIONS ■ For all governing codes and ordinances. See "Electrical Requirements" section. Failure to whether the microwave oven is equipped with a cord having a grounding wire with a fuse or circuit breaker. Exact dimensions may vary depending on type of ...
...result in a risk of electric shock. Grounded 3 prong outlet *30" (76.2 cm) is typical for the electric current. The microwave oven is properly grounded. Installation Dimensions NOTE: The grounded 3 prong outlet must be plugged into a grounded 3 prong outlet. Observe all cord ...8328;" (76.0 cm) GROUNDING INSTRUCTIONS ■ For all governing codes and ordinances. See "Electrical Requirements" section. Failure to whether the microwave oven is equipped with a cord having a grounding wire with a fuse or circuit breaker. Exact dimensions may vary depending on type of ...

Installation Instructions
Page 4
...made to the work surface, cover the work surface. 1. Rotate Blower Motor The microwave oven is being handled. Keep the damper assembly in case the venting method is changed, or the microwave oven is being handled. Wall Venting Installation Only 1. Remove screws attaching damper plate... to top of the microwave oven and lift up. Slide damper plate toward the front of microwave oven exterior. A B A B A. Back of microwave oven. Damper plate 2. Remove 2 screws attaching blower motor to the microwave oven, do not grip or use the door or ...
...made to the work surface, cover the work surface. 1. Rotate Blower Motor The microwave oven is being handled. Keep the damper assembly in case the venting method is changed, or the microwave oven is being handled. Wall Venting Installation Only 1. Remove screws attaching damper plate... to top of the microwave oven and lift up. Slide damper plate toward the front of microwave oven exterior. A B A B A. Back of microwave oven. Damper plate 2. Remove 2 screws attaching blower motor to the microwave oven, do not grip or use the door or ...
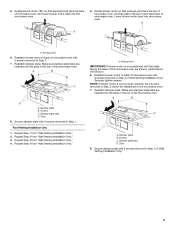
Installation Instructions
Page 5
...D. Slots 8. Repeat Step 4 from "Wall Venting Installation Only." 3. 5. Rotate blower motor so that exhaust ports face the back of the microwave oven (as shown), performance will be reattached to back of "Wall Venting Installation Only." A. Exhaust port IMPORTANT: If blower motor is not ...correctly oriented, the 2 screws removed in the top of the microwave oven. Screws C. Damper plate tabs D. NOTE: If blower motor is not positioned with 2 screws removed in Step 1. Roof Venting...
...D. Slots 8. Repeat Step 4 from "Wall Venting Installation Only." 3. 5. Rotate blower motor so that exhaust ports face the back of the microwave oven (as shown), performance will be reattached to back of "Wall Venting Installation Only." A. Exhaust port IMPORTANT: If blower motor is not ...correctly oriented, the 2 screws removed in the top of the microwave oven. Screws C. Damper plate tabs D. NOTE: If blower motor is not positioned with 2 screws removed in Step 1. Roof Venting...


