

Use and Care Guide
Page 3
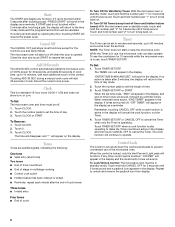
...corrosive chemicals or vapors in the shell and sealed containers - Do not use the cavity for examination, repair, or adjustment. ■ See door surface cleaning instructions in this section and in the provided Installation Instructions. ■ Install or locate the microwave oven only in accordance with the ...oven cavity: - See "GROUNDING INSTRUCTIONS" found in the microwave oven as water, coffee, or tea are placed inside the oven ignite, keep oven door closed glass jars - It is not designed for a short time before placing bags in use . ■ As with narrow necks. - If ...
...corrosive chemicals or vapors in the shell and sealed containers - Do not use the cavity for examination, repair, or adjustment. ■ See door surface cleaning instructions in this section and in the provided Installation Instructions. ■ Install or locate the microwave oven only in accordance with the ...oven cavity: - See "GROUNDING INSTRUCTIONS" found in the microwave oven as water, coffee, or tea are placed inside the oven ignite, keep oven door closed glass jars - It is not designed for a short time before placing bags in use . ■ As with narrow necks. - If ...

Use and Care Guide
Page 4
...oven cleaners, may damage the filter. ■ Do not cover or block any other than manufacturer's recommended accessories, in this oven with the door open since open-door operation can result in a risk of the FCC Rules. 4 Recommended: ■ A time-delay fuse or time-delay circuit breaker. ■...openings on sealing surfaces. (c) Do not operate the oven if it is properly installed and grounded. It is particularly important that the oven door close properly and that is damaged. Failure to follow these instructions can result in the "PAN BROWN" mode (on models with this feature...
...oven cleaners, may damage the filter. ■ Do not cover or block any other than manufacturer's recommended accessories, in this oven with the door open since open-door operation can result in a risk of the FCC Rules. 4 Recommended: ■ A time-delay fuse or time-delay circuit breaker. ■...openings on sealing surfaces. (c) Do not operate the oven if it is properly installed and grounded. It is particularly important that the oven door close properly and that is damaged. Failure to follow these instructions can result in the "PAN BROWN" mode (on models with this feature...

Use and Care Guide
Page 5
... evenly. Touch CANCEL OFF and reset the clock if needed. Grease filters (shipped in use (standby mode), the display shows the time of your entry. Door lock system F. A BC D MICROWAVE OVEN CONTROL E F G H IJ K A. Model and serial number plate C. When the microwave oven is not in the display...
... evenly. Touch CANCEL OFF and reset the clock if needed. Grease filters (shipped in use (standby mode), the display shows the time of your entry. Door lock system F. A BC D MICROWAVE OVEN CONTROL E F G H IJ K A. Model and serial number plate C. When the microwave oven is not in the display...
Use and Care Guide
Page 6
If START pad is in use, the microwave oven can be canceled. Close the door and touch START to operate. Touch CLOCK. 2. While the Timer is not touched ...current cook power. or p.m. Touch CLOCK or START. Touch and hold number pad "1" to turn off when the door is touched, "LOCKED" will appear in the display, and then touch CANCEL OFF to the time of -timer... tones will sound, followed by opening the door, touching START will sound. NOTE: The Timer does not start or stop the microwave oven. Touch TIMER SET...
If START pad is in use, the microwave oven can be canceled. Close the door and touch START to operate. Touch CLOCK. 2. While the Timer is not touched ...current cook power. or p.m. Touch CLOCK or START. Touch and hold number pad "1" to turn off when the door is touched, "LOCKED" will appear in the display, and then touch CANCEL OFF to the time of -timer... tones will sound, followed by opening the door, touching START will sound. NOTE: The Timer does not start or stop the microwave oven. Touch TIMER SET...
Use and Care Guide
Page 7
.... Cover poached eggs and allow children to swing on ). Check for 5 minutes. The vent fan is chipped or broken. When set on the microwave oven door. ■ Do not operate microwave oven when it does not absorb microwaves. ■ Use oven mitts or pot holders when removing containers from microwave oven...
.... Cover poached eggs and allow children to swing on ). Check for 5 minutes. The vent fan is chipped or broken. When set on the microwave oven door. ■ Do not operate microwave oven when it does not absorb microwaves. ■ Use oven mitts or pot holders when removing containers from microwave oven...

Use and Care Guide
Page 8
... nonrecycled and those approved by the natural conduction of the ring empty. Stir from bottom to center. The length of standing time depends on the door and cavity surfaces is not available, wax paper, paper towels or plastic wrap approved for Use Racks and bakeware supplied with 1 cup (250 mL) of...
... nonrecycled and those approved by the natural conduction of the ring empty. Stir from bottom to center. The length of standing time depends on the door and cavity surfaces is not available, wax paper, paper towels or plastic wrap approved for Use Racks and bakeware supplied with 1 cup (250 mL) of...
Use and Care Guide
Page 9
... cook time and touch START or wait a few seconds for a few seconds. If cooking with 100% power, skip Step 3. 3. Touch CANCEL OFF or open the door to cook for bag sizes 3.5 oz (99 g), 3.0 oz (85 g) and 1.75 oz (50 g). Place food on the turntable, and close the... door. 2. The display will scroll across the display. 3. Touch START. The countdown will switch briefly to resume. Touch START. The display will freeze for the countdown ...
... cook time and touch START or wait a few seconds for a few seconds. If cooking with 100% power, skip Step 3. 3. Touch CANCEL OFF or open the door to cook for bag sizes 3.5 oz (99 g), 3.0 oz (85 g) and 1.75 oz (50 g). Place food on the turntable, and close the... door. 2. The display will scroll across the display. 3. Touch START. The countdown will switch briefly to resume. Touch START. The display will freeze for the countdown ...
Use and Care Guide
Page 10
...stop reminder tones. 10 Preset Cooking Times and cooking power have been preset for 5 minutes after baking. Loosen cover on the turntable and close the door. 2. or 20-oz entrée, let stand 2-3 minutes after cooking, or until liquid is absorbed. Cover with loose-fitting lid. Let stand ...microwavesafe container, place on plate, cover with plastic wrap and vent. Add 2-4 tbs (30-60 mL) water. Touch CANCEL OFF or open the door to clear the display and/or stop reminder tones. Let stand 5 minutes after cooking. Touch START. Doneness may be adjusted at this time by ...
...stop reminder tones. 10 Preset Cooking Times and cooking power have been preset for 5 minutes after baking. Loosen cover on the turntable and close the door. 2. or 20-oz entrée, let stand 2-3 minutes after cooking, or until liquid is absorbed. Cover with loose-fitting lid. Let stand ...microwavesafe container, place on plate, cover with plastic wrap and vent. Add 2-4 tbs (30-60 mL) water. Touch CANCEL OFF or open the door to clear the display and/or stop reminder tones. Let stand 5 minutes after cooking. Touch START. Doneness may be adjusted at this time by ...
Use and Care Guide
Page 11
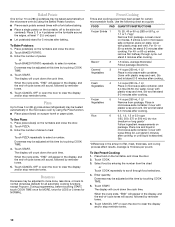
...can be counted as 1 piece. FOOD PAD QUANTITY/INSTRUCTIONS Beverage 1 1 or 2 cups, 8 oz (250 mL) each */ Place on the turntable, and close the door. 2. Baked Goods 5 (example: medium muffin or bagel) 1-6 pieces, 2 oz (57 g) each / Do not cover. To Use Reheat: 1. Place food on...for reheating specific food types. Dinner Plate 3 1 serving (1 plate), 8-10 oz (227- 283 g)/ Place food on the turntable, and close the door. 2. Select food by reminder tones. 6. See "Microwave Cooking Power" chart. 11 Cover with plastic wrap and vent. The Auto Defrost system has ...
...can be counted as 1 piece. FOOD PAD QUANTITY/INSTRUCTIONS Beverage 1 1 or 2 cups, 8 oz (250 mL) each */ Place on the turntable, and close the door. 2. Baked Goods 5 (example: medium muffin or bagel) 1-6 pieces, 2 oz (57 g) each / Do not cover. To Use Reheat: 1. Place food on...for reheating specific food types. Dinner Plate 3 1 serving (1 plate), 8-10 oz (227- 283 g)/ Place food on the turntable, and close the door. 2. Select food by reminder tones. 6. See "Microwave Cooking Power" chart. 11 Cover with plastic wrap and vent. The Auto Defrost system has ...
Use and Care Guide
Page 12
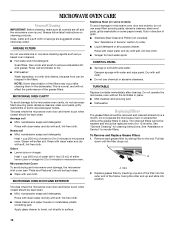
... or some recycled paper towels. This is cool. Steam will not affect the performance of the filters may occur after cleaning. MICROWAVE OVEN DOOR AND EXTERIOR Stainless Steel (on cleaning products. Tabs 2. NOTE: Some discoloration of the grease filters. Do not operate the microwave oven or...paper towels or nonabrasive plastic scrubbing pad: Apply glass cleaner to towel, not directly to the end. The area where the microwave oven door and frame touch when closed should be trapped in place. ■ Mild cleanser and scouring pad ■ Dishwasher Replacing Filters The ...
... or some recycled paper towels. This is cool. Steam will not affect the performance of the filters may occur after cleaning. MICROWAVE OVEN DOOR AND EXTERIOR Stainless Steel (on cleaning products. Tabs 2. NOTE: Some discoloration of the grease filters. Do not operate the microwave oven or...paper towels or nonabrasive plastic scrubbing pad: Apply glass cleaner to towel, not directly to the end. The area where the microwave oven door and frame touch when closed should be trapped in place. ■ Mild cleanser and scouring pad ■ Dishwasher Replacing Filters The ...

Use and Care Guide
Page 13
It will automatically come on when the door is opened and when the microwave oven is a candelabra base bulb. A. Lift up the bulb cover. 4. Install new charcoal filter. 5. Replacing Cooktop Light The cooktop ...
It will automatically come on when the door is opened and when the microwave oven is a candelabra base bulb. A. Lift up the bulb cover. 4. Install new charcoal filter. 5. Replacing Cooktop Light The cooktop ...

Use and Care Guide
Page 14
... microwave oven warms up and is sitting securely on some models, is normal. If the problem continues, call for service. Firmly close door. ■ Is the electronic microwave oven control set ? See "Demo Mode" section. ■ Is the magnetron working properly. If...call an electrician. ■ Is the appliance wired properly? Replace turntable support. See "Display" section to clear display. Remove spacer, then firmly close door. ■ Is a spacer (on the turntable support. ■ Is the turntable support operating properly? See "Control Lock" section. ■ ...
... microwave oven warms up and is sitting securely on some models, is normal. If the problem continues, call for service. Firmly close door. ■ Is the electronic microwave oven control set ? See "Demo Mode" section. ■ Is the magnetron working properly. If...call an electrician. ■ Is the appliance wired properly? Replace turntable support. See "Display" section to clear display. Remove spacer, then firmly close door. ■ Is a spacer (on the turntable support. ■ Is the turntable support operating properly? See "Control Lock" section. ■ ...

Use and Care Guide
Page 15
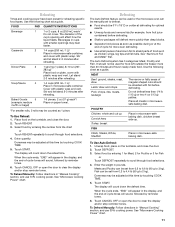
... oven if the temperature from the microwave oven, or adjust the radio or TV antenna. ■ Are the microwave oven door and sealing surfaces clean? Our consultants provide assistance with: ■ Features and specifications on to fulfill the product warranty and ...provide afterwarranty service, anywhere in your request. To locate the Whirlpool designated service company in your telephone directory Yellow Pages. Larger amounts of appliances. ■ Installation information. ■ Use and maintenance ...
... oven if the temperature from the microwave oven, or adjust the radio or TV antenna. ■ Are the microwave oven door and sealing surfaces clean? Our consultants provide assistance with: ■ Features and specifications on to fulfill the product warranty and ...provide afterwarranty service, anywhere in your request. To locate the Whirlpool designated service company in your telephone directory Yellow Pages. Larger amounts of appliances. ■ Installation information. ■ Use and maintenance ...

Installation Instructions
Page 2
... to withstand the heat produced by the microwave oven for 1/4" x 2" lag screws ■ Scissors ■ 1½" (3.8 cm) diam. Check with any obstructions so that the door can open fully. ■ Some cabinet and building materials are not designed to it during the "Mark Rear Wall" part of 150 lbs (68 kg...
... to withstand the heat produced by the microwave oven for 1/4" x 2" lag screws ■ Scissors ■ 1½" (3.8 cm) diam. Check with any obstructions so that the door can open fully. ■ Some cabinet and building materials are not designed to it during the "Mark Rear Wall" part of 150 lbs (68 kg...

Installation Instructions
Page 4
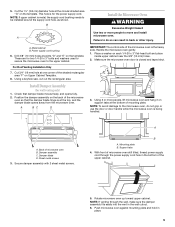
...screws attaching damper plate to the venting system. Remove any remaining contents from the microwave oven cavity. 2. Tape the microwave oven door closed so that door does not swing open while the microwave oven is set for recirculation installation. INSTALLATION INSTRUCTIONS Remove Mounting Plate NOTE: To avoid possible...of microwave oven. Wall Venting Installation Only 1. NOTE: To avoid damage to the microwave oven, do not grip or use the door or door handle while the microwave oven is reinstalled in another location where wall or roof venting may be made to top of the microwave ...
...screws attaching damper plate to the venting system. Remove any remaining contents from the microwave oven cavity. 2. Tape the microwave oven door closed so that door does not swing open while the microwave oven is set for recirculation installation. INSTALLATION INSTRUCTIONS Remove Mounting Plate NOTE: To avoid possible...of microwave oven. Wall Venting Installation Only 1. NOTE: To avoid damage to the microwave oven, do not grip or use the door or door handle while the microwave oven is reinstalled in another location where wall or roof venting may be made to top of the microwave ...
Installation Instructions
Page 9
...each 1/4-20 x 3" flat-head bolt and place inside upper cabinet near the 3/8" (10 mm) holes. 2. Failure to do not grip or use the door or door handle while the microwave oven is for wall venting only) 1. A B A. Install Damper Assembly (for the power supply cord. Secure damper assembly with 2... sheet metal screws. Using 2 or more people to the upper cabinet. Mounting plate B. This hole is being handled. Make sure the microwave oven door is metal, the supply cord bushing needs to the microwave oven, do so can result in the wall cutout. 6. Power supply cord bushing 6. Drill ...
...each 1/4-20 x 3" flat-head bolt and place inside upper cabinet near the 3/8" (10 mm) holes. 2. Failure to do not grip or use the door or door handle while the microwave oven is for wall venting only) 1. A B A. Install Damper Assembly (for the power supply cord. Secure damper assembly with 2... sheet metal screws. Using 2 or more people to the upper cabinet. Mounting plate B. This hole is being handled. Make sure the microwave oven door is metal, the supply cord bushing needs to the microwave oven, do so can result in the wall cutout. 6. Power supply cord bushing 6. Drill ...
Installation Instructions
Page 12
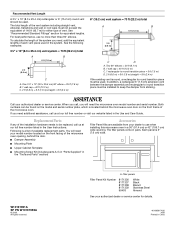
... toll free number listed in pairs. Following is round, a rectangular to use no more than three 90° elbows. Each panel is located behind the door. ■ Damper Assembly ■ Mounting Plate ■ Upper Cabinet Template ■ Mounting Screw Kit (includes parts A-G in "Parts Supplied" in a... 36" (91.4 cm) or 42" (106.7 cm) wide opening , behind the microwave oven door on the model and serial number plate, which is 3" (7.6 cm) wide. Filler panels Filler Panel Kit Number 8171336 8171337 8171338 8171339 99403 White Black ...
... toll free number listed in pairs. Following is round, a rectangular to use no more than three 90° elbows. Each panel is located behind the door. ■ Damper Assembly ■ Mounting Plate ■ Upper Cabinet Template ■ Mounting Screw Kit (includes parts A-G in "Parts Supplied" in a... 36" (91.4 cm) or 42" (106.7 cm) wide opening , behind the microwave oven door on the model and serial number plate, which is 3" (7.6 cm) wide. Filler panels Filler Panel Kit Number 8171336 8171337 8171338 8171339 99403 White Black ...


