Operating Guide
Page 9
...16 Step 4: Making setting adjustments before recording 17 Step 5: Inserting a tape or a "Memory Stick Duo 18 Recording/Playback Easy Recording/Playback (Easy Handycam 20 Recording 22 Zooming 24 Recording in dark places (NightShot plus 24 Adjusting the exposure for the "Memory Stick Duo" PICT.APPLI. Table of ... on a TV ...........32 Using the Menu Using the menu items .......... 34 Menu items 35 CAMERA SET menu 37 Settings to adjust your camcorder to a "Memory Stick Duo 60 Deleting recorded pictures from the "Memory Stick Duo 60 Marking images on a tape or other basic settings TIME...
...16 Step 4: Making setting adjustments before recording 17 Step 5: Inserting a tape or a "Memory Stick Duo 18 Recording/Playback Easy Recording/Playback (Easy Handycam 20 Recording 22 Zooming 24 Recording in dark places (NightShot plus 24 Adjusting the exposure for the "Memory Stick Duo" PICT.APPLI. Table of ... on a TV ...........32 Using the Menu Using the menu items .......... 34 Menu items 35 CAMERA SET menu 37 Settings to adjust your camcorder to a "Memory Stick Duo 60 Deleting recorded pictures from the "Memory Stick Duo 60 Marking images on a tape or other basic settings TIME...
Operating Guide
Page 11
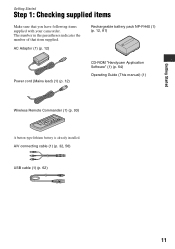
Getting Started Getting Started Step 1: Checking supplied items Make sure that item supplied. The number in the parentheses indicates the number of that you have following items supplied with your camcorder. AC Adaptor (1) (p. 12) Rechargeable battery pack NP-FH40 (1) (p. 12, 81) Power cord (Mains lead) (1) (p. 12) CD-ROM "Handycam Application Software" (1) (p. 64) Operating Guide (This manual) (1) Wireless Remote Commander (1) (p. 93) A button-type lithium battery is already installed. A/V connecting cable (1) (p. 32, 56) USB cable (1) (p. 62) 11
Getting Started Getting Started Step 1: Checking supplied items Make sure that item supplied. The number in the parentheses indicates the number of that you have following items supplied with your camcorder. AC Adaptor (1) (p. 12) Rechargeable battery pack NP-FH40 (1) (p. 12, 81) Power cord (Mains lead) (1) (p. 12) CD-ROM "Handycam Application Software" (1) (p. 64) Operating Guide (This manual) (1) Wireless Remote Commander (1) (p. 93) A button-type lithium battery is already installed. A/V connecting cable (1) (p. 32, 56) USB cable (1) (p. 62) 11
Operating Guide
Page 15
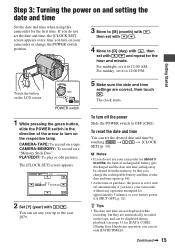
... in rechargeable battery gets discharged and the date and time settings may be displayed during playback (see page 51 for [DATA CODE] (During Easy Handycam operation, you do not set the date and time, the [CLOCK SET] screen appears every time you turn off the power Slide the POWER ...switch to OFF (CHG). PLAY/EDIT: To play or edit pictures. CLOCK SET -:--:-- To turn on the respective lamp. If you do not use your camcorder or change the POWER switch position. 3 Move to [M] (month) with , then set with / . 4 Move to save battery power ([A.SHUT OFF], p. 52). Getting Started Touch...
... in rechargeable battery gets discharged and the date and time settings may be displayed during playback (see page 51 for [DATA CODE] (During Easy Handycam operation, you do not set the date and time, the [CLOCK SET] screen appears every time you turn off the power Slide the POWER ...switch to OFF (CHG). PLAY/EDIT: To play or edit pictures. CLOCK SET -:--:-- To turn on the respective lamp. If you do not use your camcorder or change the POWER switch position. 3 Move to [M] (month) with , then set with / . 4 Move to save battery power ([A.SHUT OFF], p. 52). Getting Started Touch...
Operating Guide
Page 20
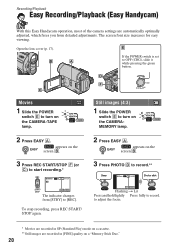
... MENU Flashing t Lit Press and hold lightly Press fully to OFF (CHG), slide it while pressing the green button. Recording/Playback Easy Recording/Playback (Easy Handycam) With this Easy Handycam operation, most of the camera settings are recorded in [FINE] quality on the CAMERA-TAPE lamp.
... MENU Flashing t Lit Press and hold lightly Press fully to OFF (CHG), slide it while pressing the green button. Recording/Playback Easy Recording/Playback (Easy Handycam) With this Easy Handycam operation, most of the camera settings are recorded in [FINE] quality on the CAMERA-TAPE lamp.
Operating Guide
Page 21
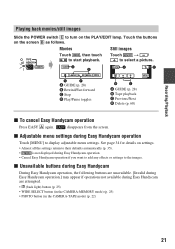
... (p. 28) B Rewind/Fast forward C Stop D Play/Pause toggles MENU B C A GUIDE (p. 28) B Tape playback C Previous/Next D Delete (p. 60) x To cancel Easy Handycam operation Press EASY A again. x Adjustable menu settings during Easy Handycam operation Touch [MENU] to select a picture. Recording/Playback Playing back movies/still images Slide the POWER switch E to start playback. Movies...
... (p. 28) B Rewind/Fast forward C Stop D Play/Pause toggles MENU B C A GUIDE (p. 28) B Tape playback C Previous/Next D Delete (p. 60) x To cancel Easy Handycam operation Press EASY A again. x Adjustable menu settings during Easy Handycam operation Touch [MENU] to select a picture. Recording/Playback Playing back movies/still images Slide the POWER switch E to start playback. Movies...
Operating Guide
Page 29
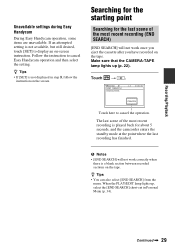
... [SET] is a blank section between recorded sections on the tape. Touch t . 6 0 min END SEARCH EXECUTING 1 0:00:00 CANCEL Touch here to cancel Easy Handycam operation and then select the setting. The last scene of the most recent recording is not available, but still desired, touch [SET] to display an.... When the PLAY/EDIT lamp lights up (p. 22). Continued , 29 If an attempted setting is played back for about 5 seconds, and the camcorder enters the standby mode at the point where the last recording has finished. Make sure that the CAMERA-TAPE lamp lights up , select the [END...
... [SET] is a blank section between recorded sections on the tape. Touch t . 6 0 min END SEARCH EXECUTING 1 0:00:00 CANCEL Touch here to cancel Easy Handycam operation and then select the setting. The last scene of the most recent recording is not available, but still desired, touch [SET] to display an.... When the PLAY/EDIT lamp lights up (p. 22). Continued , 29 If an attempted setting is played back for about 5 seconds, and the camcorder enters the standby mode at the point where the last recording has finished. Make sure that the CAMERA-TAPE lamp lights up , select the [END...

Operating Guide
Page 34
... the respective lamp. If the desired item is not displayed on the screen, touch / until the item is not displayed during Easy Handycam operation. x To use menu items during Easy Handycam operation is displayed. 3 Select the desired setting, then touch . If you like (p. 54). 1 Touch . 6 0 min STBY 0:00:00 MENU DISP GUIDE...
... the respective lamp. If the desired item is not displayed on the screen, touch / until the item is not displayed during Easy Handycam operation. x To use menu items during Easy Handycam operation is displayed. 3 Select the desired setting, then touch . If you like (p. 54). 1 Touch . 6 0 min STBY 0:00:00 MENU DISP GUIDE...

Operating Guide
Page 35
... STEADYSHOT z MEMORY SET menu (p. 42) STILL SET - FORMAT - z - z - - - z - z - OFF OFF - menu (p. 44) FADER z SLIDE SHOW - USB SELECT - z Easy Handycam AUTO - D.EFFECT z PICT.EFFECT z SMTH INT.REC z INT.REC-STL - DEMO MODE z PictBridge PRINT - z - z - - - - - AUTO OFF OFF ON OFF z*2 OFF ON OFF/FINE... menu (p. 37) SCENE SELECT z SPOT METER z EXPOSURE z WHITE BAL. z - z - ALL ERASE - z Continued , 35 During Easy Handycam operation, the following settings are automatically applied (p. 20).
... STEADYSHOT z MEMORY SET menu (p. 42) STILL SET - FORMAT - z - z - - - z - z - OFF OFF - menu (p. 44) FADER z SLIDE SHOW - USB SELECT - z Easy Handycam AUTO - D.EFFECT z PICT.EFFECT z SMTH INT.REC z INT.REC-STL - DEMO MODE z PictBridge PRINT - z - z - - - - - AUTO OFF OFF ON OFF z*2 OFF ON OFF/FINE... menu (p. 37) SCENE SELECT z SPOT METER z EXPOSURE z WHITE BAL. z - z - ALL ERASE - z Continued , 35 During Easy Handycam operation, the following settings are automatically applied (p. 20).

Operating Guide
Page 36
... MODE z VOLUME - LCD/VF SET z TV TYPE z USB CAMERA z DISP GUIDE z GUIDEFRAME z DATA CODE - menu (p. 53) CLOCK SET z WORLD TIME z LANGUAGE z MEMORY PLAY/EDIT Easy Handycam - OFF z z z z - z z 5 min - TIME/LANGU. z - z - - z AUTO z z ON z z z z z LCD PANEL z z - z z z z z -*3 z z -*3 *1 This setting is available only when recording a still image. *2 The setting is displayed only when the POWER...
... MODE z VOLUME - LCD/VF SET z TV TYPE z USB CAMERA z DISP GUIDE z GUIDEFRAME z DATA CODE - menu (p. 53) CLOCK SET z WORLD TIME z LANGUAGE z MEMORY PLAY/EDIT Easy Handycam - OFF z z z z - z z 5 min - TIME/LANGU. z - z - - z AUTO z z ON z z z z z LCD PANEL z z - z z z z z -*3 z z -*3 *1 This setting is available only when recording a still image. *2 The setting is displayed only when the POWER...

Operating Guide
Page 42
...set to CAMERA-MEMORY. • [BURST] cannot be set a screen ratio of 16:9 (wide), [IMAGE SIZE] is automatically fixed to [FINE] during Easy Handycam operation. • The maximum number of images will not function when there is space of images to CAMERA-MEMORY. • If you are marked with...; [BURST] can be set only when the POWER switch is set to be recorded in the self-timer mode or when you set during Easy Handycam operation. See page 34 for the "Memory Stick Duo" The default settings are operating with B. NORMAL ( ) Records still images continuously at about 0.5 second ...
...set to CAMERA-MEMORY. • [BURST] cannot be set a screen ratio of 16:9 (wide), [IMAGE SIZE] is automatically fixed to [FINE] during Easy Handycam operation. • The maximum number of images will not function when there is space of images to CAMERA-MEMORY. • If you are marked with...; [BURST] can be set only when the POWER switch is set to be recorded in the self-timer mode or when you set during Easy Handycam operation. See page 34 for the "Memory Stick Duo" The default settings are operating with B. NORMAL ( ) Records still images continuously at about 0.5 second ...
Operating Guide
Page 48
...this to view pictures on a "Memory Stick Duo" on the computer. When the POWER switch is inserted. - b Notes • During Easy Handycam operation, [ STREAM] cannot be set to the computer. To reverse direction: (frame) during playback pause. b Notes • You will be...**Pictures output from frame playback). menu (Continued) z Tips • The demonstration will not hear the recorded sound. When you connect the camcorder to a PictBridge-compatible printer to a personal computer with a USB cable and view pictures on selecting menu items. VAR.SPD PB (Various speed...
...this to view pictures on a "Memory Stick Duo" on the computer. When the POWER switch is inserted. - b Notes • During Easy Handycam operation, [ STREAM] cannot be set to the computer. To reverse direction: (frame) during playback pause. b Notes • You will be...**Pictures output from frame playback). menu (Continued) z Tips • The demonstration will not hear the recorded sound. When you connect the camcorder to a PictBridge-compatible printer to a personal computer with a USB cable and view pictures on selecting menu items. VAR.SPD PB (Various speed...

Operating Guide
Page 52
... (Remote control) The default setting is [ON], allowing you to use the supplied Remote Commander (p. 93). 52 z Tips • Set to [OFF] to prevent your camcorder for about 8 seconds in situations such as those described below ) Displays camera setting data. 6 0 min 1 0 : 0 0 : 0 0 : 0 0 GUIDE AUTO 100 AWB F1. ...Scrolls the menu items upwards by touching . If you record a picture without setting the clock and [--:--:--] will appear. • During Easy Handycam operation, you set [DATE/TIME] only. STANDARD SET menu (Continued) CAMERA DATA (below . • When you can set the ...
... (Remote control) The default setting is [ON], allowing you to use the supplied Remote Commander (p. 93). 52 z Tips • Set to [OFF] to prevent your camcorder for about 8 seconds in situations such as those described below ) Displays camera setting data. 6 0 min 1 0 : 0 0 : 0 0 : 0 0 GUIDE AUTO 100 AWB F1. ...Scrolls the menu items upwards by touching . If you record a picture without setting the clock and [--:--:--] will appear. • During Easy Handycam operation, you set [DATE/TIME] only. STANDARD SET menu (Continued) CAMERA DATA (below . • When you can set the ...
Operating Guide
Page 68
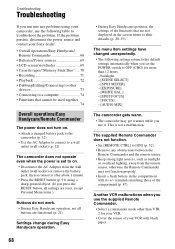
If the problem persists, disconnect the power source and contact your Sony dealer. • Overall operations/Easy Handycam/ Remote Commander 68 • Batteries/Power sources 69 • LCD screen/viewfinder 69 • Cassette tapes/"Memory Stick Duo".....70 • ...POWER switch to on . • Attach a charged battery pack to the camcorder (p. 12). • Use the AC Adaptor to connect to their defaults (p. 20, 35). Settings change during Easy Handycam operation. • During Easy Handycam operation, the settings of the functions that cannot be used together 74 Overall ...
If the problem persists, disconnect the power source and contact your Sony dealer. • Overall operations/Easy Handycam/ Remote Commander 68 • Batteries/Power sources 69 • LCD screen/viewfinder 69 • Cassette tapes/"Memory Stick Duo".....70 • ...POWER switch to on . • Attach a charged battery pack to the camcorder (p. 12). • Use the AC Adaptor to connect to their defaults (p. 20, 35). Settings change during Easy Handycam operation. • During Easy Handycam operation, the settings of the functions that cannot be used together 74 Overall ...
Operating Guide
Page 69
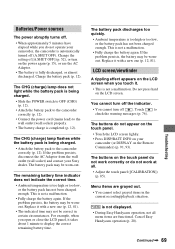
...the touch panel. • Touch the LCD screen lightly. • Press DISP/BATT INFO on your camcorder (or DISPLAY on the power again (p. 15), or use the AC Adaptor. • The battery ...the problem persists, disconnect the AC Adaptor from the wall outlet (wall socket) and contact your Sony dealer. is not a malfunction. • Fully charge the battery again. Touch to display the ...-out. This is not displayed. • During Easy Handycam operation, not all . • Adjust the touch panel ([CALIBRATION]) (p. 85). Cancel Easy Handycam operation (p. 20). Do not press hard on the LCD...
...the touch panel. • Touch the LCD screen lightly. • Press DISP/BATT INFO on your camcorder (or DISPLAY on the power again (p. 15), or use the AC Adaptor. • The battery ...the problem persists, disconnect the AC Adaptor from the wall outlet (wall socket) and contact your Sony dealer. is not a malfunction. • Fully charge the battery again. Touch to display the ...-out. This is not displayed. • During Easy Handycam operation, not all . • Adjust the touch panel ([CALIBRATION]) (p. 85). Cancel Easy Handycam operation (p. 20). Do not press hard on the LCD...

Operating Guide
Page 72
... in [AUTOSLW SHTR], [SLOW SHUTTR], [SUPER NSPLUS], or [COLOR SLOW S]. The color of [EXPOSURE] - [SPOT METER] • The backlight function does not work during Easy Handycam operation (p. 21). This is called the smear effect. You cannot use [SUPER NSPLUS]. • The NIGHTSHOT PLUS switch is too high. Use NightShot plus or...
... in [AUTOSLW SHTR], [SLOW SHUTTR], [SUPER NSPLUS], or [COLOR SLOW S]. The color of [EXPOSURE] - [SPOT METER] • The backlight function does not work during Easy Handycam operation (p. 21). This is called the smear effect. You cannot use [SUPER NSPLUS]. • The NIGHTSHOT PLUS switch is too high. Use NightShot plus or...

Operating Guide
Page 89
...other specifications. Storage temperature -20 °C to + 60 °C (-4 °F to change without notice. On trademarks • "Handycam" and are registered trademarks of Sony Corporation. • "Memory Stick," " ," "Memory Stick Duo," " ," "Memory Stick PRO Duo," " ," "Memory Stick PRO-..." ," "MagicGate Memory Stick" and "MagicGate Memory Stick Duo" are trademarks of Sony Corporation. • "InfoLITHIUM" is a trademark of Sony Corporation. • i.LINK and are trademarks of Sony Corporation. • is a trademark. • Microsoft, Windows, Windows Media, ...
...other specifications. Storage temperature -20 °C to + 60 °C (-4 °F to change without notice. On trademarks • "Handycam" and are registered trademarks of Sony Corporation. • "Memory Stick," " ," "Memory Stick Duo," " ," "Memory Stick PRO Duo," " ," "Memory Stick PRO-..." ," "MagicGate Memory Stick" and "MagicGate Memory Stick Duo" are trademarks of Sony Corporation. • "InfoLITHIUM" is a trademark of Sony Corporation. • i.LINK and are trademarks of Sony Corporation. • is a trademark. • Microsoft, Windows, Windows Media, ...
Operating Guide
Page 93
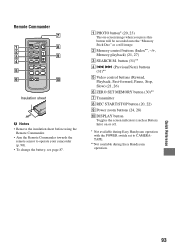
... sheet before using the Remote Commander. • Aim the Remote Commander towards the remote sensor to CAMERATAPE. ** Not available during Easy Handycam operation with the POWER switch set to operate your camcorder (p. 90). • To change the battery, see page 87. B Memory control buttons (Index**, -/+, Memory playback) (21, 27) C SEARCH M. Remote Commander...
... sheet before using the Remote Commander. • Aim the Remote Commander towards the remote sensor to CAMERATAPE. ** Not available during Easy Handycam operation with the POWER switch set to operate your camcorder (p. 90). • To change the battery, see page 87. B Memory control buttons (Index**, -/+, Memory playback) (21, 27) C SEARCH M. Remote Commander...

Operating Guide
Page 97
... 60 DEMO MODE 47 DIGITAL ZOOM 41 DISP GUIDE (Display guide 96 DISP OUTPUT 52 Display indicators 94 DOT FADER 45 Dubbing 56, 60 E Easy Handycam 20, 34 EDIT SEARCH 30 EDIT/PLAY menu 48 END SEARCH 29, 50 EXP.BRKTG (Exposure bracketing 42 EXPOSURE 38 F FADER 44 FILE NO. (File...
... 60 DEMO MODE 47 DIGITAL ZOOM 41 DISP GUIDE (Display guide 96 DISP OUTPUT 52 Display indicators 94 DOT FADER 45 Dubbing 56, 60 E Easy Handycam 20, 34 EDIT SEARCH 30 EDIT/PLAY menu 48 END SEARCH 29, 50 EXP.BRKTG (Exposure bracketing 42 EXPOSURE 38 F FADER 44 FILE NO. (File...


