
Operating Guide
Page 5
... to correct the interference by one or more of "Memory Stick" you can use in a particular installation. "First Step Guide" for connecting the camcorder to a computer and using a "Memory Stick Duo" with the limits for help. PRO Duo") ("Memory Stick - When using the supplied software ....ca.gov/hazardouswaste/perchlorate Perchlorate Material: Lithium battery contains perchlorate. However, there is no guarantee that interference will not occur in your camcorder You can use "Memory Stick" that to insert the "Memory Stick Duo" into an outlet on the supplied CD-ROM) Type ...
... to correct the interference by one or more of "Memory Stick" you can use in a particular installation. "First Step Guide" for connecting the camcorder to a computer and using a "Memory Stick Duo" with the limits for help. PRO Duo") ("Memory Stick - When using the supplied software ....ca.gov/hazardouswaste/perchlorate Perchlorate Material: Lithium battery contains perchlorate. However, there is no guarantee that interference will not occur in your camcorder You can use "Memory Stick" that to insert the "Memory Stick Duo" into an outlet on the supplied CD-ROM) Type ...
Operating Guide
Page 6
... or playback conditions. • The LCD screen and the viewfinder are operational for long periods of the pixels are manufactured using your camcorder to insert the connector plug in low light conditions, such as at the sun. About changing the language setting • The on...LCD screen, the viewfinder, or the lens to direct sunlight for effective use and care" (p. 83). • When connecting your camcorder. Take pictures of your camcorder to another device with communication cables, be some tiny black points and/or bright points (white, red, blue, or green in color...
... or playback conditions. • The LCD screen and the viewfinder are operational for long periods of the pixels are manufactured using your camcorder to insert the connector plug in low light conditions, such as at the sun. About changing the language setting • The on...LCD screen, the viewfinder, or the lens to direct sunlight for effective use and care" (p. 83). • When connecting your camcorder. Take pictures of your camcorder to another device with communication cables, be some tiny black points and/or bright points (white, red, blue, or green in color...

Operating Guide
Page 7
About this manual • The images of the LCD screen and the viewfinder used in Germany, and Sony Corporation, and produces superior images. It adopts the MTF measurement system for illustration purposes are captured using a digital still camera, and therefore ... and offers a quality typical of recording media and accessories are recorded without notice. MTF= Modulation Transfer Function The number value indicates the amount of the camcorder, storage media, etc. • TV color systems differ depending on a TV, you need a NTSC system-based TV. • Television programs, films, ...
About this manual • The images of the LCD screen and the viewfinder used in Germany, and Sony Corporation, and produces superior images. It adopts the MTF measurement system for illustration purposes are captured using a digital still camera, and therefore ... and offers a quality typical of recording media and accessories are recorded without notice. MTF= Modulation Transfer Function The number value indicates the amount of the camcorder, storage media, etc. • TV color systems differ depending on a TV, you need a NTSC system-based TV. • Television programs, films, ...
Operating Guide
Page 9
... on a TV ...........32 Using the Menu Using the menu items .......... 34 Menu items 35 CAMERA SET menu 37 Settings to adjust your camcorder to a "Memory Stick Duo 60 Deleting recorded pictures from the "Memory Stick Duo 60 Marking images on the "Memory Stick Duo" with...4: Making setting adjustments before recording 17 Step 5: Inserting a tape or a "Memory Stick Duo 18 Recording/Playback Easy Recording/Playback (Easy Handycam 20 Recording 22 Zooming 24 Recording in dark places (NightShot plus 24 Adjusting the exposure for backlit subjects 25 Recording in various modes STANDARD SET...
... on a TV ...........32 Using the Menu Using the menu items .......... 34 Menu items 35 CAMERA SET menu 37 Settings to adjust your camcorder to a "Memory Stick Duo 60 Deleting recorded pictures from the "Memory Stick Duo 60 Marking images on the "Memory Stick Duo" with...4: Making setting adjustments before recording 17 Step 5: Inserting a tape or a "Memory Stick Duo 18 Recording/Playback Easy Recording/Playback (Easy Handycam 20 Recording 22 Zooming 24 Recording in dark places (NightShot plus 24 Adjusting the exposure for backlit subjects 25 Recording in various modes STANDARD SET...
Operating Guide
Page 10
..."First Step Guide 67 Using a Macintosh computer ........ 67 Troubleshooting Troubleshooting 68 Warning indicators and messages 75 Additional Information Using your camcorder abroad ...... 78 Maintenance and precautions ...... 79 Usable cassette tapes 79 About the "Memory Stick 80 About the "InfoLITHIUM" battery... pack 81 About i.LINK 82 On using your camcorder 83 Specifications 87 Quick Reference Identifying parts and controls ....... 90 Indicators displayed during recording/ playback 94 Index 97 Spanish Quick...
..."First Step Guide 67 Using a Macintosh computer ........ 67 Troubleshooting Troubleshooting 68 Warning indicators and messages 75 Additional Information Using your camcorder abroad ...... 78 Maintenance and precautions ...... 79 Usable cassette tapes 79 About the "Memory Stick 80 About the "InfoLITHIUM" battery... pack 81 About i.LINK 82 On using your camcorder 83 Specifications 87 Quick Reference Identifying parts and controls ....... 90 Indicators displayed during recording/ playback 94 Index 97 Spanish Quick...
Operating Guide
Page 11
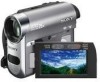
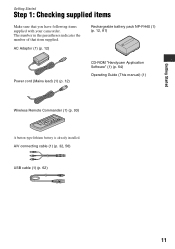
AC Adaptor (1) (p. 12) Rechargeable battery pack NP-FH40 (1) (p. 12, 81) Power cord (Mains lead) (1) (p. 12) CD-ROM "Handycam Application Software" (1) (p. 64) Operating Guide (This manual) (1) Wireless Remote Commander (1) (p. 93) A button-type lithium battery is already installed. A/V connecting cable (1) (p. 32, 56) USB cable (1) (p. 62) 11 The number in the parentheses indicates the number of that you have following items supplied with your camcorder. Getting Started Getting Started Step 1: Checking supplied items Make sure that item supplied.
AC Adaptor (1) (p. 12) Rechargeable battery pack NP-FH40 (1) (p. 12, 81) Power cord (Mains lead) (1) (p. 12) CD-ROM "Handycam Application Software" (1) (p. 64) Operating Guide (This manual) (1) Wireless Remote Commander (1) (p. 93) A button-type lithium battery is already installed. A/V connecting cable (1) (p. 32, 56) USB cable (1) (p. 62) 11 The number in the parentheses indicates the number of that you have following items supplied with your camcorder. Getting Started Getting Started Step 1: Checking supplied items Make sure that item supplied.

Operating Guide
Page 12
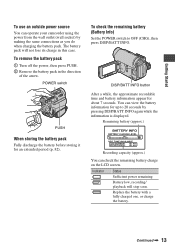
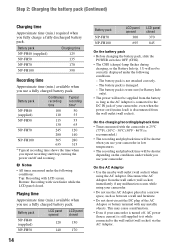
... the "InfoLITHIUM" battery pack (H series) (p. 81) after attaching it into place 2. 2 Slide the POWER switch in the direction of the battery pack and your camcorder 1, then attach the battery pack and click it to the DC IN jack on the DC plug facing down, connect the AC Adaptor to your... lamp The CHG (charge) lamp lights up and charging starts. b Notes • You cannot attach any "InfoLITHIUM" battery pack other than the H series to your camcorder. 4 Connect the power cord (mains lead) to the AC Adaptor and the wall outlet (wall socket). 1 Align the terminals of the arrow to OFF(CHG...
... the "InfoLITHIUM" battery pack (H series) (p. 81) after attaching it into place 2. 2 Slide the POWER switch in the direction of the battery pack and your camcorder 1, then attach the battery pack and click it to the DC IN jack on the DC plug facing down, connect the AC Adaptor to your... lamp The CHG (charge) lamp lights up and charging starts. b Notes • You cannot attach any "InfoLITHIUM" battery pack other than the H series to your camcorder. 4 Connect the power cord (mains lead) to the AC Adaptor and the wall outlet (wall socket). 1 Align the terminals of the arrow to OFF(CHG...
Operating Guide
Page 13
... capacity (approx.) You can check the remaining battery charge on the LCD screen. Getting Started To use an outside power source You can operate your camcorder using the power from the wall outlet (wall socket) by pressing DISP/BATT INFO again while the information is displayed. DISP/BATT INFO button After...
... capacity (approx.) You can check the remaining battery charge on the LCD screen. Getting Started To use an outside power source You can operate your camcorder using the power from the wall outlet (wall socket) by pressing DISP/BATT INFO again while the information is displayed. DISP/BATT INFO button After...
Operating Guide
Page 14
... (p. 13) will be supplied from the battery as long as between a wall and furniture. • Do not short-circuit the DC plug of your camcorder, even when the power cord (mains lead) is recommended.) • The recording and playback time will be correctly displayed under which you fully charge a...available when you use the AC Adaptor placed in low temperatures. • The recording and playback time will not be shorter when you use your camcorder in a narrow space, such as the AC Adaptor is connected to the wall outlet (wall socket) via the AC Adaptor. Disconnect the AC ...
... (p. 13) will be supplied from the battery as long as between a wall and furniture. • Do not short-circuit the DC plug of your camcorder, even when the power cord (mains lead) is recommended.) • The recording and playback time will be correctly displayed under which you fully charge a...available when you use the AC Adaptor placed in low temperatures. • The recording and playback time will not be shorter when you use your camcorder in a narrow space, such as the AC Adaptor is connected to the wall outlet (wall socket) via the AC Adaptor. Disconnect the AC ...
Operating Guide
Page 15
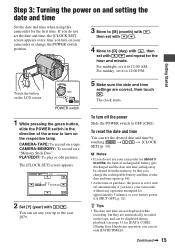
... rechargeable battery gets discharged and the date and time settings may be displayed during playback (see page 51 for [DATA CODE] (During Easy Handycam operation, you turn on your camcorder or change the POWER switch position. 3 Move to [M] (month) with , then set with / . 4 Move to [D] (day) with , then ... while recording, but they are correct, then touch . Getting Started Touch the button on a tape. b Notes • If you leave your camcorder without any year up to the year 2079. 5 Make sure the date and time settings are automatically recorded on the tape, and can set any...
... rechargeable battery gets discharged and the date and time settings may be displayed during playback (see page 51 for [DATA CODE] (During Easy Handycam operation, you turn on your camcorder or change the POWER switch position. 3 Move to [M] (month) with , then set with / . 4 Move to [D] (day) with , then ... while recording, but they are correct, then touch . Getting Started Touch the button on a tape. b Notes • If you leave your camcorder without any year up to the year 2079. 5 Make sure the date and time settings are automatically recorded on the tape, and can set any...

Operating Guide
Page 17
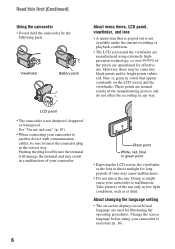
... toggle the screen indicators (such as Battery Info) on the LCD screen is clear. The LCD panel Open the LCD panel 90 degrees to the camcorder (1), then rotate it until the picture is poor. This is convenient during playback operations. • See [LCD/VF SET] - [LCD BRIGHT] (p. 51) to... adjust the brightness of the LCD screen. • Press DISP/BATT INFO to the camcorder b Notes • Do not press the buttons below the LCD frame accidentally when you can adjust the brightness of the viewfinder backlight by selecting [LCD...
... toggle the screen indicators (such as Battery Info) on the LCD screen is clear. The LCD panel Open the LCD panel 90 degrees to the camcorder (1), then rotate it until the picture is poor. This is convenient during playback operations. • See [LCD/VF SET] - [LCD BRIGHT] (p. 51) to... adjust the brightness of the LCD screen. • Press DISP/BATT INFO to the camcorder b Notes • Do not press the buttons below the LCD frame accidentally when you can adjust the brightness of the viewfinder backlight by selecting [LCD...

Operating Guide
Page 19
... direction until it may be careful that the "Memory Stick Duo" does not pop out and drop. Do not shake or knock your camcorder is lit or flashing, your camcorder, turn the power off, eject the "Memory Stick Duo," or remove the battery pack. For details, see page 42. 19 z Tips •... the v mark facing to the LCD screen To eject a "Memory Stick Duo" Lightly push in once and slide out the "Memory Stick Duo" alongside the camcorder body.
... direction until it may be careful that the "Memory Stick Duo" does not pop out and drop. Do not shake or knock your camcorder is lit or flashing, your camcorder, turn the power off, eject the "Memory Stick Duo," or remove the battery pack. For details, see page 42. 19 z Tips •... the v mark facing to the LCD screen To eject a "Memory Stick Duo" Lightly push in once and slide out the "Memory Stick Duo" alongside the camcorder body.

Operating Guide
Page 22
... B Recording movies Movies are recorded on a "Memory Stick Duo" by pressing PHOTO fully. b Notes • You cannot record movies onto a "Memory Stick Duo" using your camcorder. Still images will be fixed to image size [0.2M] in 16:9 screen or [VGA (0.3M)] in the direction of the arrow repeatedly to OFF (CHG...
... B Recording movies Movies are recorded on a "Memory Stick Duo" by pressing PHOTO fully. b Notes • You cannot record movies onto a "Memory Stick Duo" using your camcorder. Still images will be fixed to image size [0.2M] in 16:9 screen or [VGA (0.3M)] in the direction of the arrow repeatedly to OFF (CHG...

Operating Guide
Page 24
... to 25 times the original size with the power zoom lever or the zoom buttons below the LCD frame. • The minimum possible distance between camcorder and subject while maintaining sharp focus is about 1 cm (about 2 5/8 feet) for a faster zoom. Recording (Continued) Zooming You can set to the T (Telephoto) side. •...
... to 25 times the original size with the power zoom lever or the zoom buttons below the LCD frame. • The minimum possible distance between camcorder and subject while maintaining sharp focus is about 1 cm (about 2 5/8 feet) for a faster zoom. Recording (Continued) Zooming You can set to the T (Telephoto) side. •...
Operating Guide
Page 25
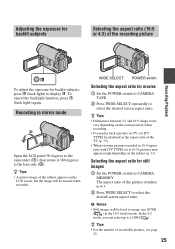
... screen aspect ratio. b Notes • Still images will be fixed to image size [0.7M] ( ) in mirror mode 2 1 Open the LCD panel 90 degrees to the camcorder (1), then rotate it 180 degrees to the lens side (2). The aspect ratio of recordable pictures, see page 42. 25 Recording in the 16:9 (wide) mode...
... screen aspect ratio. b Notes • Still images will be fixed to image size [0.7M] ( ) in mirror mode 2 1 Open the LCD panel 90 degrees to the camcorder (1), then rotate it 180 degrees to the lens side (2). The aspect ratio of recordable pictures, see page 42. 25 Recording in the 16:9 (wide) mode...
Operating Guide
Page 28
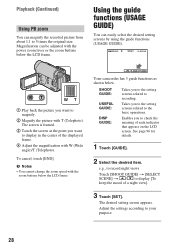
... is framed. 3 Touch the screen at the point you to the setting screens related to your purpose. 28 To cancel, touch [END]. GUIDE P-MENU Your camcorder has 3 guide functions as shown below the LCD frame. b Notes • You cannot change the zoom speed with W (Wide angle)/T (Telephoto). Magnification can be adjusted...
... is framed. 3 Touch the screen at the point you to the setting screens related to your purpose. 28 To cancel, touch [END]. GUIDE P-MENU Your camcorder has 3 guide functions as shown below the LCD frame. b Notes • You cannot change the zoom speed with W (Wide angle)/T (Telephoto). Magnification can be adjusted...
Operating Guide
Page 29
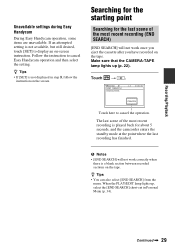
Searching for the starting point Searching for about 5 seconds, and the camcorder enters the standby mode at the point where the last recording has finished. Touch t . 6 0 min END SEARCH EXECUTING 1 0:00:00 CANCEL Touch here to display ... (END SEARCH) [END SEARCH] will not work once you eject the cassette after you have recorded on the screen. Follow the instruction to cancel Easy Handycam operation and then select the setting. Recording/Playback Unavailable settings during Easy...
Searching for the starting point Searching for about 5 seconds, and the camcorder enters the standby mode at the point where the last recording has finished. Touch t . 6 0 min END SEARCH EXECUTING 1 0:00:00 CANCEL Touch here to display ... (END SEARCH) [END SEARCH] will not work once you eject the cassette after you have recorded on the screen. Follow the instruction to cancel Easy Handycam operation and then select the setting. Recording/Playback Unavailable settings during Easy...

Operating Guide
Page 30
... that the CAMERA-TAPE lamp lights up (p. 26). The sound is set memory) Make sure that the PLAY/EDIT lamp lights up (p. 22). Then, your camcorder is not played back during the search. Searching quickly for the start point to start .
... that the CAMERA-TAPE lamp lights up (p. 26). The sound is set memory) Make sure that the PLAY/EDIT lamp lights up (p. 22). Then, your camcorder is not played back during the search. Searching quickly for the start point to start .

Operating Guide
Page 32
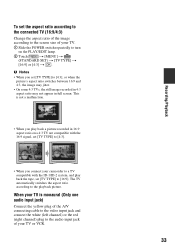
... You can display the time code on the TV screen by using the A/V connecting cable with an S VIDEO cable, pictures can connect your camcorder to be reproduced more faithfully than with S VIDEO (optional) When connecting to [V-OUT/ PANEL] (p. 52). VCR or TV When connecting your... camcorder to a TV through a VCR Connect your camcorder to the LINE IN input on the VCR. Connect your camcorder to the wall outlet (wall socket) using the A/V connecting cable (1) or the A/V connecting cable with ...
... You can display the time code on the TV screen by using the A/V connecting cable with an S VIDEO cable, pictures can connect your camcorder to be reproduced more faithfully than with S VIDEO (optional) When connecting to [V-OUT/ PANEL] (p. 52). VCR or TV When connecting your... camcorder to a TV through a VCR Connect your camcorder to the LINE IN input on the VCR. Connect your camcorder to the wall outlet (wall socket) using the A/V connecting cable (1) or the A/V connecting cable with ...
Operating Guide
Page 33
When your camcorder to a TV compatible with the 16:9 signal, set [TV TYPE] to [16:9]. b Notes • When you connect your TV is not a malfunction. • When you ...
When your camcorder to a TV compatible with the 16:9 signal, set [TV TYPE] to [16:9]. b Notes • When you connect your TV is not a malfunction. • When you ...


