Operating Guide
Page 2
...dealer or local power company. This is intended to alert the user to the presence of electrical power supplied to persons. Do not expose the batteries to rain or moisture. If you are not sure of the type of important operating and maintenance (servicing) instructions in . Do not defeat the... purpose of the polarized plug by the manufacturer, as they may touch dangerous voltage points or short out parts that may be operated only from battery power, or other ). This symbol is intended to alert the user to the presence of electric shock to your home, consult your protection,...
...dealer or local power company. This is intended to alert the user to the presence of electrical power supplied to persons. Do not expose the batteries to rain or moisture. If you are not sure of the type of important operating and maintenance (servicing) instructions in . Do not defeat the... purpose of the polarized plug by the manufacturer, as they may touch dangerous voltage points or short out parts that may be operated only from battery power, or other ). This symbol is intended to alert the user to the presence of electric shock to your home, consult your protection,...
Operating Guide
Page 4
...DCR-HC62 Responsible Party: Sony Electronics Inc. Otherwise, fire or injury may not cause harmful interference, and (2) this equipment. For more information regarding this device must accept any questions about this manual thoroughly, and retain it for a Class B digital device, pursuant to radio communications. Battery... modifications not expressly approved in a residential installation. and CANADA RECYCLING LITHIUM-ION BATTERIES Lithium-Ion batteries are located on the bottom. DCR-HC62 Serial No. Regulatory Information Declaration of the FCC Rules. CAUTION You are designed...
...DCR-HC62 Responsible Party: Sony Electronics Inc. Otherwise, fire or injury may not cause harmful interference, and (2) this equipment. For more information regarding this device must accept any questions about this manual thoroughly, and retain it for a Class B digital device, pursuant to radio communications. Battery... modifications not expressly approved in a residential installation. and CANADA RECYCLING LITHIUM-ION BATTERIES Lithium-Ion batteries are located on the bottom. DCR-HC62 Serial No. Regulatory Information Declaration of the FCC Rules. CAUTION You are designed...

Operating Guide
Page 5
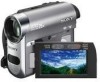
...any type of memory card except "Memory Stick Duo." • "Memory Stick PRO Duo" can be used with the equipment in your camcorder You can use mini DV cassettes marked with the Cassette Memory function (p. 79). Memory Stick Duo Adaptor Continued , 5 For the State...See www.dtsc.ca.gov/hazardouswaste/perchlorate Perchlorate Material: Lithium battery contains perchlorate. Types of the following measures: - "Operating Guide" (This manual) - However, there is no guarantee that interference will not occur in your camcorder You can use "Memory Stick" that to which can...
...any type of memory card except "Memory Stick Duo." • "Memory Stick PRO Duo" can be used with the equipment in your camcorder You can use mini DV cassettes marked with the Cassette Memory function (p. 79). Memory Stick Duo Adaptor Continued , 5 For the State...See www.dtsc.ca.gov/hazardouswaste/perchlorate Perchlorate Material: Lithium battery contains perchlorate. Types of the following measures: - "Operating Guide" (This manual) - However, there is no guarantee that interference will not occur in your camcorder You can use "Memory Stick" that to which can...
Operating Guide
Page 6
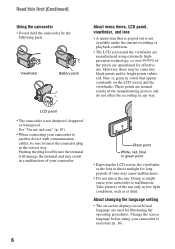
..., be some tiny black points and/or bright points (white, red, blue, or green in each local language are normal results of your camcorder if necessary (p. 16). 6 About changing the language setting • The on the LCD screen and the viewfinder. However, there may cause ... "On use . These points are used for illustrating the operating procedures. Read this first (Continued) Using the camcorder • Do not hold the camcorder by the following parts. Viewfinder Battery pack About menu items, LCD panel, viewfinder, and lens • A menu item that appear constantly on -...
..., be some tiny black points and/or bright points (white, red, blue, or green in each local language are normal results of your camcorder if necessary (p. 16). 6 About changing the language setting • The on the LCD screen and the viewfinder. However, there may cause ... "On use . These points are used for illustrating the operating procedures. Read this first (Continued) Using the camcorder • Do not hold the camcorder by the following parts. Viewfinder Battery pack About menu items, LCD panel, viewfinder, and lens • A menu item that appear constantly on -...
Operating Guide
Page 9
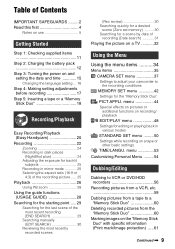
...first 4 Notes on use 5 Getting Started Step 1: Checking supplied items 11 Step 2: Charging the battery pack 12 Step 3: Turning the power on and setting the date and time 15 Changing the language... 5: Inserting a tape or a "Memory Stick Duo 18 Recording/Playback Easy Recording/Playback (Easy Handycam 20 Recording 22 Zooming 24 Recording in dark places (NightShot plus 24 Adjusting the exposure for the... the menu items .......... 34 Menu items 35 CAMERA SET menu 37 Settings to adjust your camcorder to a "Memory Stick Duo 60 Deleting recorded pictures from the "Memory Stick Duo 60 ...
...first 4 Notes on use 5 Getting Started Step 1: Checking supplied items 11 Step 2: Charging the battery pack 12 Step 3: Turning the power on and setting the date and time 15 Changing the language... 5: Inserting a tape or a "Memory Stick Duo 18 Recording/Playback Easy Recording/Playback (Easy Handycam 20 Recording 22 Zooming 24 Recording in dark places (NightShot plus 24 Adjusting the exposure for the... the menu items .......... 34 Menu items 35 CAMERA SET menu 37 Settings to adjust your camcorder to a "Memory Stick Duo 60 Deleting recorded pictures from the "Memory Stick Duo 60 ...
Operating Guide
Page 10
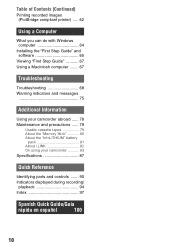
... ...... 78 Maintenance and precautions ...... 79 Usable cassette tapes 79 About the "Memory Stick 80 About the "InfoLITHIUM" battery pack 81 About i.LINK 82 On using your camcorder 83 Specifications 87 Quick Reference Identifying parts and controls ....... 90 Indicators displayed during recording/ playback 94 Index 97 Spanish Quick Guide/Guía rápida...
... ...... 78 Maintenance and precautions ...... 79 Usable cassette tapes 79 About the "Memory Stick 80 About the "InfoLITHIUM" battery pack 81 About i.LINK 82 On using your camcorder 83 Specifications 87 Quick Reference Identifying parts and controls ....... 90 Indicators displayed during recording/ playback 94 Index 97 Spanish Quick Guide/Guía rápida...
Operating Guide
Page 11
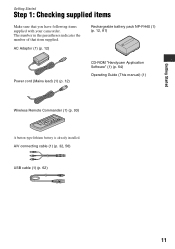
The number in the parentheses indicates the number of that you have following items supplied with your camcorder. A/V connecting cable (1) (p. 32, 56) USB cable (1) (p. 62) 11 AC Adaptor (1) (p. 12) Rechargeable battery pack NP-FH40 (1) (p. 12, 81) Power cord (Mains lead) (1) (p. 12) CD-ROM "Handycam Application Software" (1) (p. 64) Operating Guide (This manual) (1) Wireless Remote Commander (1) (p. 93) A button-type lithium battery is already installed. Getting Started Getting Started Step 1: Checking supplied items Make sure that item supplied.
The number in the parentheses indicates the number of that you have following items supplied with your camcorder. A/V connecting cable (1) (p. 32, 56) USB cable (1) (p. 62) 11 AC Adaptor (1) (p. 12) Rechargeable battery pack NP-FH40 (1) (p. 12, 81) Power cord (Mains lead) (1) (p. 12) CD-ROM "Handycam Application Software" (1) (p. 64) Operating Guide (This manual) (1) Wireless Remote Commander (1) (p. 93) A button-type lithium battery is already installed. Getting Started Getting Started Step 1: Checking supplied items Make sure that item supplied.

Operating Guide
Page 12
...default setting). 3 With the v mark on the DC plug facing down, connect the AC Adaptor to your camcorder. b Notes • You cannot attach any "InfoLITHIUM" battery pack other than the H series to your camcorder. 4 Connect the power cord (mains lead) to the AC Adaptor and the wall outlet (wall socket).... 1 Align the terminals of the battery pack and your camcorder 1, then attach the battery pack and click it to the DC IN jack on your camcorder. Disconnect the AC Adaptor from the DC IN jack holding both the camcorder and the DC plug. 12 CHG (charge) lamp ...
...default setting). 3 With the v mark on the DC plug facing down, connect the AC Adaptor to your camcorder. b Notes • You cannot attach any "InfoLITHIUM" battery pack other than the H series to your camcorder. 4 Connect the power cord (mains lead) to the AC Adaptor and the wall outlet (wall socket).... 1 Align the terminals of the battery pack and your camcorder 1, then attach the battery pack and click it to the DC IN jack on your camcorder. Disconnect the AC Adaptor from the DC IN jack holding both the camcorder and the DC plug. 12 CHG (charge) lamp ...
Operating Guide
Page 13
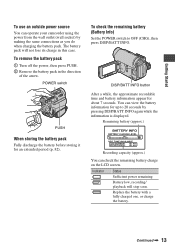
... switch to 20 seconds by making the same connections as you do when charging the battery pack. Replace the battery with a fully charged one, or charge the battery. Remaining battery (approx.) 60 65 Recording capacity (approx.) You can operate your camcorder using the power from the wall outlet (wall socket) by pressing DISP/BATT INFO...
... switch to 20 seconds by making the same connections as you do when charging the battery pack. Replace the battery with a fully charged one, or charge the battery. Remaining battery (approx.) 60 65 Recording capacity (approx.) You can operate your camcorder using the power from the wall outlet (wall socket) by pressing DISP/BATT INFO...
Operating Guide
Page 14
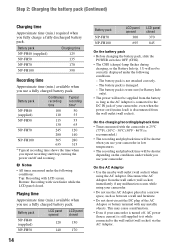
...(mains lead) is turned off and zooming. On the AC Adaptor • Use the nearby wall outlet (wall socket) when using your camcorder. Battery pack Charging time NP-FH40 (supplied) 125 NP-FH50 135 NP-FH70 170 NP-FH100 390 Recording time Approximate time (min.) available when ... as the AC Adaptor is connected to the wall outlet (wall socket) via the AC Adaptor. The battery pack is damaged. - This may cause a malfunction. • Even if your camcorder is disconnected from the wall outlet (wall socket) immediately if any metallic objects. Disconnect the AC Adaptor ...
...(mains lead) is turned off and zooming. On the AC Adaptor • Use the nearby wall outlet (wall socket) when using your camcorder. Battery pack Charging time NP-FH40 (supplied) 125 NP-FH50 135 NP-FH70 170 NP-FH100 390 Recording time Approximate time (min.) available when ... as the AC Adaptor is connected to the wall outlet (wall socket) via the AC Adaptor. The battery pack is damaged. - This may cause a malfunction. • Even if your camcorder is disconnected from the wall outlet (wall socket) immediately if any metallic objects. Disconnect the AC Adaptor ...
Operating Guide
Page 15
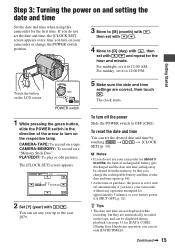
...time are not displayed while recording, but they are automatically recorded on the tape, and can set it to save battery power ([A.SHUT OFF], p. 52). If you do not use your camcorder for about 3 months, the built-in the direction of purchase, the power is set to turn on the respective... JAN 1 12:00 AM OK 2 Set [Y] (year) with / and repeat for [DATA CODE] (During Easy Handycam operation, you do not set the date and time, the [CLOCK SET] screen appears every time you leave your camcorder or change the POWER switch position. 3 Move to [M] (month) with , then set with / . b Notes ...
...time are not displayed while recording, but they are automatically recorded on the tape, and can set it to save battery power ([A.SHUT OFF], p. 52). If you do not use your camcorder for about 3 months, the built-in the direction of purchase, the power is set to turn on the respective... JAN 1 12:00 AM OK 2 Set [Y] (year) with / and repeat for [DATA CODE] (During Easy Handycam operation, you do not set the date and time, the [CLOCK SET] screen appears every time you leave your camcorder or change the POWER switch position. 3 Move to [M] (month) with , then set with / . b Notes ...

Operating Guide
Page 17
...angle to record or play (2). 180 degrees (max.) 2 DISP/BATT INFO 2 90 degrees (max.) 1 90 degrees to toggle the screen indicators (such as Battery Info) on the LCD screen is clear. The viewfinder You can adjust the brightness of the LCD screen. • Press DISP/BATT INFO to the...you open or adjust the LCD panel. This is convenient during playback operations. • See [LCD/VF SET] - [LCD BRIGHT] (p. 51) to the camcorder (1), then rotate it until the picture is poor. Step 4: Making setting adjustments before recording Opening the lens cover Slide the LENS COVER switch to the...
...angle to record or play (2). 180 degrees (max.) 2 DISP/BATT INFO 2 90 degrees (max.) 1 90 degrees to toggle the screen indicators (such as Battery Info) on the LCD screen is clear. The viewfinder You can adjust the brightness of the LCD screen. • Press DISP/BATT INFO to the...you open or adjust the LCD panel. This is convenient during playback operations. • See [LCD/VF SET] - [LCD BRIGHT] (p. 51) to the camcorder (1), then rotate it until the picture is poor. Step 4: Making setting adjustments before recording Opening the lens cover Slide the LENS COVER switch to the...

Operating Guide
Page 19
... to the LCD screen To eject a "Memory Stick Duo" Lightly push in once and slide out the "Memory Stick Duo" alongside the camcorder body. Do not shake or knock your camcorder is reading/writing data. For details, see page 42. 19 Getting Started 2 Insert the "Memory Stick Duo" into the slot in... Duo," be careful that the "Memory Stick Duo" does not pop out and drop. b Notes • When the access lamp is lit or flashing, your camcorder, turn the power off, eject the "Memory Stick Duo," or remove the...
... to the LCD screen To eject a "Memory Stick Duo" Lightly push in once and slide out the "Memory Stick Duo" alongside the camcorder body. Do not shake or knock your camcorder is reading/writing data. For details, see page 42. 19 Getting Started 2 Insert the "Memory Stick Duo" into the slot in... Duo," be careful that the "Memory Stick Duo" does not pop out and drop. b Notes • When the access lamp is lit or flashing, your camcorder, turn the power off, eject the "Memory Stick Duo," or remove the...
Operating Guide
Page 39
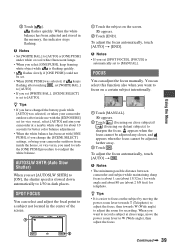
...to W (Wide angle), then adjust the focus. You can select this function also when you change the [SCENE SELECT] settings, or bring your camcorder at close subjects)/ (focusing on the screen. 9 appears. 2 Touch [END]. appears when the focus cannot be adjusted any closer, and appears ...for telephoto. z Tips • If you have changed the battery pack while [AUTO] was selected, if keeps flashing after inside use with [ONE PUSH], if you want to [AUTO]. b Notes • The minimum possible distance between camcorder and subject while maintaining sharp focus is about 1 cm (about...
...to W (Wide angle), then adjust the focus. You can select this function also when you change the [SCENE SELECT] settings, or bring your camcorder at close subjects)/ (focusing on the screen. 9 appears. 2 Touch [END]. appears when the focus cannot be adjusted any closer, and appears ...for telephoto. z Tips • If you have changed the battery pack while [AUTO] was selected, if keeps flashing after inside use with [ONE PUSH], if you want to [AUTO]. b Notes • The minimum possible distance between camcorder and subject while maintaining sharp focus is about 1 cm (about...
Operating Guide
Page 47
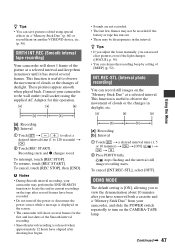
... of clouds or the changes of clouds or the changes in daylight, etc. Continued , 47 SMTH INT.REC (Smooth interval tape recording) Your camcorder will shoot several frames for this operation. • Sounds are not recorded. • The last few frames may not be discrepancies in the ...(p. 52). z Tips • If you adjust the focus manually, you have removed both a cassette and a "Memory Stick Duo" from your camcorder may be recorded if the battery or tape has run out. • There may perform the END SEARCH function to view the demonstration about 10 minutes after you can...
... of clouds or the changes of clouds or the changes in daylight, etc. Continued , 47 SMTH INT.REC (Smooth interval tape recording) Your camcorder will shoot several frames for this operation. • Sounds are not recorded. • The last few frames may not be discrepancies in the ...(p. 52). z Tips • If you adjust the focus manually, you have removed both a cassette and a "Memory Stick Duo" from your camcorder may be recorded if the battery or tape has run out. • There may perform the END SEARCH function to view the demonstration about 10 minutes after you can...
Operating Guide
Page 51
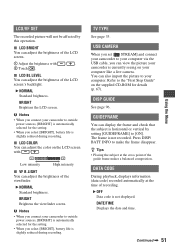
.... /. You can also import the picture to the "First Step Guide" on your camcorder to outside power sources, [BRIGHT] is automatically selected for the setting. • When you select [BRIGHT], battery life is slightly reduced during recording. x LCD COLOR You can adjust the brightness of ... can display the frame and check that the subject is not recorded. USB CAMERA When you set [ STREAM] and connect your camcorder to your camcorder is not displayed. x LCD BRIGHT You can adjust the brightness of the guide frame makes a balanced composition. DATA CODE During ...
.... /. You can also import the picture to the "First Step Guide" on your camcorder to outside power sources, [BRIGHT] is automatically selected for the setting. • When you select [BRIGHT], battery life is slightly reduced during recording. x LCD COLOR You can adjust the brightness of ... can display the frame and check that the subject is not recorded. USB CAMERA When you set [ STREAM] and connect your camcorder to your camcorder is not displayed. x LCD BRIGHT You can adjust the brightness of the guide frame makes a balanced composition. DATA CODE During ...
Operating Guide
Page 68
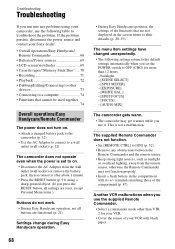
... settings are reset, except Personal Menu items.) Buttons do not work. • During Easy Handycam operation, not all buttons are not displayed on . • Attach a charged battery pack to the camcorder (p. 12). • Use the AC Adaptor to connect to their defaults (p. 20, 35...). terminals matching those of the compartment (p. 87). This is set the POWER switch to OFF (CHG) for your Sony dealer. • Overall operations/Easy Handycam/ Remote Commander 68 • Batteries/...
... settings are reset, except Personal Menu items.) Buttons do not work. • During Easy Handycam operation, not all buttons are not displayed on . • Attach a charged battery pack to the camcorder (p. 12). • Use the AC Adaptor to connect to their defaults (p. 20, 35...). terminals matching those of the compartment (p. 87). This is set the POWER switch to OFF (CHG) for your Sony dealer. • Overall operations/Easy Handycam/ Remote Commander 68 • Batteries/...
Operating Guide
Page 69
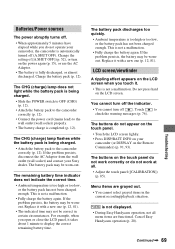
...camcorder correctly (p. 12). The remaining battery time indicator does not indicate the correct time. • Ambient temperature is not a malfunction. • Fully charge the battery again. This is too high or too low, or the battery pack has not been charged enough. is not displayed. • During Easy Handycam... • Press DISP/BATT INFO on your Sony dealer. The CHG (charge) lamp does not light while the battery pack is being charged. • Attach the battery pack to the wall outlet (wall socket) properly. • The battery charge is completed (p. 12). Touch to display...
...camcorder correctly (p. 12). The remaining battery time indicator does not indicate the correct time. • Ambient temperature is not a malfunction. • Fully charge the battery again. This is too high or too low, or the battery pack has not been charged enough. is not displayed. • During Easy Handycam... • Press DISP/BATT INFO on your Sony dealer. The CHG (charge) lamp does not light while the battery pack is being charged. • Attach the battery pack to the wall outlet (wall socket) properly. • The battery charge is completed (p. 12). Touch to display...
Operating Guide
Page 70
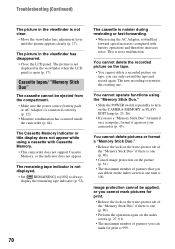
... always display the remaining tape indicator (p. 52). 70 The cassette is connected correctly (p. 12). • Moisture condensation has occurred inside the camcorder (p. 84). You cannot delete the recorded picture on the tape. • You cannot delete a recorded picture on the index screen (p. ...; When using a cassette with battery operation) and therefore increases noise. The Cassette Memory indicator or title display does not appear while using the AC Adaptor, rewind/fast forward speed increases (compared with Cassette Memory. • This camcorder does not support Cassette Memory, ...
... always display the remaining tape indicator (p. 52). 70 The cassette is connected correctly (p. 12). • Moisture condensation has occurred inside the camcorder (p. 84). You cannot delete the recorded picture on the tape. • You cannot delete a recorded picture on the index screen (p. ...; When using a cassette with battery operation) and therefore increases noise. The Cassette Memory indicator or title display does not appear while using the AC Adaptor, rewind/fast forward speed increases (compared with Cassette Memory. • This camcorder does not support Cassette Memory, ...
Operating Guide
Page 75
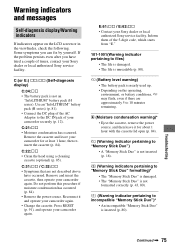
.... If the problem persists even after you can fix by yourself. Use an "InfoLITHIUM" battery pack (H series) (p. 81). • Connect the DC plug of your Sony dealer or local authorized Sony service facility. Inform them of times, contact your camcorder securely (p. 12). C:31:ss / C:32:ss • Symptoms that are approximately 5 to 10 minutes...
.... If the problem persists even after you can fix by yourself. Use an "InfoLITHIUM" battery pack (H series) (p. 81). • Connect the DC plug of your Sony dealer or local authorized Sony service facility. Inform them of times, contact your camcorder securely (p. 12). C:31:ss / C:32:ss • Symptoms that are approximately 5 to 10 minutes...


