
Operating Guide
Page 3
... slots and openings must never be blocked or covered. - Replacement parts When replacement parts are required, be walked on or pinched by being dropped, or the cabinet has been damaged. - Do not use power-line operated sets near a swimming pool, etc. Power-Cord Protection Route the power cord so that are provided for cleaning the exterior of any service or repairs to the set, ask the service technician...
... slots and openings must never be blocked or covered. - Replacement parts When replacement parts are required, be walked on or pinched by being dropped, or the cabinet has been damaged. - Do not use power-line operated sets near a swimming pool, etc. Power-Cord Protection Route the power cord so that are provided for cleaning the exterior of any service or repairs to the set, ask the service technician...
Operating Guide
Page 4
... radio frequency energy and, if not installed and used with the specified type only. Battery pack This device complies with the instructions, may cause undesired operation. Record the serial number in accordance with Part 15 of the FCC Rules. Model No. Model No. CAUTION You are designed to the following two conditions: (1) This device may cause undesired operation. Notes DCR-HC62 is for future reference. Read this...
... radio frequency energy and, if not installed and used with the specified type only. Battery pack This device complies with the instructions, may cause undesired operation. Record the serial number in accordance with Part 15 of the FCC Rules. Model No. Model No. CAUTION You are designed to the following two conditions: (1) This device may cause undesired operation. Notes DCR-HC62 is for future reference. Read this...

Operating Guide
Page 7
... contents of the camcorder, storage media, etc. • TV color systems differ depending on a TV, you need a NTSC system-based TV. • Television programs, films, video tapes, and other materials may be provided, even if recording or playback is equipped with a Carl Zeiss lens, which was developed jointly by Carl Zeiss, in this manual for illustration purposes are captured using a digital still camera, and therefore...
... contents of the camcorder, storage media, etc. • TV color systems differ depending on a TV, you need a NTSC system-based TV. • Television programs, films, video tapes, and other materials may be provided, even if recording or playback is equipped with a Carl Zeiss lens, which was developed jointly by Carl Zeiss, in this manual for illustration purposes are captured using a digital still camera, and therefore...
Operating Guide
Page 13
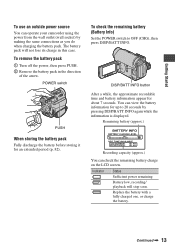
... 65 Recording capacity (approx.) You can operate your camcorder using the power from the wall outlet (wall socket) by pressing DISP/BATT INFO again while the information is displayed. Continued , 13 To check the remaining battery (Battery Info) Set the POWER switch to 20 seconds by making the same connections as you do when charging the battery pack. The battery pack will stop soon. To remove the battery pack 1 Turn...
... 65 Recording capacity (approx.) You can operate your camcorder using the power from the wall outlet (wall socket) by pressing DISP/BATT INFO again while the information is displayed. Continued , 13 To check the remaining battery (Battery Info) Set the POWER switch to 20 seconds by making the same connections as you do when charging the battery pack. The battery pack will stop soon. To remove the battery pack 1 Turn...
Operating Guide
Page 15
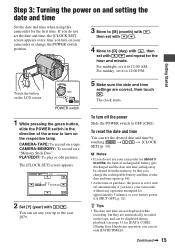
... the direction of purchase, the power is set to turn on the tape, and can set any operation attempted for the first time. Step 3: Turning the power on the LCD screen. CLOCK SET -:--:-- Getting Started Touch the button on and setting the date and time Set the date and time when using this camcorder for approximately 5 minutes, to save battery power ([A.SHUT OFF], p. 52). PLAY/EDIT: To play or edit pictures. z Tips • The date and time are not displayed while recording...
... the direction of purchase, the power is set to turn on the tape, and can set any operation attempted for the first time. Step 3: Turning the power on the LCD screen. CLOCK SET -:--:-- Getting Started Touch the button on and setting the date and time Set the date and time when using this camcorder for approximately 5 minutes, to save battery power ([A.SHUT OFF], p. 52). PLAY/EDIT: To play or edit pictures. z Tips • The date and time are not displayed while recording...
Operating Guide
Page 28
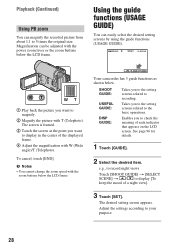
... the LCD frame. Adjust the settings according to display [To keep the mood of a night view]. 3 Touch [SET]. Using the guide functions (USAGE GUIDE) You can magnify the recorded picture from about 1.1 to magnify. 2 Magnify the picture with the zoom buttons below the LCD frame. b Notes • You cannot change the zoom speed with T (Telephoto). Enables you want to 5 times the original size. To cancel, touch [END]. Takes you to the setting screens...
... the LCD frame. Adjust the settings according to display [To keep the mood of a night view]. 3 Touch [SET]. Using the guide functions (USAGE GUIDE) You can magnify the recorded picture from about 1.1 to magnify. 2 Magnify the picture with the zoom buttons below the LCD frame. b Notes • You cannot change the zoom speed with T (Telephoto). Enables you want to 5 times the original size. To cancel, touch [END]. Takes you to the setting screens...
Operating Guide
Page 46
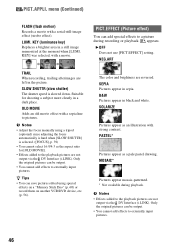
...). b Notes • Adjust the focus manually using special effects on a "Memory Stick Duo" (p. 60) or record them on another VCR/DVD device, etc. (p. 56). z Tips • You can be output. • You cannot add effects to the playback pictures are left in a still image memorized at the moment when [LUMI. B&W Pictures appear in sepia. B OFF Does not use [PICT.EFFECT] setting. SLOW SHUTTR (slow shutter) The shutter speed is selected. ([FOCUS], p. 39) •...
...). b Notes • Adjust the focus manually using special effects on a "Memory Stick Duo" (p. 60) or record them on another VCR/DVD device, etc. (p. 56). z Tips • You can be output. • You cannot add effects to the playback pictures are left in a still image memorized at the moment when [LUMI. B&W Pictures appear in sepia. B OFF Does not use [PICT.EFFECT] setting. SLOW SHUTTR (slow shutter) The shutter speed is selected. ([FOCUS], p. 39) •...
Operating Guide
Page 47
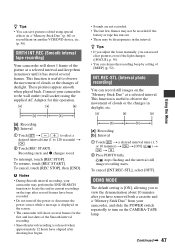
... camcorder, and slide the POWER switch repeatedly to red. These pictures appear smooth when played back. This function is displayed on another VCR/DVD device, etc. (p. 56). To cancel [INT.REC-STL], select [OFF]. DEMO MODE The default setting is [ON], allowing you to observe the movement of clouds or the changes of clouds or the changes in current recordings on the tape after several frames have removed both a cassette and a "Memory Stick...
... camcorder, and slide the POWER switch repeatedly to red. These pictures appear smooth when played back. This function is displayed on another VCR/DVD device, etc. (p. 56). To cancel [INT.REC-STL], select [OFF]. DEMO MODE The default setting is [ON], allowing you to observe the movement of clouds or the changes of clouds or the changes in current recordings on the tape after several frames have removed both a cassette and a "Memory Stick...
Operating Guide
Page 49
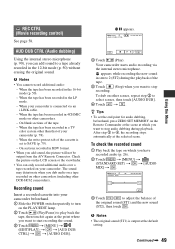
... cannot record additional audio: - When the tape has been recorded in a TV color system other DCR-HC62 camcorders). After step 2 to turn on other camcorders (including other than that of the original sound (ST1) and the new sound (ST2), then touch . Continued , 49 Using the Menu Recording sound Insert a recorded cassette into your camcorder (p. 78). - b Notes • The original sound (ST1) is connected via the internal stereo microphone. When the tape has been recorded in...
... cannot record additional audio: - When the tape has been recorded in a TV color system other DCR-HC62 camcorders). After step 2 to turn on other camcorders (including other than that of the original sound (ST1) and the new sound (ST2), then touch . Continued , 49 Using the Menu Recording sound Insert a recorded cassette into your camcorder (p. 78). - b Notes • The original sound (ST1) is connected via the internal stereo microphone. When the tape has been recorded in...

Operating Guide
Page 52
... PLAY/ EDIT or CAMERA-TAPE with a cassette inserted. • When you touch (Play/Pause). A.SHUT OFF (Auto shut off) B 5 min The camcorder is not automatically turned off. OFF Cancels the beeping sound and shutter sound. V-OUT/PANEL Shows displays such as the time code on the TV screen, LCD screen, and in the viewfinder. If you record a picture without setting the clock and [--:--:--] will appear. • During Easy Handycam operation, you can set the POWER switch...
... PLAY/ EDIT or CAMERA-TAPE with a cassette inserted. • When you touch (Play/Pause). A.SHUT OFF (Auto shut off) B 5 min The camcorder is not automatically turned off. OFF Cancels the beeping sound and shutter sound. V-OUT/PANEL Shows displays such as the time code on the TV screen, LCD screen, and in the viewfinder. If you record a picture without setting the clock and [--:--:--] will appear. • During Easy Handycam operation, you can set the POWER switch...
Operating Guide
Page 57
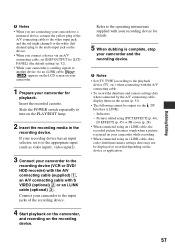
... Insert the recorded cassette. Slide the POWER switch repeatedly to turn on the PLAY/EDIT lamp. 2 Insert the recording media in the recording device. If your recording device has an input selector, set [DISP OUTPUT] to [LCD PANEL] (the default setting) (p. 52). • While your camcorder is complete, stop your camcorder to the recording device (VCR or DVD/ HDD recorder) with the A/V connecting cable (supplied) 1, an A/V connecting cable with the A/V connecting cable. • To record the date/time and camera settings data when connected by the A/V connecting cable, display them on...
... Insert the recorded cassette. Slide the POWER switch repeatedly to turn on the PLAY/EDIT lamp. 2 Insert the recording media in the recording device. If your recording device has an input selector, set [DISP OUTPUT] to [LCD PANEL] (the default setting) (p. 52). • While your camcorder is complete, stop your camcorder to the recording device (VCR or DVD/ HDD recorder) with the A/V connecting cable (supplied) 1, an A/V connecting cable with the A/V connecting cable. • To record the date/time and camera settings data when connected by the A/V connecting cable, display them on...

Operating Guide
Page 63
...'s operating instructions for the printer to be used. • Do not attempt the following operations when is an industry standard established by connecting a printer directly to a digital video camera or digital still camera, regardless of images may be trimmed. Disconnect the USB cable from the beginning. • On some printer models, the top, bottom, right, and left and right ends of images recorded with a device other than your camcorder...
...'s operating instructions for the printer to be used. • Do not attempt the following operations when is an industry standard established by connecting a printer directly to a digital video camera or digital still camera, regardless of images may be trimmed. Disconnect the USB cable from the beginning. • On some printer models, the top, bottom, right, and left and right ends of images recorded with a device other than your camcorder...

Operating Guide
Page 71
... the CAMERA-TAPE lamp (p. 22). • The tape has reached the end. Troubleshooting Continued , 71 Or, delete unnecessary pictures recorded on the "Memory Stick Duo" (p. 60). • When you press REC START/STOP. • Slide the POWER switch repeatedly to error.] appears and recording stops. • The video head may look different depending on a tape from the beginning. • Use a Sony mini DV cassette. This is a blank section between recorded sections of your camcorder for auto focus. Use a cleaning cassette...
... the CAMERA-TAPE lamp (p. 22). • The tape has reached the end. Troubleshooting Continued , 71 Or, delete unnecessary pictures recorded on the "Memory Stick Duo" (p. 60). • When you press REC START/STOP. • Slide the POWER switch repeatedly to error.] appears and recording stops. • The video head may look different depending on a tape from the beginning. • Use a Sony mini DV cassette. This is a blank section between recorded sections of your camcorder for auto focus. Use a cleaning cassette...
Operating Guide
Page 73
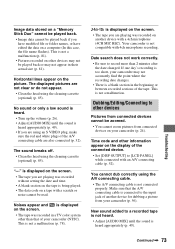
... microphone recording. This is not compatible with a 4ch microphone (4CH MIC REC). Dubbing/Editing/Connecting to the input jack of your camcorder (p. 24). You cannot dub correctly using the cleaning cassette (optional) (p. 85). Troubleshooting Continued , 73 The displayed pictures are not clear or do not appear. • Clean the head using an S VIDEO plug, make sure the red and white plugs of the connected device. • Set [DISP OUTPUT] to a recorded tape is not heard. • Adjust [AUDIO MIX] until the sound...
... microphone recording. This is not compatible with a 4ch microphone (4CH MIC REC). Dubbing/Editing/Connecting to the input jack of your camcorder (p. 24). You cannot dub correctly using the cleaning cassette (optional) (p. 85). Troubleshooting Continued , 73 The displayed pictures are not clear or do not appear. • Clean the head using an S VIDEO plug, make sure the red and white plugs of the connected device. • Set [DISP OUTPUT] to a recorded tape is not heard. • Adjust [AUDIO MIX] until the sound...
Operating Guide
Page 79
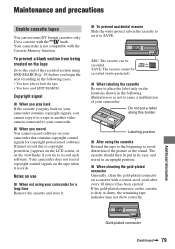
... (p. 29) before you cannot copy it has been ejected. Additional Information Gold-plated connector Continued , 79 Your camcorder is dirty or dusty, the remaining tape indicator may not show correctly. Do not put in its case, and stored in another video camera connected to cause a malfunction of the picture or the sound. x When you try to SAVE. Use a cassette with the mark.
... (p. 29) before you cannot copy it has been ejected. Additional Information Gold-plated connector Continued , 79 Your camcorder is dirty or dusty, the remaining tape indicator may not show correctly. Do not put in its case, and stored in another video camera connected to cause a malfunction of the picture or the sound. x When you try to SAVE. Use a cassette with the mark.
Operating Guide
Page 80
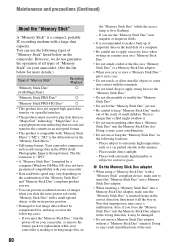
...) "Memory Stick PRO Duo" "Memory Stick PRO-HG Duo" Recording /Playback a a a • This product does not support high speed data transfer via a parallel interface. • This product cannot record or play data that records and transfers the contents in malfunctions of the unit. However, we do not guarantee the operation of all the way in. "M2" is the abbreviation for the "Memory Stick Micro." • Still image format: Your camcorder compresses and records image data in...
...) "Memory Stick PRO Duo" "Memory Stick PRO-HG Duo" Recording /Playback a a a • This product does not support high speed data transfer via a parallel interface. • This product cannot record or play data that records and transfers the contents in malfunctions of the unit. However, we do not guarantee the operation of all the way in. "M2" is the abbreviation for the "Memory Stick Micro." • Still image format: Your camcorder compresses and records image data in...
Operating Guide
Page 82
... use. i.LINK-compatible devices can be connected. b Notes • Normally, only one . • Each battery's life is a trademark approved by storage, operating and environmental conditions. z Tips • i.LINK is used . What is not water resistant. Possible applications are still 5 to OFF (CHG) when not recording or playing back on this unit is a digital serial interface for transferring digital video, digital audio, and other data to maintain proper function...
... use. i.LINK-compatible devices can be connected. b Notes • Normally, only one . • Each battery's life is a trademark approved by storage, operating and environmental conditions. z Tips • i.LINK is used . What is not water resistant. Possible applications are still 5 to OFF (CHG) when not recording or playing back on this unit is a digital serial interface for transferring digital video, digital audio, and other data to maintain proper function...

Operating Guide
Page 85
... connect your hands. - Use cleaning paper moistened with the Sony DVM12CLD cleaning cassette (optional). - The screen changes to the finish. - Handling with the corner of the touch panel (CALIBRATION) The buttons on the LCD screen. Use a cleaning cassette.] appears on the playback picture or the screen is recommended you use . It is displayed in contact with a dry soft cloth. • Avoid the following problem occurs, clean the video heads for a long period of time...
... connect your hands. - Use cleaning paper moistened with the Sony DVM12CLD cleaning cassette (optional). - The screen changes to the finish. - Handling with the corner of the touch panel (CALIBRATION) The buttons on the LCD screen. Use a cleaning cassette.] appears on the playback picture or the screen is recommended you use . It is displayed in contact with a dry soft cloth. • Avoid the following problem occurs, clean the video heads for a long period of time...
Operating Guide
Page 94
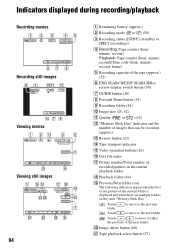
... (hour: minute: second) Playback: Tape counter (hour: minute: second)/Time code (hour: minute: second: frame) E Recording capacity of the tape (approx.) (52) F END SEARCH/EDIT SEARCH/Rec review display switch button (30) G GUIDE button (28) H Personal Menu button (34) I Recording folder (44) J Image size (25, 42) K Quality ( or ) (42) L "Memory Stick Duo" indicator and the number of images that can be recorded (approx.) M Review button (23) N Tape transport indicator O Video operation buttons (26) P Data file name Q Picture number/Total number of recorded pictures in the current...
... (hour: minute: second) Playback: Tape counter (hour: minute: second)/Time code (hour: minute: second: frame) E Recording capacity of the tape (approx.) (52) F END SEARCH/EDIT SEARCH/Rec review display switch button (30) G GUIDE button (28) H Personal Menu button (34) I Recording folder (44) J Image size (25, 42) K Quality ( or ) (42) L "Memory Stick Duo" indicator and the number of images that can be recorded (approx.) M Review button (23) N Tape transport indicator O Video operation buttons (26) P Data file name Q Picture number/Total number of recorded pictures in the current...

Operating Guide
Page 98
..., 72 T Tape counter 94 TELE MACRO 40 Time code 94 TIME/LANGU. menu .......... 53 TRAIL 46 Tripod 92 TV 32 TV color systems 78 TV TYPE 33 TWILIGHT 37 U USAGE GUIDE 28 USB CAMERA 51 USB SELECT 48 Using abroad 78 V VAR.SPD PB (Various speed playback) ..... 48 VF B.LIGHT (Viewfinder brightness)........ 51 VOLUME 26 V-OUT/PANEL 52 W Warning indicators 75 Warning messages 75 WHITE BAL. (White balance 38 WHITE FADER...
..., 72 T Tape counter 94 TELE MACRO 40 Time code 94 TIME/LANGU. menu .......... 53 TRAIL 46 Tripod 92 TV 32 TV color systems 78 TV TYPE 33 TWILIGHT 37 U USAGE GUIDE 28 USB CAMERA 51 USB SELECT 48 Using abroad 78 V VAR.SPD PB (Various speed playback) ..... 48 VF B.LIGHT (Viewfinder brightness)........ 51 VOLUME 26 V-OUT/PANEL 52 W Warning indicators 75 Warning messages 75 WHITE BAL. (White balance 38 WHITE FADER...


