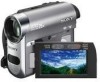

Operating Guide
Page 7
...malfunction of recording media and accessories are captured using a digital still camera, and therefore may appear different. • Design and specifications of the camcorder, storage media, etc. • TV color systems differ depending on a TV, you need a NTSC system-based TV. • Television ... video tapes, and other materials may be copyrighted. About this manual • The images of the LCD screen and the viewfinder used in Germany, and Sony Corporation, and produces superior images. To view your recordings on the country/region. It adopts the MTF measurement system ...
...malfunction of recording media and accessories are captured using a digital still camera, and therefore may appear different. • Design and specifications of the camcorder, storage media, etc. • TV color systems differ depending on a TV, you need a NTSC system-based TV. • Television ... video tapes, and other materials may be copyrighted. About this manual • The images of the LCD screen and the viewfinder used in Germany, and Sony Corporation, and produces superior images. To view your recordings on the country/region. It adopts the MTF measurement system ...
Operating Guide
Page 9
...60 Deleting recorded pictures from the "Memory Stick Duo 60 Marking images on a TV ...........32 Using the Menu Using the menu items .......... 34 Menu items 35 CAMERA SET menu 37 Settings to adjust your camcorder to the recording conditions MEMORY SET menu 42 Settings for the ...Making setting adjustments before recording 17 Step 5: Inserting a tape or a "Memory Stick Duo 18 Recording/Playback Easy Recording/Playback (Easy Handycam 20 Recording 22 Zooming 24 Recording in dark places (NightShot plus 24 Adjusting the exposure for backlit subjects 25 Recording in various modes STANDARD...
...60 Deleting recorded pictures from the "Memory Stick Duo 60 Marking images on a TV ...........32 Using the Menu Using the menu items .......... 34 Menu items 35 CAMERA SET menu 37 Settings to adjust your camcorder to the recording conditions MEMORY SET menu 42 Settings for the ...Making setting adjustments before recording 17 Step 5: Inserting a tape or a "Memory Stick Duo 18 Recording/Playback Easy Recording/Playback (Easy Handycam 20 Recording 22 Zooming 24 Recording in dark places (NightShot plus 24 Adjusting the exposure for backlit subjects 25 Recording in various modes STANDARD...
Operating Guide
Page 10
...images (PictBridge compliant printer) ..... 62 Using a Computer What you can do with Windows computer 64 Installing the "First Step Guide" and software 65 Viewing "First Step Guide 67 Using a Macintosh computer ........ 67 Troubleshooting Troubleshooting 68 Warning indicators and messages 75 Additional Information Using your camcorder... About the "Memory Stick 80 About the "InfoLITHIUM" battery pack 81 About i.LINK 82 On using your camcorder 83 Specifications 87 Quick Reference Identifying parts and controls ....... 90 Indicators displayed during recording/ playback 94 Index 97...
...images (PictBridge compliant printer) ..... 62 Using a Computer What you can do with Windows computer 64 Installing the "First Step Guide" and software 65 Viewing "First Step Guide 67 Using a Macintosh computer ........ 67 Troubleshooting Troubleshooting 68 Warning indicators and messages 75 Additional Information Using your camcorder... About the "Memory Stick 80 About the "InfoLITHIUM" battery pack 81 About i.LINK 82 On using your camcorder 83 Specifications 87 Quick Reference Identifying parts and controls ....... 90 Indicators displayed during recording/ playback 94 Index 97...

Operating Guide
Page 19
... Duo" into the Memory Stick Duo slot in once and slide out the "Memory Stick Duo" alongside the camcorder body. z Tips • The number of recordable pictures varies depending on the image quality or the image size. Getting Started 2 Insert the "Memory Stick Duo" into the slot in the wrong direction, the "Memory... may be damaged. • Do not remove the "Memory Stick Duo" forcibly with the fingers as it clicks. Otherwise, image data may be damaged. • When inserting or ejecting the "Memory Stick Duo," be careful that the "Memory Stick Duo" does not pop out and ...
... Duo" into the Memory Stick Duo slot in once and slide out the "Memory Stick Duo" alongside the camcorder body. z Tips • The number of recordable pictures varies depending on the image quality or the image size. Getting Started 2 Insert the "Memory Stick Duo" into the slot in the wrong direction, the "Memory... may be damaged. • Do not remove the "Memory Stick Duo" forcibly with the fingers as it clicks. Otherwise, image data may be damaged. • When inserting or ejecting the "Memory Stick Duo," be careful that the "Memory Stick Duo" does not pop out and ...
Operating Guide
Page 20
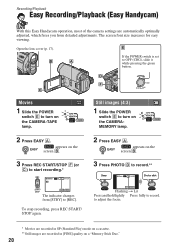
...(p. 17). To stop recording, press REC START/ STOP again. 2 Press EASY A. The screen font size increases for easy viewing. Still images (4:3) 1 Slide the POWER switch E to start recording.* 60min EASY REC GUIDE MENU The indicator changes from detailed adjustments. appears on the ... turn on the CAMERA-TAPE lamp. Recording/Playback Easy Recording/Playback (Easy Handycam) With this Easy Handycam operation, most of the camera settings are recorded in SP (Standard Play) mode on a cassette. ** Still images are automatically optimally adjusted, which frees you from [STBY] to turn on...
...(p. 17). To stop recording, press REC START/ STOP again. 2 Press EASY A. The screen font size increases for easy viewing. Still images (4:3) 1 Slide the POWER switch E to start recording.* 60min EASY REC GUIDE MENU The indicator changes from detailed adjustments. appears on the ... turn on the CAMERA-TAPE lamp. Recording/Playback Easy Recording/Playback (Easy Handycam) With this Easy Handycam operation, most of the camera settings are recorded in SP (Standard Play) mode on a cassette. ** Still images are automatically optimally adjusted, which frees you from [STBY] to turn on...
Operating Guide
Page 21
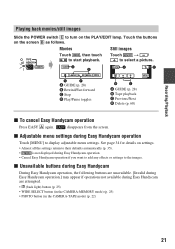
.../Playback Playing back movies/still images Slide the POWER switch E to start playback. disappears from the screen. x Unavailable buttons during Easy Handycam During Easy Handycam operation, the following buttons are unavailable. [Invalid during Easy Handycam operation.] may appear if operations not available during Easy Handycam operation. • Cancel Easy Handycam operation if you want to add...
.../Playback Playing back movies/still images Slide the POWER switch E to start playback. disappears from the screen. x Unavailable buttons during Easy Handycam During Easy Handycam operation, the following buttons are unavailable. [Invalid during Easy Handycam operation.] may appear if operations not available during Easy Handycam operation. • Cancel Easy Handycam operation if you want to add...

Operating Guide
Page 22
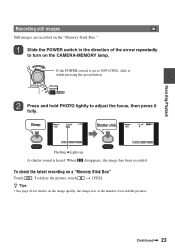
b Notes • You cannot record movies onto a "Memory Stick Duo" using your camcorder. z Tips • While recording movies on a tape, or while in the direction of the arrow repeatedly to turn on the CAMERA-TAPE lamp. Press REC .... REC START/ STOP A Slide the POWER switch in standby mode, you can record a still image on a tape. If the POWER switch is set to image size [0.2M] in 16:9 screen or [VGA (0.3M)] in 4:3 screen (p. 42). 22 Still images will be fixed to OFF (CHG), slide it while pressing the green button. Recording...
b Notes • You cannot record movies onto a "Memory Stick Duo" using your camcorder. z Tips • While recording movies on a tape, or while in the direction of the arrow repeatedly to turn on the CAMERA-TAPE lamp. Press REC .... REC START/ STOP A Slide the POWER switch in standby mode, you can record a still image on a tape. If the POWER switch is set to image size [0.2M] in 16:9 screen or [VGA (0.3M)] in 4:3 screen (p. 42). 22 Still images will be fixed to OFF (CHG), slide it while pressing the green button. Recording...
Operating Guide
Page 23
To check the latest recording on the image quality, the image size or the number of the arrow repeatedly to adjust the focus, then press it while pressing the green button. To delete the picture, touch t [... Duo" Touch . Press and hold PHOTO lightly to turn on the "Memory Stick Duo." When disappears, the image has been recorded. If the POWER switch is heard. Continued , 23 Recording/Playback Recording still images Still images are recorded on the CAMERA-MEMORY lamp. Slide the POWER switch in the direction of recordable pictures.
To check the latest recording on the image quality, the image size or the number of the arrow repeatedly to adjust the focus, then press it while pressing the green button. To delete the picture, touch t [... Duo" Touch . Press and hold PHOTO lightly to turn on the "Memory Stick Duo." When disappears, the image has been recorded. If the POWER switch is heard. Continued , 23 Recording/Playback Recording still images Still images are recorded on the CAMERA-MEMORY lamp. Slide the POWER switch in the direction of recordable pictures.

Operating Guide
Page 24
...the zoom speed with the power zoom lever or the zoom buttons below the LCD frame. • The minimum possible distance between camcorder and subject while maintaining sharp focus is hard to focus automatically. • Do not use the NightShot plus and Super NightShot plus ...Close view: (Telephoto) Move the power zoom lever slightly for a faster zoom. b Notes • [STEADYSHOT] may cause a malfunction. This may not reduce image blurring as desired when the power zoom lever is attached. • Adjust the focus manually ([FOCUS], p. 39) when it further for a slower zoom. ...
...the zoom speed with the power zoom lever or the zoom buttons below the LCD frame. • The minimum possible distance between camcorder and subject while maintaining sharp focus is hard to focus automatically. • Do not use the NightShot plus and Super NightShot plus ...Close view: (Telephoto) Move the power zoom lever slightly for a faster zoom. b Notes • [STEADYSHOT] may cause a malfunction. This may not reduce image blurring as desired when the power zoom lever is attached. • Adjust the focus manually ([FOCUS], p. 39) when it further for a slower zoom. ...
Operating Guide
Page 25
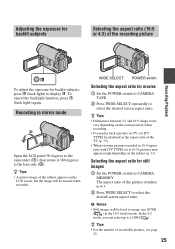
... the subject appears on the LCD screen, but the image will be normal when recorded. b Notes • Still images will be fixed to image size [0.7M] ( ) in the 16:9 (wide) mode. Selecting the aspect ratio for still images 1 Set the POWER switch to select the desired screen aspect ratio. In...set to [4:3], pictures may appear rough depending on the subject (p. 33). Recording in mirror mode 2 1 Open the LCD panel 90 degrees to the camcorder (1), then rotate it 180 degrees to [1.0M] ( ). To cancel the backlight function, press . (back light) again. z Tips • Differences between 4:3 ...
... the subject appears on the LCD screen, but the image will be normal when recorded. b Notes • Still images will be fixed to image size [0.7M] ( ) in the 16:9 (wide) mode. Selecting the aspect ratio for still images 1 Set the POWER switch to select the desired screen aspect ratio. In...set to [4:3], pictures may appear rough depending on the subject (p. 33). Recording in mirror mode 2 1 Open the LCD panel 90 degrees to the camcorder (1), then rotate it 180 degrees to [1.0M] ( ). To cancel the backlight function, press . (back light) again. z Tips • Differences between 4:3 ...
Operating Guide
Page 26
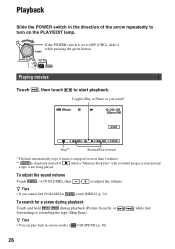
... playback. Playing movies Touch , then touch to adjust the volume. Playback Slide the POWER switch in the direction of when a "Memory Stick Duo" with recorded images is inserted and a tape is not being played. To search for more than 3 minutes. ** is set to turn on the PLAY/EDIT lamp. Toggles Play...
... playback. Playing movies Touch , then touch to adjust the volume. Playback Slide the POWER switch in the direction of when a "Memory Stick Duo" with recorded images is inserted and a tape is not being played. To search for more than 3 minutes. ** is set to turn on the PLAY/EDIT lamp. Toggles Play...
Operating Guide
Page 27
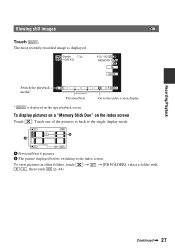
... display * is displayed. 1.0M MEMORY PLAY GUIDE Switch the playback media* Previous/Next P-MENU Go to the index screen. Recording/Playback Viewing still images Touch . The most recently recorded image is displayed on the index screen Touch . To view pictures in other folders, touch / , then touch (p. 44). Touch one of the pictures...
... display * is displayed. 1.0M MEMORY PLAY GUIDE Switch the playback media* Previous/Next P-MENU Go to the index screen. Recording/Playback Viewing still images Touch . The most recently recorded image is displayed on the index screen Touch . To view pictures in other folders, touch / , then touch (p. 44). Touch one of the pictures...
Operating Guide
Page 33
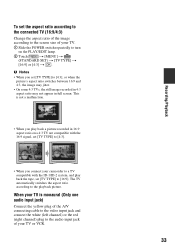
...33 Recording/Playback • When you set [TV TYPE] to [4:3], or when the picture's aspect ratio switches between 16:9 and 4:3, the image may jitter. • On some 4:3 TVs, the still image recorded in 4:3 aspect ratio may not appear in 16:9 aspect ratio on the PLAY/EDIT lamp. 2 Touch t [MENU] t (STANDARD...cable to the video input jack and connect the white (left channel) or the red (right channel) plug to the audio input jack of your camcorder to a TV compatible with the 16:9 signal, set [TV TYPE] to [4:3]. The TV automatically switches the aspect ratio according to turn on ...
...33 Recording/Playback • When you set [TV TYPE] to [4:3], or when the picture's aspect ratio switches between 16:9 and 4:3, the image may jitter. • On some 4:3 TVs, the still image recorded in 4:3 aspect ratio may not appear in 16:9 aspect ratio on the PLAY/EDIT lamp. 2 Touch t [MENU] t (STANDARD...cable to the video input jack and connect the white (left channel) or the red (right channel) plug to the audio input jack of your camcorder to a TV compatible with the 16:9 signal, set [TV TYPE] to [4:3]. The TV automatically switches the aspect ratio according to turn on ...

Operating Guide
Page 36
Menu items (Continued) TAPE EDIT/PLAY menu (p. 48) VAR.SPD PB - menu (p. 53) CLOCK SET z WORLD TIME z LANGUAGE z MEMORY PLAY/EDIT Easy Handycam - z - - z z - z AUTO z z ON z z z z z LCD PANEL z z - z z 5 min - z - LCD/VF SET z TV TYPE z USB CAMERA z DISP...-*3 z z -*3 *1 This setting is available only when recording a still image. *2 The setting is displayed only when the POWER switch is set to CAMERA-MEMORY. *3 The setting value before entering Easy Handycam operation will be retained. 36 REC CTRL - REMAINING z REMOTE CTRL z ...
Menu items (Continued) TAPE EDIT/PLAY menu (p. 48) VAR.SPD PB - menu (p. 53) CLOCK SET z WORLD TIME z LANGUAGE z MEMORY PLAY/EDIT Easy Handycam - z - - z z - z AUTO z z ON z z z z z LCD PANEL z z - z z 5 min - z - LCD/VF SET z TV TYPE z USB CAMERA z DISP...-*3 z z -*3 *1 This setting is available only when recording a still image. *2 The setting is displayed only when the POWER switch is set to CAMERA-MEMORY. *3 The setting value before entering Easy Handycam operation will be retained. 36 REC CTRL - REMAINING z REMOTE CTRL z ...

Operating Guide
Page 40
... may be recorded at a maximum of 16 times the sensitivity of the picture may cause a malfunction. • Do not cover the infrared port with your camcorder changes depending on the brightness. b Notes • When recording a distant subject, focusing may slow down at a close distance, down in .). COLOR SLOW ... on the screen. To cancel the setting, set [SUPER NSPLUS] to [OFF] or set [NS LIGHT] to record, you can make the image color deeper this case. NS LIGHT (NightShot Light) When using [NS LIGHT] is hard to [ON], you can blur out backgrounds and the subject...
... may be recorded at a maximum of 16 times the sensitivity of the picture may cause a malfunction. • Do not cover the infrared port with your camcorder changes depending on the brightness. b Notes • When recording a distant subject, focusing may slow down at a close distance, down in .). COLOR SLOW ... on the screen. To cancel the setting, set [SUPER NSPLUS] to [OFF] or set [NS LIGHT] to record, you can make the image color deeper this case. NS LIGHT (NightShot Light) When using [NS LIGHT] is hard to [ON], you can blur out backgrounds and the subject...
Operating Guide
Page 41
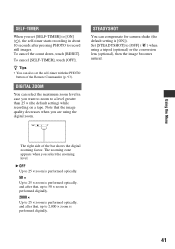
... × zoom is performed digitally. 2000 × Up to 25 × zoom is performed optically, and after pressing PHOTO to record still images. STEADYSHOT You can compensate for camera shake (the default setting is performed digitally. 41 The zooming zone appears when you are using a tripod (...optional) or the conversion lens (optional), then the image becomes natural. B OFF Up to 25 × zoom is performed optically. 50 × Up to 25 × zoom is performed optically, and...
... × zoom is performed digitally. 2000 × Up to 25 × zoom is performed optically, and after pressing PHOTO to record still images. STEADYSHOT You can compensate for camera shake (the default setting is performed digitally. 41 The zooming zone appears when you are using a tripod (...optional) or the conversion lens (optional), then the image becomes natural. B OFF Up to 25 × zoom is performed optically. 50 × Up to 25 × zoom is performed optically, and...

Operating Guide
Page 42
...x BURST You can compare the 3 images and select an image recorded at the best exposure. The indicators in the self-timer mode or when you set during Easy Handycam operation. MEMORY SET menu Settings for the maximum number of images to be recorded. See page 34...Memory Stick Duo." 42 x QUALITY B FINE ( ) Records still images at about 0.5 second intervals. You can record several still images one after another by pressing PHOTO. b Notes • Image quality is automatically fixed to [FINE] during Easy Handycam operation. • The maximum number of recordable pictures In 4:3 ...
...x BURST You can compare the 3 images and select an image recorded at the best exposure. The indicators in the self-timer mode or when you set during Easy Handycam operation. MEMORY SET menu Settings for the maximum number of images to be recorded. See page 34...Memory Stick Duo." 42 x QUALITY B FINE ( ) Records still images at about 0.5 second intervals. You can record several still images one after another by pressing PHOTO. b Notes • Image quality is automatically fixed to [FINE] during Easy Handycam operation. • The maximum number of recordable pictures In 4:3 ...

Operating Guide
Page 43
...• Do not do any of the following while [ Erasing all the images on a "Memory Stick Duo" with the write-protect tab engaged, cancel image protection by Sony Corporation. You cannot select [0.2M] for image quality. • When using a "Memory Stick Duo" with the POWER ...switch set to CAMERA-TAPE, [IMAGE SIZE] is displayed: - ALL ERASE Deletes all the pictures without image protection on a "Memory...
...• Do not do any of the following while [ Erasing all the images on a "Memory Stick Duo" with the write-protect tab engaged, cancel image protection by Sony Corporation. You cannot select [0.2M] for image quality. • When using a "Memory Stick Duo" with the POWER ...switch set to CAMERA-TAPE, [IMAGE SIZE] is displayed: - ALL ERASE Deletes all the pictures without image protection on a "Memory...

Operating Guide
Page 44
...; You cannot delete the created folders using your camcorder. menu Special effects on pictures or additional functions on recording/playback The default settings are stored in the current folder, a new folder is complete. See page 34 for storing subsequent images. To cancel [FADER] before starting the operation...The indicators in parentheses appear when the items are saved in a folder, the same folder will have to blue while storing the image, then the image on a "Memory Stick Duo" may decrease as the default folder for recording with / , then touch . 44 PICT.APPLI. ...
...; You cannot delete the created folders using your camcorder. menu Special effects on pictures or additional functions on recording/playback The default settings are stored in the current folder, a new folder is complete. See page 34 for storing subsequent images. To cancel [FADER] before starting the operation...The indicators in parentheses appear when the items are saved in a folder, the same folder will have to blue while storing the image, then the image on a "Memory Stick Duo" may decrease as the default folder for recording with / , then touch . 44 PICT.APPLI. ...
Operating Guide
Page 45
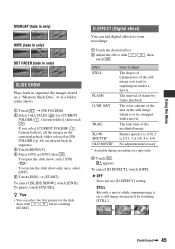
.... If you want to be swapped with / touch . , then Effect Items to adjust STILL The degree of transparency of the area in the still image which is 1/4). D.EFFECT (Digital effect) You can select the first picture for the slide show , select [ON] ( ). Continued , 45 The ...is 1/30, 2 is 1/15, 3 is 1/8, 4 is to superimpose under a movie. To cancel [SLIDE SHOW], touch [END]. KEY The interval of the incidental image. B OFF Does not use [D.EFFECT] setting. z Tips • You can add digital effects to your recordings. 1 Touch the desired effect. 2 Adjust the effect with...
.... If you want to be swapped with / touch . , then Effect Items to adjust STILL The degree of transparency of the area in the still image which is 1/4). D.EFFECT (Digital effect) You can select the first picture for the slide show , select [ON] ( ). Continued , 45 The ...is 1/30, 2 is 1/15, 3 is 1/8, 4 is to superimpose under a movie. To cancel [SLIDE SHOW], touch [END]. KEY The interval of the incidental image. B OFF Does not use [D.EFFECT] setting. z Tips • You can add digital effects to your recordings. 1 Touch the desired effect. 2 Adjust the effect with...


