Operating Guide
Page 2
... will fit into the outlet, try reversing the plug. Overloading Do not overload wall outlets, extension cords or convenience receptacles beyond their capacity, since this manual for future reference. Attachments Do not use attachments not recommended by forcing it in. This symbol is intended to alert the user to them. This...
... will fit into the outlet, try reversing the plug. Overloading Do not overload wall outlets, extension cords or convenience receptacles beyond their capacity, since this manual for future reference. Attachments Do not use attachments not recommended by forcing it in. This symbol is intended to alert the user to them. This...
Operating Guide
Page 4
...is to Part 15 of Conformity Trade Name: SONY Model No.: DCR-HC62 Responsible Party: Sony Electronics Inc. Owner's Record The model and serial numbers are cautioned that may result. Note This equipment has been tested and found to operate this manual thoroughly, and retain it for a Class B...You are located on the bottom. DCR-HC62 Serial No. Read this first Before operating the unit, please read this equipment. This equipment generates, uses, and can help preserve our environment by returning your used in this manual could void your Sony dealer regarding recycling of the FCC ...
...is to Part 15 of Conformity Trade Name: SONY Model No.: DCR-HC62 Responsible Party: Sony Electronics Inc. Owner's Record The model and serial numbers are cautioned that may result. Note This equipment has been tested and found to operate this manual thoroughly, and retain it for a Class B...You are located on the bottom. DCR-HC62 Serial No. Read this first Before operating the unit, please read this equipment. This equipment generates, uses, and can help preserve our environment by returning your used in this manual could void your Sony dealer regarding recycling of the FCC ...

Operating Guide
Page 5
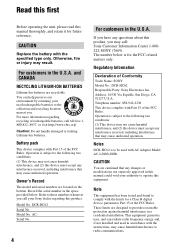
...on a "Memory Stick Duo" or a Memory Stick Duo adaptor. Memory Stick Duo Adaptor Continued , 5 "First Step Guide" for connecting the camcorder to insert the "Memory Stick Duo" into an outlet on a circuit different from that to correct the interference by turning the equipment off and... on the supplied CD-ROM) Type of manuals - "Operating Guide" (This manual) - PRO-HG Duo") ("Memory Stick "Memory Stick Duo" (This size can be used with your camcorder.) "Memory Stick" (You cannot use with your camcorder You can use Your camcorder is not compatible with "Memory Stick" compatible...
...on a "Memory Stick Duo" or a Memory Stick Duo adaptor. Memory Stick Duo Adaptor Continued , 5 "First Step Guide" for connecting the camcorder to insert the "Memory Stick Duo" into an outlet on a circuit different from that to correct the interference by turning the equipment off and... on the supplied CD-ROM) Type of manuals - "Operating Guide" (This manual) - PRO-HG Duo") ("Memory Stick "Memory Stick Duo" (This size can be used with your camcorder.) "Memory Stick" (You cannot use with your camcorder You can use Your camcorder is not compatible with "Memory Stick" compatible...

Operating Guide
Page 7
...images of the LCD screen and the viewfinder used in this manual for illustration purposes are captured using a digital still camera, ... programs, films, video tapes, and other materials may be copyrighted. About the Carl Zeiss lens • Your camcorder is not possible due to the copyright laws. Unauthorized recording of light from a subject coming into the lens. ...is equipped with a Carl Zeiss lens, which was developed jointly by Carl Zeiss, in Germany, and Sony Corporation, and produces superior images. It adopts the MTF measurement system for the contents of recordings cannot be...
...images of the LCD screen and the viewfinder used in this manual for illustration purposes are captured using a digital still camera, ... programs, films, video tapes, and other materials may be copyrighted. About the Carl Zeiss lens • Your camcorder is not possible due to the copyright laws. Unauthorized recording of light from a subject coming into the lens. ...is equipped with a Carl Zeiss lens, which was developed jointly by Carl Zeiss, in Germany, and Sony Corporation, and produces superior images. It adopts the MTF measurement system for the contents of recordings cannot be...
Operating Guide
Page 9
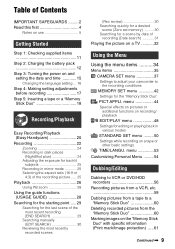
... Inserting a tape or a "Memory Stick Duo 18 Recording/Playback Easy Recording/Playback (Easy Handycam 20 Recording 22 Zooming 24 Recording in dark places (NightShot plus 24 Adjusting the exposure for ... ..... 29 Searching for the last scene of the most recent recording (END SEARCH 29 Searching manually (EDIT SEARCH 30 Reviewing the most recently recorded scenes (Rec review 30 Searching quickly for a...Using the menu items .......... 34 Menu items 35 CAMERA SET menu 37 Settings to adjust your camcorder to a "Memory Stick Duo 60 Deleting recorded pictures from the "Memory Stick Duo 60 ...
... Inserting a tape or a "Memory Stick Duo 18 Recording/Playback Easy Recording/Playback (Easy Handycam 20 Recording 22 Zooming 24 Recording in dark places (NightShot plus 24 Adjusting the exposure for ... ..... 29 Searching for the last scene of the most recent recording (END SEARCH 29 Searching manually (EDIT SEARCH 30 Reviewing the most recently recorded scenes (Rec review 30 Searching quickly for a...Using the menu items .......... 34 Menu items 35 CAMERA SET menu 37 Settings to adjust your camcorder to a "Memory Stick Duo 60 Deleting recorded pictures from the "Memory Stick Duo 60 ...
Operating Guide
Page 11
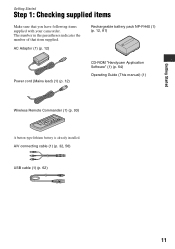
A/V connecting cable (1) (p. 32, 56) USB cable (1) (p. 62) 11 The number in the parentheses indicates the number of that you have following items supplied with your camcorder. AC Adaptor (1) (p. 12) Rechargeable battery pack NP-FH40 (1) (p. 12, 81) Power cord (Mains lead) (1) (p. 12) CD-ROM "Handycam Application Software" (1) (p. 64) Operating Guide (This manual) (1) Wireless Remote Commander (1) (p. 93) A button-type lithium battery is already installed. Getting Started Getting Started Step 1: Checking supplied items Make sure that item supplied.
A/V connecting cable (1) (p. 32, 56) USB cable (1) (p. 62) 11 The number in the parentheses indicates the number of that you have following items supplied with your camcorder. AC Adaptor (1) (p. 12) Rechargeable battery pack NP-FH40 (1) (p. 12, 81) Power cord (Mains lead) (1) (p. 12) CD-ROM "Handycam Application Software" (1) (p. 64) Operating Guide (This manual) (1) Wireless Remote Commander (1) (p. 93) A button-type lithium battery is already installed. Getting Started Getting Started Step 1: Checking supplied items Make sure that item supplied.

Operating Guide
Page 24
... telephoto. If you want to zoom to a level greater than 25 ×. Remove the conversion lens (optional) if it is attached. • Adjust the focus manually ([FOCUS], p. 39) when it further for a slower zoom. Recording (Continued) Zooming You can set to the T (Telephoto) side. • Be sure to keep your fingers... to 25 times the original size with the power zoom lever or the zoom buttons below the LCD frame. • The minimum possible distance between camcorder and subject while maintaining sharp focus is about 1 cm (about 13/32 in bright places.
... telephoto. If you want to zoom to a level greater than 25 ×. Remove the conversion lens (optional) if it is attached. • Adjust the focus manually ([FOCUS], p. 39) when it further for a slower zoom. Recording (Continued) Zooming You can set to the T (Telephoto) side. • Be sure to keep your fingers... to 25 times the original size with the power zoom lever or the zoom buttons below the LCD frame. • The minimum possible distance between camcorder and subject while maintaining sharp focus is about 1 cm (about 13/32 in bright places.

Operating Guide
Page 30
Then, your camcorder is set memory) Make sure that the PLAY/EDIT lamp lights up (p. 26). STBY 0:00:00 EDIT The last 2 seconds (approx.) of the scene recorded ... the screen. 6 0 min 0:00:00 GUIDE P-MENU If the tape counter is not played back during the search. Searching for the starting point (Continued) Searching manually (EDIT SEARCH) You can view about 2 seconds of the most recently recorded scene are played back.
Then, your camcorder is set memory) Make sure that the PLAY/EDIT lamp lights up (p. 26). STBY 0:00:00 EDIT The last 2 seconds (approx.) of the scene recorded ... the screen. 6 0 min 0:00:00 GUIDE P-MENU If the tape counter is not played back during the search. Searching for the starting point (Continued) Searching manually (EDIT SEARCH) You can view about 2 seconds of the most recently recorded scene are played back.

Operating Guide
Page 32
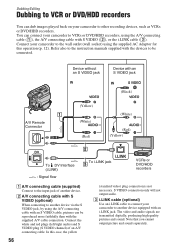
...by setting [DISP OUTPUT] to [V-OUT/ PANEL] (p. 52). z Tips • You can display the time code on the VCR. Connect your camcorder to the input jack of an A/V connecting cable. Device without an S VIDEO jack Device with the devices to the LINE IN input on the TV... screen by using the supplied AC Adaptor for this case, the yellow (standard video) plug connection is not necessary. Refer also to the instruction manuals supplied with an S VIDEO jack (Black) 1 A/V Remote Connector (Yellow) (White) (Red) (White) (Red) (Yellow) 2 : Signal flow A A/V connecting cable (supplied) ...
...by setting [DISP OUTPUT] to [V-OUT/ PANEL] (p. 52). z Tips • You can display the time code on the VCR. Connect your camcorder to the input jack of an A/V connecting cable. Device without an S VIDEO jack Device with the devices to the LINE IN input on the TV... screen by using the supplied AC Adaptor for this case, the yellow (standard video) plug connection is not necessary. Refer also to the instruction manuals supplied with an S VIDEO jack (Black) 1 A/V Remote Connector (Yellow) (White) (Red) (White) (Red) (Yellow) 2 : Signal flow A A/V connecting cable (supplied) ...

Operating Guide
Page 38
... Under video lamps in a studio, or under the same lighting conditions as a piece of a picture manually. SPOT METER (Flexible spot meter) You can adjust and fix the exposure to [MANUAL]. Sunrise or sunset - To return the setting to automatic exposure, touch [AUTO] t [END]. b ...Notes • If you set [SPOT METER], [EXPOSURE] is too bright or too dark. 2 1 3 1 Touch [MANUAL]. Adjust the brightness when the subject is automatically set [SCENE SELECT], [WHITE BAL.] setting is appropriately adjusted for the following recording conditions: - WHITE BAL. (...
... Under video lamps in a studio, or under the same lighting conditions as a piece of a picture manually. SPOT METER (Flexible spot meter) You can adjust and fix the exposure to [MANUAL]. Sunrise or sunset - To return the setting to automatic exposure, touch [AUTO] t [END]. b ...Notes • If you set [SPOT METER], [EXPOSURE] is too bright or too dark. 2 1 3 1 Touch [MANUAL]. Adjust the brightness when the subject is automatically set [SCENE SELECT], [WHITE BAL.] setting is appropriately adjusted for the following recording conditions: - WHITE BAL. (...
Operating Guide
Page 39
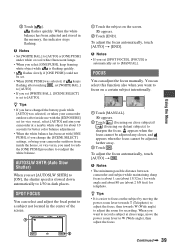
...better color balance adjustment. • When the white balance has been set (or vice versa), select [AUTO] and aim your camcorder at close subjects)/ (focusing on distant subjects) to sharpen the focus. SPOT FOCUS You can select and adjust the focal point to... Notes • If you want to focus on a certain subject intentionally. 1 Touch [MANUAL]. 9 appears. 2 Touch (focusing on close range, move the power zoom lever to [MANUAL]. b Notes • The minimum possible distance between camcorder and subject while maintaining sharp focus is set [SPOT FOCUS], [FOCUS] is slowed down ...
...better color balance adjustment. • When the white balance has been set (or vice versa), select [AUTO] and aim your camcorder at close subjects)/ (focusing on distant subjects) to sharpen the focus. SPOT FOCUS You can select and adjust the focal point to... Notes • If you want to focus on a certain subject intentionally. 1 Touch [MANUAL]. 9 appears. 2 Touch (focusing on close range, move the power zoom lever to [MANUAL]. b Notes • The minimum possible distance between camcorder and subject while maintaining sharp focus is set [SPOT FOCUS], [FOCUS] is slowed down ...

Operating Guide
Page 40
... or other objects (p. 90). • Remove the conversion lens (optional) if it is hard to focus automatically. • The shutter speed of your camcorder changes depending on the brightness. COLOR SLOW S (Color Slow Shutter) When you set [COLOR SLOW S] to [ON], you can record clearer pictures by setting... to about 3 m (10 feet). z Tips • If you set [TELE MACRO] to [ON] ( ), the zoom (p. 24) moves to the top of your camcorder changes depending on the brightness. b Notes • Adjust the focus manually ([FOCUS], p. 39) when it is about 38 cm (15 in bright places.
... or other objects (p. 90). • Remove the conversion lens (optional) if it is hard to focus automatically. • The shutter speed of your camcorder changes depending on the brightness. COLOR SLOW S (Color Slow Shutter) When you set [COLOR SLOW S] to [ON], you can record clearer pictures by setting... to about 3 m (10 feet). z Tips • If you set [TELE MACRO] to [ON] ( ), the zoom (p. 24) moves to the top of your camcorder changes depending on the brightness. b Notes • Adjust the focus manually ([FOCUS], p. 39) when it is about 38 cm (15 in bright places.
Operating Guide
Page 46
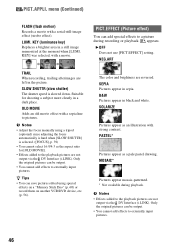
...] setting. Suitable for [OLD MOVIE]. • Effects added to the playback pictures are not output via the DV Interface (i.LINK). b Notes • Adjust the focus manually using special effects on a "Memory Stick Duo" (p. 60) or record them on another VCR/DVD device, etc. (p. 56). SEPIA Pictures appear in a still image memorized...
...] setting. Suitable for [OLD MOVIE]. • Effects added to the playback pictures are not output via the DV Interface (i.LINK). b Notes • Adjust the focus manually using special effects on a "Memory Stick Duo" (p. 60) or record them on another VCR/DVD device, etc. (p. 56). SEPIA Pictures appear in a still image memorized...
Operating Guide
Page 47
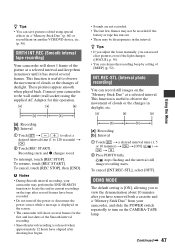
...Continued , 47 SMTH INT.REC (Smooth interval tape recording) Your camcorder will shoot several frames. z Tips • If you adjust the focus manually, you have removed both a cassette and a "Memory Stick Duo" from your camcorder to the wall outlet (wall socket) using special effects on a ... to select a desired interval time (1 to 120 seconds) t . 2 Touch [REC START]. These pictures appear smooth when played back. Connect your camcorder, and slide the POWER switch repeatedly to red. z Tips • You can save pictures edited using the supplied AC Adaptor for the first and ...
...Continued , 47 SMTH INT.REC (Smooth interval tape recording) Your camcorder will shoot several frames. z Tips • If you adjust the focus manually, you have removed both a cassette and a "Memory Stick Duo" from your camcorder to the wall outlet (wall socket) using special effects on a ... to select a desired interval time (1 to 120 seconds) t . 2 Touch [REC START]. These pictures appear smooth when played back. Connect your camcorder, and slide the POWER switch repeatedly to red. z Tips • You can save pictures edited using the supplied AC Adaptor for the first and ...
Operating Guide
Page 56
... (optional) When connecting to another device via the S VIDEO jack, by using the A/V connecting cable with an S VIDEO cable, pictures can connect your camcorder to the wall outlet (wall socket) using the A/V connecting cable (1), the A/V connecting cable with an i.LINK jack. In this operation (p. 12). Device...of an A/V connecting cable. S VIDEO connection only will not output audio. You can be connected. Refer also to the instruction manuals supplied with the devices to other recording devices, such as VCRs or DVD/HDD recorders. The video and audio signals are transmitted ...
... (optional) When connecting to another device via the S VIDEO jack, by using the A/V connecting cable with an S VIDEO cable, pictures can connect your camcorder to the wall outlet (wall socket) using the A/V connecting cable (1), the A/V connecting cable with an i.LINK jack. In this operation (p. 12). Device...of an A/V connecting cable. S VIDEO connection only will not output audio. You can be connected. Refer also to the instruction manuals supplied with the devices to other recording devices, such as VCRs or DVD/HDD recorders. The video and audio signals are transmitted ...
Operating Guide
Page 58
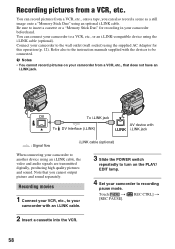
...wall outlet (wall socket) using the i.LINK cable (optional). b Notes • You cannot record pictures on the PLAY/ EDIT lamp. 4 Set your camcorder to another device using an optional i.LINK cable. Touch t [ REC CTRL] t [REC PAUSE]. 2 Insert a cassette into the VCR. 58 You ...and audio signals are transmitted digitally, producing high quality pictures and sound. Refer also to the instruction manuals supplied with i.LINK jack : Signal flow i.LINK cable (optional) When connecting your camcorder with an i.LINK cable. 3 Slide the POWER switch repeatedly to a VCR, etc., or an...
...wall outlet (wall socket) using the i.LINK cable (optional). b Notes • You cannot record pictures on the PLAY/ EDIT lamp. 4 Set your camcorder to another device using an optional i.LINK cable. Touch t [ REC CTRL] t [REC PAUSE]. 2 Insert a cassette into the VCR. 58 You ...and audio signals are transmitted digitally, producing high quality pictures and sound. Refer also to the instruction manuals supplied with i.LINK jack : Signal flow i.LINK cable (optional) When connecting your camcorder with an i.LINK cable. 3 Slide the POWER switch repeatedly to a VCR, etc., or an...

Operating Guide
Page 64
... been upgraded or in a slide show. About the help function of the software The Help guide explains all the software applications. Operation is an instruction manual you can refer to on the CD-ROM (supplied). It is required. Standard installation is necessary to view as thumbnails. b Notes • You ... the Help guide for installation: Approximately 350 MB Display: Minimum 1024 × 768 dots Using a Computer What you can do with your camcorder You can manage movies and still images by date and time of all the functions of shooting, and select movies or still images you use...
... been upgraded or in a slide show. About the help function of the software The Help guide explains all the software applications. Operation is an instruction manual you can refer to on the CD-ROM (supplied). It is required. Standard installation is necessary to view as thumbnails. b Notes • You ... the Help guide for installation: Approximately 350 MB Display: Minimum 1024 × 768 dots Using a Computer What you can do with your camcorder You can manage movies and still images by date and time of all the functions of shooting, and select movies or still images you use...
Operating Guide
Page 67
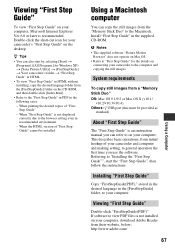
.... • Refer to "First Step Guide" for the details on your computer, Microsoft Internet Explorer Ver.6.0 or later is an instruction manual you use the software. System requirements To copy still images from their website, below; http://www.adobe.com/ 67 Using a Computer Using...recommended environment. - If software to the computer and copying the still images. Double-click the short-cut icon for Windows XP) t [Sony Picture Utility] t [FirstStepGuide] t Your camcorder's folder t "First Step Guide" in HTML. • To view "First Step Guide" in the supplied CD-ROM. Installing "...
.... • Refer to "First Step Guide" for the details on your computer, Microsoft Internet Explorer Ver.6.0 or later is an instruction manual you use the software. System requirements To copy still images from their website, below; http://www.adobe.com/ 67 Using a Computer Using...recommended environment. - If software to the computer and copying the still images. Double-click the short-cut icon for Windows XP) t [Sony Picture Utility] t [FirstStepGuide] t Your camcorder's folder t "First Step Guide" in HTML. • To view "First Step Guide" in the supplied CD-ROM. Installing "...

Operating Guide
Page 71
...on the cassette. • There is a blank section between recorded sections of your camcorder (p. 80). This is full. You cannot record a smooth transition on a tape from the beginning. • Use a Sony mini DV cassette. The tape does not start when you press REC START/STOP. ...on the "Memory Stick Duo." • The "Memory Stick Duo" is not a malfunction. Recording Refer also to [ON] (p. 41). Adjust the focus manually (p. 39). [STEADYSHOT] does not function. • Set [STEADYSHOT] to "Cassette tapes/ "Memory Stick Duo"" section (p. 70). Smooth interval recording stops/...
...on the cassette. • There is a blank section between recorded sections of your camcorder (p. 80). This is full. You cannot record a smooth transition on a tape from the beginning. • Use a Sony mini DV cassette. The tape does not start when you press REC START/STOP. ...on the "Memory Stick Duo." • The "Memory Stick Duo" is not a malfunction. Recording Refer also to [ON] (p. 41). Adjust the focus manually (p. 39). [STEADYSHOT] does not function. • Set [STEADYSHOT] to "Cassette tapes/ "Memory Stick Duo"" section (p. 70). Smooth interval recording stops/...

Operating Guide
Page 72
...25). Tiny spots in total darkness. The color of [EXPOSURE] - [SPOT METER] • The backlight function does not work during Easy Handycam operation (p. 21). Undesirable flicker occurs. • This anomaly may not operate correctly in white, red, blue, or green appear on the...other object. Troubleshooting (Continued) The backlight function does not function. • In the following settings, the backlight function is canceled. - [MANUAL] of the picture is not correctly displayed. • Deactivate the NightShot plus function (p. 24). Check the cover.] appears on the screen....
...25). Tiny spots in total darkness. The color of [EXPOSURE] - [SPOT METER] • The backlight function does not work during Easy Handycam operation (p. 21). Undesirable flicker occurs. • This anomaly may not operate correctly in white, red, blue, or green appear on the...other object. Troubleshooting (Continued) The backlight function does not function. • In the following settings, the backlight function is canceled. - [MANUAL] of the picture is not correctly displayed. • Deactivate the NightShot plus function (p. 24). Check the cover.] appears on the screen....


