
Operating Guide
Page 5
... memory card except "Memory Stick Duo." • "Memory Stick PRO Duo" can use Your camcorder is no guarantee that have the logo shown below (p. 80). - ("Memory Stick Duo") - PRO-HG Duo") ("Memory Stick "Memory Stick Duo" (This size can be used with your camcorder.) "Memory Stick" (You cannot use with your camcorder You can be used only with "Memory Stick PRO" compatible equipment. • Do not attach a label or the like on use "Memory Stick...
... memory card except "Memory Stick Duo." • "Memory Stick PRO Duo" can use Your camcorder is no guarantee that have the logo shown below (p. 80). - ("Memory Stick Duo") - PRO-HG Duo") ("Memory Stick "Memory Stick Duo" (This size can be used with your camcorder.) "Memory Stick" (You cannot use with your camcorder You can be used only with "Memory Stick PRO" compatible equipment. • Do not attach a label or the like on use "Memory Stick...
Operating Guide
Page 9
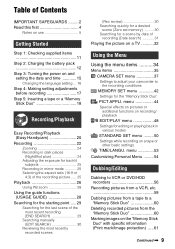
... recording (Date search 31 Playing the picture on a TV ...........32 Using the Menu Using the menu items .......... 34 Menu items 35 CAMERA SET menu 37 Settings to adjust your camcorder to a "Memory Stick Duo 60 Deleting recorded pictures from the "Memory Stick Duo 60 Marking images on the "Memory Stick Duo" with specific information (Print mark/Image protection) .....61...
... recording (Date search 31 Playing the picture on a TV ...........32 Using the Menu Using the menu items .......... 34 Menu items 35 CAMERA SET menu 37 Settings to adjust your camcorder to a "Memory Stick Duo 60 Deleting recorded pictures from the "Memory Stick Duo 60 Marking images on the "Memory Stick Duo" with specific information (Print mark/Image protection) .....61...
Operating Guide
Page 10
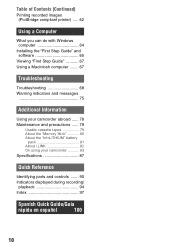
... computer ........ 67 Troubleshooting Troubleshooting 68 Warning indicators and messages 75 Additional Information Using your camcorder abroad ...... 78 Maintenance and precautions ...... 79 Usable cassette tapes 79 About the "Memory Stick 80 About the "InfoLITHIUM" battery pack 81 About i.LINK 82 On using your camcorder 83 Specifications 87 Quick Reference Identifying parts and controls ....... 90 Indicators displayed during...
... computer ........ 67 Troubleshooting Troubleshooting 68 Warning indicators and messages 75 Additional Information Using your camcorder abroad ...... 78 Maintenance and precautions ...... 79 Usable cassette tapes 79 About the "Memory Stick 80 About the "InfoLITHIUM" battery pack 81 About i.LINK 82 On using your camcorder 83 Specifications 87 Quick Reference Identifying parts and controls ....... 90 Indicators displayed during...
Operating Guide
Page 15
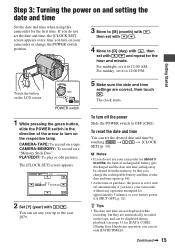
... memory. CAMERA-MEMORY: To record on a tape. The clock starts. To reset the date and time You can set only [DATE/TIME])). Step 3: Turning the power on and setting the date and time Set the date and time when using this camcorder for [DATA CODE] (During Easy Handycam operation...the desired date and time by touching t / t [CLOCK SET] (p. 34). If you do not use your camcorder without any year up to 12:00 PM. CAMERA-TAPE: To record on a "Memory Stick Duo." Continued , 15 Getting Started Touch the button on the respective lamp. To turn off automatically if ...
... memory. CAMERA-MEMORY: To record on a tape. The clock starts. To reset the date and time You can set only [DATE/TIME])). Step 3: Turning the power on and setting the date and time Set the date and time when using this camcorder for [DATA CODE] (During Easy Handycam operation...the desired date and time by touching t / t [CLOCK SET] (p. 34). If you do not use your camcorder without any year up to 12:00 PM. CAMERA-TAPE: To record on a "Memory Stick Duo." Continued , 15 Getting Started Touch the button on the respective lamp. To turn off automatically if ...
Operating Guide
Page 18
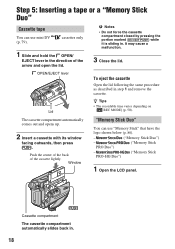
...Slide and hold the OPEN/ EJECT lever in step 1 and remove the cassette. Step 5: Inserting a tape or a "Memory Stick Duo" Cassette tape You can use mini DV (p. 79). b Notes • Do not force the cassette compartment closed by pressing the portion marked {DO NOT... The cassette compartment automatically slides back in . It may cause a malfunction. 3 Close the lid. Window "Memory Stick Duo" You can use "Memory Stick" that have the logo shown below (p. 80). - ("Memory Stick Duo") - ("Memory Stick PRO Duo") - ("Memory Stick PRO-HG Duo") 1 Open the LCD panel.
...Slide and hold the OPEN/ EJECT lever in step 1 and remove the cassette. Step 5: Inserting a tape or a "Memory Stick Duo" Cassette tape You can use mini DV (p. 79). b Notes • Do not force the cassette compartment closed by pressing the portion marked {DO NOT... The cassette compartment automatically slides back in . It may cause a malfunction. 3 Close the lid. Window "Memory Stick Duo" You can use "Memory Stick" that have the logo shown below (p. 80). - ("Memory Stick Duo") - ("Memory Stick PRO Duo") - ("Memory Stick PRO-HG Duo") 1 Open the LCD panel.

Operating Guide
Page 22
..., press REC START/STOP A (or B) again. z Tips • While recording movies on a "Memory Stick Duo" by pressing PHOTO fully. REC START/ STOP A Slide the POWER switch in the direction of the arrow repeatedly to OFF (CHG), slide it while pressing the green button. b Notes • You cannot record movies onto a "Memory Stick Duo" using your camcorder.
..., press REC START/STOP A (or B) again. z Tips • While recording movies on a "Memory Stick Duo" by pressing PHOTO fully. REC START/ STOP A Slide the POWER switch in the direction of the arrow repeatedly to OFF (CHG), slide it while pressing the green button. b Notes • You cannot record movies onto a "Memory Stick Duo" using your camcorder.

Operating Guide
Page 34
.../editing 2 Touch the LCD screen to select the menu item. CAMERA-TAPE lamp: settings on a tape CAMERA-MEMORY lamp: Duo" settings on a "Memory Stick PLAY/EDIT lamp: settings for frequently used menu items are not added to Personal Menu. 1 Touch t [MENU]. 2 Select the desired menu. z ...Tips • You can also touch the item directly to select the item, then touch . (The process in step 3 is not displayed during Easy Handycam ...
.../editing 2 Touch the LCD screen to select the menu item. CAMERA-TAPE lamp: settings on a tape CAMERA-MEMORY lamp: Duo" settings on a "Memory Stick PLAY/EDIT lamp: settings for frequently used menu items are not added to Personal Menu. 1 Touch t [MENU]. 2 Select the desired menu. z ...Tips • You can also touch the item directly to select the item, then touch . (The process in step 3 is not displayed during Easy Handycam ...

Operating Guide
Page 43
...Sony Corporation. Formatting is displayed: - b Notes • Do not do any of the following while [ Formatting...] is completed, and all the images will not be deleted. Operate the POWER switch/operation buttons. - Bottom: [STANDARD] is selected for image quality. b Notes • When using the "Memory Stick...image size in [STILL SET]. Eject the "Memory Stick Duo." • Formatting erases everything on the recording environment and the recording media. You cannot select [0.2M] for image quality. • When using a "Memory Stick Duo" with the POWER switch set to ...
...Sony Corporation. Formatting is displayed: - b Notes • Do not do any of the following while [ Formatting...] is completed, and all the images will not be deleted. Operate the POWER switch/operation buttons. - Bottom: [STANDARD] is selected for image quality. b Notes • When using the "Memory Stick...image size in [STILL SET]. Eject the "Memory Stick Duo." • Formatting erases everything on the recording environment and the recording media. You cannot select [0.2M] for image quality. • When using a "Memory Stick Duo" with the POWER switch set to ...

Operating Guide
Page 44
... is replaced with another . Touch [YES] t . b Notes • You cannot delete the created folders using your camcorder. menu Special effects on pictures or additional functions on a "Memory Stick Duo." To cancel [FADER] before starting the operation, touch [OFF] in , the picture gradually changes from ... color. When fading out, it gradually changes from black and white to format the "Memory Stick Duo" (p. 43), or delete them using your computer. • The number of folders increases. MEMORY SET menu (Continued) FILE NO. NEW FOLDER You can add the following effects to ...
... is replaced with another . Touch [YES] t . b Notes • You cannot delete the created folders using your camcorder. menu Special effects on pictures or additional functions on a "Memory Stick Duo." To cancel [FADER] before starting the operation, touch [OFF] in , the picture gradually changes from ... color. When fading out, it gradually changes from black and white to format the "Memory Stick Duo" (p. 43), or delete them using your computer. • The number of folders increases. MEMORY SET menu (Continued) FILE NO. NEW FOLDER You can add the following effects to ...
Operating Guide
Page 45
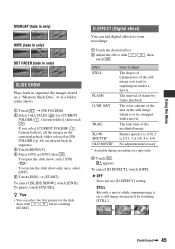
FLASH LUMI. STILL Records a movie while superimposing it on a "Memory Stick Duo," or in a folder (slide show with / touch . , then Effect Items to your recordings. 1 Touch the desired effect. 2 Adjust the effect with / before touching [...in the still image which is 1/4). SLOW SHUTTR* OLD MOVIE* Shutter speed (1 is 1/30, 2 is 1/15, 3 is 1/8, 4 is to superimpose under a movie. B OFF Does not use [D.EFFECT] setting. D.EFFECT (Digital effect) You can select the first picture for the slide show ). 1 Touch t [PB FOLDER]. 2 Select [ALL FILES ( )] or [CURRNT FOLDER ( ,...
FLASH LUMI. STILL Records a movie while superimposing it on a "Memory Stick Duo," or in a folder (slide show with / touch . , then Effect Items to your recordings. 1 Touch the desired effect. 2 Adjust the effect with / before touching [...in the still image which is 1/4). SLOW SHUTTR* OLD MOVIE* Shutter speed (1 is 1/30, 2 is 1/15, 3 is 1/8, 4 is to superimpose under a movie. B OFF Does not use [D.EFFECT] setting. D.EFFECT (Digital effect) You can select the first picture for the slide show ). 1 Touch t [PB FOLDER]. 2 Select [ALL FILES ( )] or [CURRNT FOLDER ( ,...
Operating Guide
Page 46
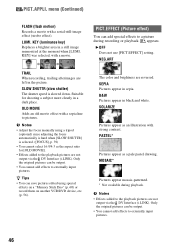
...ratio for shooting a subject more clearly in a still image memorized at the moment when [LUMI. Only the original pictures can save pictures edited using a tripod (optional) since adjusting the focus automatically is hard when [SLOW SHUTTR] is slowed down. KEY] was selected, with a sepia... • Effects added to the playback pictures are not output via the DV Interface (i.LINK). b Notes • Adjust the focus manually using special effects on a "Memory Stick Duo" (p. 60) or record them on another VCR/DVD device, etc. (p. 56). The color and brightness are left in the picture...
...ratio for shooting a subject more clearly in a still image memorized at the moment when [LUMI. Only the original pictures can save pictures edited using a tripod (optional) since adjusting the focus automatically is hard when [SLOW SHUTTR] is slowed down. KEY] was selected, with a sepia... • Effects added to the playback pictures are not output via the DV Interface (i.LINK). b Notes • Adjust the focus manually using special effects on a "Memory Stick Duo" (p. 60) or record them on another VCR/DVD device, etc. (p. 56). The color and brightness are left in the picture...
Operating Guide
Page 47
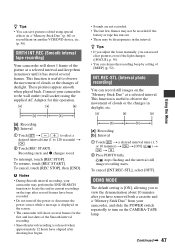
...; You can save pictures edited using the supplied AC Adaptor for the first and last shots of the Smooth interval recording. • Smooth interval recording is [ON], allowing you have removed both a cassette and a "Memory Stick Duo" from your camcorder, and slide the POWER switch ...repeatedly to turn off the power or disconnect the power source while a message is displayed on another VCR/DVD device, etc. (p. 56). Using the Menu [a]: Recording [b]: Interval 1 Touch t ...
...; You can save pictures edited using the supplied AC Adaptor for the first and last shots of the Smooth interval recording. • Smooth interval recording is [ON], allowing you have removed both a cassette and a "Memory Stick Duo" from your camcorder, and slide the POWER switch ...repeatedly to turn off the power or disconnect the power source while a message is displayed on another VCR/DVD device, etc. (p. 56). Using the Menu [a]: Recording [b]: Interval 1 Touch t ...
Operating Guide
Page 48
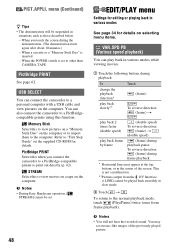
...Guide" on selecting menu items. VAR.SPD PB (Various speed playback) You can also connect the camcorder to a PictBridgecompatible printer using this to the computer. PICT.APPLI. When a cassette or a "Memory Stick Duo" is not a malfunction. **Pictures output from frame playback). PictBridge PRINT See page 62.... PictBridge PRINT Select this to view pictures on a "Memory Stick Duo" on the computer or to import them to view movies on a tape on the computer. This is inserted. - b Notes • During Easy Handycam operation, [ STREAM] cannot be set to the normal playback mode...
...Guide" on selecting menu items. VAR.SPD PB (Various speed playback) You can also connect the camcorder to a PictBridgecompatible printer using this to the computer. PICT.APPLI. When a cassette or a "Memory Stick Duo" is not a malfunction. **Pictures output from frame playback). PictBridge PRINT See page 62.... PictBridge PRINT Select this to view pictures on a "Memory Stick Duo" on the computer or to import them to view movies on a tape on the computer. This is inserted. - b Notes • During Easy Handycam operation, [ STREAM] cannot be set to the normal playback mode...

Operating Guide
Page 52
...images on a "Memory Stick Duo" are played back. • In the [DATE/TIME] data display, the date and time are displayed in the viewfinder. MENU ROTATE B NORMAL Scrolls the menu items downwards by touching . OPPOSITE Scrolls the menu items upwards by touching . NEVER The camcorder is [ON], ... will appear. • During Easy Handycam operation, you can set the POWER switch to PLAY/ EDIT or CAMERA-TAPE with a cassette inserted. • When you to use the supplied Remote Commander (p. 93). 52 z Tips • Set to [OFF] to prevent your camcorder for about 8 seconds in the viewfinder...
...images on a "Memory Stick Duo" are played back. • In the [DATE/TIME] data display, the date and time are displayed in the viewfinder. MENU ROTATE B NORMAL Scrolls the menu items downwards by touching . OPPOSITE Scrolls the menu items upwards by touching . NEVER The camcorder is [ON], ... will appear. • During Easy Handycam operation, you can set the POWER switch to PLAY/ EDIT or CAMERA-TAPE with a cassette inserted. • When you to use the supplied Remote Commander (p. 93). 52 z Tips • Set to [OFF] to prevent your camcorder for about 8 seconds in the viewfinder...
Operating Guide
Page 58
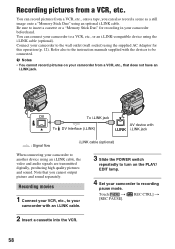
... jack : Signal flow i.LINK cable (optional) When connecting your camcorder to insert a cassette or a "Memory Stick Duo" for this operation (p. 12). You can also record a scene as a still image onto a "Memory Stick Duo" using the supplied AC Adaptor for recording in your camcorder to be connected. Connect your camcorder beforehand. DV To i.LINK jack To DV Interface (i.LINK...
... jack : Signal flow i.LINK cable (optional) When connecting your camcorder to insert a cassette or a "Memory Stick Duo" for this operation (p. 12). You can also record a scene as a still image onto a "Memory Stick Duo" using the supplied AC Adaptor for recording in your camcorder to be connected. Connect your camcorder beforehand. DV To i.LINK jack To DV Interface (i.LINK...

Operating Guide
Page 61
... images on the "Memory Stick Duo" with specific information (Print mark/Image protection) When you are using a "Memory Stick Duo" with the write-protect tab, make sure the write-protect tab on the "Memory Stick Duo" is used to select images for printing on your camcorder if the "Memory Stick Duo" already has ...Notes • To cancel Print mark, touch the image again to the write-protect position (p. 80). • Do not mark images on your camcorder. PROTECT appears. 101-0002 2/ 10 101 OK 4 Touch t [END]. Selecting still images for printing (Print mark) The DPOF (Digital Print Order...
... images on the "Memory Stick Duo" with specific information (Print mark/Image protection) When you are using a "Memory Stick Duo" with the write-protect tab, make sure the write-protect tab on the "Memory Stick Duo" is used to select images for printing on your camcorder if the "Memory Stick Duo" already has ...Notes • To cancel Print mark, touch the image again to the write-protect position (p. 80). • Do not mark images on your camcorder. PROTECT appears. 101-0002 2/ 10 101 OK 4 Touch t [END]. Selecting still images for printing (Print mark) The DPOF (Digital Print Order...
Operating Guide
Page 62
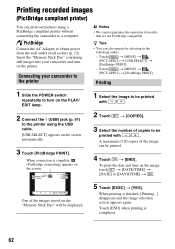
... the screen. 1.0M PictBridge PRINT 101-0001 1 / 10 101 END - + SET EXEC One of the images stored on the "Memory Stick Duo" will be displayed. 1 Select the image to be printed with / . Touch [END] when printing is finished, [Printing...] disappears... of models that are not PictBridge compatible. Insert the "Memory Stick Duo" containing still images into your camcorder to a computer. Printing recorded images (PictBridge compliant printer) You can print out pictures using a PictBridge compliant printer without connecting the camcorder to the printer z Tips • You can be ...
... the screen. 1.0M PictBridge PRINT 101-0001 1 / 10 101 END - + SET EXEC One of the images stored on the "Memory Stick Duo" will be displayed. 1 Select the image to be printed with / . Touch [END] when printing is finished, [Printing...] disappears... of models that are not PictBridge compatible. Insert the "Memory Stick Duo" containing still images into your camcorder to a computer. Printing recorded images (PictBridge compliant printer) You can print out pictures using a PictBridge compliant printer without connecting the camcorder to the printer z Tips • You can be ...

Operating Guide
Page 63
...right ends of images recorded with a device other than your camcorder. • PictBridge is an industry standard established by connecting a printer directly to your printer's operating instructions for the printer to be used. • Do not attempt the following operations when is on... still images without using a computer by the Camera & Imaging Products Association (CIPA). Disconnect the USB cable from your camcorder. • If the printer stops working, disconnect the USB cable, turn the printer off and on the screen. Remove the "Memory Stick Duo" from your camcorder or the printer...
...right ends of images recorded with a device other than your camcorder. • PictBridge is an industry standard established by connecting a printer directly to your printer's operating instructions for the printer to be used. • Do not attempt the following operations when is on... still images without using a computer by the Camera & Imaging Products Association (CIPA). Disconnect the USB cable from your camcorder. • If the printer stops working, disconnect the USB cable, turn the printer off and on the screen. Remove the "Memory Stick Duo" from your camcorder or the printer...
Operating Guide
Page 65
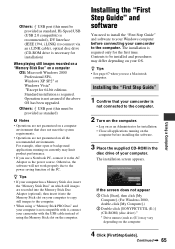
... to the power saving function of using the Memory Stick slot on the computer. z Tips • If your computer has a Memory Stick slot, insert the "Memory Stick Duo" on which still images are recorded into the Memory Stick Duo Adaptor (optional), then insert it into the Memory Stick slot on your OS. Others: ... AC Adaptor as the power source. Otherwise, the software will not work properly due to the computer. • When using a "Memory Stick PRO Duo" and your camcorder with the USB cable instead of the PC. Contents to be installed and procedures may vary depending on the computer. 4...
... to the power saving function of using the Memory Stick slot on the computer. z Tips • If your computer has a Memory Stick slot, insert the "Memory Stick Duo" on which still images are recorded into the Memory Stick Duo Adaptor (optional), then insert it into the Memory Stick slot on your OS. Others: ... AC Adaptor as the power source. Otherwise, the software will not work properly due to the computer. • When using a "Memory Stick PRO Duo" and your camcorder with the USB cable instead of the PC. Contents to be installed and procedures may vary depending on the computer. 4...
Operating Guide
Page 81
... children. When playing back image data recorded with other devices (DCRTRV900 or DSC-D700/D770) that do one of the following to use a "Memory Stick Micro" with the camcorder, you can be used with another device, format it with an "InfoLITHIUM" battery pack. About the "InfoLITHIUM" battery pack This unit is an "InfoLITHIUM" battery pack...
... children. When playing back image data recorded with other devices (DCRTRV900 or DSC-D700/D770) that do one of the following to use a "Memory Stick Micro" with the camcorder, you can be used with another device, format it with an "InfoLITHIUM" battery pack. About the "InfoLITHIUM" battery pack This unit is an "InfoLITHIUM" battery pack...


