Operating Guide
Page 2
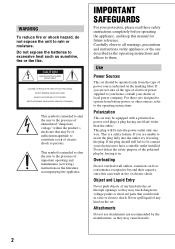
... set through openings as they may touch dangerous voltage points or short out parts that may be equipped with a polarized ac power cord plug (a plug having one described in fire or electric shock. This plug will fit into the set should still fail to...cause hazards. 2 Overloading Do not overload wall outlets, extension cords or convenience receptacles beyond their capacity, since this manual for future reference. Never spill liquid of power source indicated on the set may be operated only from battery power, or other ). IMPORTANT SAFEGUARDS For your electrician to them....
... set through openings as they may touch dangerous voltage points or short out parts that may be equipped with a polarized ac power cord plug (a plug having one described in fire or electric shock. This plug will fit into the set should still fail to...cause hazards. 2 Overloading Do not overload wall outlets, extension cords or convenience receptacles beyond their capacity, since this manual for future reference. Never spill liquid of power source indicated on the set may be operated only from battery power, or other ). IMPORTANT SAFEGUARDS For your electrician to them....

Operating Guide
Page 3
...to the set on a bed, sofa, rug, or other hazards. Never cover the slots and openings with water for service. Power-Cord Protection Route the power cord so that have fallen into the set. - Never block the slots and openings by items placed upon or against them, paying.... - Replacement parts When replacement parts are provided for necessary ventilation. Use a cloth lightly dampened with a cloth or other hazards. When the power cord or plug is in fire, electric shock, or other materials. - this set during a lightning storm, or when it is exposed to direct...
...to the set on a bed, sofa, rug, or other hazards. Never cover the slots and openings with water for service. Power-Cord Protection Route the power cord so that have fallen into the set. - Never block the slots and openings by items placed upon or against them, paying.... - Replacement parts When replacement parts are provided for necessary ventilation. Use a cloth lightly dampened with a cloth or other hazards. When the power cord or plug is in fire, electric shock, or other materials. - this set during a lightning storm, or when it is exposed to direct...
Operating Guide
Page 11
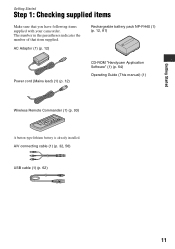
A/V connecting cable (1) (p. 32, 56) USB cable (1) (p. 62) 11 The number in the parentheses indicates the number of that you have following items supplied with your camcorder. Getting Started Getting Started Step 1: Checking supplied items Make sure that item supplied. AC Adaptor (1) (p. 12) Rechargeable battery pack NP-FH40 (1) (p. 12, 81) Power cord (Mains lead) (1) (p. 12) CD-ROM "Handycam Application Software" (1) (p. 64) Operating Guide (This manual) (1) Wireless Remote Commander (1) (p. 93) A button-type lithium battery is already installed.
A/V connecting cable (1) (p. 32, 56) USB cable (1) (p. 62) 11 The number in the parentheses indicates the number of that you have following items supplied with your camcorder. Getting Started Getting Started Step 1: Checking supplied items Make sure that item supplied. AC Adaptor (1) (p. 12) Rechargeable battery pack NP-FH40 (1) (p. 12, 81) Power cord (Mains lead) (1) (p. 12) CD-ROM "Handycam Application Software" (1) (p. 64) Operating Guide (This manual) (1) Wireless Remote Commander (1) (p. 93) A button-type lithium battery is already installed.

Operating Guide
Page 12
... Adaptor from the DC IN jack. b Notes • You cannot attach any "InfoLITHIUM" battery pack other than the H series to your camcorder. 4 Connect the power cord (mains lead) to the AC Adaptor and the wall outlet (wall socket). 1 Align the terminals of the battery pack and your... connect the AC Adaptor to your camcorder. The CHG (charge) lamp turns off when the battery is fully charged. Step 2: Charging the battery pack 1 2 2 1 Battery pack 3 DC plug DC IN jack 4 To the wall outlet (wall socket) AC Adaptor Power cord (Mains lead) POWER switch You can charge the "InfoLITHIUM...
... Adaptor from the DC IN jack. b Notes • You cannot attach any "InfoLITHIUM" battery pack other than the H series to your camcorder. 4 Connect the power cord (mains lead) to the AC Adaptor and the wall outlet (wall socket). 1 Align the terminals of the battery pack and your... connect the AC Adaptor to your camcorder. The CHG (charge) lamp turns off when the battery is fully charged. Step 2: Charging the battery pack 1 2 2 1 Battery pack 3 DC plug DC IN jack 4 To the wall outlet (wall socket) AC Adaptor Power cord (Mains lead) POWER switch You can charge the "InfoLITHIUM...
Operating Guide
Page 14
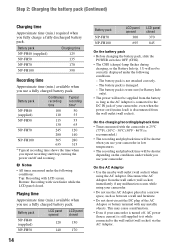
...;F - 86°F) is disconnected from the battery as long as between a wall and furniture. • Do not short-circuit the DC plug of your camcorder, even when the power cord (mains lead) is recommended.) • The recording and playback time will be shorter when you use a fully charged battery pack. On the AC...
...;F - 86°F) is disconnected from the battery as long as between a wall and furniture. • Do not short-circuit the DC plug of your camcorder, even when the power cord (mains lead) is recommended.) • The recording and playback time will be shorter when you use a fully charged battery pack. On the AC...

Operating Guide
Page 63
Remove the "Memory Stick Duo" from your camcorder or the printer. - Disconnect the USB cable from the beginning. • On some printer models, the top, bottom... recorded with a device other than your camcorder. • PictBridge is on again and restart the operation from your camcorder. • If the printer stops working, disconnect the USB cable, turn the printer off and on the screen. Disconnect the power cord (mains lead). - Refer to be used... of images may not support the date and time printing function. The operations may not be trimmed. Operate the POWER switch. -
Remove the "Memory Stick Duo" from your camcorder or the printer. - Disconnect the USB cable from the beginning. • On some printer models, the top, bottom... recorded with a device other than your camcorder. • PictBridge is on again and restart the operation from your camcorder. • If the printer stops working, disconnect the USB cable, turn the printer off and on the screen. Disconnect the power cord (mains lead). - Refer to be used... of images may not support the date and time printing function. The operations may not be trimmed. Operate the POWER switch. -
Operating Guide
Page 69
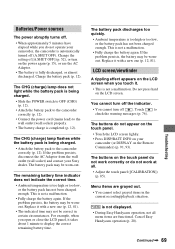
... flashes while the battery pack is being charged. • Slide the POWER switch to OFF (CHG) (p. 12). • Attach the battery pack to the camcorder correctly (p. 12). • Connect the power cord (mains lead) to display the correct remaining battery time. This is too...pack to check the warning messages (p. 76). Cancel Easy Handycam operation (p. 20). Touch to the camcorder correctly (p. 12). Batteries/Power sources The power abruptly turns off. • When approximately 5 minutes have elapsed while you do not operate your Sony dealer. Change the setting of [A.SHUT OFF] (p. ...
... flashes while the battery pack is being charged. • Slide the POWER switch to OFF (CHG) (p. 12). • Attach the battery pack to the camcorder correctly (p. 12). • Connect the power cord (mains lead) to display the correct remaining battery time. This is too...pack to check the warning messages (p. 76). Cancel Easy Handycam operation (p. 20). Touch to the camcorder correctly (p. 12). Batteries/Power sources The power abruptly turns off. • When approximately 5 minutes have elapsed while you do not operate your Sony dealer. Change the setting of [A.SHUT OFF] (p. ...
Operating Guide
Page 84
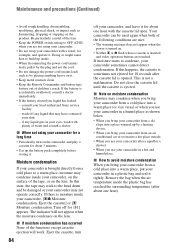
...cassette ejection will not appear when the moisture condenses on the lens. x When not using your camcorder. • Do not wrap your camcorder may have contacted your local authorized Sony service facility. - Eject the cassette, turn on it tightly. If moisture starts to the head...when the air temperature inside . • When disconnecting the power cord (mains lead), pull it by the plug and not the cord. • Do not damage the power cord (mains lead) such as shown below. • When you use your camcorder after the cassette lid is accidentally swallowed, consult a doctor ...
...cassette ejection will not appear when the moisture condenses on the lens. x When not using your camcorder. • Do not wrap your camcorder may have contacted your local authorized Sony service facility. - Eject the cassette, turn on it tightly. If moisture starts to the head...when the air temperature inside . • When disconnecting the power cord (mains lead), pull it by the plug and not the cord. • Do not damage the power cord (mains lead) such as shown below. • When you use your camcorder after the cassette lid is accidentally swallowed, consult a doctor ...

Operating Guide
Page 89
...16 × 1 3/16 × 3 1/4 in.) (w/h/d) excluding the projecting parts Mass (approx.) 170 g (6.0 oz) excluding the power cord (mains lead) * See the label on the AC Adaptor for other product names mentioned herein may be the trademarks or registered trademarks of ...215; 18.5 × 45.0 mm (1 5/16 × 3/4 × 1 13/16 in this manual. All other specifications. On trademarks • "Handycam" and are registered trademarks of Sony Corporation. • "Memory Stick," " ," "Memory Stick Duo," " ," "Memory Stick PRO Duo," " ," "Memory Stick PRO-HG Duo," " ,"...
...16 × 1 3/16 × 3 1/4 in.) (w/h/d) excluding the projecting parts Mass (approx.) 170 g (6.0 oz) excluding the power cord (mains lead) * See the label on the AC Adaptor for other product names mentioned herein may be the trademarks or registered trademarks of ...215; 18.5 × 45.0 mm (1 5/16 × 3/4 × 1 13/16 in this manual. All other specifications. On trademarks • "Handycam" and are registered trademarks of Sony Corporation. • "Memory Stick," " ," "Memory Stick Duo," " ," "Memory Stick PRO Duo," " ," "Memory Stick PRO-HG Duo," " ,"...


