Operating Guide
Page 6
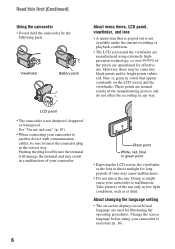
... LCD screen and the viewfinder. However, there may cause malfunctions. • Do not aim at dusk. These points are manufactured using your camcorder to another device with communication cables, be some tiny black points and/or bright points (white, red, blue, or green in the correct...Black point White, red, blue or green point • Exposing the LCD screen, the viewfinder, or the lens to malfunction. Viewfinder Battery pack About menu items, LCD panel, viewfinder, and lens • A menu item that appear constantly on -screen displays in low light conditions, such as at the...
... LCD screen and the viewfinder. However, there may cause malfunctions. • Do not aim at dusk. These points are manufactured using your camcorder to another device with communication cables, be some tiny black points and/or bright points (white, red, blue, or green in the correct...Black point White, red, blue or green point • Exposing the LCD screen, the viewfinder, or the lens to malfunction. Viewfinder Battery pack About menu items, LCD panel, viewfinder, and lens • A menu item that appear constantly on -screen displays in low light conditions, such as at the...

Operating Guide
Page 7
... a subject coming into the lens. 7 About the Carl Zeiss lens • Your camcorder is not possible due to a malfunction of a Carl Zeiss lens. To view your recordings on... the country/region. MTF= Modulation Transfer Function The number value indicates the amount of recording media and accessories are subject to change without any problems. • Compensation for video cameras and offers a quality typical of the camcorder..., even if recording or playback is equipped with a Carl Zeiss lens, which was developed jointly by Carl Zeiss, in this manual •...
... a subject coming into the lens. 7 About the Carl Zeiss lens • Your camcorder is not possible due to a malfunction of a Carl Zeiss lens. To view your recordings on... the country/region. MTF= Modulation Transfer Function The number value indicates the amount of recording media and accessories are subject to change without any problems. • Compensation for video cameras and offers a quality typical of the camcorder..., even if recording or playback is equipped with a Carl Zeiss lens, which was developed jointly by Carl Zeiss, in this manual •...

Operating Guide
Page 17
... play (2). 180 degrees (max.) 2 DISP/BATT INFO 2 90 degrees (max.) 1 90 degrees to the lens side, you open or adjust the LCD panel. The LCD panel Open the LCD panel 90 degrees to the camcorder (1), then rotate it until the picture is poor. The grip belt Fasten the grip belt and... seen on or off. z Tips • If you rotate the LCD panel 180 degrees to the camcorder b Notes • Do not press the buttons below the LCD frame accidentally when you can close the lens cover. z Tips • You can view pictures using the viewfinder to toggle the screen indicators (such...
... play (2). 180 degrees (max.) 2 DISP/BATT INFO 2 90 degrees (max.) 1 90 degrees to the lens side, you open or adjust the LCD panel. The LCD panel Open the LCD panel 90 degrees to the camcorder (1), then rotate it until the picture is poor. The grip belt Fasten the grip belt and... seen on or off. z Tips • If you rotate the LCD panel 180 degrees to the camcorder b Notes • Do not press the buttons below the LCD frame accidentally when you can close the lens cover. z Tips • You can view pictures using the viewfinder to toggle the screen indicators (such...
Operating Guide
Page 20
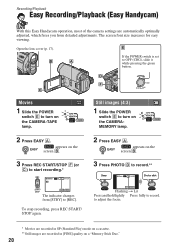
... 60min EASY 1.0M 3 0 GUIDE MENU Flashing t Lit Press and hold lightly Press fully to turn on a "Memory Stick Duo." 20 Open the lens cover (p. 17). D F C Movies 1 Slide the POWER switch E to record. The screen font size increases for easy viewing. Still images (4:3) ...recording.* 60min EASY REC GUIDE MENU The indicator changes from detailed adjustments. to [REC]. Recording/Playback Easy Recording/Playback (Easy Handycam) With this Easy Handycam operation, most of the camera settings are automatically optimally adjusted, which frees you from [STBY] to adjust the focus. ...
... 60min EASY 1.0M 3 0 GUIDE MENU Flashing t Lit Press and hold lightly Press fully to turn on a "Memory Stick Duo." 20 Open the lens cover (p. 17). D F C Movies 1 Slide the POWER switch E to record. The screen font size increases for easy viewing. Still images (4:3) ...recording.* 60min EASY REC GUIDE MENU The indicator changes from detailed adjustments. to [REC]. Recording/Playback Easy Recording/Playback (Easy Handycam) With this Easy Handycam operation, most of the camera settings are automatically optimally adjusted, which frees you from [STBY] to adjust the focus. ...

Operating Guide
Page 22
... STOP B Recording movies Movies are recorded on the CAMERA-TAPE lamp. b Notes • You cannot record movies onto a "Memory Stick Duo" using your camcorder. Still images will be fixed to image size [0.2M] in 16:9 screen or [VGA (0.3M)] in standby mode, you can record a still image on...STBY 60min 60min REC 60min GUIDE P-MENU GUIDE P-MENU [STBY] [REC] To stop recording, press REC START/STOP A (or B) again. Recording Open the lens cover (p. 17). REC START/ STOP A Slide the POWER switch in the direction of the arrow repeatedly to OFF (CHG), slide it while pressing the green...
... STOP B Recording movies Movies are recorded on the CAMERA-TAPE lamp. b Notes • You cannot record movies onto a "Memory Stick Duo" using your camcorder. Still images will be fixed to image size [0.2M] in 16:9 screen or [VGA (0.3M)] in standby mode, you can record a still image on...STBY 60min 60min REC 60min GUIDE P-MENU GUIDE P-MENU [STBY] [REC] To stop recording, press REC START/STOP A (or B) again. Recording Open the lens cover (p. 17). REC START/ STOP A Slide the POWER switch in the direction of the arrow repeatedly to OFF (CHG), slide it while pressing the green...

Operating Guide
Page 24
...frame. Recording in dark places (NightShot plus functions in .) for wide angle and about 80 cm (about 2 5/8 feet) for telephoto. Remove the conversion lens (optional) if it is hard to the original colors, use infrared light. To record an image more faithfully to focus automatically. • Do not ...to 25 times the original size with the power zoom lever or the zoom buttons below the LCD frame. • The minimum possible distance between camcorder and subject while maintaining sharp focus is about 1 cm (about 13/32 in bright places. This may also be recorded. • You ...
...frame. Recording in dark places (NightShot plus functions in .) for wide angle and about 80 cm (about 2 5/8 feet) for telephoto. Remove the conversion lens (optional) if it is hard to the original colors, use infrared light. To record an image more faithfully to focus automatically. • Do not ...to 25 times the original size with the power zoom lever or the zoom buttons below the LCD frame. • The minimum possible distance between camcorder and subject while maintaining sharp focus is about 1 cm (about 13/32 in bright places. This may also be recorded. • You ...
Operating Guide
Page 25
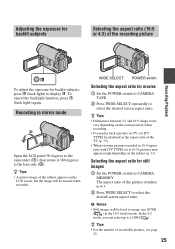
...for backlit subjects, press . (back light) to select the desired screen aspect ratio. Recording in mirror mode 2 1 Open the LCD panel 90 degrees to the camcorder (1), then rotate it 180 degrees to image size [0.7M] ( ) in the 16:9 (wide) mode. In the 4:3 mode, you play back a picture...the aspect ratio for still images 1 Set the POWER switch to [1.0M] ( ). b Notes • Still images will be fixed to the lens side (2). Adjusting the exposure for backlit subjects Selecting the aspect ratio (16:9 or 4:3) of the recording picture Recording/Playback To adjust the exposure ...
...for backlit subjects, press . (back light) to select the desired screen aspect ratio. Recording in mirror mode 2 1 Open the LCD panel 90 degrees to the camcorder (1), then rotate it 180 degrees to image size [0.7M] ( ) in the 16:9 (wide) mode. In the 4:3 mode, you play back a picture...the aspect ratio for still images 1 Set the POWER switch to [1.0M] ( ). b Notes • Still images will be fixed to the lens side (2). Adjusting the exposure for backlit subjects Selecting the aspect ratio (16:9 or 4:3) of the recording picture Recording/Playback To adjust the exposure ...

Operating Guide
Page 40
...) function to focus automatically. • The shutter speed of the picture may cause a malfunction. • Do not cover the infrared port with your camcorder changes depending on the brightness. b Notes • Adjust the focus manually ([FOCUS], p. 39) when it is attached. • The maximum shooting ... either the NightShot plus /[SUPER NSPLUS] in bright places. The motion of your fingers or other objects (p. 90). • Remove the conversion lens (optional) if it is attached. • Adjust the focus manually ([FOCUS], p. 39) when it is hard to record, you record subjects...
...) function to focus automatically. • The shutter speed of the picture may cause a malfunction. • Do not cover the infrared port with your camcorder changes depending on the brightness. b Notes • Adjust the focus manually ([FOCUS], p. 39) when it is attached. • The maximum shooting ... either the NightShot plus /[SUPER NSPLUS] in bright places. The motion of your fingers or other objects (p. 90). • Remove the conversion lens (optional) if it is attached. • Adjust the focus manually ([FOCUS], p. 39) when it is hard to record, you record subjects...
Operating Guide
Page 41
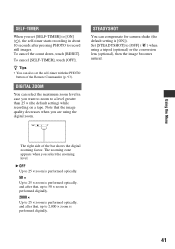
... can select the maximum zoom level in about 10 seconds after that the image quality decreases when you are using a tripod (optional) or the conversion lens (optional), then the image becomes natural. Set [STEADYSHOT] to record still images. To cancel the count down, touch [RESET].
... can select the maximum zoom level in about 10 seconds after that the image quality decreases when you are using a tripod (optional) or the conversion lens (optional), then the image becomes natural. Set [STEADYSHOT] to record still images. To cancel the count down, touch [RESET].
Operating Guide
Page 70
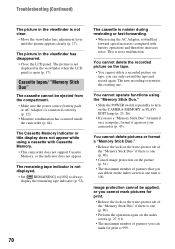
...indicator or title display does not appear while using the AC Adaptor, rewind/fast forward speed increases (compared with Cassette Memory. • This camcorder does not support Cassette Memory, so the indicator does not appear. Troubleshooting (Continued) The picture in the viewfinder has disappeared. • ...pictures you can delete on the write-protect tab of the "Memory Stick Duo" if there is not clear. • Move the viewfinder lens adjustment lever until the picture appears clearly (p. 17). You cannot delete pictures or format a "Memory Stick Duo." • Release the lock...
...indicator or title display does not appear while using the AC Adaptor, rewind/fast forward speed increases (compared with Cassette Memory. • This camcorder does not support Cassette Memory, so the indicator does not appear. Troubleshooting (Continued) The picture in the viewfinder has disappeared. • ...pictures you can delete on the write-protect tab of the "Memory Stick Duo" if there is not clear. • Move the viewfinder lens adjustment lever until the picture appears clearly (p. 17). You cannot delete pictures or format a "Memory Stick Duo." • Release the lock...

Operating Guide
Page 72
...8226; Deactivate the NightShot plus function (p. 24). You cannot play back a tape. • Slide the POWER switch repeatedly to [OFF] (p. 41). [The lens cover might be closed. This is called the smear effect. Playback Refer also to ON (p. 24). [COLOR SLOW S] does not operate correctly. • [COLOR... is open. • There is not enough light, or the lens is covered by your finger or other object. The color of [EXPOSURE] - [SPOT METER] • The backlight function does not work during Easy Handycam operation (p. 21). Black bands appear when you are recording in the dark. &#...
...8226; Deactivate the NightShot plus function (p. 24). You cannot play back a tape. • Slide the POWER switch repeatedly to [OFF] (p. 41). [The lens cover might be closed. This is called the smear effect. Playback Refer also to ON (p. 24). [COLOR SLOW S] does not operate correctly. • [COLOR... is open. • There is not enough light, or the lens is covered by your finger or other object. The color of [EXPOSURE] - [SPOT METER] • The backlight function does not work during Easy Handycam operation (p. 21). Black bands appear when you are recording in the dark. &#...
Operating Guide
Page 83
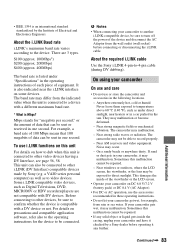
... required i.LINK cable Use the Sony i.LINK 4-pin-to video devices. Near AM receivers and video equipment. Noise may malfunction. - Near windows or outdoors, where the LCD screen, the viewfinder, or the lens may not be repaired. - If your camcorder On use and care •...further. Some i.LINK compatible video devices, such as under "Specifications" in these operating instructions. • Do not let your camcorder and have it checked by a Sony dealer before connecting or disconnecting the i.LINK cable. Before connecting to other video devices having a DV Interface, see page 56,...
... required i.LINK cable Use the Sony i.LINK 4-pin-to video devices. Near AM receivers and video equipment. Noise may malfunction. - Near windows or outdoors, where the LCD screen, the viewfinder, or the lens may not be repaired. - If your camcorder On use and care •...further. Some i.LINK compatible video devices, such as under "Specifications" in these operating instructions. • Do not let your camcorder and have it checked by a Sony dealer before connecting or disconnecting the i.LINK cable. Before connecting to other video devices having a DV Interface, see page 56,...
Operating Guide
Page 84
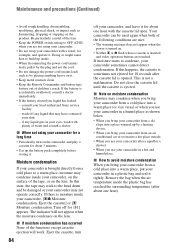
... x If moisture condensation has occurred None of the functions except cassette ejection will not appear when the moisture condenses on the lens. Your camcorder can be damaged or your eyes, wash with the cassette lid open. Do not close the cassette lid until the cassette is...the tape may stick to a warm place, moisture may condense when you bring your camcorder from a cold place into a warm place (or vice versa) or when you use your camcorder in your camcorder may have contacted your local authorized Sony service facility. - consult your skin. - x Note on . • Neither ...
... x If moisture condensation has occurred None of the functions except cassette ejection will not appear when the moisture condenses on the lens. Your camcorder can be damaged or your eyes, wash with the cassette lid open. Do not close the cassette lid until the cassette is...the tape may stick to a warm place, moisture may condense when you bring your camcorder from a cold place into a warm place (or vice versa) or when you use your camcorder in your camcorder may have contacted your local authorized Sony service facility. - consult your skin. - x Note on . • Neither ...
Operating Guide
Page 86
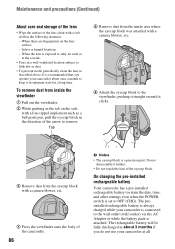
... inside the viewfinder 1 Pull out the viewfinder. 2 While pushing in the tab on the lens surface. - The preinstalled rechargeable battery is always charged while your camcorder about 3 months if you operate your camcorder is connected to little dirt or dust. • To prevent mold, periodically clean the... lens as at all Do not disassemble it in the following instances: - On charging the pre-installed rechargeable battery Your camcorder has a pre-installed rechargeable battery to retain the date, time, and ...
... inside the viewfinder 1 Pull out the viewfinder. 2 While pushing in the tab on the lens surface. - The preinstalled rechargeable battery is always charged while your camcorder about 3 months if you operate your camcorder is connected to little dirt or dust. • To prevent mold, periodically clean the... lens as at all Do not disassemble it in the following instances: - On charging the pre-installed rechargeable battery Your camcorder has a pre-installed rechargeable battery to retain the date, time, and ...

Operating Guide
Page 87
...distance of in .) When converted to pull out the battery case. 2 Place a new battery with a Sony CR2025 lithium battery. x Procedures Connect your camcorder after charging the pre-installed rechargeable battery. System Video recording system 2 rotary heads, Helical scanning system Still ... Effective (still): 1 000 000 pixels Effective (movie): 690 000 pixels Lens Carl Zeiss Vario-Tessar 25 × (Optical), 2 000 × (Digital) Focal length f=2.5 ~ 62.5 mm (1/8 ~ 2 1/2 in fire. Use your camcorder to OFF (CHG) for more than 24 hours. Do not recharge, disassemble...
...distance of in .) When converted to pull out the battery case. 2 Place a new battery with a Sony CR2025 lithium battery. x Procedures Connect your camcorder after charging the pre-installed rechargeable battery. System Video recording system 2 rotary heads, Helical scanning system Still ... Effective (still): 1 000 000 pixels Effective (movie): 690 000 pixels Lens Carl Zeiss Vario-Tessar 25 × (Optical), 2 000 × (Digital) Focal length f=2.5 ~ 62.5 mm (1/8 ~ 2 1/2 in fire. Use your camcorder to OFF (CHG) for more than 24 hours. Do not recharge, disassemble...
Operating Guide
Page 90
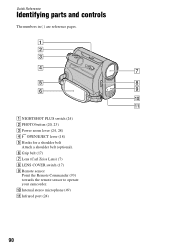
F Grip belt (17) G Lens (Carl Zeiss Lens) (7) H LENS COVER switch (17) I Remote sensor Point the Remote Commander (93) towards the remote sensor to operate your camcorder. J Internal stereo microphone (49) K Infrared port (24) 90 Quick Reference Identifying parts and controls The numbers in ( ) are reference pages. A NIGHTSHOT PLUS switch (24) B PHOTO button (20, 23) C Power zoom lever (24, 28) D OPEN/EJECT lever (18) E Hooks for a shoulder belt Attach a shoulder belt (optional).
F Grip belt (17) G Lens (Carl Zeiss Lens) (7) H LENS COVER switch (17) I Remote sensor Point the Remote Commander (93) towards the remote sensor to operate your camcorder. J Internal stereo microphone (49) K Infrared port (24) 90 Quick Reference Identifying parts and controls The numbers in ( ) are reference pages. A NIGHTSHOT PLUS switch (24) B PHOTO button (20, 23) C Power zoom lever (24, 28) D OPEN/EJECT lever (18) E Hooks for a shoulder belt Attach a shoulder belt (optional).
Operating Guide
Page 92
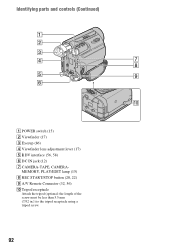
Identifying parts and controls (Continued) A POWER switch (15) B Viewfinder (17) C Eyecup (86) D Viewfinder lens adjustment lever (17) E DV interface (56, 58) F DC IN jack (12) G CAMERA-TAPE, CAMERA- MEMORY, PLAY/EDIT lamp (15) H REC START/STOP button (20, 22) I A/V Remote Connector (32, 56) J Tripod receptacle Attach the tripod (optional: the length of the screw must be less than 5.5 mm (7/32 in.)) to the tripod receptacle using a tripod screw. 92
Identifying parts and controls (Continued) A POWER switch (15) B Viewfinder (17) C Eyecup (86) D Viewfinder lens adjustment lever (17) E DV interface (56, 58) F DC IN jack (12) G CAMERA-TAPE, CAMERA- MEMORY, PLAY/EDIT lamp (15) H REC START/STOP button (20, 22) I A/V Remote Connector (32, 56) J Tripod receptacle Attach the tripod (optional: the length of the screw must be less than 5.5 mm (7/32 in.)) to the tripod receptacle using a tripod screw. 92


