
Reference Manual
Page 14
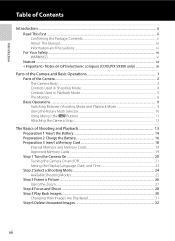
...Package Contents...ii About This Manual...iii Information and Precautions...iv For Your Safety...vi WARNINGS ...vi Notices ...ix Notes on GPS/electronic compass (COOLPIX S9300 only xi Parts of the Camera and Basic Operations 1 Parts of the Camera ...2 The Camera Body...2 Controls Used in Shooting Mode ...4 Controls... Language, Date, and Time 22 Step 2 Select a Shooting Mode...24 Available Shooting Modes...25 Step 3 Frame a Picture...26 Using the Zoom...27 Step 4 Focus and Shoot ...28 Step 5 Play Back Images ...30 Changing How Images Are Displayed 31 Step 6 Delete Unwanted Images 32 xii
...Package Contents...ii About This Manual...iii Information and Precautions...iv For Your Safety...vi WARNINGS ...vi Notices ...ix Notes on GPS/electronic compass (COOLPIX S9300 only xi Parts of the Camera and Basic Operations 1 Parts of the Camera ...2 The Camera Body...2 Controls Used in Shooting Mode ...4 Controls... Language, Date, and Time 22 Step 2 Select a Shooting Mode...24 Available Shooting Modes...25 Step 3 Frame a Picture...26 Using the Zoom...27 Step 4 Focus and Shoot ...28 Step 5 Play Back Images ...30 Changing How Images Are Displayed 31 Step 6 Delete Unwanted Images 32 xii
Reference Manual
Page 18
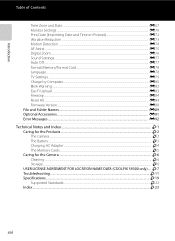
... and Date...E67 Monitor Settings...E70 Print Date (Imprinting Date and Time on Pictures E72 Vibration Reduction ...E73 Motion Detection...E74 AF Assist...E75 Digital Zoom...E76 Sound Settings...E77 Auto Off ...E77 Format Memory/Format Card...E78 Language...E78 TV Settings ...E79 Charge by Computer...E80 Blink Warning ...E82 Eye......F3 Charging AC Adapter ...F4 The Memory Cards...F5 Caring for the Camera ...F6 Cleaning ...F6 Storage ...F6 USER LICENSE AGREEMENT FOR LOCATION NAME DATA (COOLPIX S9300 only)....
... and Date...E67 Monitor Settings...E70 Print Date (Imprinting Date and Time on Pictures E72 Vibration Reduction ...E73 Motion Detection...E74 AF Assist...E75 Digital Zoom...E76 Sound Settings...E77 Auto Off ...E77 Format Memory/Format Card...E78 Language...E78 TV Settings ...E79 Charge by Computer...E80 Blink Warning ...E82 Eye......F3 Charging AC Adapter ...F4 The Memory Cards...F5 Caring for the Camera ...F6 Cleaning ...F6 Storage ...F6 USER LICENSE AGREEMENT FOR LOCATION NAME DATA (COOLPIX S9300 only)....
Reference Manual
Page 20
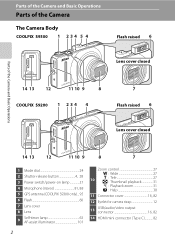
Parts of the Camera and Basic Operations Parts of the Camera The Camera Body COOLPIX S9300 1 2 3 4 5 4 Flash raised 6 Lens cover closed Parts of the Camera and Basic Operations 14 13 12 11 10 9 8 COOLPIX S9200 1 2 3 4 4 7 Flash raised 6 Lens cover closed 14 13 12 11 10 9 8 7 1 Mode ... 21 4 Microphone (stereo 81, 88 5 GPS antenna (COOLPIX S9300 only)... 95 6 Flash 60 7 Lens cover 8 Lens 9 Self-timer lamp 63 AF-assist illuminator 101 Zoom control 27 f : Wide 27 10 g : Tele 27 h: Thumbnail playback 31 i : Playback zoom 31 j : Help 38 11 Connector cover 16, 82...
Parts of the Camera and Basic Operations Parts of the Camera The Camera Body COOLPIX S9300 1 2 3 4 5 4 Flash raised 6 Lens cover closed Parts of the Camera and Basic Operations 14 13 12 11 10 9 8 COOLPIX S9200 1 2 3 4 4 7 Flash raised 6 Lens cover closed 14 13 12 11 10 9 8 7 1 Mode ... 21 4 Microphone (stereo 81, 88 5 GPS antenna (COOLPIX S9300 only)... 95 6 Flash 60 7 Lens cover 8 Lens 9 Self-timer lamp 63 AF-assist illuminator 101 Zoom control 27 f : Wide 27 10 g : Tele 27 h: Thumbnail playback 31 i : Playback zoom 31 j : Help 38 11 Connector cover 16, 82...
Reference Manual
Page 22
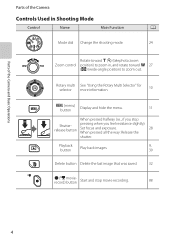
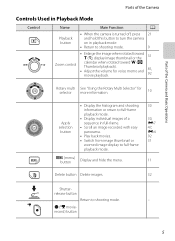
... Basic Operations Parts of the Camera Controls Used in Shooting Mode Control Name Main Function A Mode dial Change the shooting mode. 24 Rotate toward g (i) (telephoto zoom Zoom control position) to zoom in, and rotate toward f 27 (h) (wide-angle position) to...
... Basic Operations Parts of the Camera Controls Used in Shooting Mode Control Name Main Function A Mode dial Change the shooting mode. 24 Rotate toward g (i) (telephoto zoom Zoom control position) to zoom in, and rotate toward f 27 (h) (wide-angle position) to...
Reference Manual
Page 23
... individual images of a sequence in full-frame. • Scroll an image recorded with easy panorama. • Play back movies. • Switch from image thumbnail or zoomed image display to shooting mode. - d (menu) button Display and hide the menu. 30 30, E7 47, E4 92 31 11 Delete button Delete images. 32...
... individual images of a sequence in full-frame. • Scroll an image recorded with easy panorama. • Play back movies. • Switch from image thumbnail or zoomed image display to shooting mode. - d (menu) button Display and hide the menu. 30 30, E7 47, E4 92 31 11 Delete button Delete images. 32...
Reference Manual
Page 25
...Shooting mode 24, 25 2 Macro mode 64 3 Zoom indicator 27, 64 4 AF indicator 28 5 AE/AF-L indicator E5 6 Flash mode 61 7 Battery level indicator 20 Eye-Fi communication 8 indicator 102, E83 9 Vibration reduction icon 101 10 GPS reception (COOLPIX S9300 only).....96 11 Log display (COOLPIX S9300 only 98 12 Motion detection icon 101 13... shooting mode 48, 53 41 Self-timer 63 42 Smile timer 50 43 Pet portrait auto release 48 Compass display (Direction gauge) 44 (COOLPIX S9300 only 98 Compass display (Compass) (COOLPIX 45 S9300 only 98 Location name information (POI 46 information...
...Shooting mode 24, 25 2 Macro mode 64 3 Zoom indicator 27, 64 4 AF indicator 28 5 AE/AF-L indicator E5 6 Flash mode 61 7 Battery level indicator 20 Eye-Fi communication 8 indicator 102, E83 9 Vibration reduction icon 101 10 GPS reception (COOLPIX S9300 only).....96 11 Log display (COOLPIX S9300 only 98 12 Motion detection icon 101 13... shooting mode 48, 53 41 Self-timer 63 42 Smile timer 50 43 Pet portrait auto release 48 Compass display (Direction gauge) 44 (COOLPIX S9300 only 98 Compass display (Compass) (COOLPIX 45 S9300 only 98 Location name information (POI 46 information...
Reference Manual
Page 44
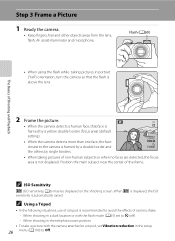
... no faces are detected, the focus area is automatically raised. When shooting in the setup 26 menu (A100) to W (off) - When shooting in the telephoto zoom position • To take a picture with the camera attached to a tripod, set Vibration reduction in a dark location or with the flash mode (A61) set to...
... no faces are detected, the focus area is automatically raised. When shooting in the setup 26 menu (A100) to W (off) - When shooting in the telephoto zoom position • To take a picture with the camera attached to a tripod, set Vibration reduction in a dark location or with the flash mode (A61) set to...
Reference Manual
Page 45
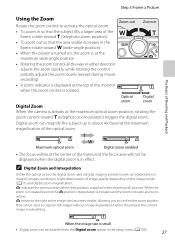
... subject fills a larger area of the frame, rotate toward g (telephoto zoom position). • To zoom out so that can be used to activate the optical zoom. Optical Digital zoom zoom Digital Zoom When the camera is displayed at the center of the optical zoom. When the zoom is increased beyond the maximum magnification of the frame and the...
... subject fills a larger area of the frame, rotate toward g (telephoto zoom position). • To zoom out so that can be used to activate the optical zoom. Optical Digital zoom zoom Digital Zoom When the camera is displayed at the center of the optical zoom. When the zoom is increased beyond the maximum magnification of the frame and the...
Reference Manual
Page 46
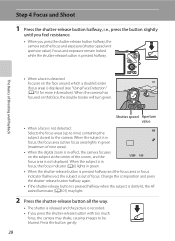
... pressed halfway. When the subject is in focus, the focus area (active focus area) lights in green (maximum of nine areas). • When the digital zoom is in green. 1 / 2 5 0 F 3.5 • When the shutter-release button is pressed halfway and the focus area or focus indicator flashes red, the subject is out...
... pressed halfway. When the subject is in focus, the focus area (active focus area) lights in green (maximum of nine areas). • When the digital zoom is in green. 1 / 2 5 0 F 3.5 • When the shutter-release button is pressed halfway and the focus area or focus indicator flashes red, the subject is out...

Reference Manual
Page 49
... using playback mode, you want. • You can crop the image and save the displayed area of the image as a separate file by rotating the zoom control toward f (h)/g (i). Thumbnail Playback, Calendar Display 15/05/2012 15:30 0004.JPG f (h) 1/ 132 f (h) 1 132 Full-frame playback mode g g (i) (i)... • You can view several images on an area of the image where there are enlarged at the center of images displayed by rotating the zoom control toward f (h)/g (i). • Rotate the multi selector or press H, I , J, or K. • Pictures taken using face detection (A75) or ...
... using playback mode, you want. • You can crop the image and save the displayed area of the image as a separate file by rotating the zoom control toward f (h)/g (i). Thumbnail Playback, Calendar Display 15/05/2012 15:30 0004.JPG f (h) 1/ 132 f (h) 1 132 Full-frame playback mode g g (i) (i)... • You can view several images on an area of the image where there are enlarged at the center of images displayed by rotating the zoom control toward f (h)/g (i). • Rotate the multi selector or press H, I , J, or K. • Pictures taken using face detection (A75) or ...
Reference Manual
Page 51
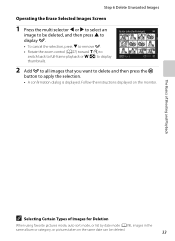
... instructions displayed on the same date can be deleted, and then press H to display y. • To cancel the selection, press I to remove y. • Rotate the zoom control (A27) toward g (i) to switch back to full-frame playback or f(h) to display thumbnails. Step 6 Delete Unwanted Images Operating the Erase Selected Images Screen 1 Press...
... instructions displayed on the same date can be deleted, and then press H to display y. • To cancel the selection, press I to remove y. • Rotate the zoom control (A27) toward g (i) to switch back to full-frame playback or f(h) to display thumbnails. Step 6 Delete Unwanted Images Operating the Erase Selected Images Screen 1 Press...
Reference Manual
Page 56
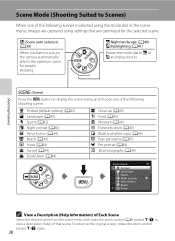
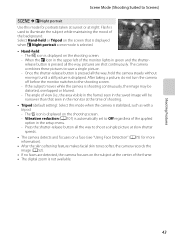
...(A39) When you frame a picture, the camera automatically selects the optimum scene for the selected scene. To return to the original screen, rotate the zoom control toward g (j) to view a description (help) of that are optimized for simpler shooting. y (Scene) Press the d button to display the ... Party/indoor Beach Snow C View a Description (Help Information) of Each Scene Select the desired scene from the scene menu and rotate the zoom control (A4) toward g (j) again. 38 Shooting Features Scene Mode (Shooting Suited to Scenes) When one of the following scenes is selected...
...(A39) When you frame a picture, the camera automatically selects the optimum scene for the selected scene. To return to the original screen, rotate the zoom control toward g (j) to view a description (help) of that are optimized for simpler shooting. y (Scene) Press the d button to display the ... Party/indoor Beach Snow C View a Description (Help Information) of Each Scene Select the desired scene from the scene menu and rotate the zoom control (A4) toward g (j) again. 38 Shooting Features Scene Mode (Shooting Suited to Scenes) When one of the following scenes is selected...
Reference Manual
Page 57
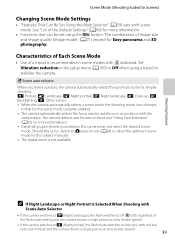
... panorama and 3D photography). Should this occur, switch to A (auto) mode (A24) or select the optimum scene mode for the subject manually. • The digital zoom is recommended in scene modes with the composition. Scene Mode (Shooting Suited to Scenes) Changing Scene Mode Settings • "Features That Can Be Set Using...
... panorama and 3D photography). Should this occur, switch to A (auto) mode (A24) or select the optimum scene mode for the subject manually. • The digital zoom is recommended in scene modes with the composition. Scene Mode (Shooting Suited to Scenes) Changing Scene Mode Settings • "Features That Can Be Set Using...
Reference Manual
Page 58
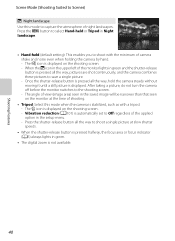
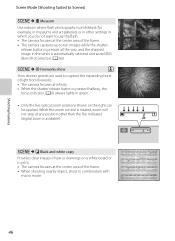
... shutter speeds. • When the shutter-release button is pressed halfway, the focus area or focus indicator (A6) always lights in green. • The digital zoom is not available. 40 Shooting Features Scene Mode (Shooting Suited to Scenes) j Night landscape Use this mode when the camera is stabilized, such as with...
... shutter speeds. • When the shutter-release button is pressed halfway, the focus area or focus indicator (A6) always lights in green. • The digital zoom is not available. 40 Shooting Features Scene Mode (Shooting Suited to Scenes) j Night landscape Use this mode when the camera is stabilized, such as with...
Reference Manual
Page 59
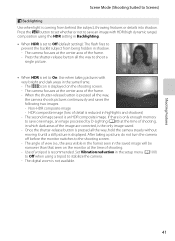
... (high dynamic range) composition using a tripod to stabilize the camera. - The P icon is reduced in shadow. - HDR composite image (loss of the frame. - The digital zoom is coming from being hidden in highlights and shadows) - Shooting Features Scene Mode (Shooting Suited to Scenes) o Backlighting Use when light is not available. 41...
... (high dynamic range) composition using a tripod to stabilize the camera. - The P icon is reduced in shadow. - HDR composite image (loss of the frame. - The digital zoom is coming from being hidden in highlights and shadows) - Shooting Features Scene Mode (Shooting Suited to Scenes) o Backlighting Use when light is not available. 41...
Reference Manual
Page 60
... facial skin tones softer, the camera records the image (A52). • If no faces are shot at the center of the frame. • The digital zoom is not pressed halfway. Shooting Features Scene Mode (Shooting Suited to Scenes) y M b Portrait Use this mode for portraits. • The camera detects and focuses on...
... facial skin tones softer, the camera records the image (A52). • If no faces are shot at the center of the frame. • The digital zoom is not pressed halfway. Shooting Features Scene Mode (Shooting Suited to Scenes) y M b Portrait Use this mode for portraits. • The camera detects and focuses on...
Reference Manual
Page 61
... the camera is stabilized, such as with a tripod. - Flash is used to illuminate the subject while maintaining the mood of the frame. • The digital zoom is not available. 43 Vibration reduction (A101) is displayed. release button is pressed all the way, hold the camera steady without moving it until a still...
... the camera is stabilized, such as with a tripod. - Flash is used to illuminate the subject while maintaining the mood of the frame. • The digital zoom is not available. 43 Vibration reduction (A101) is displayed. release button is pressed all the way, hold the camera steady without moving it until a still...

Reference Manual
Page 63
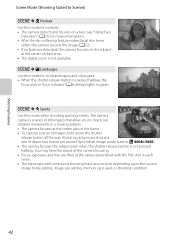
... this mode to photograph flowers, insects, and other small objects at close range. • Macro mode (A64) is set to ON and the camera automatically zooms to the closest position to the subject where the camera can shoot. • You can adjust the hue by pressing the multi selector H or I , J, or... Suited to Scenes) y M k Close-up Use this mode when taking pictures of food. • Macro mode (A64) is set to ON and the camera automatically zooms to the closest position to the subject where the camera can shoot. • You can move the focus area that the camera focuses on. Self...
... this mode to photograph flowers, insects, and other small objects at close range. • Macro mode (A64) is set to ON and the camera automatically zooms to the closest position to the subject where the camera can shoot. • You can adjust the hue by pressing the multi selector H or I , J, or... Suited to Scenes) y M k Close-up Use this mode when taking pictures of food. • Macro mode (A64) is set to ON and the camera automatically zooms to the closest position to the subject where the camera can shoot. • You can move the focus area that the camera focuses on. Self...
Reference Manual
Page 64
...infinity. • When the shutter-release button is pressed halfway, the focus indicator (A6) always lights in green. • Only the five optical zoom positions shown on a white board or in print. • The camera focuses at the center area of light from fireworks. • The camera ...M l Museum Use indoors where flash photography is prohibited (for example, in museums and art galleries) or in other than the five indicated (digital zoom is available). release button is pressed all the way, and the sharpest image in the series is automatically selected and saved (BSS (Best Shot Selector...
...infinity. • When the shutter-release button is pressed halfway, the focus indicator (A6) always lights in green. • Only the five optical zoom positions shown on a white board or in print. • The camera focuses at the center area of light from fireworks. • The camera ...M l Museum Use indoors where flash photography is prohibited (for example, in museums and art galleries) or in other than the five indicated (digital zoom is available). release button is pressed all the way, and the sharpest image in the series is automatically selected and saved (BSS (Best Shot Selector...
Reference Manual
Page 65
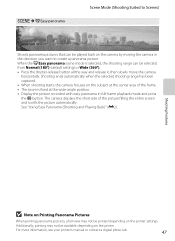
...-release button all the way and release it, then slowly move the camera horizontally. The camera displays the short side of the frame. • The zoom is selected, the shooting range can be played back on the printer settings. When the V Easy panorama scene mode is fixed at the wide-angle...
...-release button all the way and release it, then slowly move the camera horizontally. The camera displays the short side of the frame. • The zoom is selected, the shooting range can be played back on the printer settings. When the V Easy panorama scene mode is fixed at the wide-angle...


