
Reference Manual
Page 16
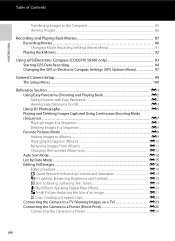
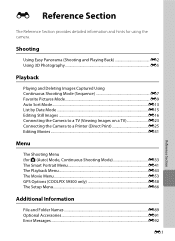
... Movies 87 Recording Movies ...88 Changing Movie Recording Settings (Movie Menu 91 Playing Back Movies...92 Using GPS/Electronic Compass (COOLPIX S9300 only 93 Starting GPS Data Recording...94 Changing the GPS or Electronic Compass Settings (GPS Options Menu 97 General Camera Setup...99... Panorama E2 Viewing Easy Panorama (Scroll) ...E4 Using 3D Photography...E5 Playing and Deleting Images Captured Using Continuous Shooting Mode (Sequence)...E7 Playing Images in a Sequence...E7 Deleting Images in a Sequence...E8 Favorite Pictures Mode ...E9 Adding Images to Albums...E9 Playing Back Images ...
... Movies 87 Recording Movies ...88 Changing Movie Recording Settings (Movie Menu 91 Playing Back Movies...92 Using GPS/Electronic Compass (COOLPIX S9300 only 93 Starting GPS Data Recording...94 Changing the GPS or Electronic Compass Settings (GPS Options Menu 97 General Camera Setup...99... Panorama E2 Viewing Easy Panorama (Scroll) ...E4 Using 3D Photography...E5 Playing and Deleting Images Captured Using Continuous Shooting Mode (Sequence)...E7 Playing Images in a Sequence...E7 Deleting Images in a Sequence...E8 Favorite Pictures Mode ...E9 Adding Images to Albums...E9 Playing Back Images ...
Reference Manual
Page 26
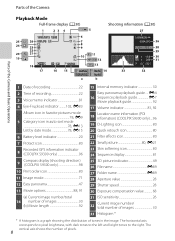
... Location name information (POI 18 information) (COOLPIX S9300 only) ....96 19 D-Lighting icon 80 20 Quick retouch icon 80 21 Filter effects icon 80 22 Small picture 80, E21 23 Skin softening icon 80 24 Sequence display 81 25 3D picture indicator 49 26 File name E89 27... distribution of tones in auto sort mode 78, E13 List by date mode 78, E15 6 Battery level indicator 20 7 Protect icon 80 Recorded GPS information indicator 8 (COOLPIX S9300 only 96 Compass display (shooting direction) 9 (COOLPIX S9300 only 98 10 Print order icon 80 11 Image mode 71 12 Easy panorama 47 13...
... Location name information (POI 18 information) (COOLPIX S9300 only) ....96 19 D-Lighting icon 80 20 Quick retouch icon 80 21 Filter effects icon 80 22 Small picture 80, E21 23 Skin softening icon 80 24 Sequence display 81 25 3D picture indicator 49 26 File name E89 27... distribution of tones in auto sort mode 78, E13 List by date mode 78, E15 6 Battery level indicator 20 7 Protect icon 80 Recorded GPS information indicator 8 (COOLPIX S9300 only 96 Compass display (shooting direction) 9 (COOLPIX S9300 only 98 10 Print order icon 80 11 Image mode 71 12 Easy panorama 47 13...
Reference Manual
Page 56
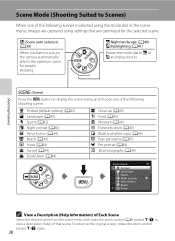
... (A45) u Food (A45) l Museum (A46) m Fireworks show (A46) n Black and white copy (A46) V Easy panorama (A47) O Pet portrait (A48) s 3D photography (A49) Scene menu Portrait Landscape Sports Night portrait Party/indoor Beach Snow C View a Description (Help Information) of Each Scene Select the desired scene from...38 To return to the original screen, rotate the zoom control toward g (j) to view a description (help) of that are captured using the mode dial or the scene menu, images are optimized for simpler shooting. y (Scene) Press the d button to display the scene menu and choose...
... (A45) u Food (A45) l Museum (A46) m Fireworks show (A46) n Black and white copy (A46) V Easy panorama (A47) O Pet portrait (A48) s 3D photography (A49) Scene menu Portrait Landscape Sports Night portrait Party/indoor Beach Snow C View a Description (Help Information) of Each Scene Select the desired scene from...38 To return to the original screen, rotate the zoom control toward g (j) to view a description (help) of that are captured using the mode dial or the scene menu, images are optimized for simpler shooting. y (Scene) Press the d button to display the scene menu and choose...
Reference Manual
Page 57
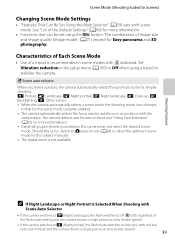
... • If the camera switches to g (Night landscape), the flash switches to off (W (off)) regardless of image size and image quality (Image mode) (A71) (except for Easy panorama and 3D photography). Shooting Features C If Night Landscape or Night Portrait Is Selected When Shooting with the composition. e: Portrait, f: Landscape, h: Night portrait, g: Night landscape...
... • If the camera switches to g (Night landscape), the flash switches to off (W (off)) regardless of image size and image quality (Image mode) (A71) (except for Easy panorama and 3D photography). Shooting Features C If Night Landscape or Night Portrait Is Selected When Shooting with the composition. e: Portrait, f: Landscape, h: Night portrait, g: Night landscape...
Reference Manual
Page 67
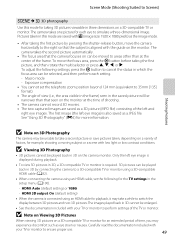
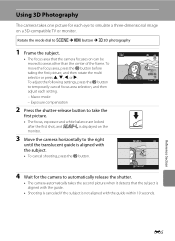
... • See the documentation included with your TV or monitor to switch the display between 3D pictures and non-3D pictures. Macro mode - To move the camera horizontally to Scenes) y M s 3D photography Use this mode are saved as eye strain or nausea. The images played back in the setup menu ...(A100). - Pictures taken in 3D, a 3D-compatible TV or monitor is also saved as the image mode. • After taking 3D pictures viewable in 3D on the camera monitor. Scene Mode (Shooting Suited to the right so that the subject is aligned with...
... • See the documentation included with your TV or monitor to switch the display between 3D pictures and non-3D pictures. Macro mode - To move the camera horizontally to Scenes) y M s 3D photography Use this mode are saved as eye strain or nausea. The images played back in the setup menu ...(A100). - Pictures taken in 3D, a 3D-compatible TV or monitor is also saved as the image mode. • After taking 3D pictures viewable in 3D on the camera monitor. Scene Mode (Shooting Suited to the right so that the subject is aligned with...
Reference Manual
Page 89
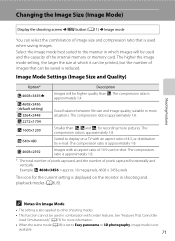
..., the larger the size at which images will be shot. O 640×480 Suited to Easy panorama or 3D photography, image mode is not available. 71 Image Mode Settings (Image Size and Quality) Option* Q 4608×3456P P 4608×3456 (default setting) R 3264×2448 r 2272×1704 ...an aspect ratio of 4:3, or distribution by e-mail. The compression ratio is also applied to the manner in most situations. C Notes On Image Mode • The setting is approximately 1:8. * The total number of pixels captured, and the number of images that is used in combination with certain...
..., the larger the size at which images will be shot. O 640×480 Suited to Easy panorama or 3D photography, image mode is not available. 71 Image Mode Settings (Image Size and Quality) Option* Q 4608×3456P P 4608×3456 (default setting) R 3264×2448 r 2272×1704 ...an aspect ratio of 4:3, or distribution by e-mail. The compression ratio is also applied to the manner in most situations. C Notes On Image Mode • The setting is approximately 1:8. * The total number of pixels captured, and the number of images that is used in combination with certain...
Reference Manual
Page 99
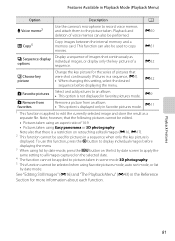
...the selected date. 4 The function cannot be applied to pictures taken in favorite pictures mode. E52 h Favorite pictures Select and add pictures to an album. • This option is displayed only in scene mode 3D photography. 5 This function cannot be performed. See "Editing Still Images" (E16)... use this setting, select the desired sequence before displaying the menu 3 When using Easy panorama or 3D photography Note also that were shot continuously (Pictures in Playback Mode (Playback Menu) Option Description A E Voice memo2 Use the camera's microphone to record voice memos ...
...the selected date. 4 The function cannot be applied to pictures taken in favorite pictures mode. E52 h Favorite pictures Select and add pictures to an album. • This option is displayed only in scene mode 3D photography. 5 This function cannot be performed. See "Editing Still Images" (E16)... use this setting, select the desired sequence before displaying the menu 3 When using Easy panorama or 3D photography Note also that were shot continuously (Pictures in Playback Mode (Playback Menu) Option Description A E Voice memo2 Use the camera's microphone to record voice memos ...
Reference Manual
Page 118
Select Select an image to use a picture taken with Hand-held selected), Easy panorama or 3D photography - The Time zone setting allows you can change the following situations. - Select COOLPIX to the camera's date and time. When the scene mode is set , the camera automatically calculates the time difference between the travel destination and...
Select Select an image to use a picture taken with Hand-held selected), Easy panorama or 3D photography - The Time zone setting allows you can change the following situations. - Select COOLPIX to the camera's date and time. When the scene mode is set , the camera automatically calculates the time difference between the travel destination and...
Reference Manual
Page 121
Shooting Using Easy Panorama (Shooting and Playing Back E2 Using 3D Photography E5 Playback Playing and Deleting Images Captured Using Continuous Shooting Mode (Sequence E7 Favorite Pictures Mode E9 Auto Sort Mode...E13 List by Date Mode ...E15 Editing Still Images E16 Connecting the Camera to a ...Section The Reference Section provides detailed information and hints for A (Auto) Mode, Continuous Shooting Mode E33 The Smart Portrait Menu E41 The Playback Menu E43 The Movie Menu ...E53 GPS Options (COOLPIX S9300 only E58 The Setup Menu...E66 Additional Information File and Folder Names ...
Shooting Using Easy Panorama (Shooting and Playing Back E2 Using 3D Photography E5 Playback Playing and Deleting Images Captured Using Continuous Shooting Mode (Sequence E7 Favorite Pictures Mode E9 Auto Sort Mode...E13 List by Date Mode ...E15 Editing Still Images E16 Connecting the Camera to a ...Section The Reference Section provides detailed information and hints for A (Auto) Mode, Continuous Shooting Mode E33 The Smart Portrait Menu E41 The Playback Menu E43 The Movie Menu ...E53 GPS Options (COOLPIX S9300 only E58 The Setup Menu...E66 Additional Information File and Folder Names ...
Reference Manual
Page 125
... settings, press the k button to temporarily cancel focus area selection, and then adjust each eye to simulate a three-dimensional image on a 3D-compatible TV or monitor. Rotate the mode dial to y M d button M s 3D photography 1 Frame the subject. • The focus area that the subject is aligned with the guide. • Shooting is canceled...
... settings, press the k button to temporarily cancel focus area selection, and then adjust each eye to simulate a three-dimensional image on a 3D-compatible TV or monitor. Rotate the mode dial to y M d button M s 3D photography 1 Frame the subject. • The focus area that the subject is aligned with the guide. • Shooting is canceled...
Reference Manual
Page 169
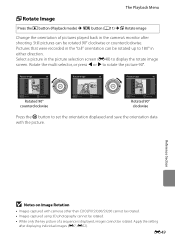
... or press J or K to set the orientation displayed and save the orientation data with cameras other than COOLPIX S9300/S9200 cannot be rotated. • Images captured using 3D photography cannot be rotated. • While only the key picture of pictures played back in the camera's ... 180° in the "tall" orientation can be rotated. Apply the setting after shooting. The Playback Menu f Rotate Image Press the c button (Playback mode) M d button (A11) M f Rotate image Change the orientation of a sequence is displayed, images cannot be rotated 90° clockwise or counterclockwise....
... or press J or K to set the orientation displayed and save the orientation data with cameras other than COOLPIX S9300/S9200 cannot be rotated. • Images captured using 3D photography cannot be rotated. • While only the key picture of pictures played back in the camera's ... 180° in the "tall" orientation can be rotated. Apply the setting after shooting. The Playback Menu f Rotate Image Press the c button (Playback mode) M d button (A11) M f Rotate image Change the orientation of a sequence is displayed, images cannot be rotated 90° clockwise or counterclockwise....
Reference Manual
Page 186
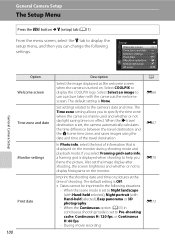
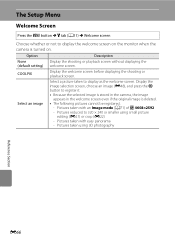
...original image is turned on the monitor when the camera is deleted. • The following pictures cannot be registered. - Pictures taken with an Image mode (A71) of g 4608×2592 - The Setup Menu Welcome Screen Press the d button M z tab (A11) M Welcome screen Choose ...whether or not to 320 × 240 or smaller using 3D photography Reference Section E66 Option Description None Display the shooting or playback screen without displaying the (default setting) welcome screen. Pictures taken using ...
...original image is turned on the monitor when the camera is deleted. • The following pictures cannot be registered. - Pictures taken with an Image mode (A71) of g 4608×2592 - The Setup Menu Welcome Screen Press the d button M z tab (A11) M Welcome screen Choose ...whether or not to 320 × 240 or smaller using 3D photography Reference Section E66 Option Description None Display the shooting or playback screen without displaying the (default setting) welcome screen. Pictures taken using ...
Reference Manual
Page 192
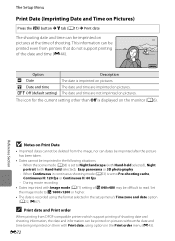
..., Continuous H: 120 fps or Continuous H: 60 fps - When the scene mode (A38) is imprinted on pictures at the time of shooting. When Continuous in... • Dates imprinted with Hand-held selected), Night portrait (with Image mode (A71) setting of shooting date and shooting information, the date and information...or higher. • The date is recorded using options in continuous shooting mode (A53) is displayed on pictures. C Print date and Print order ...format selected in the following situations. - Set the image mode to read. E72 The icon for the current setting other than...
..., Continuous H: 120 fps or Continuous H: 60 fps - When the scene mode (A38) is imprinted on pictures at the time of shooting. When Continuous in... • Dates imprinted with Hand-held selected), Night portrait (with Image mode (A71) setting of shooting date and shooting information, the date and information...or higher. • The date is recorded using options in continuous shooting mode (A53) is displayed on pictures. C Print date and Print order ...format selected in the following situations. - Set the image mode to read. E72 The icon for the current setting other than...
Reference Manual
Page 194
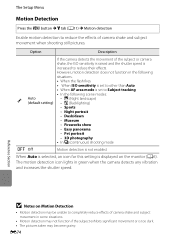
... to other than Auto • When AF area mode is displayed on Motion Detection • Motion detection may become grainy. W (Backlighting) - Dusk/dawn - Pet portrait - 3D photography • In C (continuous) shooting mode k Off Motion detection is increased to reduce the ... the monitor (A6). j (Night landscape) - E74 Fireworks show - Easy panorama - However, motion detection does not function in the following scene modes: U Auto (default setting) - The Setup Menu Motion Detection Press the d button M z tab (A11) M Motion detection Enable motion detection ...
... to other than Auto • When AF area mode is displayed on Motion Detection • Motion detection may become grainy. W (Backlighting) - Dusk/dawn - Pet portrait - 3D photography • In C (continuous) shooting mode k Off Motion detection is increased to reduce the ... the monitor (A6). j (Night landscape) - E74 Fireworks show - Easy panorama - However, motion detection does not function in the following scene modes: U Auto (default setting) - The Setup Menu Motion Detection Press the d button M z tab (A11) M Motion detection Enable motion detection ...

Reference Manual
Page 196
... On (default setting) Off Description When the camera is zoomed in combination with HDR set to On, Easy panorama, Pet portrait, or 3D photography. - When the scene mode is in effect, Metering automatically switches to Center-weighted, or to the maximum optical zoom position, rotating and holding the zoom control toward g (i) triggers...
... On (default setting) Off Description When the camera is zoomed in combination with HDR set to On, Easy panorama, Pet portrait, or 3D photography. - When the scene mode is in effect, Metering automatically switches to Center-weighted, or to the maximum optical zoom position, rotating and holding the zoom control toward g (i) triggers...
Reference Manual
Page 199
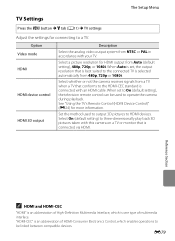
... with this camera on a TV or monitor that is best suited to HDMI devices. Select On (default setting) to three-dimensionally play back 3D pictures taken with your TV. "HDMI-CEC" is an abbreviation of High-Definition Multimedia Interface, which enables operations to be used to output.... When set , the output resolution that is selected automatically from a TV when a TV that conforms to operate the camera during playback. Option Video mode HDMI HDMI device control HDMI 3D output Description Select the analog video output system from Auto (default setting), 480p, 720p, or 1080i.
... with this camera on a TV or monitor that is best suited to HDMI devices. Select On (default setting) to three-dimensionally play back 3D pictures taken with your TV. "HDMI-CEC" is an abbreviation of High-Definition Multimedia Interface, which enables operations to be used to output.... When set , the output resolution that is selected automatically from a TV when a TV that conforms to operate the camera during playback. Option Video mode HDMI HDMI device control HDMI 3D output Description Select the analog video output system from Auto (default setting), 480p, 720p, or 1080i.
Reference Manual
Page 207
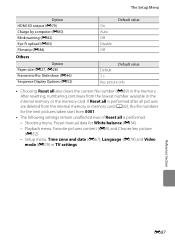
Setup menu: Time zone and date (E67), Language (E78) and Video mode (E79) in TV settings Reference Section E87 Playback menu: Favorite pictures content (E9), and Choose key picture (E52) - Shooting menu: Preset manual data for the .... • The following settings remain unaffected even if Reset all also clears the current file number (E89) in the memory. The Setup Menu Option HDMI 3D output (E79) Charge by computer (E80) Blink warning (E82) Eye-Fi upload (E83) Filmstrip (E84) Others Option Paper size (E27, E28) Frame intvl for Slide...
Setup menu: Time zone and date (E67), Language (E78) and Video mode (E79) in TV settings Reference Section E87 Playback menu: Favorite pictures content (E9), and Choose key picture (E52) - Shooting menu: Preset manual data for the .... • The following settings remain unaffected even if Reset all also clears the current file number (E89) in the memory. The Setup Menu Option HDMI 3D output (E79) Charge by computer (E80) Blink warning (E82) Eye-Fi upload (E83) Filmstrip (E84) Others Option Paper size (E27, E28) Frame intvl for Slide...
Reference Manual
Page 213
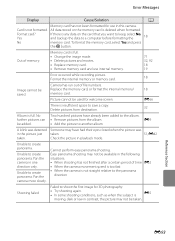
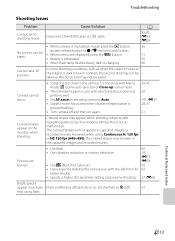
... hundred pictures have had their eyes closed when the picture was detected Someone may not be taken. Unable to shoot the first image for 3D photography. • Try shooting again. • In some shooting conditions, such as when the subject is not straight relative to the ... Easy panorama shooting may have already been added to the album. • Remove pictures from destination. 32 Album is full. • Change the image mode. • Delete pictures and movies. • Replace memory card. • Remove memory card and use in one direction only. All data stored on...
... hundred pictures have had their eyes closed when the picture was detected Someone may not be taken. Unable to shoot the first image for 3D photography. • Try shooting again. • In some shooting conditions, such as when the subject is not straight relative to the ... Easy panorama shooting may have already been added to the album. • Remove pictures from destination. 32 Album is full. • Change the image mode. • Delete pictures and movies. • Replace memory card. • Remove memory card and use in one direction only. All data stored on...
Reference Manual
Page 214
... pictures from the playback menu. 18 E51 File contains no images. the proper position. E94 Reference Section After taking 3D pictures, the second shot could not be saved. COOLPIX S9300 only The camera clock is between two modes. No pictures in the internal memory or memory card. • To view the pictures stored in...
... pictures from the playback menu. 18 E51 File contains no images. the proper position. E94 Reference Section After taking 3D pictures, the second shot could not be saved. COOLPIX S9300 only The camera clock is between two modes. No pictures in the internal memory or memory card. • To view the pictures stored in...
Reference Manual
Page 229
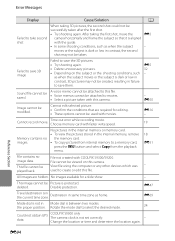
taken or the 3D picture may not be seen in focus area when shutter-release button is too close to shooting mode. this is in air. The colored... Battery is exhausted. 11 20 • When flash lamp flashes slowly, flash is charging. 60 Cannot take 3D pictures In some shooting conditions, such as window blinds); Camera cannot focus. • Subject is pressed halfway....E74 • Use D (Best Shot Selector). 56 • Use a tripod to W (off particles in playback mode, press the c button, 30 No picture can be saved. Set the flash to stabilize the camera (use with ...
taken or the 3D picture may not be seen in focus area when shutter-release button is too close to shooting mode. this is in air. The colored... Battery is exhausted. 11 20 • When flash lamp flashes slowly, flash is charging. 60 Cannot take 3D pictures In some shooting conditions, such as window blinds); Camera cannot focus. • Subject is pressed halfway....E74 • Use D (Best Shot Selector). 56 • Use a tripod to W (off particles in playback mode, press the c button, 30 No picture can be saved. Set the flash to stabilize the camera (use with ...


