
Reference Manual
Page 7
... possession of material that deleting images or formatting data storage devices such as memory cards or built-in camera memory does not completely erase the original image data. v Deleted files can delete unsaved log data from the memory card using commercial deletion software, or format the device and then completely refill it with copyright notices The copying or reproduction of copyrighted creative works such as books, music, paintings, woodcut prints, maps, drawings, movies, and photographs is...
... possession of material that deleting images or formatting data storage devices such as memory cards or built-in camera memory does not completely erase the original image data. v Deleted files can delete unsaved log data from the memory card using commercial deletion software, or format the device and then completely refill it with copyright notices The copying or reproduction of copyrighted creative works such as books, music, paintings, woodcut prints, maps, drawings, movies, and photographs is...
Reference Manual
Page 14
... of Shooting and Playback 13 Preparation 1 Insert the Battery...14 Preparation 2 Charge the Battery 16 Preparation 3 Insert a Memory Card 18 Internal Memory and Memory Cards...19 Approved Memory Cards ...19 Step 1 Turn the Camera On ...20 Turning the Camera On and Off...21 Setting the Display Language, Date, and Time 22 Step 2 Select a Shooting Mode...24 Available Shooting Modes...25 Step 3 Frame a Picture...26 Using the Zoom...27 Step 4 Focus and Shoot ...28 Step 5 Play Back Images ...30 Changing How Images Are Displayed 31 Step 6 Delete Unwanted Images...
... of Shooting and Playback 13 Preparation 1 Insert the Battery...14 Preparation 2 Charge the Battery 16 Preparation 3 Insert a Memory Card 18 Internal Memory and Memory Cards...19 Approved Memory Cards ...19 Step 1 Turn the Camera On ...20 Turning the Camera On and Off...21 Setting the Display Language, Date, and Time 22 Step 2 Select a Shooting Mode...24 Available Shooting Modes...25 Step 3 Frame a Picture...26 Using the Zoom...27 Step 4 Focus and Shoot ...28 Step 5 Play Back Images ...30 Changing How Images Are Displayed 31 Step 6 Delete Unwanted Images...
Reference Manual
Page 16
...Playing Back Movies 87 Recording Movies ...88 Changing Movie Recording Settings (Movie Menu 91 Playing Back Movies...92 Using GPS/Electronic Compass (COOLPIX S9300 only 93 Starting GPS Data Recording...94 Changing the GPS or Electronic Compass Settings (GPS Options Menu 97 General Camera Setup...99 The Setup Menu ...100 Reference Section...E1 Using Easy Panorama (Shooting and Playing Back E2 Taking Pictures with Easy Panorama E2 Viewing Easy Panorama (Scroll) ...E4 Using 3D Photography...E5 Playing and Deleting Images Captured Using Continuous Shooting Mode (Sequence)...E7 Playing Images...
...Playing Back Movies 87 Recording Movies ...88 Changing Movie Recording Settings (Movie Menu 91 Playing Back Movies...92 Using GPS/Electronic Compass (COOLPIX S9300 only 93 Starting GPS Data Recording...94 Changing the GPS or Electronic Compass Settings (GPS Options Menu 97 General Camera Setup...99 The Setup Menu ...100 Reference Section...E1 Using Easy Panorama (Shooting and Playing Back E2 Taking Pictures with Easy Panorama E2 Viewing Easy Panorama (Scroll) ...E4 Using 3D Photography...E5 Playing and Deleting Images Captured Using Continuous Shooting Mode (Sequence)...E7 Playing Images...
Reference Manual
Page 18
... Date and Time on Pictures E72 Vibration Reduction ...E73 Motion Detection...E74 AF Assist...E75 Digital Zoom...E76 Sound Settings...E77 Auto Off ...E77 Format Memory/Format Card...E78 Language...E78 TV Settings ...E79 Charge by Computer...E80 Blink Warning ...E82 Eye-Fi Upload ...E83 Filmstrip ...E84 Reset All ...E84 Firmware Version...E88 File and Folder Names...E89 Optional Accessories ...E91 Error Messages ...E92 Technical Notes and Index ...F1 Caring for the Products...F2 The Camera...
... Date and Time on Pictures E72 Vibration Reduction ...E73 Motion Detection...E74 AF Assist...E75 Digital Zoom...E76 Sound Settings...E77 Auto Off ...E77 Format Memory/Format Card...E78 Language...E78 TV Settings ...E79 Charge by Computer...E80 Blink Warning ...E82 Eye-Fi Upload ...E83 Filmstrip ...E84 Reset All ...E84 Firmware Version...E88 File and Folder Names...E89 Optional Accessories ...E91 Error Messages ...E92 Technical Notes and Index ...F1 Caring for the Products...F2 The Camera...
Reference Manual
Page 22
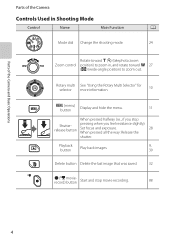
When pressed all the way: Release the 28 shutter. Playback button Play back images. 9, 30 Delete button Delete the last image that was saved. 32 b (e movierecord) button Start and stop Shutterrelease button pressing when you feel resistance slightly): Set focus and exposure. Parts of the Camera and Basic Operations Parts of the Camera Controls Used in Shooting Mode Control Name Main Function A Mode dial Change the shooting mode. 24 Rotate toward g (i) (telephoto zoom Zoom control position) to zoom in, and rotate toward f 27 (h) (wide-angle position...
When pressed all the way: Release the 28 shutter. Playback button Play back images. 9, 30 Delete button Delete the last image that was saved. 32 b (e movierecord) button Start and stop Shutterrelease button pressing when you feel resistance slightly): Set focus and exposure. Parts of the Camera and Basic Operations Parts of the Camera Controls Used in Shooting Mode Control Name Main Function A Mode dial Change the shooting mode. 24 Rotate toward g (i) (telephoto zoom Zoom control position) to zoom in, and rotate toward f 27 (h) (wide-angle position...
Reference Manual
Page 46
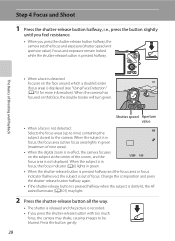
... the screen, and the focus area is recorded. • If you press the shutter-release button halfway, the camera sets the focus and exposure (shutter speed and aperture value). When the subject is in focus, the focus indicator (A6) lights in green. 1 / 2 5 0 F 3.5 • When the shutter-release button is pressed halfway and the focus area or focus indicator flashes red, the subject is pressed halfway. Press the button gently. 28 Focus and exposure remain locked while the shutter-release button...
... the screen, and the focus area is recorded. • If you press the shutter-release button halfway, the camera sets the focus and exposure (shutter speed and aperture value). When the subject is in focus, the focus indicator (A6) lights in green. 1 / 2 5 0 F 3.5 • When the shutter-release button is pressed halfway and the focus area or focus indicator flashes red, the subject is pressed halfway. Press the button gently. 28 Focus and exposure remain locked while the shutter-release button...
Reference Manual
Page 59
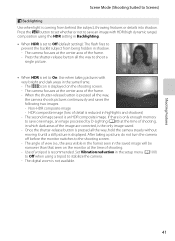
... digital zoom is an HDR composite image. Set Vibration reduction in the setup menu (A100) to Off when using the HDR setting in Backlighting. • When HDR is reduced in the saved image will be narrower than that seen on the shooting screen. - The camera focuses at the center area of shooting, in the same frame. - When the shutter-release button is displayed. Shooting Features Scene Mode (Shooting Suited to the shooting screen...
... digital zoom is an HDR composite image. Set Vibration reduction in the setup menu (A100) to Off when using the HDR setting in Backlighting. • When HDR is reduced in the saved image will be narrower than that seen on the shooting screen. - The camera focuses at the center area of shooting, in the same frame. - When the shutter-release button is displayed. Shooting Features Scene Mode (Shooting Suited to the shooting screen...
Reference Manual
Page 66
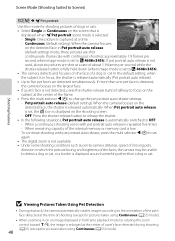
...-frame playback mode by rotating the zoom control toward g (i), the image is released automatically. When a continuous shooting series with pet portrait auto release, press the multi selector J (n) to set , the d icon is displayed on an image displayed in focus, the shutter is not detected, press the shutter-release button halfway to focus on the detected face in on the shooting screen. - If pet portrait auto release is not used, about six pictures are shot...
...-frame playback mode by rotating the zoom control toward g (i), the image is released automatically. When a continuous shooting series with pet portrait auto release, press the multi selector J (n) to set , the d icon is displayed on an image displayed in focus, the shutter is not detected, press the shutter-release button halfway to focus on the detected face in on the shooting screen. - If pet portrait auto release is not used, about six pictures are shot...
Reference Manual
Page 67
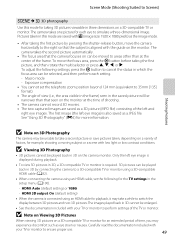
... time, you may experience discomfort such as the image mode. • After taking the first picture by connecting the camera to take a while to perform settings of shooting. • The camera cannot record 3D movies. • The two captured images are saved with m (image size: 1920 × 1080 pixels) as eye strain or nausea. B Note on Viewing 3D Pictures When viewing 3D pictures on a 3D-compatible TV or monitor for more information. To adjust...
... time, you may experience discomfort such as the image mode. • After taking the first picture by connecting the camera to take a while to perform settings of shooting. • The camera cannot record 3D movies. • The two captured images are saved with m (image size: 1920 × 1080 pixels) as eye strain or nausea. B Note on Viewing 3D Pictures When viewing 3D pictures on a 3D-compatible TV or monitor for more information. To adjust...
Reference Manual
Page 99
E50 h Copy5 Copy images between the internal memory and a memory card. E52 x Choose key picture Change the key picture for more information about each function. Note, however, that were shot continuously (Pictures in favorite pictures mode. Playback and deletion of a sequence. Playback Features 81 This function can also be used for pictures in the Reference Section for the series of 16:9 • Pictures taken using Easy panorama or 3D photography Note also that there is a restriction...
E50 h Copy5 Copy images between the internal memory and a memory card. E52 x Choose key picture Change the key picture for more information about each function. Note, however, that were shot continuously (Pictures in favorite pictures mode. Playback and deletion of a sequence. Playback Features 81 This function can also be used for pictures in the Reference Section for the series of 16:9 • Pictures taken using Easy panorama or 3D photography Note also that there is a restriction...
Reference Manual
Page 121
Shooting Using Easy Panorama (Shooting and Playing Back E2 Using 3D Photography E5 Playback Playing and Deleting Images Captured Using Continuous Shooting Mode (Sequence E7 Favorite Pictures Mode E9 Auto Sort Mode...E13 List by Date Mode ...E15 Editing Still Images E16 Connecting the Camera to a TV (Viewing Images on a TV E23 Connecting the Camera to a Printer (Direct Print E25 Editing Movies ...E31 Menu The Shooting Menu (for using the camera. E Reference Section The Reference Section provides detailed information and hints for A (Auto) Mode, Continuous Shooting Mode E33 The Smart...
Shooting Using Easy Panorama (Shooting and Playing Back E2 Using 3D Photography E5 Playback Playing and Deleting Images Captured Using Continuous Shooting Mode (Sequence E7 Favorite Pictures Mode E9 Auto Sort Mode...E13 List by Date Mode ...E15 Editing Still Images E16 Connecting the Camera to a TV (Viewing Images on a TV E23 Connecting the Camera to a Printer (Direct Print E25 Editing Movies ...E31 Menu The Shooting Menu (for using the camera. E Reference Section The Reference Section provides detailed information and hints for A (Auto) Mode, Continuous Shooting Mode E33 The Smart...
Reference Manual
Page 127
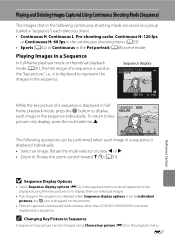
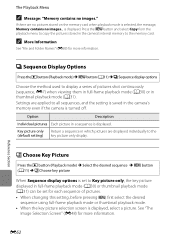
... Deleting Images Captured Using Continuous Shooting Mode (Sequence) The images shot in the following operations can be displayed as a sequence. Reference Section B Sequence Display Options • Select Sequence display options (E52) in the playback menu to set all sequences to be displayed using Choose key picture (E52) in Sequence A sequence's key picture can be performed when each image in the sequence individually. C Changing Key Picture in the playback menu. To return to Individual pictures, the F icon...
... Deleting Images Captured Using Continuous Shooting Mode (Sequence) The images shot in the following operations can be displayed as a sequence. Reference Section B Sequence Display Options • Select Sequence display options (E52) in the playback menu to set all sequences to be displayed using Choose key picture (E52) in Sequence A sequence's key picture can be performed when each image in the sequence individually. C Changing Key Picture in the playback menu. To return to Individual pictures, the F icon...
Reference Manual
Page 172
... pictures shot continuously (sequence, E7) when viewing them in full-frame playback mode (A30) or in the camera's internal memory to display a series of pictures. • When changing this setting, before pressing d, first select the desired sequence using full-frame playback mode or thumbnail playback mode. • When the key picture selection screen is displayed. E52 C More Information See "File and Folder Names" (E89) for more information. C Sequence Display Options Press the c button (Playback mode) M d button (A11) M C Sequence display...
... pictures shot continuously (sequence, E7) when viewing them in full-frame playback mode (A30) or in the camera's internal memory to display a series of pictures. • When changing this setting, before pressing d, first select the desired sequence using full-frame playback mode or thumbnail playback mode. • When the key picture selection screen is displayed. E52 C More Information See "File and Folder Names" (E89) for more information. C Sequence Display Options Press the c button (Playback mode) M d button (A11) M C Sequence display...
Reference Manual
Page 200
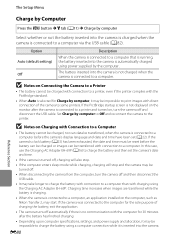
..., use the Charging AC Adapter EH-69P (A16) to a computer via the USB cable (A82). Charging time increases when images are transferred while the battery is charging. • When the camera is turned off, charging will also stop. • If the computer enters sleep mode while charging, charging will stop and the camera may start. If the PictBridge startup screen is connected to charge the battery and then set (A22). If the camera was connected to...
..., use the Charging AC Adapter EH-69P (A16) to a computer via the USB cable (A82). Charging time increases when images are transferred while the battery is charging. • When the camera is turned off, charging will also stop. • If the computer enters sleep mode while charging, charging will stop and the camera may start. If the PictBridge startup screen is connected to charge the battery and then set (A22). If the camera was connected to...
Reference Manual
Page 214
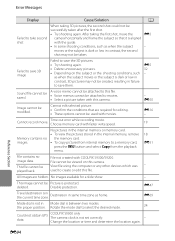
... write speed. 19 Memory contains no image data. File cannot be used to a memory card, press the d button and select Copy from internal memory to create or edit this camera. Disable protection. Rotate the mode dial to save them. COOLPIX S9300 only The camera clock is protected. Change the location or time and determine the location again. - Failed to save 3D image Failed to save the 3D pictures. • Try shooting again. • Delete unnecessary pictures. • Depending on this file. Cannot record movie. Time...
... write speed. 19 Memory contains no image data. File cannot be used to a memory card, press the d button and select Copy from internal memory to create or edit this camera. Disable protection. Rotate the mode dial to save them. COOLPIX S9300 only The camera clock is protected. Change the location or time and determine the location again. - Failed to save 3D image Failed to save the 3D pictures. • Try shooting again. • Delete unnecessary pictures. • Depending on this file. Cannot record movie. Time...
Reference Manual
Page 227
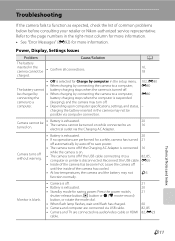
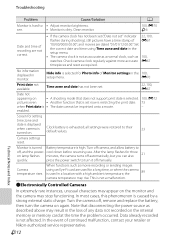
... the USB cable. until flash has charged. • Camera and computer are connected via computer connection. E26 • Inside of the camera has cooled. • At low temperatures, the camera and the battery may not F3 function normally. computer. • Depending upon computer specifications, settings, and status, - Power, Display, Settings Issues Problem Cause/Solution A The battery inserted in the camera may not be turned on while connected to a computer, E80 The battery cannot battery charging...
... the USB cable. until flash has charged. • Camera and computer are connected via computer connection. E26 • Inside of the camera has cooled. • At low temperatures, the camera and the battery may not F3 function normally. computer. • Depending upon computer specifications, settings, and status, - Power, Display, Settings Issues Problem Cause/Solution A The battery inserted in the camera may not be turned on while connected to a computer, E80 The battery cannot battery charging...
Reference Manual
Page 228
... displayed in the setup menu. • The camera clock is not a malfunction. Screen for three on . Monitor is turned Battery temperature is dirty. cool down before resuming use. press the power switch to their default values. 23 Camera settings reset. Camera temperature rises. This is not as accurate as a normal clock, such as required. In the event of any data not recorded on • A shooting mode that does not support print date...
... displayed in the setup menu. • The camera clock is not a malfunction. Screen for three on . Monitor is turned Battery temperature is dirty. cool down before resuming use. press the power switch to their default values. 23 Camera settings reset. Camera temperature rises. This is not as accurate as a normal clock, such as required. In the event of any data not recorded on • A shooting mode that does not support print date...
Reference Manual
Page 230
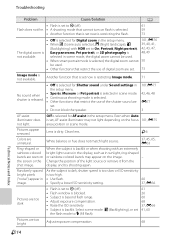
..., 47, The digital zoom is Easy panorama, Pet portrait, or 3D photography is selected for Digital zoom in the setup menu. Continuous shooting mode is dirty. As the subject is dark, shutter speed is too slow or ISO sensitivity is too high. • Use flash. • Specify a lower ISO sensitivity setting. 60 37, E36 Pictures are set now is restricting the flash. Troubleshooting Problem Cause/Solution • Flash is set to W (off ). Clean lens. Off is 48...
..., 47, The digital zoom is Easy panorama, Pet portrait, or 3D photography is selected for Digital zoom in the setup menu. Continuous shooting mode is dirty. As the subject is dark, shutter speed is too slow or ISO sensitivity is too high. • Use flash. • Specify a lower ISO sensitivity setting. 60 37, E36 Pictures are set now is restricting the flash. Troubleshooting Problem Cause/Solution • Flash is set to W (off ). Clean lens. Off is 48...
Reference Manual
Page 232
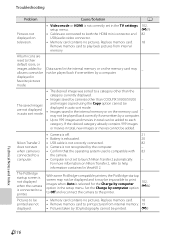
... cameras other than COOLPIX S9300/S9200 and images copied using the Copy option cannot be impossible to print images when Auto is compatible with 83 connected to play back pictures from internal memory. 19 • Pictures taken by 3D photography cannot be printed. For more information on the memory card may be displayed in auto sort mode. • Images saved in ViewNX 2. Set the Charge by computer option in the TV settings setup menu. • Cables are not displayed. • Memory card contains no pictures...
... cameras other than COOLPIX S9300/S9200 and images copied using the Copy option cannot be impossible to print images when Auto is compatible with 83 connected to play back pictures from internal memory. 19 • Pictures taken by 3D photography cannot be printed. For more information on the memory card may be displayed in auto sort mode. • Images saved in ViewNX 2. Set the Charge by computer option in the TV settings setup menu. • Cables are not displayed. • Memory card contains no pictures...
Reference Manual
Page 241
... Playback button 4, 5 Playback menu 80, E43 Playback mode 30 Playback modes 78 Playback zoom 31 Points of interest E60 Portrait b 42 Power switch/Power-on lamp 20, 21 Preset manual E34 Pre-shooting cache 55 Print E25, E27, E28 Print date 23, 100, E72 Print order 80, E43, E44 Print order option E44 Printer 82, E25 Printing E27, E28 Protect 80, E47 Q Quick retouch 80, E18 R Rechargeable Li-ion battery 14, E91 Recording slow motion movies E55 Remove...
... Playback button 4, 5 Playback menu 80, E43 Playback mode 30 Playback modes 78 Playback zoom 31 Points of interest E60 Portrait b 42 Power switch/Power-on lamp 20, 21 Preset manual E34 Pre-shooting cache 55 Print E25, E27, E28 Print date 23, 100, E72 Print order 80, E43, E44 Print order option E44 Printer 82, E25 Printing E27, E28 Protect 80, E47 Q Quick retouch 80, E18 R Rechargeable Li-ion battery 14, E91 Recording slow motion movies E55 Remove...


