

Reference Manual
Page 2
...logo and High-Definition Multimedia Interface are trademarks or registered trademarks of HDMI Licensing LLC. • All other trade names mentioned in this manual or the other documentation provided with the AVC standard ("AVC video") and/or (ii) decode AVC video that was encoded by a consumer...Patent Portfolio License This product is granted or shall be obtained from a video provider licensed to (i) encode video in compliance with your Nikon product are trademarks of Apple Inc., registered in the U.S. No license is licensed under the AVC Patent Portfolio License for any other ...
...logo and High-Definition Multimedia Interface are trademarks or registered trademarks of HDMI Licensing LLC. • All other trade names mentioned in this manual or the other documentation provided with the AVC standard ("AVC video") and/or (ii) decode AVC video that was encoded by a consumer...Patent Portfolio License This product is granted or shall be obtained from a video provider licensed to (i) encode video in compliance with your Nikon product are trademarks of Apple Inc., registered in the U.S. No license is licensed under the AVC Patent Portfolio License for any other ...

Reference Manual
Page 4
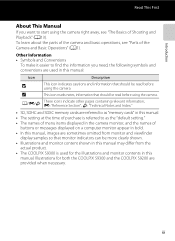
...information provided in this manual. Introduction Introduction Read This First Thank you purchased the camera. Before using the camera, please read the information in a country or region that any items are missing, please contact the store where you for purchasing the Nikon COOLPIX S9300/S9200 digital camera. ...After reading, please keep this manual handy and refer to it to enhance your new camera. NOTE: A memory card is included if the ...
...information provided in this manual. Introduction Introduction Read This First Thank you purchased the camera. Before using the camera, please read the information in a country or region that any items are missing, please contact the store where you for purchasing the Nikon COOLPIX S9300/S9200 digital camera. ...After reading, please keep this manual handy and refer to it to enhance your new camera. NOTE: A memory card is included if the ...
Reference Manual
Page 5
...to as "memory cards" in bold. • In this manual. • The setting at the time of purchase is used for both the COOLPIX S9300 and the COOLPIX S9200 are sometimes omitted from the actual product. • The COOLPIX S9300 is referred to as the "default setting." • The names... of menu items displayed in the camera monitor, and the names of buttons or messages displayed on a computer monitor appear in this manual, images are provided when necessary. Other ...
...to as "memory cards" in bold. • In this manual. • The setting at the time of purchase is used for both the COOLPIX S9300 and the COOLPIX S9200 are sometimes omitted from the actual product. • The COOLPIX S9300 is referred to as the "default setting." • The names... of menu items displayed in the camera monitor, and the names of buttons or messages displayed on a computer monitor appear in this manual, images are provided when necessary. Other ...
Reference Manual
Page 6
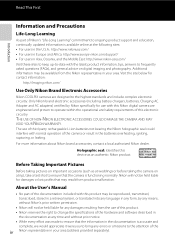
...taking pictures on important occasions (such as an authentic Nikon product. For more information about Nikon brand accessories, contact a local authorized Nikon dealer. Holographic seal: Identifies this electronic circuitry. About the User's Manual • No part of the documentation included with... rechargeable Li-ion batteries not bearing the Nikon holographic seal could interfere with this product may be held liable for contact information: http://imaging.nikon.com/ Use Only Nikon Brand Electronic Accessories Nikon COOLPIX cameras are engineered and proven to operate ...
...taking pictures on important occasions (such as an authentic Nikon product. For more information about Nikon brand accessories, contact a local authorized Nikon dealer. Holographic seal: Identifies this electronic circuitry. About the User's Manual • No part of the documentation included with... rechargeable Li-ion batteries not bearing the Nikon holographic seal could interfere with this product may be held liable for contact information: http://imaging.nikon.com/ Use Only Nikon Brand Electronic Accessories Nikon COOLPIX cameras are engineered and proven to operate ...
Reference Manual
Page 14
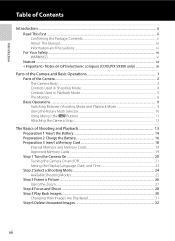
Introduction Table of Contents Introduction ...ii Read This First ...ii Confirming the Package Contents...ii About This Manual...iii Information and Precautions...iv For Your Safety...vi WARNINGS ...vi Notices ...ix Notes on GPS/electronic compass (COOLPIX S9300 only xi Parts of the Camera and Basic Operations 1 Parts of the Camera ...2 The Camera Body...
Introduction Table of Contents Introduction ...ii Read This First ...ii Confirming the Package Contents...ii About This Manual...iii Information and Precautions...iv For Your Safety...vi WARNINGS ...vi Notices ...ix Notes on GPS/electronic compass (COOLPIX S9300 only xi Parts of the Camera and Basic Operations 1 Parts of the Camera ...2 The Camera Body...
Reference Manual
Page 25
...E5 6 Flash mode 61 7 Battery level indicator 20 Eye-Fi communication 8 indicator 102, E83 9 Vibration reduction icon 101 10 GPS reception (COOLPIX S9300 only).....96 11 Log display (COOLPIX S9300 only 98 12 Motion detection icon 101 13 Wind noise reduction 91 14 Print date 100 15 "Date not set" indicator 23, 100... 21 Easy panorama 47 Number of exposures remaining 22 (still pictures 20, 72 23 Internal memory indicator 20 24 Aperture value 28 Focus area (for manual, for center) 25 28, 37 26 Focus area (for auto 37 Focus area (for face detection, 27 pet detection 37, 48, 75 Focus ...
...E5 6 Flash mode 61 7 Battery level indicator 20 Eye-Fi communication 8 indicator 102, E83 9 Vibration reduction icon 101 10 GPS reception (COOLPIX S9300 only).....96 11 Log display (COOLPIX S9300 only 98 12 Motion detection icon 101 13 Wind noise reduction 91 14 Print date 100 15 "Date not set" indicator 23, 100... 21 Easy panorama 47 Number of exposures remaining 22 (still pictures 20, 72 23 Internal memory indicator 20 24 Aperture value 28 Focus area (for manual, for center) 25 28, 37 26 Focus area (for auto 37 Focus area (for face detection, 27 pet detection 37, 48, 75 Focus ...
Reference Manual
Page 28
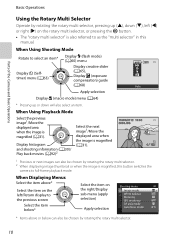
... by rotating the rotary multi selector. 10 When Using Playback Mode Select the previous image1/Move the displayed area when the image is magnified, this manual.
... by rotating the rotary multi selector. 10 When Using Playback Mode Select the previous image1/Move the displayed area when the image is magnified, this manual.
Reference Manual
Page 55
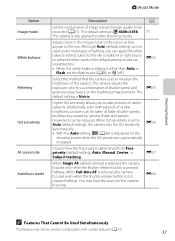
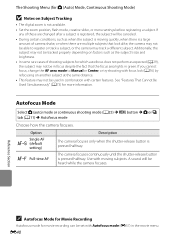
... on the shooting screen when the ISO sensitivity is displayed on the brightness measurement. The default setting is determined from Face priority (default setting), Auto, Manual, Center, or Subject tracking. E40 Shooting Features C Features That Cannot Be Used Simultaneously This feature may hear the sound of the subject. Although Auto (default...
... on the shooting screen when the ISO sensitivity is displayed on the brightness measurement. The default setting is determined from Face priority (default setting), Auto, Manual, Center, or Subject tracking. E40 Shooting Features C Features That Cannot Be Used Simultaneously This feature may hear the sound of the subject. Although Auto (default...
Reference Manual
Page 57
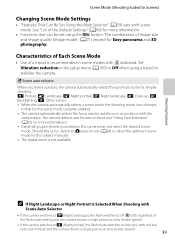
... switches to off (W (off)) regardless of a tripod is not available. See "List of image size and image quality (Image mode) (A71) (except for the subject manually. • The digital zoom is recommended in scene modes with the composition. Scene Mode (Shooting Suited to Scenes) Changing Scene Mode Settings • "Features That...
... switches to off (W (off)) regardless of a tripod is not available. See "List of image size and image quality (Image mode) (A71) (except for the subject manually. • The digital zoom is recommended in scene modes with the composition. Scene Mode (Shooting Suited to Scenes) Changing Scene Mode Settings • "Features That...
Reference Manual
Page 65
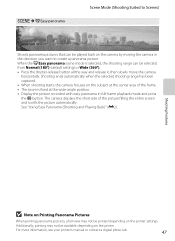
y M V Easy panorama Scene Mode (Shooting Suited to create a panorama picture. For more information, see your printer's manual or contact a digital photo lab. 47 See "Using Easy Panorama (Shooting and Playing Back)" (E2). Shooting Features B Note on Printing Panorama Pictures When printing panorama ...
y M V Easy panorama Scene Mode (Shooting Suited to create a panorama picture. For more information, see your printer's manual or contact a digital photo lab. 47 See "Using Easy Panorama (Shooting and Playing Back)" (E2). Shooting Features B Note on Printing Panorama Pictures When printing panorama ...

Reference Manual
Page 69
Smart Portrait Mode (Shooting Smiling Faces) C Releasing the Shutter Manually The shutter can also be used when On is selected. The camera makes facial skin tones softer before saving images. The extent of the frame. ...
Smart Portrait Mode (Shooting Smiling Faces) C Releasing the Shutter Manually The shutter can also be used when On is selected. The camera makes facial skin tones softer before saving images. The extent of the frame. ...
Reference Manual
Page 104
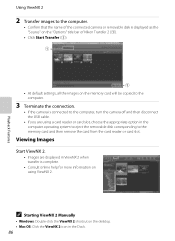
Viewing Images Start ViewNX 2. • Images are using ViewNX 2. C Starting ViewNX 2 Manually • Windows: Double-click the ViewNX 2 shortcut on using a card reader or card slot, choose the appropriate option in the Dock. 86 Playback Features Using ... the computer. • Confirm that the name of the connected camera or removable disk is displayed as the "Source" on the "Options" title bar of Nikon Transfer 2 (1). • Click Start Transfer (2). 1 2 • At default settings, all the images on the memory card will be copied to the computer. 3 Terminate the connection...
Viewing Images Start ViewNX 2. • Images are using ViewNX 2. C Starting ViewNX 2 Manually • Windows: Double-click the ViewNX 2 shortcut on using a card reader or card slot, choose the appropriate option in the Dock. 86 Playback Features Using ... the computer. • Confirm that the name of the connected camera or removable disk is displayed as the "Source" on the "Options" title bar of Nikon Transfer 2 (1). • Click Start Transfer (2). 1 2 • At default settings, all the images on the memory card will be copied to the computer. 3 Terminate the connection...
Reference Manual
Page 144
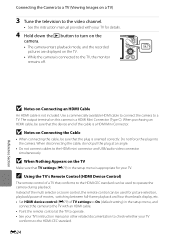
...to the HDMI-CEC standard. Connecting the Camera to a TV (Viewing Images on a TV) 3 Tune the television to the video channel. • See the instruction manual provided with an HDMI cable. • Point the remote control at an angle. • Do not connect cables to the HDMI mini connector and USB... cable is a HDMI Mini Connector. When disconnecting the cable, do not pull the plug at the TV to operate. • See your TV's instruction manual or other related documentation to check whether your TV conforms to a TV. The output terminal on Connecting an HDMI Cable An HDMI cable is oriented...
...to the HDMI-CEC standard. Connecting the Camera to a TV (Viewing Images on a TV) 3 Tune the television to the video channel. • See the instruction manual provided with an HDMI cable. • Point the remote control at an angle. • Do not connect cables to the HDMI mini connector and USB... cable is a HDMI Mini Connector. When disconnecting the cable, do not pull the plug at the TV to operate. • See your TV's instruction manual or other related documentation to check whether your TV conforms to a TV. The output terminal on Connecting an HDMI Cable An HDMI cable is oriented...
Reference Manual
Page 153
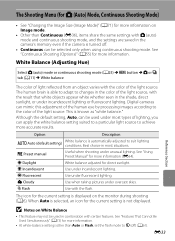
...current setting is known as "white balance." See "Features That Cannot Be Used Simultaneously" (A73) for more information. b Preset manual Useful when shooting under fluorescent lighting. Digital cameras can mimic this adjustment of the human eye by processing images according to changes in...varies with the flash. Although the default setting, Auto, can be used under incandescent lighting or fluorescent lighting. See "Using Preset Manual" for more accurate results. This is displayed on White Balance • This feature may not be selected only when using continuous ...
...current setting is known as "white balance." See "Features That Cannot Be Used Simultaneously" (A73) for more information. b Preset manual Useful when shooting under fluorescent lighting. Digital cameras can mimic this adjustment of the human eye by processing images according to changes in...varies with the flash. Although the default setting, Auto, can be used under incandescent lighting or fluorescent lighting. See "Using Preset Manual" for more accurate results. This is displayed on White Balance • This feature may not be selected only when using continuous ...
Reference Manual
Page 154
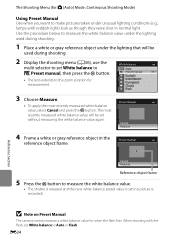
... shooting. 2 Display the shooting menu (A36), use the multi selector to the zoom position for measurement. White balance Auto Preset manual Daylight Incandescent Fluorescent Cloudy Flash 3 Choose Measure. • To apply the most recently measured white balance value will be set White balance...white or gray reference object in normal light. The most recently measured white balance value, select Cancel and press the k button. Preset manual Reference Section Cancel Measure Reference object frame 5 Press the k button to Auto or Flash. Use the procedure below to measure the white...
... shooting. 2 Display the shooting menu (A36), use the multi selector to the zoom position for measurement. White balance Auto Preset manual Daylight Incandescent Fluorescent Cloudy Flash 3 Choose Measure. • To apply the most recently measured white balance value will be set White balance...white or gray reference object in normal light. The most recently measured white balance value, select Cancel and press the k button. Preset manual Reference Section Cancel Measure Reference object frame 5 Press the k button to Auto or Flash. Use the procedure below to measure the white...
Reference Manual
Page 158
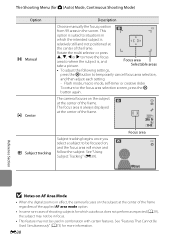
... subject at the center of the frame. See "Features That Cannot Be Used Simultaneously" (A73) for A (Auto) Mode, Continuous Shooting Mode) Option x Manual y Center s Subject tracking Description Choose manually the focus position from 99 areas in the screen. The Shooting Menu (for more information. The camera focuses on , and the focus area...
... subject at the center of the frame. See "Features That Cannot Be Used Simultaneously" (A73) for A (Auto) Mode, Continuous Shooting Mode) Option x Manual y Center s Subject tracking Description Choose manually the focus position from 99 areas in the screen. The Shooting Menu (for more information. The camera focuses on , and the focus area...
Reference Manual
Page 159
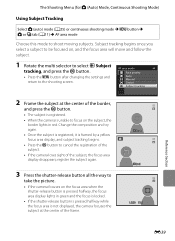
... (A25) or continuous shooting mode M d button M A or C tab (A11) M AF area mode Choose this mode to the shooting screen. AF area mode Face priority Auto Manual Center Subject tracking 2 Frame the subject at the center of the border, and press the k button. • The subject is registered. • When the camera...
... (A25) or continuous shooting mode M d button M A or C tab (A11) M AF area mode Choose this mode to the shooting screen. AF area mode Face priority Auto Manual Center Subject tracking 2 Frame the subject at the center of the border, and press the k button. • The subject is registered. • When the camera...
Reference Manual
Page 160
... not perform as expected (A29), the subject may not be in focus despite the fact that look alike, the camera may not be able to Manual or Center, or try shooting with moving quickly, when there is not available. • Set the zoom position, flash mode, creative slider, or menu settings...
... not perform as expected (A29), the subject may not be in focus despite the fact that look alike, the camera may not be able to Manual or Center, or try shooting with moving quickly, when there is not available. • Set the zoom position, flash mode, creative slider, or menu settings...
Reference Manual
Page 203
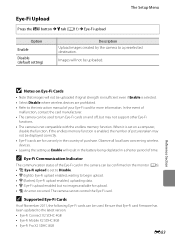
.... uploading data. • y: Eye-Fi upload enabled but may not be uploaded if signal strength is insufficient even if Enable is set to the instruction manual of pictures taken may not support other Eye-Fi functions. • The camera is set on a computer, disable the function. Be sure that images will...
.... uploading data. • y: Eye-Fi upload enabled but may not be uploaded if signal strength is insufficient even if Enable is set to the instruction manual of pictures taken may not support other Eye-Fi functions. • The camera is set on a computer, disable the function. Be sure that images will...
Reference Manual
Page 207
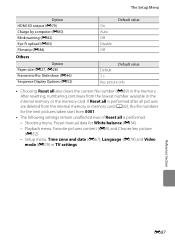
Playback menu: Favorite pictures content (E9), and Choose key picture (E52) - Shooting menu: Preset manual data for the next pictures taken start from the lowest number available in the internal memory or the memory card. The Setup Menu Option HDMI ...
Playback menu: Favorite pictures content (E9), and Choose key picture (E52) - Shooting menu: Preset manual data for the next pictures taken start from the lowest number available in the internal memory or the memory card. The Setup Menu Option HDMI ...


