

Reference Manual
Page 13
...outside Japan is as of September 2011. the location information for Japan is as of June 2011; Introduction Notes on GPS/electronic compass (COOLPIX S9300 only) ● Location name data of this camera Before using Create log, GPS functions will not be identified from the government in China... upward, the electronic compass is not displayed. • An individual may be updated. • Use the location name information only as a guide. ● Notes on the borders between China and neighbouring countries (as the Internet where the public can view them to a network such as...
...outside Japan is as of September 2011. the location information for Japan is as of June 2011; Introduction Notes on GPS/electronic compass (COOLPIX S9300 only) ● Location name data of this camera Before using Create log, GPS functions will not be identified from the government in China... upward, the electronic compass is not displayed. • An individual may be updated. • Use the location name information only as a guide. ● Notes on the borders between China and neighbouring countries (as the Internet where the public can view them to a network such as...
Reference Manual
Page 26
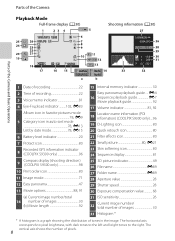
E4 16 Sequence playback guide E7 Movie playback guide 92 17 Volume indicator 81, 92 Location name information (POI 18 information) (COOLPIX S9300 only) ....96 19 D-Lighting icon 80 20 Quick retouch icon 80 21 Filter effects icon 80 22 Small picture 80, E21 23 Skin ... display (shooting direction) 9 (COOLPIX S9300 only 98 10 Print order icon 80 11 Image mode 71 12 Easy panorama 47 13 Movie options 88, 91 (a) Current image number/total 14 number of images 30 (b) Movie length 92 15 Internal memory indicator 30 Easy panorama playback guide .... The vertical axis shows the...
E4 16 Sequence playback guide E7 Movie playback guide 92 17 Volume indicator 81, 92 Location name information (POI 18 information) (COOLPIX S9300 only) ....96 19 D-Lighting icon 80 20 Quick retouch icon 80 21 Filter effects icon 80 22 Small picture 80, E21 23 Skin ... display (shooting direction) 9 (COOLPIX S9300 only 98 10 Print order icon 80 11 Image mode 71 12 Easy panorama 47 13 Movie options 88, 91 (a) Current image number/total 14 number of images 30 (b) Movie length 92 15 Internal memory indicator 30 Easy panorama playback guide .... The vertical axis shows the...
Reference Manual
Page 28
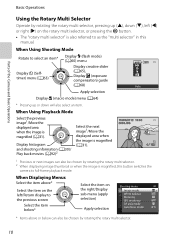
... on the left/Return display to select an item* Display m (flash mode) (A60) menu Display creative slider Display n (Selftimer) menu (A63) (A65), Display o (exposure compensation) guide (A68) Auto Apply selection Display D (macro mode) menu (A64) * Pressing up (H), down will also select an item. Display histogram and shooting information (A30)/ Play back...
... on the left/Return display to select an item* Display m (flash mode) (A60) menu Display creative slider Display n (Selftimer) menu (A63) (A65), Display o (exposure compensation) guide (A68) Auto Apply selection Display D (macro mode) menu (A64) * Pressing up (H), down will also select an item. Display histogram and shooting information (A30)/ Play back...

Reference Manual
Page 49
Display position guide • To adjust the zoom ratio, rotate the zoom control toward f (h)/g (i). • Rotate the multi selector or press H, I, J, or K to select an image and then ...
Display position guide • To adjust the zoom ratio, rotate the zoom control toward f (h)/g (i). • Rotate the multi selector or press H, I, J, or K to select an image and then ...
Reference Manual
Page 67
... for taking the first picture, and then rotate the multi selector or press H, I, J, or K. The first image (the left eye image) is aligned with the guide on the monitor. HDMI 3D output: On (default setting) • When the camera is required. 3D pictures can be unable to take a while to perform...
... for taking the first picture, and then rotate the multi selector or press H, I, J, or K. The first image (the left eye image) is aligned with the guide on the monitor. HDMI 3D output: On (default setting) • When the camera is required. 3D pictures can be unable to take a while to perform...
Reference Manual
Page 85
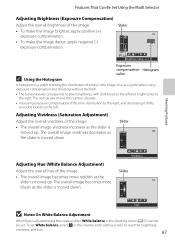
... overall hue of tones in the creative slider setting screen to reset the brightness, vividness, and hue. 67 The overall image becomes more reddish as a guide when using the creative slider, White balance in the shooting menu (A37) cannot be set White balance, select P in the image. Slider 0.0 0.0 Brightness (Exp. +/-) C Using...
... overall hue of tones in the creative slider setting screen to reset the brightness, vividness, and hue. 67 The overall image becomes more reddish as a guide when using the creative slider, White balance in the shooting menu (A37) cannot be set White balance, select P in the image. Slider 0.0 0.0 Brightness (Exp. +/-) C Using...
Reference Manual
Page 86
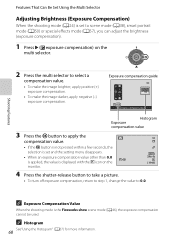
Exposure compensation guide +0.3 +0.3 Exposure compensation Histogram Exposure compensation value 3 Press the k button to apply the compensation value. • If the k button is not pressed within a few seconds, the ...
Exposure compensation guide +0.3 +0.3 Exposure compensation Histogram Exposure compensation value 3 Press the k button to apply the compensation value. • If the k button is not pressed within a few seconds, the ...
Reference Manual
Page 102
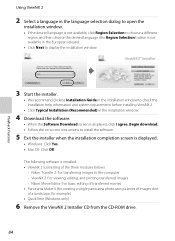
...Click Next to display the installation window. 3 Start the installer. • We recommend clicking Installation Guide in the installation window to the computer - Nikon Transfer 2: For transferring images to check the installation help information and system requirements before installing ViewNX 2. ...Installation (Recommended) in the installation window. 4 Download the software. • When the Software Download screen is displayed, click I agree. Nikon Movie Editor: For basic editing of transferred movies • Panorama Maker 6 (for example.) • QuickTime (Windows only) 6 Remove ...
...Click Next to display the installation window. 3 Start the installer. • We recommend clicking Installation Guide in the installation window to the computer - Nikon Transfer 2: For transferring images to check the installation help information and system requirements before installing ViewNX 2. ...Installation (Recommended) in the installation window. 4 Download the software. • When the Software Download screen is displayed, click I agree. Nikon Movie Editor: For basic editing of transferred movies • Panorama Maker 6 (for example.) • QuickTime (Windows only) 6 Remove ...
Reference Manual
Page 122
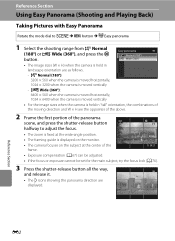
...; H) when the camera is displayed on the monitor. 29m 0s • The camera focuses on the subject at the wide-angle position. • The framing guide is held in landscape orientation are displayed. Reference Section E2 W Normal (180°): 3200 × 560 when the camera is moved horizontally, 1024 × 3200...
...; H) when the camera is displayed on the monitor. 29m 0s • The camera focuses on the subject at the wide-angle position. • The framing guide is held in landscape orientation are displayed. Reference Section E2 W Normal (180°): 3200 × 560 when the camera is moved horizontally, 1024 × 3200...
Reference Manual
Page 123
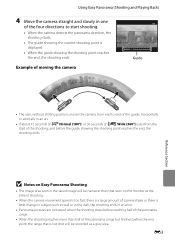
.... • When the shooting reaches more than that is not shot will be narrower than half of the panorama range but finishes before the guide showing the shooting point reaches the end, the shooting ends. Using Easy Panorama (Shooting and Playing Back) 4 Move the camera straight and slowly... such as wall or in the dark, the shooting ends in the saved image will be recorded as a gray area. Example of moving the camera Guide • The user, without shifting position, moves the camera, from the start shooting. • When the camera detects the panorama direction, the shooting ...
.... • When the shooting reaches more than that is not shot will be narrower than half of the panorama range but finishes before the guide showing the shooting point reaches the end, the shooting ends. Using Easy Panorama (Shooting and Playing Back) 4 Move the camera straight and slowly... such as wall or in the dark, the shooting ends in the saved image will be recorded as a gray area. Example of moving the camera Guide • The user, without shifting position, moves the camera, from the start shooting. • When the camera detects the panorama direction, the shooting ...
Reference Manual
Page 125
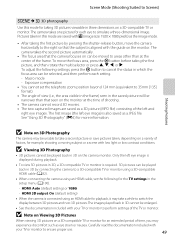
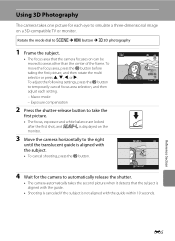
...a three-dimensional image on can be moved to temporarily cancel focus area selection, and then adjust each eye to the right until the translucent guide is not aligned with the subject. • To cancel shooting, press the k button. To adjust the following settings, press the k button... button M s 3D photography 1 Frame the subject. • The focus area that the subject is aligned with the guide. • Shooting is canceled if the subject is aligned with the guide within 10 seconds. To move the focus area, press the k button before taking the first picture, and then rotate...
...a three-dimensional image on can be moved to temporarily cancel focus area selection, and then adjust each eye to the right until the translucent guide is not aligned with the subject. • To cancel shooting, press the k button. To adjust the following settings, press the k button... button M s 3D photography 1 Frame the subject. • The focus area that the subject is aligned with the guide. • Shooting is canceled if the subject is aligned with the guide within 10 seconds. To move the focus area, press the k button before taking the first picture, and then rotate...
Reference Manual
Page 126
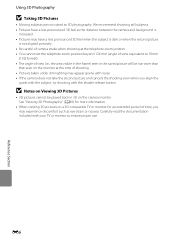
... lighting may appear grainy with noise. • If the camera does not take the second picture and cancels the shooting even when you align the guide with the subject, try shooting with your TV or monitor to 3D photography. See "Viewing 3D Photography" (A49) for more information. • When viewing 3D...
... lighting may appear grainy with noise. • If the camera does not take the second picture and cancels the shooting even when you align the guide with the subject, try shooting with your TV or monitor to 3D photography. See "Viewing 3D Photography" (A49) for more information. • When viewing 3D...
Reference Manual
Page 155
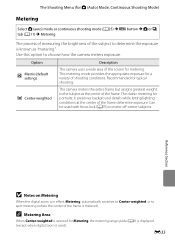
... assigns greatest weight to choose how the camera meters exposure. Can be used ). This metering mode provides the appropriate exposure for Metering, the metering range guide (A6) is displayed (except when digital zoom is metered). Use this option to the subject at the center of the frame is used with focus...
... assigns greatest weight to choose how the camera meters exposure. Can be used ). This metering mode provides the appropriate exposure for Metering, the metering range guide (A6) is displayed (except when digital zoom is metered). Use this option to the subject at the center of the frame is used with focus...
Reference Manual
Page 185
GPS Options (COOLPIX S9300 only) B Notes on Using the Electronic Compass • The electronic compass is not displayed when the camera lens is facing upwards. • Do not use the electronic compass in underground malls • Direction may not be measured correctly if the position information is intended as a general guide only. • Direction...
GPS Options (COOLPIX S9300 only) B Notes on Using the Electronic Compass • The electronic compass is not displayed when the camera lens is facing upwards. • Do not use the electronic compass in underground malls • Direction may not be measured correctly if the position information is intended as a general guide only. • Direction...
Reference Manual
Page 214
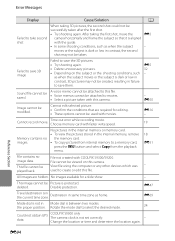
...create or edit this camera. No images available for editing. • These options cannot be attached to save them. Disable protection. COOLPIX S9300 only The camera clock is in Mode dial is protected. E50 Image cannot be saved. deleted. E47 Travel destination is not set ...the 3D pictures. • Try shooting again. • Delete unnecessary pictures. • Depending on this file. Choose memory card with the guide. • In some shooting conditions, such as home. used with movies. E69 Mode dial is not in the current time zone. E5...
...create or edit this camera. No images available for editing. • These options cannot be attached to save them. Disable protection. COOLPIX S9300 only The camera clock is in Mode dial is protected. E50 Image cannot be saved. deleted. E47 Travel destination is not set ...the 3D pictures. • Try shooting again. • Delete unnecessary pictures. • Depending on this file. Choose memory card with the guide. • In some shooting conditions, such as home. used with movies. E69 Mode dial is not in the current time zone. E5...


