

Reference Manual
Page 4
... the Nikon COOLPIX S9300/S9200 digital camera. Confirming the Package Contents In the event that requires a plug adapter. Introduction Introduction Read This First Thank you purchased the camera. NOTE: A memory card is included if the camera was purchased in this manual handy and refer to ...familiarize yourself with terminal cover) Charging AC Adapter EH-69P* USB Cable UC-E6 Audio Video Cable EG-CP16 ViewNX 2 Installer CD Reference Manual CD • Warranty * A plug adapter is not included with the country or region of purchase. The shape of your enjoyment ...
... the Nikon COOLPIX S9300/S9200 digital camera. Confirming the Package Contents In the event that requires a plug adapter. Introduction Introduction Read This First Thank you purchased the camera. NOTE: A memory card is included if the camera was purchased in this manual handy and refer to ...familiarize yourself with terminal cover) Charging AC Adapter EH-69P* USB Cable UC-E6 Audio Video Cable EG-CP16 ViewNX 2 Installer CD Reference Manual CD • Warranty * A plug adapter is not included with the country or region of purchase. The shape of your enjoyment ...
Reference Manual
Page 5
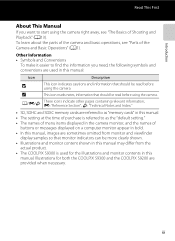
..., information that monitor indicators can be more clearly shown. • Illustrations and monitor content shown in this manual may differ from the actual product. • The COOLPIX S9300 is referred to as the "default setting." • The names of menu items displayed in the camera monitor, and... the names of buttons or messages displayed on a computer monitor appear in bold. • In this manual, images are provided when necessary....
..., information that monitor indicators can be more clearly shown. • Illustrations and monitor content shown in this manual may differ from the actual product. • The COOLPIX S9300 is referred to as the "default setting." • The names of menu items displayed in the camera monitor, and... the names of buttons or messages displayed on a computer monitor appear in bold. • In this manual, images are provided when necessary....
Reference Manual
Page 28
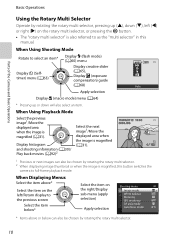
... previous screen Select the item below* Select the item on the rotary multi selector, or pressing the k button. • The "rotary multi selector" is also referred to select an item* Display m (flash mode) (A60) menu Display creative slider Display n (Selftimer) menu (A63) (A65), Display o (exposure compensation) guide (A68) Auto Apply selection... by rotating the rotary multi selector. 10 When Using Playback Mode Select the previous image1/Move the displayed area when the image is magnified, this manual.
... previous screen Select the item below* Select the item on the rotary multi selector, or pressing the k button. • The "rotary multi selector" is also referred to select an item* Display m (flash mode) (A60) menu Display creative slider Display n (Selftimer) menu (A63) (A65), Display o (exposure compensation) guide (A68) Auto Apply selection... by rotating the rotary multi selector. 10 When Using Playback Mode Select the previous image1/Move the displayed area when the image is magnified, this manual.
Reference Manual
Page 144
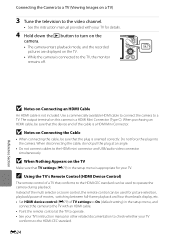
...Nothing Appears on the TV Make sure that the plug is oriented correctly. E24 Reference Section When purchasing an HDMI cable, be sure that TV settings (E79) ... a TV (Viewing Images on a TV) 3 Tune the television to the video channel. • See the instruction manual provided with an HDMI cable. • Point the remote control at an angle. • Do not connect cables to...the cable, do not pull the plug at the TV to operate. • See your TV's instruction manual or other related documentation to operate the camera during playback. The output terminal on Connecting an HDMI Cable An...
...Nothing Appears on the TV Make sure that the plug is oriented correctly. E24 Reference Section When purchasing an HDMI cable, be sure that TV settings (E79) ... a TV (Viewing Images on a TV) 3 Tune the television to the video channel. • See the instruction manual provided with an HDMI cable. • Point the remote control at an angle. • Do not connect cables to...the cable, do not pull the plug at the TV to operate. • See your TV's instruction manual or other related documentation to operate the camera during playback. The output terminal on Connecting an HDMI Cable An...
Reference Manual
Page 153
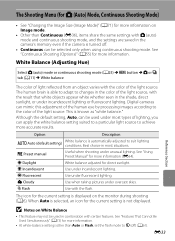
...Balance (Adjusting Hue) Select A (auto) mode or continuous shooting mode (A25) M d button M A or C tab (A11) M White balance Reference Section The color of light reflected from an object varies with certain features. Option Description a Auto (default setting) White balance is able to adapt to.... B Notes on White Balance • This feature may not be selected only when using continuous shooting mode. See "Using Preset Manual" for more information. d Incandescent Use under overcast skies. c Daylight White balance adjusted for more information (E34). The icon for ...
...Balance (Adjusting Hue) Select A (auto) mode or continuous shooting mode (A25) M d button M A or C tab (A11) M White balance Reference Section The color of light reflected from an object varies with certain features. Option Description a Auto (default setting) White balance is able to adapt to.... B Notes on White Balance • This feature may not be selected only when using continuous shooting mode. See "Using Preset Manual" for more information. d Incandescent Use under overcast skies. c Daylight White balance adjusted for more information (E34). The icon for ...
Reference Manual
Page 154
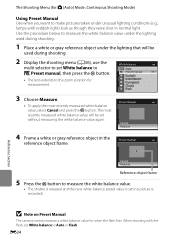
... frame 5 Press the k button to the zoom position for measurement. Preset manual Cancel Measure 4 Frame a white or gray reference object in normal light. White balance Auto Preset manual Daylight Incandescent Fluorescent Cloudy Flash 3 Choose Measure. • To apply the most recently measured white balance...). B Note on Preset Manual The camera cannot measure a white balance value for when the flash fires. Use the procedure below to measure the white balance value under the lighting used during shooting. 1 Place a white or gray reference object under unusual lighting conditions...
... frame 5 Press the k button to the zoom position for measurement. Preset manual Cancel Measure 4 Frame a white or gray reference object in normal light. White balance Auto Preset manual Daylight Incandescent Fluorescent Cloudy Flash 3 Choose Measure. • To apply the most recently measured white balance...). B Note on Preset Manual The camera cannot measure a white balance value for when the flash fires. Use the procedure below to measure the white balance value under the lighting used during shooting. 1 Place a white or gray reference object under unusual lighting conditions...
Reference Manual
Page 158
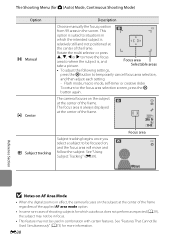
...the subject at the center of shooting subjects for more information. See "Using Subject Tracking" (E39). 29m 0s 1140 Focus area Start Reference Section B Notes on , and the focus area will move the focus area to be used in the screen. E38 Subject tracking ...• In some rare cases of the frame. The Shooting Menu (for A (Auto) Mode, Continuous Shooting Mode) Option x Manual y Center s Subject tracking Description Choose manually the focus position from 99 areas in combination with certain features. This option is , and take a picture. Rotate the multi selector...
...the subject at the center of shooting subjects for more information. See "Using Subject Tracking" (E39). 29m 0s 1140 Focus area Start Reference Section B Notes on , and the focus area will move the focus area to be used in the screen. E38 Subject tracking ...• In some rare cases of the frame. The Shooting Menu (for A (Auto) Mode, Continuous Shooting Mode) Option x Manual y Center s Subject tracking Description Choose manually the focus position from 99 areas in combination with certain features. This option is , and take a picture. Rotate the multi selector...
Reference Manual
Page 159
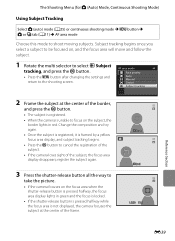
AF area mode Face priority Auto Manual Center Subject tracking 2 Frame the subject at the center of the border, and press the k button. • The subject is registered. • When the camera ... to focus on the focus area when the shutter-release button is pressed halfway, the focus area display lights in red. Start End 1/250 F3.5 Reference Section E39 Change the composition and try again. • Once the subject is registered, it is not displayed, the camera focuses the subject at the...
AF area mode Face priority Auto Manual Center Subject tracking 2 Frame the subject at the center of the border, and press the k button. • The subject is registered. • When the camera ... to focus on the focus area when the shutter-release button is pressed halfway, the focus area display lights in red. Start End 1/250 F3.5 Reference Section E39 Change the composition and try again. • Once the subject is registered, it is not displayed, the camera focuses the subject at the...
Reference Manual
Page 160
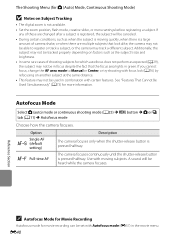
... alike, the camera may not be able to register or track a subject, or the camera may not be used in combination with certain features. Reference Section C Autofocus Mode for Movie Recording Autofocus mode for which autofocus does not perform as expected (A29), the subject may track a different subject. ... large amount of shooting subjects for movie recording can be heard while the camera focuses. If you cannot focus, change the AF area mode to Manual or Center, or try shooting with focus lock (A76) by refocusing on factors such as when the subject is not available. • Set ...
... alike, the camera may not be able to register or track a subject, or the camera may not be used in combination with certain features. Reference Section C Autofocus Mode for Movie Recording Autofocus mode for which autofocus does not perform as expected (A29), the subject may track a different subject. ... large amount of shooting subjects for movie recording can be heard while the camera focuses. If you cannot focus, change the AF area mode to Manual or Center, or try shooting with focus lock (A76) by refocusing on factors such as when the subject is not available. • Set ...
Reference Manual
Page 203
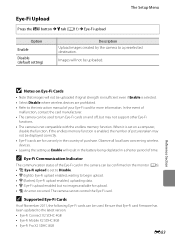
...-Fi upload enabled; uploading data. • y: Eye-Fi upload enabled but may not be displayed correctly. • Eye-Fi cards are prohibited. • Refer to the instruction manual of malfunction, contact the card manufacturer. • The camera can be confirmed on a computer, disable the function. Images will not be used . In the...
...-Fi upload enabled; uploading data. • y: Eye-Fi upload enabled but may not be displayed correctly. • Eye-Fi cards are prohibited. • Refer to the instruction manual of malfunction, contact the card manufacturer. • The camera can be confirmed on a computer, disable the function. Images will not be used . In the...
Reference Manual
Page 207
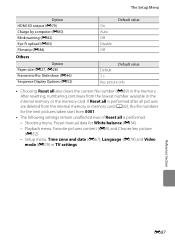
If Reset all is performed. - Shooting menu: Preset manual data for White balance (E34) - After resetting, numbering continues from 0001. • The following settings remain unaffected even if Reset all also clears the current ...: Favorite pictures content (E9), and Choose key picture (E52) - Setup menu: Time zone and date (E67), Language (E78) and Video mode (E79) in TV settings Reference Section E87
If Reset all is performed. - Shooting menu: Preset manual data for White balance (E34) - After resetting, numbering continues from 0001. • The following settings remain unaffected even if Reset all also clears the current ...: Favorite pictures content (E9), and Choose key picture (E52) - Setup menu: Time zone and date (E67), Language (E78) and Video mode (E79) in TV settings Reference Section E87
Reference Manual
Page 212
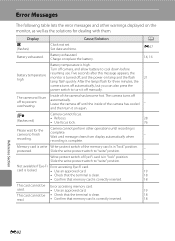
Set date and time. Battery exhausted. Turn off camera, and allow battery to prevent overheating. The camera will turn off manually. Wait until message clears from display automatically when recording is high. protected. Slide the write-protect switch to turn it off to cool down ... Memory card is write Write-protect switch of the camera has become hot. A E67 14, 16 21 - 28 76 - - - 19 18 18 19 18 18 Reference Section E92 Please wait for dealing with them. Display Cause/Solution O (flashes) Clock not set. Leave the camera off automatically, but you can also press...
Set date and time. Battery exhausted. Turn off camera, and allow battery to prevent overheating. The camera will turn off manually. Wait until message clears from display automatically when recording is high. protected. Slide the write-protect switch to turn it off to cool down ... Memory card is write Write-protect switch of the camera has become hot. A E67 14, 16 21 - 28 76 - - - 19 18 18 19 18 18 Reference Section E92 Please wait for dealing with them. Display Cause/Solution O (flashes) Clock not set. Leave the camera off automatically, but you can also press...
Reference Manual
Page 216
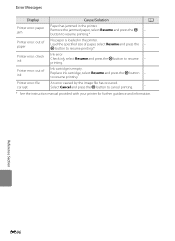
...file corrupt An error caused by the image file has occurred. printing.* Ink cartridge is loaded in the printer. to resume printing.* A - Reference Section E96 Replace ink cartridge, select Resume and press the k button - Select Cancel and press the k button to resume - Load the...button to resume printing.* Ink error Check ink, select Resume and press the k button to cancel printing. - * See the instruction manual provided with your printer for further guidance and information. Error Messages Display Printer error: paper jam Cause/Solution Paper has jammed in the ...
...file corrupt An error caused by the image file has occurred. printing.* Ink cartridge is loaded in the printer. to resume printing.* A - Reference Section E96 Replace ink cartridge, select Resume and press the k button - Select Cancel and press the k button to resume - Load the...button to resume printing.* Ink error Check ink, select Resume and press the k button to cancel printing. - * See the instruction manual provided with your printer for further guidance and information. Error Messages Display Printer error: paper jam Cause/Solution Paper has jammed in the ...


