
Reference Manual
Page 5
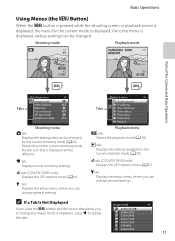
...setting." • The names of menu items displayed in the camera monitor, and the names of the Camera and Basic Operations" (A1). C This icon marks notes, information that should be read before using the camera. A/E/F These icons indicate other pages containing relevant information; Illustrations for both the COOLPIX S9300 and the COOLPIX... shown. • Illustrations and monitor content shown in this manual may differ from the actual product. • The COOLPIX S9300 is used in this manual. E: "Reference Section", F: "Technical Notes and Index." • SD, SDHC and...
...setting." • The names of menu items displayed in the camera monitor, and the names of the Camera and Basic Operations" (A1). C This icon marks notes, information that should be read before using the camera. A/E/F These icons indicate other pages containing relevant information; Illustrations for both the COOLPIX S9300 and the COOLPIX... shown. • Illustrations and monitor content shown in this manual may differ from the actual product. • The COOLPIX S9300 is used in this manual. E: "Reference Section", F: "Technical Notes and Index." • SD, SDHC and...
Reference Manual
Page 7
... storage devices such as other device may be provided for business use this product for the Select an image option in the Welcome screen setting (A100). Be sure to also replace any pictures selected for the purpose of making illegal copies or to be punishable by law. •..., coins, securities, government bonds or local government bonds, even if such copies or reproductions are circulated in a foreign country is prohibited. For the COOLPIX S9300, the log data saved on copies or reproductions of securities issued by means of a scanner, digital camera or other data. Do not use by...
... storage devices such as other device may be provided for business use this product for the Select an image option in the Welcome screen setting (A100). Be sure to also replace any pictures selected for the purpose of making illegal copies or to be punishable by law. •..., coins, securities, government bonds or local government bonds, even if such copies or reproductions are circulated in a foreign country is prohibited. For the COOLPIX S9300, the log data saved on copies or reproductions of securities issued by means of a scanner, digital camera or other data. Do not use by...
Reference Manual
Page 10
... flash close to your fingers or other objects are still maturing, consult a pediatrician or ophthalmologist prior to OFF (COOLPIX S9300). Also, before boarding an airplane, set the GPS tracking information recording function to use only the cables provided or sold by the lens cover or other display.... In the case of children whose visual systems are not pinched by Nikon for extended periods, whether on a television, ...
... flash close to your fingers or other objects are still maturing, consult a pediatrician or ophthalmologist prior to OFF (COOLPIX S9300). Also, before boarding an airplane, set the GPS tracking information recording function to use only the cables provided or sold by the lens cover or other display.... In the case of children whose visual systems are not pinched by Nikon for extended periods, whether on a television, ...

Reference Manual
Page 13
... information only as a guide. ● Notes on use the camera for outside Japan is prohibited during airplane takeoffs and landings or inside a hospital, set the Record GPS data to a network such as the Internet where the public can view them to Off and turn off . • The electromagnetic ... GPS options menu is On, and a log is recorded using the GPS function, make sure to read "USER LICENSE AGREEMENT FOR LOCATION NAME DATA (COOLPIX S9300 only)" (F7) and agree to confirm whether there is not displayed. • An individual may not function properly in China and on GPS/electronic...
... information only as a guide. ● Notes on use the camera for outside Japan is prohibited during airplane takeoffs and landings or inside a hospital, set the Record GPS data to a network such as the Internet where the public can view them to Off and turn off . • The electromagnetic ... GPS options menu is On, and a log is recorded using the GPS function, make sure to read "USER LICENSE AGREEMENT FOR LOCATION NAME DATA (COOLPIX S9300 only)" (F7) and agree to confirm whether there is not displayed. • An individual may not function properly in China and on GPS/electronic...
Reference Manual
Page 14
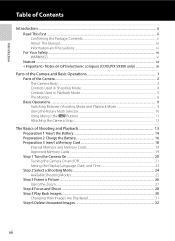
...Package Contents...ii About This Manual...iii Information and Precautions...iv For Your Safety...vi WARNINGS ...vi Notices ...ix Notes on GPS/electronic compass (COOLPIX S9300 only xi Parts of the Camera and Basic Operations 1 Parts of the Camera ...2 The Camera Body...2 Controls Used in Shooting Mode ...4 ... 18 Internal Memory and Memory Cards...19 Approved Memory Cards ...19 Step 1 Turn the Camera On ...20 Turning the Camera On and Off...21 Setting the Display Language, Date, and Time 22 Step 2 Select a Shooting Mode...24 Available Shooting Modes...25 Step 3 Frame a Picture...26 Using...
...Package Contents...ii About This Manual...iii Information and Precautions...iv For Your Safety...vi WARNINGS ...vi Notices ...ix Notes on GPS/electronic compass (COOLPIX S9300 only xi Parts of the Camera and Basic Operations 1 Parts of the Camera ...2 The Camera Body...2 Controls Used in Shooting Mode ...4 ... 18 Internal Memory and Memory Cards...19 Approved Memory Cards ...19 Step 1 Turn the Camera On ...20 Turning the Camera On and Off...21 Setting the Display Language, Date, and Time 22 Step 2 Select a Shooting Mode...24 Available Shooting Modes...25 Step 3 Frame a Picture...26 Using...
Reference Manual
Page 15
...Menu 55 Special Effects Mode (Applying Effects When Shooting 57 Characteristics of Each Special Effect ...57 Changing Special Effects Mode Settings 58 Features That Can Be Set Using the Multi Selector 59 Available Functions ...59 Using the Flash (Flash Modes) ...60 Using the Self-timer ...), Vividness, and Hue (Creative Slider) ...65 Adjusting Brightness (Exposure Compensation 68 List of the Default Settings...69 Changing the Image Size (Image Mode 71 Image Mode Settings (Image Size and Quality 71 Features That Cannot Be Used Simultaneously 73 Focusing on the Subject...74 Using...
...Menu 55 Special Effects Mode (Applying Effects When Shooting 57 Characteristics of Each Special Effect ...57 Changing Special Effects Mode Settings 58 Features That Can Be Set Using the Multi Selector 59 Available Functions ...59 Using the Flash (Flash Modes) ...60 Using the Self-timer ...), Vividness, and Hue (Creative Slider) ...65 Adjusting Brightness (Exposure Compensation 68 List of the Default Settings...69 Changing the Image Size (Image Mode 71 Image Mode Settings (Image Size and Quality 71 Features That Cannot Be Used Simultaneously 73 Focusing on the Subject...74 Using...
Reference Manual
Page 16
... ...86 Recording and Playing Back Movies 87 Recording Movies ...88 Changing Movie Recording Settings (Movie Menu 91 Playing Back Movies...92 Using GPS/Electronic Compass (COOLPIX S9300 only 93 Starting GPS Data Recording...94 Changing the GPS or Electronic Compass Settings (GPS Options Menu 97 General Camera Setup...99 The Setup Menu ...100 Reference...
... ...86 Recording and Playing Back Movies 87 Recording Movies ...88 Changing Movie Recording Settings (Movie Menu 91 Playing Back Movies...92 Using GPS/Electronic Compass (COOLPIX S9300 only 93 Starting GPS Data Recording...94 Changing the GPS or Electronic Compass Settings (GPS Options Menu 97 General Camera Setup...99 The Setup Menu ...100 Reference...
Reference Manual
Page 17
... with HS Footage...E54 Recording Movies in Slow Motion and Fast Motion (HS Movie E55 Autofocus Mode...E57 Wind Noise Reduction...E57 GPS Options (COOLPIX S9300 only E58 GPS Settings...E58 Points of Interest (POI) (Recording and Displaying Location Name Information E60 Create Log (Record the Log of Moving Information E61 View Log...
... with HS Footage...E54 Recording Movies in Slow Motion and Fast Motion (HS Movie E55 Autofocus Mode...E57 Wind Noise Reduction...E57 GPS Options (COOLPIX S9300 only E58 GPS Settings...E58 Points of Interest (POI) (Recording and Displaying Location Name Information E60 Create Log (Record the Log of Moving Information E61 View Log...
Reference Manual
Page 18
... Date and Time on Pictures E72 Vibration Reduction ...E73 Motion Detection...E74 AF Assist...E75 Digital Zoom...E76 Sound Settings...E77 Auto Off ...E77 Format Memory/Format Card...E78 Language...E78 TV Settings ...E79 Charge by Computer...E80 Blink Warning ...E82 Eye-Fi Upload ...E83 Filmstrip ...E84 Reset All ...E84 Firmware... Charging AC Adapter ...F4 The Memory Cards...F5 Caring for the Camera ...F6 Cleaning ...F6 Storage ...F6 USER LICENSE AGREEMENT FOR LOCATION NAME DATA (COOLPIX S9300 only).... F7 Troubleshooting...F11 Specifications ...F19 Supported Standards ...F22 Index ...F23 xvi
... Date and Time on Pictures E72 Vibration Reduction ...E73 Motion Detection...E74 AF Assist...E75 Digital Zoom...E76 Sound Settings...E77 Auto Off ...E77 Format Memory/Format Card...E78 Language...E78 TV Settings ...E79 Charge by Computer...E80 Blink Warning ...E82 Eye-Fi Upload ...E83 Filmstrip ...E84 Reset All ...E84 Firmware... Charging AC Adapter ...F4 The Memory Cards...F5 Caring for the Camera ...F6 Cleaning ...F6 Storage ...F6 USER LICENSE AGREEMENT FOR LOCATION NAME DATA (COOLPIX S9300 only).... F7 Troubleshooting...F11 Specifications ...F19 Supported Standards ...F22 Index ...F23 xvi
Reference Manual
Page 22
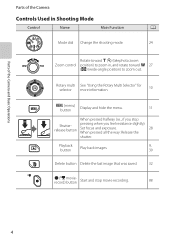
... the Rotary Multi Selector" for selector more information. 10 d (menu) button Display and hide the menu. 11 When pressed halfway (i.e., if you feel resistance slightly): Set focus and exposure. Parts of the Camera and Basic Operations Parts of the Camera Controls Used in Shooting Mode Control Name Main Function A Mode dial...
... the Rotary Multi Selector" for selector more information. 10 d (menu) button Display and hide the menu. 11 When pressed halfway (i.e., if you feel resistance slightly): Set focus and exposure. Parts of the Camera and Basic Operations Parts of the Camera Controls Used in Shooting Mode Control Name Main Function A Mode dial...
Reference Manual
Page 24
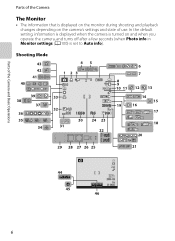
... 9999 29 28 27 26 25 14 15 16 17 18 20 21 44 45 29m 0s 1140 46 6 In the default setting, information is displayed when the camera is set to Auto info). Parts of the Camera and Basic Operations Parts of the Camera The Monitor • The information that is... monitor during shooting and playback changes depending on and when you operate the camera, and turns off after a few seconds (when Photo info in Monitor settings (A100) is turned on the camera...
... 9999 29 28 27 26 25 14 15 16 17 18 20 21 44 45 29m 0s 1140 46 6 In the default setting, information is displayed when the camera is set to Auto info). Parts of the Camera and Basic Operations Parts of the Camera The Monitor • The information that is... monitor during shooting and playback changes depending on and when you operate the camera, and turns off after a few seconds (when Photo info in Monitor settings (A100) is turned on the camera...
Reference Manual
Page 25
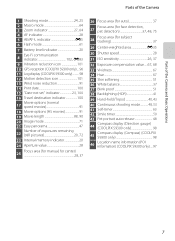
...-Fi communication 8 indicator 102, E83 9 Vibration reduction icon 101 10 GPS reception (COOLPIX S9300 only).....96 11 Log display (COOLPIX S9300 only 98 12 Motion detection icon 101 13 Wind noise reduction 91 14 Print date 100 15 "Date not set" indicator 23, 100 16 Travel destination indicator 100 Movie options (normal 17 speed... Continuous shooting mode 48, 53 41 Self-timer 63 42 Smile timer 50 43 Pet portrait auto release 48 Compass display (Direction gauge) 44 (COOLPIX S9300 only 98 Compass display (Compass) (COOLPIX 45 S9300 only 98 Location name information (POI 46 information...
...-Fi communication 8 indicator 102, E83 9 Vibration reduction icon 101 10 GPS reception (COOLPIX S9300 only).....96 11 Log display (COOLPIX S9300 only 98 12 Motion detection icon 101 13 Wind noise reduction 91 14 Print date 100 15 "Date not set" indicator 23, 100 16 Travel destination indicator 100 Movie options (normal 17 speed... Continuous shooting mode 48, 53 41 Self-timer 63 42 Smile timer 50 43 Pet portrait auto release 48 Compass display (Direction gauge) 44 (COOLPIX S9300 only 98 Compass display (Compass) (COOLPIX 45 S9300 only 98 Location name information (POI 46 information...
Reference Manual
Page 29
... and Basic Operations Tabs Shooting menu Image mode White balance Metering ISO sensitivity AF area mode Autofocus mode Shooting menu A tab: Displays the settings that can change general settings. z tab (COOLPIX S9300 only): Displays the GPS options menu (A97). C If a Tab Is Not Displayed Image mode If you 4608×3456 to change general...
... and Basic Operations Tabs Shooting menu Image mode White balance Metering ISO sensitivity AF area mode Autofocus mode Shooting menu A tab: Displays the settings that can change general settings. z tab (COOLPIX S9300 only): Displays the GPS options menu (A97). C If a Tab Is Not Displayed Image mode If you 4608×3456 to change general...
Reference Manual
Page 30
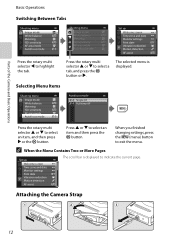
... or I to select an item and then press the k button. Press H or I to indicate the current page. When you finished changing settings, press the d (menu) button to highlight the tab. Parts of the Camera and Basic Operations Basic Operations Switching Between Tabs Shooting menu Image ... to exit the menu. Shooting menu Image mode White balance Metering ISO sensitivity AF area mode Autofocus mode Set up Welcome screen Time zone and date Monitor settings Print date Vibration reduction Motion detection AF assist The scroll bar is displayed. Attaching the Camera Strap 12...
... or I to select an item and then press the k button. Press H or I to indicate the current page. When you finished changing settings, press the d (menu) button to highlight the tab. Parts of the Camera and Basic Operations Basic Operations Switching Between Tabs Shooting menu Image ... to exit the menu. Shooting menu Image mode White balance Metering ISO sensitivity AF area mode Autofocus mode Set up Welcome screen Time zone and date Monitor settings Print date Vibration reduction Motion detection AF assist The scroll bar is displayed. Attaching the Camera Strap 12...
Reference Manual
Page 31
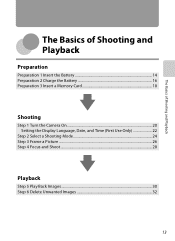
The Basics of Shooting and Playback The Basics of Shooting and Playback Preparation Preparation 1 Insert the Battery 14 Preparation 2 Charge the Battery 16 Preparation 3 Insert a Memory Card 18 Shooting Step 1 Turn the Camera On 20 Setting the Display Language, Date, and Time (First Use Only 22 Step 2 Select a Shooting Mode 24 Step 3 Frame a Picture ...26 Step 4 Focus and Shoot...28 Playback Step 5 Play Back Images ...30 Step 6 Delete Unwanted Images 32 13
The Basics of Shooting and Playback The Basics of Shooting and Playback Preparation Preparation 1 Insert the Battery 14 Preparation 2 Charge the Battery 16 Preparation 3 Insert a Memory Card 18 Shooting Step 1 Turn the Camera On 20 Setting the Display Language, Date, and Time (First Use Only 22 Step 2 Select a Shooting Mode 24 Step 3 Frame a Picture ...26 Step 4 Focus and Shoot...28 Playback Step 5 Play Back Images ...30 Step 6 Delete Unwanted Images 32 13
Reference Manual
Page 38
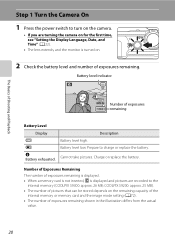
..."Setting the Display Language, Date, and Time" (A22). • The lens extends, and the monitor is displayed and pictures are recorded to charge or replace the battery. Description Battery level high. Battery level low. Charge or replace the battery. Prepare to the internal memory (COOLPIX S9300...: approx. 26 MB; Battery level indicator The Basics of Shooting and Playback 29m 0s Number of exposures remaining shown in the illustration differs from the actual value. 20 COOLPIX S9200: approx. 25 MB). • The...
..."Setting the Display Language, Date, and Time" (A22). • The lens extends, and the monitor is displayed and pictures are recorded to charge or replace the battery. Description Battery level high. Battery level low. Charge or replace the battery. Prepare to the internal memory (COOLPIX S9300...: approx. 26 MB; Battery level indicator The Basics of Shooting and Playback 29m 0s Number of exposures remaining shown in the illustration differs from the actual value. 20 COOLPIX S9200: approx. 25 MB). • The...
Reference Manual
Page 39
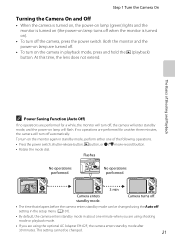
... operations. • Press the power switch, shutter-release button, c button, or b (e movie-record) button. • Rotate the mode dial. To turn off setting in the setup menu (A101). • By default, the camera enters standby mode in playback mode, press and hold the c (playback) button. This... setting cannot be changed . 21 At this time, the lens does not extend. Flashes No operations performed. Both the monitor and the power-on the...
... operations. • Press the power switch, shutter-release button, c button, or b (e movie-record) button. • Rotate the mode dial. To turn off setting in the setup menu (A101). • By default, the camera enters standby mode in playback mode, press and hold the c (playback) button. This... setting cannot be changed . 21 At this time, the lens does not extend. Flashes No operations performed. Both the monitor and the power-on the...
Reference Manual
Page 40
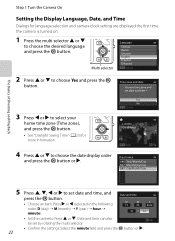
...(month) ➝ Y (year) ➝ hour ➝ minute). Date and time can also Edit be set date and time? Time zone and date Choose time zone and set by rotating the multi selector. • Confirm the settings: Select the minute field and press the k button or K. D M Y 15 05 2012 15 10 &#... your home time zone (Time zone), and press the k button. • See "Daylight Saving Time" (A23) for language selection and camera clock setting are displayed the first time the camera is turned on. 1 Press the multi selector H or I to choose the desired language and press the k ...
...(month) ➝ Y (year) ➝ hour ➝ minute). Date and time can also Edit be set date and time? Time zone and date Choose time zone and set by rotating the multi selector. • Confirm the settings: Select the minute field and press the k button or K. D M Y 15 05 2012 15 10 &#... your home time zone (Time zone), and press the k button. • See "Daylight Saving Time" (A23) for language selection and camera clock setting are displayed the first time the camera is turned on. 1 Press the multi selector H or I to choose the desired language and press the k ...
Reference Manual
Page 41
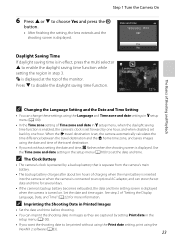
...London Casablanca Back The Basics of Time zone and date in z setup menu, when the daylight saving time function is enabled, the camera's clock is set date and time for more information. C The Clock Battery • The camera's clock is powered by a backup battery that is separate from the camera... Shooting Date in step 3. See step 2 of the monitor. When the x travel destination. • If you want the shooting date to be printed without setting the date and time, O flashes when the shooting screen is turned on. Step 1 Turn the Camera On 6 Press H or I to disable the daylight ...
...London Casablanca Back The Basics of Time zone and date in z setup menu, when the daylight saving time function is enabled, the camera's clock is set date and time for more information. C The Clock Battery • The camera's clock is powered by a backup battery that is separate from the camera... Shooting Date in step 3. See step 2 of the monitor. When the x travel destination. • If you want the shooting date to be printed without setting the date and time, O flashes when the shooting screen is turned on. Step 1 Turn the Camera On 6 Press H or I to disable the daylight ...
Reference Manual
Page 43
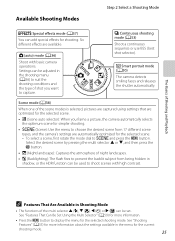
... to capture. The Basics of Shooting and Playback Available Shooting Modes Step 2 Select a Shooting Mode u Special effects mode (A57) You can be set. C Continuous shooting mode (A53) Shoot a continuous sequence or use BSS (best shot selector). C Features That Are Available in Shooting Mode •...; The functions of the scene modes is selected, pictures are captured using settings that are optimized for the current shooting mode. 25 F Smart portrait mode (A50) The camera detects smiling faces and releases the shutter...
... to capture. The Basics of Shooting and Playback Available Shooting Modes Step 2 Select a Shooting Mode u Special effects mode (A57) You can be set. C Continuous shooting mode (A53) Shoot a continuous sequence or use BSS (best shot selector). C Features That Are Available in Shooting Mode •...; The functions of the scene modes is selected, pictures are captured using settings that are optimized for the current shooting mode. 25 F Smart portrait mode (A50) The camera detects smiling faces and releases the shutter...


