

Reference Manual
Page 4
or COOLPIX S9300 Digital Camera COOLPIX S9200 Digital Camera Camera Strap Rechargeable Li-ion Battery EN-EL12 (with the country or region of purchase. The shape of your new camera. Introduction Introduction Read This First Thank you purchased the camera. ... is included if the camera was purchased in a country or region that any items are missing, please contact the store where you for purchasing the Nikon COOLPIX S9300/S9200 digital camera. Confirming the Package Contents In the event that requires a plug adapter. After reading, please keep this manual.
or COOLPIX S9300 Digital Camera COOLPIX S9200 Digital Camera Camera Strap Rechargeable Li-ion Battery EN-EL12 (with the country or region of purchase. The shape of your new camera. Introduction Introduction Read This First Thank you purchased the camera. ... is included if the camera was purchased in a country or region that any items are missing, please contact the store where you for purchasing the Nikon COOLPIX S9300/S9200 digital camera. Confirming the Package Contents In the event that requires a plug adapter. After reading, please keep this manual.
Reference Manual
Page 6
... this product may be held liable for contact information: http://imaging.nikon.com/ Use Only Nikon Brand Electronic Accessories Nikon COOLPIX cameras are engineered and proven to operate within the operational and safety requirements of third-party rechargeable Li-ion batteries not bearing the Nikon holographic seal could interfere with the latest product information, tips, answers...
... this product may be held liable for contact information: http://imaging.nikon.com/ Use Only Nikon Brand Electronic Accessories Nikon COOLPIX cameras are engineered and proven to operate within the operational and safety requirements of third-party rechargeable Li-ion batteries not bearing the Nikon holographic seal could interfere with the latest product information, tips, answers...
Reference Manual
Page 8
... Handle the camera strap with the camera, Charging AC Adapter, or AC adapter for inspection, after unplugging the product and/or removing the battery. Do not remain in contact with care Never place the strap around the neck of malfunction Should you notice smoke or an unusual smell ...coming from putting the battery or other accident, take the equipment to a Nikon-authorized service representative for extended periods may cause injury. Do not use the product will read them. Doing so may...
... Handle the camera strap with the camera, Charging AC Adapter, or AC adapter for inspection, after unplugging the product and/or removing the battery. Do not remain in contact with care Never place the strap around the neck of malfunction Should you notice smoke or an unusual smell ...coming from putting the battery or other accident, take the equipment to a Nikon-authorized service representative for extended periods may cause injury. Do not use the product will read them. Doing so may...
Reference Manual
Page 9
... not attempt to insert it upside down or backwards. • Do not short or disassemble the battery or attempt to remove or break the battery insulation or casing. • Do not expose the battery to flame or to excessive heat. • Do not immerse in or expose to leakage when fully ... inspection. Should the insulation be damaged and the wires become exposed, take it to observe this product: • Before replacing the battery, turn the product off. Observe the following precautions when handling the Charging AC Adapter • Keep dry. If you notice any change in fire...
... not attempt to insert it upside down or backwards. • Do not short or disassemble the battery or attempt to remove or break the battery insulation or casing. • Do not expose the battery to flame or to excessive heat. • Do not immerse in or expose to leakage when fully ... inspection. Should the insulation be damaged and the wires become exposed, take it to observe this product: • Before replacing the battery, turn the product off. Observe the following precautions when handling the Charging AC Adapter • Keep dry. If you notice any change in fire...

Reference Manual
Page 12
... digital apparatus complies with this symbol or not, are not expressly approved by Nikon for separate collection at an appropriate collection point. x Notices for Customers in Europe CAUTIONS RISK OF EXPLOSION IF BATTERY IS REPLACED BY AN INCORRECT TYPE. The following apply only to users in ...not dispose of as household waste. • For more information, contact the retailer or the local authorities in European countries: • All batteries, whether marked with Canadian ICES-003. ATTENTION Cet appareil numérique de la classe B est conforme à la norme NMB-003 du...
... digital apparatus complies with this symbol or not, are not expressly approved by Nikon for separate collection at an appropriate collection point. x Notices for Customers in Europe CAUTIONS RISK OF EXPLOSION IF BATTERY IS REPLACED BY AN INCORRECT TYPE. The following apply only to users in ...not dispose of as household waste. • For more information, contact the retailer or the local authorities in European countries: • All batteries, whether marked with Canadian ICES-003. ATTENTION Cet appareil numérique de la classe B est conforme à la norme NMB-003 du...
Reference Manual
Page 14
......ii About This Manual...iii Information and Precautions...iv For Your Safety...vi WARNINGS ...vi Notices ...ix Notes on GPS/electronic compass (COOLPIX S9300 only xi Parts of the Camera and Basic Operations 1 Parts of the Camera ...2 The Camera Body...2 Controls Used in Shooting Mode ... Menus (the d Button) ...11 Attaching the Camera Strap ...12 The Basics of Shooting and Playback 13 Preparation 1 Insert the Battery...14 Preparation 2 Charge the Battery 16 Preparation 3 Insert a Memory Card 18 Internal Memory and Memory Cards...19 Approved Memory Cards ...19 Step 1 Turn the Camera...
......ii About This Manual...iii Information and Precautions...iv For Your Safety...vi WARNINGS ...vi Notices ...ix Notes on GPS/electronic compass (COOLPIX S9300 only xi Parts of the Camera and Basic Operations 1 Parts of the Camera ...2 The Camera Body...2 Controls Used in Shooting Mode ... Menus (the d Button) ...11 Attaching the Camera Strap ...12 The Basics of Shooting and Playback 13 Preparation 1 Insert the Battery...14 Preparation 2 Charge the Battery 16 Preparation 3 Insert a Memory Card 18 Internal Memory and Memory Cards...19 Approved Memory Cards ...19 Step 1 Turn the Camera...
Reference Manual
Page 18
... Notes and Index ...F1 Caring for the Products...F2 The Camera ...F2 The Battery...F3 Charging AC Adapter ...F4 The Memory Cards...F5 Caring for the Camera ...F6 Cleaning ...F6 Storage ...F6 USER LICENSE AGREEMENT FOR LOCATION NAME DATA (COOLPIX S9300 only).... F7 Troubleshooting...F11 Specifications ...F19 Supported Standards ...F22 Index ...F23 xvi...
... Notes and Index ...F1 Caring for the Products...F2 The Camera ...F2 The Battery...F3 Charging AC Adapter ...F4 The Memory Cards...F5 Caring for the Camera ...F6 Cleaning ...F6 Storage ...F6 USER LICENSE AGREEMENT FOR LOCATION NAME DATA (COOLPIX S9300 only).... F7 Troubleshooting...F11 Specifications ...F19 Supported Standards ...F22 Index ...F23 xvi...
Reference Manual
Page 21
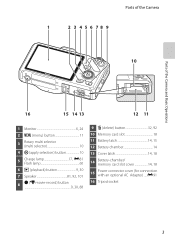
... 7 Speaker 81, 92, 101 8 b (e movie-record) button 9, 30, 88 9 l (delete) button 32, 92 10 Memory card slot 18 11 Battery latch 14, 15 12 Battery chamber 14 13 Cover latch 14, 18 14 Battery-chamber/ memory card slot cover 14, 18 15 Power connector cover (for connection with an optional AC Adapter) .....E91...
... 7 Speaker 81, 92, 101 8 b (e movie-record) button 9, 30, 88 9 l (delete) button 32, 92 10 Memory card slot 18 11 Battery latch 14, 15 12 Battery chamber 14 13 Cover latch 14, 18 14 Battery-chamber/ memory card slot cover 14, 18 15 Power connector cover (for connection with an optional AC Adapter) .....E91...
Reference Manual
Page 25
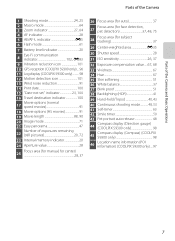
...Zoom indicator 27, 64 4 AF indicator 28 5 AE/AF-L indicator E5 6 Flash mode 61 7 Battery level indicator 20 Eye-Fi communication 8 indicator 102, E83 9 Vibration reduction icon 101 10 GPS reception (COOLPIX S9300 only).....96 11 Log display (COOLPIX S9300 only 98 12 Motion detection icon 101 13 Wind noise reduction 91 14 Print date... shooting mode 48, 53 41 Self-timer 63 42 Smile timer 50 43 Pet portrait auto release 48 Compass display (Direction gauge) 44 (COOLPIX S9300 only 98 Compass display (Compass) (COOLPIX 45 S9300 only 98 Location name information (POI 46 information...
...Zoom indicator 27, 64 4 AF indicator 28 5 AE/AF-L indicator E5 6 Flash mode 61 7 Battery level indicator 20 Eye-Fi communication 8 indicator 102, E83 9 Vibration reduction icon 101 10 GPS reception (COOLPIX S9300 only).....96 11 Log display (COOLPIX S9300 only 98 12 Motion detection icon 101 13 Wind noise reduction 91 14 Print date... shooting mode 48, 53 41 Self-timer 63 42 Smile timer 50 43 Pet portrait auto release 48 Compass display (Direction gauge) 44 (COOLPIX S9300 only 98 Compass display (Compass) (COOLPIX 45 S9300 only 98 Location name information (POI 46 information...
Reference Manual
Page 26
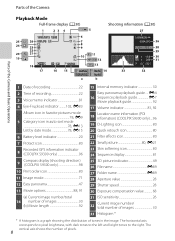
...the right. E4 16 Sequence playback guide E7 Movie playback guide 92 17 Volume indicator 81, 92 Location name information (POI 18 information) (COOLPIX S9300 only) ....96 19 D-Lighting icon 80 20 Quick retouch icon 80 21 Filter effects icon 80 22 Small picture 80, E21 23 Skin ... of tones in auto sort mode 78, E13 List by date mode 78, E15 6 Battery level indicator 20 7 Protect icon 80 Recorded GPS information indicator 8 (COOLPIX S9300 only 96 Compass display (shooting direction) 9 (COOLPIX S9300 only 98 10 Print order icon 80 11 Image mode 71 12 Easy panorama 47 13 ...
...the right. E4 16 Sequence playback guide E7 Movie playback guide 92 17 Volume indicator 81, 92 Location name information (POI 18 information) (COOLPIX S9300 only) ....96 19 D-Lighting icon 80 20 Quick retouch icon 80 21 Filter effects icon 80 22 Small picture 80, E21 23 Skin ... of tones in auto sort mode 78, E13 List by date mode 78, E15 6 Battery level indicator 20 7 Protect icon 80 Recorded GPS information indicator 8 (COOLPIX S9300 only 96 Compass display (shooting direction) 9 (COOLPIX S9300 only 98 10 Print order icon 80 11 Image mode 71 12 Easy panorama 47 13 ...
Reference Manual
Page 31
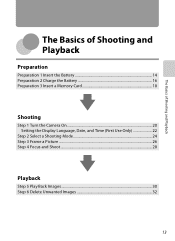
The Basics of Shooting and Playback The Basics of Shooting and Playback Preparation Preparation 1 Insert the Battery 14 Preparation 2 Charge the Battery 16 Preparation 3 Insert a Memory Card 18 Shooting Step 1 Turn the Camera On 20 Setting the Display Language, Date, and Time (First Use Only 22 Step 2 Select a Shooting Mode 24 Step 3 Frame a Picture ...26 Step 4 Focus and Shoot...28 Playback Step 5 Play Back Images ...30 Step 6 Delete Unwanted Images 32 13
The Basics of Shooting and Playback The Basics of Shooting and Playback Preparation Preparation 1 Insert the Battery 14 Preparation 2 Charge the Battery 16 Preparation 3 Insert a Memory Card 18 Shooting Step 1 Turn the Camera On 20 Setting the Display Language, Date, and Time (First Use Only 22 Step 2 Select a Shooting Mode 24 Step 3 Frame a Picture ...26 Step 4 Focus and Shoot...28 Playback Step 5 Play Back Images ...30 Step 6 Delete Unwanted Images 32 13
Reference Manual
Page 32
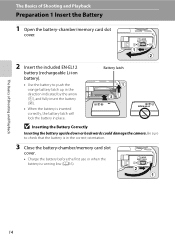
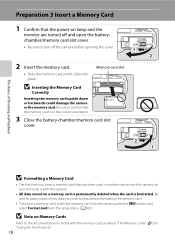
... direction indicated by the arrow (1), and fully insert the battery (2). • When the battery is inserted correctly, the battery latch will lock the battery in the correct orientation. 3 Close the battery-chamber/memory card slot cover. • Charge the battery before the first use or when the battery is in place. The Basics of Shooting and Playback...
... direction indicated by the arrow (1), and fully insert the battery (2). • When the battery is inserted correctly, the battery latch will lock the battery in the correct orientation. 3 Close the battery-chamber/memory card slot cover. • Charge the battery before the first use or when the battery is in place. The Basics of Shooting and Playback...
Reference Manual
Page 33
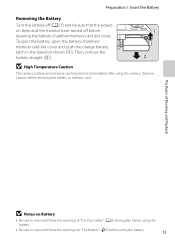
... "For Your Safety" (Avi) thoroughly before using the battery. • Be sure to read and follow the warnings for "The Battery" (F3) before opening the battery-chamber/memory card slot cover. B High Temperature Caution The camera, battery, and memory card may be sure that the poweron lamp... and the monitor have turned off before using the battery. 15 To eject the battery, open the battery-chamber/ memory card slot cover and push the orange battery latch in the direction shown (1). Preparation 1 Insert the Battery Removing the Battery Turn the camera off (A21) and be hot ...
... "For Your Safety" (Avi) thoroughly before using the battery. • Be sure to read and follow the warnings for "The Battery" (F3) before opening the battery-chamber/memory card slot cover. B High Temperature Caution The camera, battery, and memory card may be sure that the poweron lamp... and the monitor have turned off before using the battery. 15 To eject the battery, open the battery-chamber/ memory card slot cover and push the orange battery latch in the direction shown (1). Preparation 1 Insert the Battery Removing the Battery Turn the camera off (A21) and be hot ...
Reference Manual
Page 34
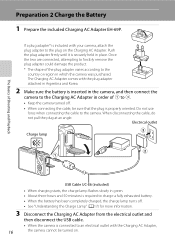
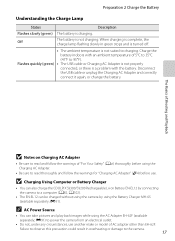
... in which the camera was purchased. If a plug adapter* is included with your camera, attach the plug adapter to charge a fully exhausted battery. • When the battery has been completely charged, the charge lamp turns off . • When connecting the cable, be turned on the Charging AC Adapter. Once ...Do not use force when connecting the cable to an electrical outlet with the plug adapter attached in Argentina and Korea. 2 Make sure the battery is required to the plug on . The Charging AC Adapter comes with the Charging AC Adapter, the camera cannot be sure that the plug ...
... in which the camera was purchased. If a plug adapter* is included with your camera, attach the plug adapter to charge a fully exhausted battery. • When the battery has been completely charged, the charge lamp turns off . • When connecting the cable, be turned on the Charging AC Adapter. Once ...Do not use force when connecting the cable to an electrical outlet with the plug adapter attached in Argentina and Korea. 2 Make sure the battery is required to the plug on . The Charging AC Adapter comes with the Charging AC Adapter, the camera cannot be sure that the plug ...
Reference Manual
Page 35
... another make or model of 5°C to 35°C (41°F to the camera. 17 B Charging Using Computer or Battery Charger • You can also charge the COOLPIX S9300/S9200 Rechargeable Li-ion Battery EN-EL12 by connecting the camera to observe this precaution could result in green stops and is turned off. •...
... another make or model of 5°C to 35°C (41°F to the camera. 17 B Charging Using Computer or Battery Charger • You can also charge the COOLPIX S9300/S9200 Rechargeable Li-ion Battery EN-EL12 by connecting the camera to observe this precaution could result in green stops and is turned off. •...
Reference Manual
Page 36
... slot • Slide the memory card until it with the memory card, as well as "The Memory Cards" (F5) in the correct orientation. 3 Close the battery-chamber/memory card slot cover. Preparation 3 Insert a Memory Card 1 Confirm that the power-on lamp and the monitor are turned off and open the batterychamber...
... slot • Slide the memory card until it with the memory card, as well as "The Memory Cards" (F5) in the correct orientation. 3 Close the battery-chamber/memory card slot cover. Preparation 3 Insert a Memory Card 1 Confirm that the power-on lamp and the monitor are turned off and open the batterychamber...
Reference Manual
Page 37
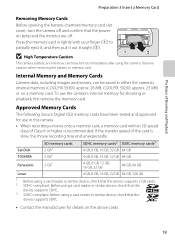
... and Playback Preparation 3 Insert a Memory Card Removing Memory Cards Before opening the battery-chamber/memory card slot cover, turn the camera off and confirm that the device supports SDHC. 3 SDXC-compliant. COOLPIX S9200: approx. 25 MB) or on the above cards. 19 If the transfer... when removing the battery or memory card. Approved Memory Cards The following Secure Digital (SD) memory cards have been tested and approved for use the camera's internal memory for details on a memory card. Press the memory card in either the camera's internal memory (COOLPIX S9300: approx. 26...
... and Playback Preparation 3 Insert a Memory Card Removing Memory Cards Before opening the battery-chamber/memory card slot cover, turn the camera off and confirm that the device supports SDHC. 3 SDXC-compliant. COOLPIX S9200: approx. 25 MB) or on the above cards. 19 If the transfer... when removing the battery or memory card. Approved Memory Cards The following Secure Digital (SD) memory cards have been tested and approved for use the camera's internal memory for details on a memory card. Press the memory card in either the camera's internal memory (COOLPIX S9300: approx. 26...
Reference Manual
Page 38
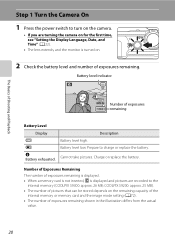
... high. Charge or replace the battery. COOLPIX S9200: approx. 25 MB). • The number of pictures that can be stored depends on . 2 Check the battery level and number of exposures remaining. Battery level indicator The Basics of Shooting and Playback 29m 0s Number of ... number of exposures 1140 remaining Battery Level Display b B N Battery exhausted. Cannot take pictures. Step 1 Turn the Camera On 1 Press the power switch to turn on the camera. • If you are recorded to charge or replace the battery. Prepare to the internal memory (COOLPIX S9300: approx. 26 MB;
... high. Charge or replace the battery. COOLPIX S9200: approx. 25 MB). • The number of pictures that can be stored depends on . 2 Check the battery level and number of exposures remaining. Battery level indicator The Basics of Shooting and Playback 29m 0s Number of ... number of exposures 1140 remaining Battery Level Display b B N Battery exhausted. Cannot take pictures. Step 1 Turn the Camera On 1 Press the power switch to turn on the camera. • If you are recorded to charge or replace the battery. Prepare to the internal memory (COOLPIX S9300: approx. 26 MB;
Reference Manual
Page 41
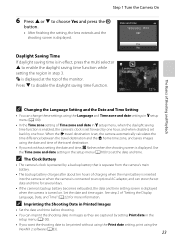
... Date and Time Setting • You can store the set back by one hour. Set the date and time again. W is turned on. C The Clock Battery • The camera's clock is powered by setting Print date in the setup menu (A100). • If you exit without using the Print date setting... and the shooting screen is set forward by one hour, and when disabled, set date and time for several days. • If the camera's backup battery becomes exhausted, the date and time setting screen is displayed when the camera is displayed at the top of "Setting the Display Language, Date, and...
... Date and Time Setting • You can store the set back by one hour. Set the date and time again. W is turned on. C The Clock Battery • The camera's clock is powered by setting Print date in the setup menu (A100). • If you exit without using the Print date setting... and the shooting screen is set forward by one hour, and when disabled, set date and time for several days. • If the camera's backup battery becomes exhausted, the date and time setting screen is displayed when the camera is displayed at the top of "Setting the Display Language, Date, and...
Reference Manual
Page 47
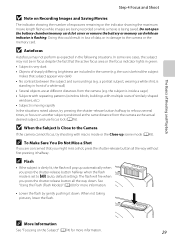
... remaining or the indicator showing the maximum movie length flashes while images are included in the scene (e.g. Do not open the battery-chamber/memory card slot cover or remove the battery or memory card while an indicator is dimly lit, the flash will fire when you might miss a shot, press the shutter...
... remaining or the indicator showing the maximum movie length flashes while images are included in the scene (e.g. Do not open the battery-chamber/memory card slot cover or remove the battery or memory card while an indicator is dimly lit, the flash will fire when you might miss a shot, press the shutter...


