
Reference Manual
Page 21
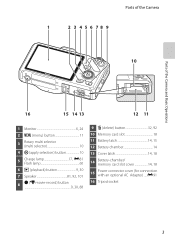
... latch 14, 18 14 Battery-chamber/ memory card slot cover 14, 18 15 Power connector cover (for connection with an optional AC Adapter) .....E91 16 Tripod socket 3
... latch 14, 18 14 Battery-chamber/ memory card slot cover 14, 18 15 Power connector cover (for connection with an optional AC Adapter) .....E91 16 Tripod socket 3
Reference Manual
Page 25
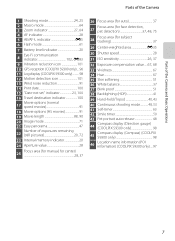
...mode 61 7 Battery level indicator 20 Eye-Fi communication 8 indicator 102, E83 9 Vibration reduction icon 101 10 GPS reception (COOLPIX S9300 only).....96 11 Log display (COOLPIX S9300 only 98 12 Motion detection icon 101 13 Wind noise reduction 91 14 Print date 100 15 "Date not set" indicator 23... (HDR 41 39 Hand-held/Tripod 40, 43 40 Continuous shooting mode 48, 53 41 Self-timer 63 42 Smile timer 50 43 Pet portrait auto release 48 Compass display (Direction gauge) 44 (COOLPIX S9300 only 98 Compass display (Compass) (COOLPIX 45 S9300 only 98 Location name information (...
...mode 61 7 Battery level indicator 20 Eye-Fi communication 8 indicator 102, E83 9 Vibration reduction icon 101 10 GPS reception (COOLPIX S9300 only).....96 11 Log display (COOLPIX S9300 only 98 12 Motion detection icon 101 13 Wind noise reduction 91 14 Print date 100 15 "Date not set" indicator 23... (HDR 41 39 Hand-held/Tripod 40, 43 40 Continuous shooting mode 48, 53 41 Self-timer 63 42 Smile timer 50 43 Pet portrait auto release 48 Compass display (Direction gauge) 44 (COOLPIX S9300 only 98 Compass display (Compass) (COOLPIX 45 S9300 only 98 Location name information (...
Reference Manual
Page 44
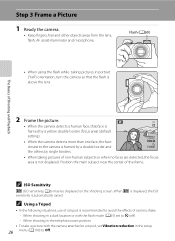
... one face, the face closest to avoid the effects of the frame. Position the main subject near the center of camera shake: - C Using a Tripod • In the following situations, use of non-human subjects or when no faces are detected, the focus area is above the lens. C ISO ... sensitivity is recommended to the camera is framed by a double border and the others by single borders. 29m 0s 1140 • When taking pictures of a tripod is automatically raised. When shooting in the setup 26 menu (A100) to W (off) - When shooting in the telephoto zoom position • To take ...
... one face, the face closest to avoid the effects of the frame. Position the main subject near the center of camera shake: - C Using a Tripod • In the following situations, use of non-human subjects or when no faces are detected, the focus area is above the lens. C ISO ... sensitivity is recommended to the camera is framed by a double border and the others by single borders. 29m 0s 1140 • When taking pictures of a tripod is automatically raised. When shooting in the setup 26 menu (A100) to W (off) - When shooting in the telephoto zoom position • To take ...
Reference Manual
Page 57
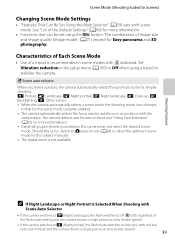
...j: Backlighting, d: Other scenes • When the camera automatically selects a scene mode, the shooting mode icon changes to that can be set using a tripod to stabilize the camera. Characteristics of Each Scene Mode • Use of the Default Settings" (A69) for more information). • Depending upon shooting ...desired scene mode. The camera detects and focuses on faces (see "Using Face Detection" (A75) for simpler shooting. See "List of a tripod is not available. Should this occur, switch to A (auto) mode (A24) or select the optimum scene mode for autofocus in scene ...
...j: Backlighting, d: Other scenes • When the camera automatically selects a scene mode, the shooting mode icon changes to that can be set using a tripod to stabilize the camera. Characteristics of Each Scene Mode • Use of the Default Settings" (A69) for more information). • Depending upon shooting ...desired scene mode. The camera detects and focuses on faces (see "Using Face Detection" (A75) for simpler shooting. See "List of a tripod is not available. Should this occur, switch to A (auto) mode (A24) or select the optimum scene mode for autofocus in scene ...
Reference Manual
Page 58
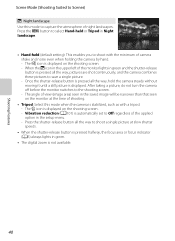
... reduction (A101) is automatically set to Off regardless of the applied option in Night landscape. • Hand-held or Tripod in the setup menu. - Once the shutter-release button is pressed all the way, pictures are shot continuously, and the camera combines these pictures to ...; The digital zoom is not available. 40 Press the shutter-release button all the way to shoot a single picture at the time of shooting. • Tripod: Select this mode to capture the atmosphere of night landscapes. After taking a picture, do not turn the camera off before the monitor switches to the...
... reduction (A101) is automatically set to Off regardless of the applied option in Night landscape. • Hand-held or Tripod in the setup menu. - Once the shutter-release button is pressed all the way, pictures are shot continuously, and the camera combines these pictures to ...; The digital zoom is not available. 40 Press the shutter-release button all the way to shoot a single picture at the time of shooting. • Tripod: Select this mode to capture the atmosphere of night landscapes. After taking a picture, do not turn the camera off before the monitor switches to the...
Reference Manual
Page 59
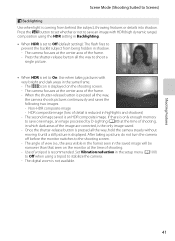
..., hold the camera steady without moving it until a still picture is an HDR composite image. The second image saved is displayed. Use of a tripod is not available. 41 The digital zoom is recommended. The camera focuses at the time of shooting. - The angle of view (i.e., the area... pictures continuously and saves the following two images. - Non-HDR composite image - After taking pictures with HDR (high dynamic range) composition using a tripod to stabilize the camera. - If there is only enough memory to save an image with very bright and dark areas in which dark areas of...
..., hold the camera steady without moving it until a still picture is an HDR composite image. The second image saved is displayed. Use of a tripod is not available. 41 The digital zoom is recommended. The camera focuses at the time of shooting. - The angle of view (i.e., the area... pictures continuously and saves the following two images. - Non-HDR composite image - After taking pictures with HDR (high dynamic range) composition using a tripod to stabilize the camera. - If there is only enough memory to save an image with very bright and dark areas in which dark areas of...
Reference Manual
Page 61
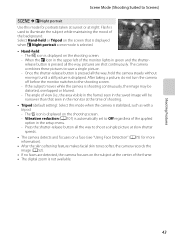
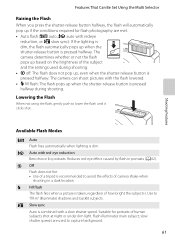
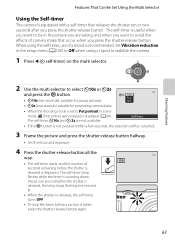
... displayed on the screen that seen in the monitor at the center of the frame. • The digital zoom is selected. • Hand-held or Tripod on the shooting screen. - Vibration reduction (A101) is pressed all the way to the shooting screen. - Select Hand-held : - release button is automatically... and the shutter- The Y icon is displayed on the subject at the time of the monitor lights in the upper left of shooting. • Tripod (default setting): Select this mode for portraits taken at sunset or at slow shutter speeds. • The camera detects and focuses on a face (see...
... displayed on the screen that seen in the monitor at the center of the frame. • The digital zoom is selected. • Hand-held or Tripod on the shooting screen. - Vibration reduction (A101) is pressed all the way to the shooting screen. - Select Hand-held : - release button is automatically... and the shutter- The Y icon is displayed on the subject at the time of the monitor lights in the upper left of shooting. • Tripod (default setting): Select this mode for portraits taken at sunset or at slow shutter speeds. • The camera detects and focuses on a face (see...
Reference Manual
Page 62
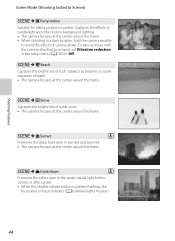
... snow. • The camera focuses at the center area of the frame. • When shooting in parties. To take a picture with the camera attached to a tripod, set Vibration reduction in the setup menu (A100) to Scenes) y M f Party/indoor Suitable for taking pictures in a dark location, hold the camera steadily to avoid...
... snow. • The camera focuses at the center area of the frame. • When shooting in parties. To take a picture with the camera attached to a tripod, set Vibration reduction in the setup menu (A100) to Scenes) y M f Party/indoor Suitable for taking pictures in a dark location, hold the camera steadily to avoid...
Reference Manual
Page 79
W Off Flash does not fire. • Use of a tripod is . Flash illuminates main subject; Available Flash Modes U Auto Flash fires automatically when lighting is combined with a slow shutter speed. Use to capture background. 61 Y ...
W Off Flash does not fire. • Use of a tripod is . Flash illuminates main subject; Available Flash Modes U Auto Flash fires automatically when lighting is combined with a slow shutter speed. Use to capture background. 61 Y ...
Reference Manual
Page 81
... Pet portrait in the picture you want to avoid the effects of a tripod is displayed. Self-timer • If the k button is not pressed within a few seconds, the selection will be in scene mode, Y (Pet portrait auto release) ...
... Pet portrait in the picture you want to avoid the effects of a tripod is displayed. Self-timer • If the k button is not pressed within a few seconds, the selection will be in scene mode, Y (Pet portrait auto release) ...
Reference Manual
Page 119
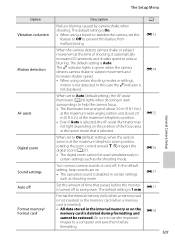
... on . • The operation sound is disabled in green when the camera detects camera shake or subject movement and increases shutter speed. • When using a tripod to stabilize the camera, set to On (default setting), when the optical zoom is at the time of shooting, it automatically increases ISO sensitivity and...
... on . • The operation sound is disabled in green when the camera detects camera shake or subject movement and increases shutter speed. • When using a tripod to stabilize the camera, set to On (default setting), when the optical zoom is at the time of shooting, it automatically increases ISO sensitivity and...
Reference Manual
Page 193
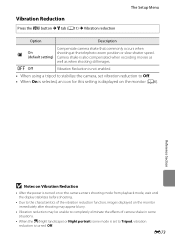
... the effects of the vibration reduction function, images displayed on the monitor (A6). k Off Vibration Reduction is not enabled. • When using a tripod to stabilize the camera, set to Tripod, vibration reduction is displayed on the monitor immediately after shooting may appear blurry. • Vibration reduction may be unable to Off. •...
... the effects of the vibration reduction function, images displayed on the monitor (A6). k Off Vibration Reduction is not enabled. • When using a tripod to stabilize the camera, set to Tripod, vibration reduction is displayed on the monitor immediately after shooting may appear blurry. • Vibration reduction may be unable to Off. •...
Reference Manual
Page 202
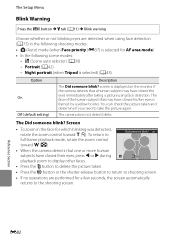
... (A11) M Blink warning Choose whether or not blinking eyes are performed for a few seconds, the screen automatically returns to Did someone blink? Night portrait (when Tripod is framed by a yellow border. The Did someone blink? screen is displayed on the monitor if the camera detects that a human subject may have closed...
... (A11) M Blink warning Choose whether or not blinking eyes are performed for a few seconds, the screen automatically returns to Did someone blink? Night portrait (when Tripod is framed by a yellow border. The Did someone blink? screen is displayed on the monitor if the camera detects that a human subject may have closed...
Reference Manual
Page 205
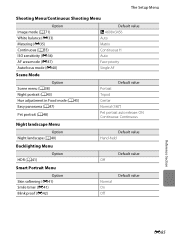
... priority Single AF Option Scene menu (A38) Night portrait (A43) Hue adjustment in Food mode (A45) Easy panorama (A47) Pet portrait (A48) Default value Portrait Tripod Center Normal (180°) Pet portrait auto release: ON Continuous: Continuous Night landscape Menu Option Night landscape (A40) Default value Hand-held Backlighting Menu HDR...
... priority Single AF Option Scene menu (A38) Night portrait (A43) Hue adjustment in Food mode (A45) Easy panorama (A47) Pet portrait (A48) Default value Portrait Tripod Center Normal (180°) Pet portrait auto release: ON Continuous: Continuous Night landscape Menu Option Night landscape (A40) Default value Hand-held Backlighting Menu HDR...
Reference Manual
Page 229
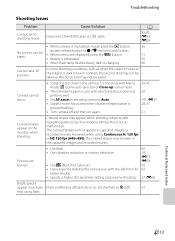
... menus are blurred. • Use flash. 60 • Use vibration reduction or motion detection. 101, E73, E74 • Use D (Best Shot Selector). 56 • Use a tripod to W (off ). 61 shot using Continuous H: 120 fps or HS 120 fps (640×480), the colored stripes may not be taken. Technical Notes and...
... menus are blurred. • Use flash. 60 • Use vibration reduction or motion detection. 101, E73, E74 • Use D (Best Shot Selector). 56 • Use a tripod to W (off ). 61 shot using Continuous H: 120 fps or HS 120 fps (640×480), the colored stripes may not be taken. Technical Notes and...
Reference Manual
Page 236
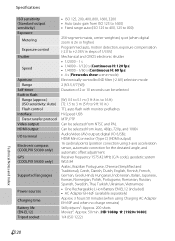
.... 50 min. (HD 1080p P (1920×1080)) 1/4 (ISO 1222) Technical Notes and Index F20 digital I /O terminal Electronic compass (COOLPIX S9300 only) GPS (COOLPIX S9300 only) Supported languages Power sources Charging time Battery life (EN-EL12) Tripod socket • ISO 125, 200, 400, 800, 1600, 3200 • Auto (auto gain from Auto, 480p, 720p, and 1080i...
.... 50 min. (HD 1080p P (1920×1080)) 1/4 (ISO 1222) Technical Notes and Index F20 digital I /O terminal Electronic compass (COOLPIX S9300 only) GPS (COOLPIX S9300 only) Supported languages Power sources Charging time Battery life (EN-EL12) Tripod socket • ISO 125, 200, 400, 800, 1600, 3200 • Auto (auto gain from Auto, 480p, 720p, and 1080i...
Reference Manual
Page 242
..., E39 Sunset h 44 T Telephoto zoom 27 Thumbnail playback 31 Time difference E68, E69 Time zone 22, E67, E69 Time zone and date 22, 100, E67 Tripod socket 3 TV 82 TV settings 102, E79 U USB cable 16, 82, E26, E91 USB/audio/video output connector 16, 82, E23, E26 V Vibration reduction 101...
..., E39 Sunset h 44 T Telephoto zoom 27 Thumbnail playback 31 Time difference E68, E69 Time zone 22, E67, E69 Time zone and date 22, 100, E67 Tripod socket 3 TV 82 TV settings 102, E79 U USB cable 16, 82, E26, E91 USB/audio/video output connector 16, 82, E23, E26 V Vibration reduction 101...