

Reference Manual
Page 4
... region that any items are missing, please contact the store where you for purchasing the Nikon COOLPIX S9300/S9200 digital camera. or COOLPIX S9300 Digital Camera COOLPIX S9200 Digital Camera Camera Strap Rechargeable Li-ion Battery EN-EL12 (with terminal cover) Charging AC Adapter EH-69P* USB Cable UC-E6 Audio Video Cable EG-CP16 ViewNX 2 Installer...
... region that any items are missing, please contact the store where you for purchasing the Nikon COOLPIX S9300/S9200 digital camera. or COOLPIX S9300 Digital Camera COOLPIX S9200 Digital Camera Camera Strap Rechargeable Li-ion Battery EN-EL12 (with terminal cover) Charging AC Adapter EH-69P* USB Cable UC-E6 Audio Video Cable EG-CP16 ViewNX 2 Installer...
Reference Manual
Page 6
...Charging AC Adapter and AC adapters) certified by any means, without Nikon's prior written permission. • Nikon will not be available from the Nikon representative in your area (address provided separately). For more information about Nikon brand accessories, contact a local authorized Nikon ... in any form, by Nikon specifically for contact information: http://imaging.nikon.com/ Use Only Nikon Brand Electronic Accessories Nikon COOLPIX cameras are engineered and proven to the highest standards and include complex electronic circuitry. Nikon will not be reproduced, transmitted...
...Charging AC Adapter and AC adapters) certified by any means, without Nikon's prior written permission. • Nikon will not be available from the Nikon representative in your area (address provided separately). For more information about Nikon brand accessories, contact a local authorized Nikon ... in any form, by Nikon specifically for contact information: http://imaging.nikon.com/ Use Only Nikon Brand Electronic Accessories Nikon COOLPIX cameras are engineered and proven to the highest standards and include complex electronic circuitry. Nikon will not be reproduced, transmitted...
Reference Manual
Page 8
... or other small parts into their entirety before using this Nikon product, to a Nikon-authorized service representative for extended periods may cause injury. Repairs should be read them. Do not use the camera or Charging AC Adapter in the presence of flammable gas Using the camera...removing or disconnecting the power source, take the product to a Nikon-authorized service representative for inspection, after unplugging the product and/or removing the battery. Parts of children. Should the camera or Charging AC Adapter break open as flammable sprays or dust could result in...
... or other small parts into their entirety before using this Nikon product, to a Nikon-authorized service representative for extended periods may cause injury. Repairs should be read them. Do not use the camera or Charging AC Adapter in the presence of flammable gas Using the camera...removing or disconnecting the power source, take the product to a Nikon-authorized service representative for inspection, after unplugging the product and/or removing the battery. Parts of children. Should the camera or Charging AC Adapter break open as flammable sprays or dust could result in...
Reference Manual
Page 9
...the following precautions when handling the battery for use could result in fire. • Do not handle the plug or go near the Charging AC Adapter during lightning storms. Failure to a Nikonauthorized service representative for inspection. Should the insulation be damaged and the wires become exposed,...• Dust on or near the metal parts of water. • If leaked battery fluid gets into the camera and connecting the Charging AC Adapter. For Your Safety Introduction Observe caution when handling the battery The battery may leak, overheat, or explode if improperly handled....
...the following precautions when handling the battery for use could result in fire. • Do not handle the plug or go near the Charging AC Adapter during lightning storms. Failure to a Nikonauthorized service representative for inspection. Should the insulation be damaged and the wires become exposed,...• Dust on or near the metal parts of water. • If leaked battery fluid gets into the camera and connecting the Charging AC Adapter. For Your Safety Introduction Observe caution when handling the battery The battery may leak, overheat, or explode if improperly handled....
Reference Manual
Page 10
...instruments of the hospital. For Your Safety Introduction • Do not handle the plug or Charging AC Adapter with this device for the purpose, to your subject's eyes could result in ...care should be observed if photographing infants, when the flash should be sure to OFF (COOLPIX S9300). Use appropriate cables When connecting cables to the input and output jacks, use only the...injury caused by this device should any of children whose visual systems are not pinched by Nikon for extended periods, whether on audio CD equipment. Observe caution when using inside an ...
...instruments of the hospital. For Your Safety Introduction • Do not handle the plug or Charging AC Adapter with this device for the purpose, to your subject's eyes could result in ...care should be observed if photographing infants, when the flash should be sure to OFF (COOLPIX S9300). Use appropriate cables When connecting cables to the input and output jacks, use only the...injury caused by this device should any of children whose visual systems are not pinched by Nikon for extended periods, whether on audio CD equipment. Observe caution when using inside an ...

Reference Manual
Page 12
... BATTERIES ACCORDING TO THE INSTRUCTIONS. The following apply only to be collected separately. Interface Cables Use the interface cables sold or provided by Nikon Corporation may void the user's authority to cause birth defects or other interface cables may exceed the limits of Class B Part 15 of... collection point. Do not dispose of as household waste. • For more information, contact the retailer or the local authorities in charge of waste management. Do not dispose of as household waste. • For more information, contact the retailer or the local authorities in...
... BATTERIES ACCORDING TO THE INSTRUCTIONS. The following apply only to be collected separately. Interface Cables Use the interface cables sold or provided by Nikon Corporation may void the user's authority to cause birth defects or other interface cables may exceed the limits of Class B Part 15 of... collection point. Do not dispose of as household waste. • For more information, contact the retailer or the local authorities in charge of waste management. Do not dispose of as household waste. • For more information, contact the retailer or the local authorities in...
Reference Manual
Page 14
...Contents...ii About This Manual...iii Information and Precautions...iv For Your Safety...vi WARNINGS ...vi Notices ...ix Notes on GPS/electronic compass (COOLPIX S9300 only xi Parts of the Camera and Basic Operations 1 Parts of the Camera ...2 The Camera Body...2 Controls Used in Shooting Mode ...(the d Button) ...11 Attaching the Camera Strap ...12 The Basics of Shooting and Playback 13 Preparation 1 Insert the Battery...14 Preparation 2 Charge the Battery 16 Preparation 3 Insert a Memory Card 18 Internal Memory and Memory Cards...19 Approved Memory Cards ...19 Step 1 Turn the Camera On...
...Contents...ii About This Manual...iii Information and Precautions...iv For Your Safety...vi WARNINGS ...vi Notices ...ix Notes on GPS/electronic compass (COOLPIX S9300 only xi Parts of the Camera and Basic Operations 1 Parts of the Camera ...2 The Camera Body...2 Controls Used in Shooting Mode ...(the d Button) ...11 Attaching the Camera Strap ...12 The Basics of Shooting and Playback 13 Preparation 1 Insert the Battery...14 Preparation 2 Charge the Battery 16 Preparation 3 Insert a Memory Card 18 Internal Memory and Memory Cards...19 Approved Memory Cards ...19 Step 1 Turn the Camera On...
Reference Manual
Page 18
......E74 AF Assist...E75 Digital Zoom...E76 Sound Settings...E77 Auto Off ...E77 Format Memory/Format Card...E78 Language...E78 TV Settings ...E79 Charge by Computer...E80 Blink Warning ...E82 Eye-Fi Upload ...E83 Filmstrip ...E84 Reset All ...E84 Firmware Version...E88 File and Folder Names... ...E91 Error Messages ...E92 Technical Notes and Index ...F1 Caring for the Products...F2 The Camera ...F2 The Battery...F3 Charging AC Adapter ...F4 The Memory Cards...F5 Caring for the Camera ...F6 Cleaning ...F6 Storage ...F6 USER LICENSE AGREEMENT FOR LOCATION NAME DATA (COOLPIX S9300 only)....
......E74 AF Assist...E75 Digital Zoom...E76 Sound Settings...E77 Auto Off ...E77 Format Memory/Format Card...E78 Language...E78 TV Settings ...E79 Charge by Computer...E80 Blink Warning ...E82 Eye-Fi Upload ...E83 Filmstrip ...E84 Reset All ...E84 Firmware Version...E88 File and Folder Names... ...E91 Error Messages ...E92 Technical Notes and Index ...F1 Caring for the Products...F2 The Camera ...F2 The Battery...F3 Charging AC Adapter ...F4 The Memory Cards...F5 Caring for the Camera ...F6 Cleaning ...F6 Storage ...F6 USER LICENSE AGREEMENT FOR LOCATION NAME DATA (COOLPIX S9300 only)....
Reference Manual
Page 21
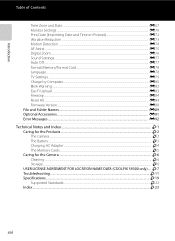
... Camera and Basic Operations 16 15 14 13 12 11 1 Monitor 6, 24 2 d (menu) button 11 3 Rotary multi selector (multi selector 10 4 k (apply selection) button 10 5 Charge lamp 17, E81 Flash lamp 60 6 c (playback) button 9, 30 7 Speaker 81, 92, 101 8 b (e movie-record) button 9, 30, 88 9 l (delete) button 32, 92 10 Memory card...
... Camera and Basic Operations 16 15 14 13 12 11 1 Monitor 6, 24 2 d (menu) button 11 3 Rotary multi selector (multi selector 10 4 k (apply selection) button 10 5 Charge lamp 17, E81 Flash lamp 60 6 c (playback) button 9, 30 7 Speaker 81, 92, 101 8 b (e movie-record) button 9, 30, 88 9 l (delete) button 32, 92 10 Memory card...
Reference Manual
Page 31
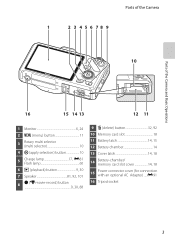
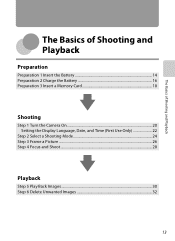
The Basics of Shooting and Playback The Basics of Shooting and Playback Preparation Preparation 1 Insert the Battery 14 Preparation 2 Charge the Battery 16 Preparation 3 Insert a Memory Card 18 Shooting Step 1 Turn the Camera On 20 Setting the Display Language, Date, and Time (First Use Only 22 Step 2 Select a Shooting Mode 24 Step 3 Frame a Picture ...26 Step 4 Focus and Shoot...28 Playback Step 5 Play Back Images ...30 Step 6 Delete Unwanted Images 32 13
The Basics of Shooting and Playback The Basics of Shooting and Playback Preparation Preparation 1 Insert the Battery 14 Preparation 2 Charge the Battery 16 Preparation 3 Insert a Memory Card 18 Shooting Step 1 Turn the Camera On 20 Setting the Display Language, Date, and Time (First Use Only 22 Step 2 Select a Shooting Mode 24 Step 3 Frame a Picture ...26 Step 4 Focus and Shoot...28 Playback Step 5 Play Back Images ...30 Step 6 Delete Unwanted Images 32 13
Reference Manual
Page 32
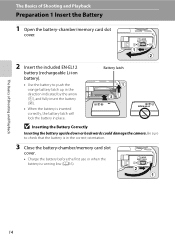
... the battery is inserted correctly, the battery latch will lock the battery in the correct orientation. 3 Close the battery-chamber/memory card slot cover. • Charge the battery before the first use or when the battery is in place. Battery latch • Use the battery to check that the battery is...
... the battery is inserted correctly, the battery latch will lock the battery in the correct orientation. 3 Close the battery-chamber/memory card slot cover. • Charge the battery before the first use or when the battery is in place. Battery latch • Use the battery to check that the battery is...
Reference Manual
Page 34
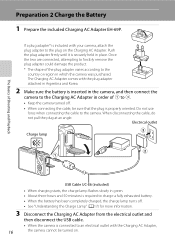
... product. * The shape of Shooting and Playback 3 16 USB Cable UC-E6 (included) • When charging starts, the charge lamp flashes slowly in which the camera was purchased. Electrical outlet Charge lamp The Basics of the plug adapter varies according to the plug on . When disconnecting the cable, do... not pull the plug at an angle. Disconnect the Charging AC Adapter from the electrical outlet and then disconnect the USB cable. • When the camera is connected to an electrical outlet with ...
... product. * The shape of Shooting and Playback 3 16 USB Cable UC-E6 (included) • When charging starts, the charge lamp flashes slowly in which the camera was purchased. Electrical outlet Charge lamp The Basics of the plug adapter varies according to the plug on . When disconnecting the cable, do... not pull the plug at an angle. Disconnect the Charging AC Adapter from the electrical outlet and then disconnect the USB cable. • When the camera is connected to an electrical outlet with ...
Reference Manual
Page 35
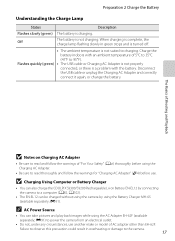
... (available separately; Off The battery is charging. E91). Preparation 2 Charge the Battery Understanding the Charge Lamp Status Description Flashes slowly (green) The battery is not charging. When charging is complete, the charge lamp flashing slowly in overheating or damage to charging. B Charging Using Computer or Battery Charger • You can also charge the COOLPIX S9300/S9200 Rechargeable Li-ion Battery EN...
... (available separately; Off The battery is charging. E91). Preparation 2 Charge the Battery Understanding the Charge Lamp Status Description Flashes slowly (green) The battery is not charging. When charging is complete, the charge lamp flashing slowly in overheating or damage to charging. B Charging Using Computer or Battery Charger • You can also charge the COOLPIX S9300/S9200 Rechargeable Li-ion Battery EN...
Reference Manual
Page 38
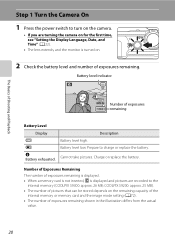
Prepare to the internal memory (COOLPIX S9300: approx. 26 MB; Battery level indicator The Basics of Shooting and Playback 29m 0s Number of exposures remaining shown in the illustration differs from the .... Battery level low. Step 1 Turn the Camera On 1 Press the power switch to turn on the camera. • If you are recorded to charge or replace the battery. COOLPIX S9200: approx. 25 MB). • The number of pictures that can be stored depends on . 2 Check the battery level and number of exposures...
Prepare to the internal memory (COOLPIX S9300: approx. 26 MB; Battery level indicator The Basics of Shooting and Playback 29m 0s Number of exposures remaining shown in the illustration differs from the .... Battery level low. Step 1 Turn the Camera On 1 Press the power switch to turn on the camera. • If you are recorded to charge or replace the battery. COOLPIX S9200: approx. 25 MB). • The number of pictures that can be stored depends on . 2 Check the battery level and number of exposures...
Reference Manual
Page 41
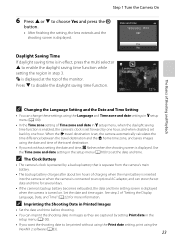
...imprint the shooting date in images as they are captured by a backup battery that is separate from the camera's main battery. • The backup battery charges after about ten hours of the travel destination is turned on. C The Clock Battery • The camera's clock is powered by setting Print date ... date setting in the setup menu (A100). • If you exit without using the Print date setting, print using the date and time of charging when the main battery is inserted into the camera or when the camera is displayed. C Imprinting the Shooting Date in Printed Images • Set ...
...imprint the shooting date in images as they are captured by a backup battery that is separate from the camera's main battery. • The backup battery charges after about ten hours of the travel destination is turned on. C The Clock Battery • The camera's clock is powered by setting Print date ... date setting in the setup menu (A100). • If you exit without using the Print date setting, print using the date and time of charging when the main battery is inserted into the camera or when the camera is displayed. C Imprinting the Shooting Date in Printed Images • Set ...
Reference Manual
Page 78
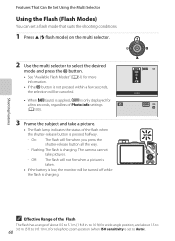
...) for telephoto zoom position (when ISO sensitivity is set to Auto). 60 On: The flash will be turned off while the flash is charging. Flashing:The flash is charging. Shooting Features C Effective Range of the Flash The flash has a range of about 1.5 to 3.0 m (5 ft to 9 ft 10 in . Auto • When U (auto...
...) for telephoto zoom position (when ISO sensitivity is set to Auto). 60 On: The flash will be turned off while the flash is charging. Flashing:The flash is charging. Shooting Features C Effective Range of the Flash The flash has a range of about 1.5 to 3.0 m (5 ft to 9 ft 10 in . Auto • When U (auto...
Reference Manual
Page 120
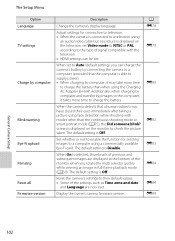
...Camera Setup 102 Set whether or not to enable the function for connection to television. • When the camera is connected to charge the battery. When On is displayed on the monitor to a computer using face detection while shooting with the television. • HDMI settings can... the current camera firmware version. Adjust settings for sending images to check the picture taken. screen is able to supply power). • When charging by computer and transferring images to the computer, it may have closed their default values. • Some of the monitor when you can be...
...Camera Setup 102 Set whether or not to enable the function for connection to television. • When the camera is connected to charge the battery. When On is displayed on the monitor to a computer using face detection while shooting with the television. • HDMI settings can... the current camera firmware version. Adjust settings for sending images to check the picture taken. screen is able to supply power). • When charging by computer and transferring images to the computer, it may have closed their default values. • Some of the monitor when you can be...
Reference Manual
Page 145
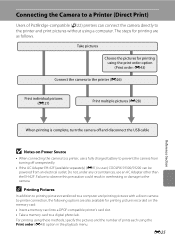
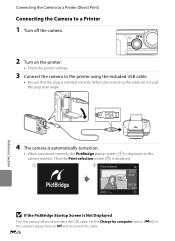
... Insert a memory card into a DPOF-compatible printer's card slot. • Take a memory card to the camera. Do not, under any circumstances, use a fully charged battery to prevent the camera from an electrical outlet. Connecting the Camera to a Printer (Direct Print) Users of prints each using the Print order (E43...order: E43) Connect the camera to the printer (E26) Print individual pictures (E27) Print multiple pictures (E28) Reference Section When printing is used, COOLPIX S9300/S9200 can connect the camera directly to the printer and print pictures without using a computer.
... Insert a memory card into a DPOF-compatible printer's card slot. • Take a memory card to the camera. Do not, under any circumstances, use a fully charged battery to prevent the camera from an electrical outlet. Connecting the Camera to a Printer (Direct Print) Users of prints each using the Print order (E43...order: E43) Connect the camera to the printer (E26) Print individual pictures (E27) Print multiple pictures (E28) Reference Section When printing is used, COOLPIX S9300/S9200 can connect the camera directly to the printer and print pictures without using a computer.
Reference Manual
Page 146
... the Print selection screen (2) is displayed on the printer. • Check the printer settings. 3 Connect the camera to Off and reconnect the cable. Set the Charge by computer option (E80) in the camera's setup menu to the printer using the included USB cable. • Be sure that the plug is oriented...
... the Print selection screen (2) is displayed on the printer. • Check the printer settings. 3 Connect the camera to Off and reconnect the cable. Set the Charge by computer option (E80) in the camera's setup menu to the printer using the included USB cable. • Be sure that the plug is oriented...

Reference Manual
Page 152
... there is created through editing, it cannot be extracted. • Editing functions are extracted in the internal memory or on Editing Movies • Use a fully charged battery to prevent the camera from the set start point and end point. When the battery level is B, movie editing is not possible. • Once...
... there is created through editing, it cannot be extracted. • Editing functions are extracted in the internal memory or on Editing Movies • Use a fully charged battery to prevent the camera from the set start point and end point. When the battery level is B, movie editing is not possible. • Once...


