

Reference Manual
Page 4
... are missing, please contact the store where you for purchasing the Nikon COOLPIX S9300/S9200 digital camera. or COOLPIX S9300 Digital Camera COOLPIX S9200 Digital Camera Camera Strap Rechargeable Li-ion Battery EN-EL12 (with the camera. ii NOTE: A memory card is not included with terminal cover) Charging AC Adapter EH-69P* USB Cable UC-E6 Audio Video...
... are missing, please contact the store where you for purchasing the Nikon COOLPIX S9300/S9200 digital camera. or COOLPIX S9300 Digital Camera COOLPIX S9200 Digital Camera Camera Strap Rechargeable Li-ion Battery EN-EL12 (with the camera. ii NOTE: A memory card is not included with terminal cover) Charging AC Adapter EH-69P* USB Cable UC-E6 Audio Video...
Reference Manual
Page 6
Only Nikon brand electronic accessories (including battery chargers, batteries, Charging AC Adapter and AC adapters) certified by any means, without prior notice. • While every effort was made to ensure that the camera is ... any damages resulting from the use of third-party rechargeable Li-ion batteries not bearing the Nikon holographic seal could interfere with this product may be held liable for contact information: http://imaging.nikon.com/ Use Only Nikon Brand Electronic Accessories Nikon COOLPIX cameras are engineered and proven to operate within the operational and safety...
Only Nikon brand electronic accessories (including battery chargers, batteries, Charging AC Adapter and AC adapters) certified by any means, without prior notice. • While every effort was made to ensure that the camera is ... any damages resulting from the use of third-party rechargeable Li-ion batteries not bearing the Nikon holographic seal could interfere with this product may be held liable for contact information: http://imaging.nikon.com/ Use Only Nikon Brand Electronic Accessories Nikon COOLPIX cameras are engineered and proven to operate within the operational and safety...
Reference Manual
Page 8
...child. After removing or disconnecting the power source, take the product to a Nikon-authorized service representative for inspection. Doing so may result in the event of the camera or Charging AC Adapter could result in explosion or fire. This icon marks warnings, ...taken to prevent infants from the camera or Charging AC Adapter, unplug the Charging AC Adapter and remove the battery immediately, taking care to a Nikon-authorized service representative for inspection, after unplugging the product and/or removing the battery. Parts of children. Leaving the devices in ...
...child. After removing or disconnecting the power source, take the product to a Nikon-authorized service representative for inspection. Doing so may result in the event of the camera or Charging AC Adapter could result in explosion or fire. This icon marks warnings, ...taken to prevent infants from the camera or Charging AC Adapter, unplug the Charging AC Adapter and remove the battery immediately, taking care to a Nikon-authorized service representative for inspection, after unplugging the product and/or removing the battery. Parts of children. Leaving the devices in ...
Reference Manual
Page 9
...handle the plug or go near the metal parts of water. • If leaked battery fluid gets into the camera and connecting the Charging AC Adapter. Charge the battery by inserting it to charge batteries that are using the Charging AC Adapter/AC adapter, be removed with plenty of the plug should you are ... not attempt to insert it to leakage when fully discharged. To avoid damage to the product, be sure to remove the battery when no charge remains. • Discontinue use immediately should be sure it is prone to heat or flames. Continued use in fire or electric shock. •...
...handle the plug or go near the metal parts of water. • If leaked battery fluid gets into the camera and connecting the Charging AC Adapter. Charge the battery by inserting it to charge batteries that are using the Charging AC Adapter/AC adapter, be removed with plenty of the plug should you are ... not attempt to insert it to leakage when fully discharged. To avoid damage to the product, be sure to remove the battery when no charge remains. • Discontinue use immediately should be sure it is prone to heat or flames. Continued use in fire or electric shock. •...

Reference Manual
Page 12
... or modifications made to this device that are designated for Customers in Europe CAUTIONS RISK OF EXPLOSION IF BATTERY IS REPLACED BY AN INCORRECT TYPE. Nikon Inc., 1300 Walt Whitman Road, Melville, New York 11747-3064 USA Tel: 631-547-4200 Notice ...for separate collection at an appropriate collection point. DISPOSE OF USED BATTERIES ACCORDING TO THE INSTRUCTIONS. Do not dispose of as household waste. • For more information, contact the retailer or the local authorities in charge...
... or modifications made to this device that are designated for Customers in Europe CAUTIONS RISK OF EXPLOSION IF BATTERY IS REPLACED BY AN INCORRECT TYPE. Nikon Inc., 1300 Walt Whitman Road, Melville, New York 11747-3064 USA Tel: 631-547-4200 Notice ...for separate collection at an appropriate collection point. DISPOSE OF USED BATTERIES ACCORDING TO THE INSTRUCTIONS. Do not dispose of as household waste. • For more information, contact the retailer or the local authorities in charge...
Reference Manual
Page 14
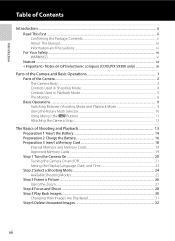
......ii About This Manual...iii Information and Precautions...iv For Your Safety...vi WARNINGS ...vi Notices ...ix Notes on GPS/electronic compass (COOLPIX S9300 only xi Parts of the Camera and Basic Operations 1 Parts of the Camera ...2 The Camera Body...2 Controls Used in Shooting Mode ...Using Menus (the d Button) ...11 Attaching the Camera Strap ...12 The Basics of Shooting and Playback 13 Preparation 1 Insert the Battery...14 Preparation 2 Charge the Battery 16 Preparation 3 Insert a Memory Card 18 Internal Memory and Memory Cards...19 Approved Memory Cards ...19 Step 1 Turn the Camera ...
......ii About This Manual...iii Information and Precautions...iv For Your Safety...vi WARNINGS ...vi Notices ...ix Notes on GPS/electronic compass (COOLPIX S9300 only xi Parts of the Camera and Basic Operations 1 Parts of the Camera ...2 The Camera Body...2 Controls Used in Shooting Mode ...Using Menus (the d Button) ...11 Attaching the Camera Strap ...12 The Basics of Shooting and Playback 13 Preparation 1 Insert the Battery...14 Preparation 2 Charge the Battery 16 Preparation 3 Insert a Memory Card 18 Internal Memory and Memory Cards...19 Approved Memory Cards ...19 Step 1 Turn the Camera ...
Reference Manual
Page 18
...AF Assist...E75 Digital Zoom...E76 Sound Settings...E77 Auto Off ...E77 Format Memory/Format Card...E78 Language...E78 TV Settings ...E79 Charge by Computer...E80 Blink Warning ...E82 Eye-Fi Upload ...E83 Filmstrip ...E84 Reset All ...E84 Firmware Version...E88 File and ......F1 Caring for the Products...F2 The Camera ...F2 The Battery...F3 Charging AC Adapter ...F4 The Memory Cards...F5 Caring for the Camera ...F6 Cleaning ...F6 Storage ...F6 USER LICENSE AGREEMENT FOR LOCATION NAME DATA (COOLPIX S9300 only).... F7 Troubleshooting...F11 Specifications ...F19 Supported Standards ...F22 Index...
...AF Assist...E75 Digital Zoom...E76 Sound Settings...E77 Auto Off ...E77 Format Memory/Format Card...E78 Language...E78 TV Settings ...E79 Charge by Computer...E80 Blink Warning ...E82 Eye-Fi Upload ...E83 Filmstrip ...E84 Reset All ...E84 Firmware Version...E88 File and ......F1 Caring for the Products...F2 The Camera ...F2 The Battery...F3 Charging AC Adapter ...F4 The Memory Cards...F5 Caring for the Camera ...F6 Cleaning ...F6 Storage ...F6 USER LICENSE AGREEMENT FOR LOCATION NAME DATA (COOLPIX S9300 only).... F7 Troubleshooting...F11 Specifications ...F19 Supported Standards ...F22 Index...
Reference Manual
Page 21
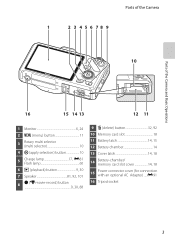
...Basic Operations 16 15 14 13 12 11 1 Monitor 6, 24 2 d (menu) button 11 3 Rotary multi selector (multi selector 10 4 k (apply selection) button 10 5 Charge lamp 17, E81 Flash lamp 60 6 c (playback) button 9, 30 7 Speaker 81, 92, 101 8 b (e movie-record) button 9, 30, 88 9 l (delete)... button 32, 92 10 Memory card slot 18 11 Battery latch 14, 15 12 Battery chamber 14 13 Cover latch 14, 18 14 Battery-chamber/ memory card slot cover 14, 18 15 Power connector cover (for connection with an optional AC Adapter) .....E91...
...Basic Operations 16 15 14 13 12 11 1 Monitor 6, 24 2 d (menu) button 11 3 Rotary multi selector (multi selector 10 4 k (apply selection) button 10 5 Charge lamp 17, E81 Flash lamp 60 6 c (playback) button 9, 30 7 Speaker 81, 92, 101 8 b (e movie-record) button 9, 30, 88 9 l (delete)... button 32, 92 10 Memory card slot 18 11 Battery latch 14, 15 12 Battery chamber 14 13 Cover latch 14, 18 14 Battery-chamber/ memory card slot cover 14, 18 15 Power connector cover (for connection with an optional AC Adapter) .....E91...
Reference Manual
Page 31
The Basics of Shooting and Playback The Basics of Shooting and Playback Preparation Preparation 1 Insert the Battery 14 Preparation 2 Charge the Battery 16 Preparation 3 Insert a Memory Card 18 Shooting Step 1 Turn the Camera On 20 Setting the Display Language, Date, and Time (First Use Only 22 Step 2 Select a Shooting Mode 24 Step 3 Frame a Picture ...26 Step 4 Focus and Shoot...28 Playback Step 5 Play Back Images ...30 Step 6 Delete Unwanted Images 32 13
The Basics of Shooting and Playback The Basics of Shooting and Playback Preparation Preparation 1 Insert the Battery 14 Preparation 2 Charge the Battery 16 Preparation 3 Insert a Memory Card 18 Shooting Step 1 Turn the Camera On 20 Setting the Display Language, Date, and Time (First Use Only 22 Step 2 Select a Shooting Mode 24 Step 3 Frame a Picture ...26 Step 4 Focus and Shoot...28 Playback Step 5 Play Back Images ...30 Step 6 Delete Unwanted Images 32 13
Reference Manual
Page 32
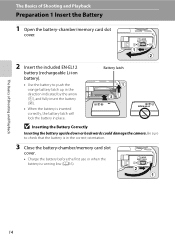
... or backwards could damage the camera. Battery latch • Use the battery to check that the battery is in the correct orientation. 3 Close the battery-chamber/memory card slot cover. • Charge the battery before the first use or when the battery is inserted correctly, the battery latch will lock the battery in the direction indicated by the arrow...
... or backwards could damage the camera. Battery latch • Use the battery to check that the battery is in the correct orientation. 3 Close the battery-chamber/memory card slot cover. • Charge the battery before the first use or when the battery is inserted correctly, the battery latch will lock the battery in the direction indicated by the arrow...
Reference Manual
Page 34
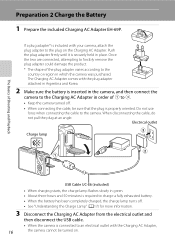
... Argentina and Korea. 2 Make sure the battery is inserted in the camera, and then connect the camera to the Charging AC Adapter in order of Shooting and Playback 3 16 USB Cable UC-E6 (included) • When charging starts, the charge lamp flashes slowly in green. •...to the plug on . Electrical outlet Charge lamp The Basics of 1 to charge a fully exhausted battery. • When the battery has been completely charged, the charge lamp turns off . • When connecting the cable, be turned on the Charging AC Adapter. Disconnect the Charging AC Adapter from the electrical outlet and...
... Argentina and Korea. 2 Make sure the battery is inserted in the camera, and then connect the camera to the Charging AC Adapter in order of Shooting and Playback 3 16 USB Cable UC-E6 (included) • When charging starts, the charge lamp flashes slowly in green. •...to the plug on . Electrical outlet Charge lamp The Basics of 1 to charge a fully exhausted battery. • When the battery has been completely charged, the charge lamp turns off . • When connecting the cable, be turned on the Charging AC Adapter. Disconnect the Charging AC Adapter from the electrical outlet and...
Reference Manual
Page 35
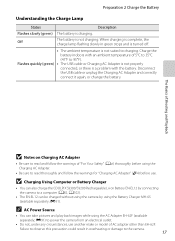
...-65 (available separately; C AC Power Source • You can also charge the COOLPIX S9300/S9200 Rechargeable Li-ion Battery EN-EL12 by connecting the camera to 95°F). E91) to the camera. 17 Preparation 2 Charge the Battery Understanding the Charge Lamp Status Description Flashes slowly (green) The battery is a problem with an ambient temperature of AC adapter other...
...-65 (available separately; C AC Power Source • You can also charge the COOLPIX S9300/S9200 Rechargeable Li-ion Battery EN-EL12 by connecting the camera to 95°F). E91) to the camera. 17 Preparation 2 Charge the Battery Understanding the Charge Lamp Status Description Flashes slowly (green) The battery is a problem with an ambient temperature of AC adapter other...
Reference Manual
Page 38
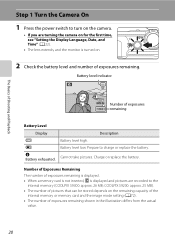
... Basics of Shooting and Playback 29m 0s Number of exposures remaining shown in the illustration differs from the actual value. 20 Charge or replace the battery. Prepare to the internal memory (COOLPIX S9300: approx. 26 MB; Number of Exposures Remaining The number of exposures remaining is displayed. • When a memory card is not inserted...
... Basics of Shooting and Playback 29m 0s Number of exposures remaining shown in the illustration differs from the actual value. 20 Charge or replace the battery. Prepare to the internal memory (COOLPIX S9300: approx. 26 MB; Number of Exposures Remaining The number of exposures remaining is displayed. • When a memory card is not inserted...
Reference Manual
Page 41
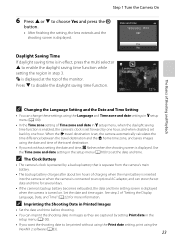
...of Time zone and date in step 3. C The Clock Battery • The camera's clock is powered by a backup battery that is separate from the camera's main battery. • The backup battery charges after about ten hours of charging when the main battery is inserted into the camera or when the camera is ... monitor. See step 2 of "Setting the Display Language, Date, and Time" (A22) for several days. • If the camera's backup battery becomes exhausted, the date and time setting screen is displayed when the camera is displayed at the top of Shooting and Playback C Changing the Language...
...of Time zone and date in step 3. C The Clock Battery • The camera's clock is powered by a backup battery that is separate from the camera's main battery. • The backup battery charges after about ten hours of charging when the main battery is inserted into the camera or when the camera is ... monitor. See step 2 of "Setting the Display Language, Date, and Time" (A22) for several days. • If the camera's backup battery becomes exhausted, the date and time setting screen is displayed when the camera is displayed at the top of Shooting and Playback C Changing the Language...
Reference Manual
Page 78
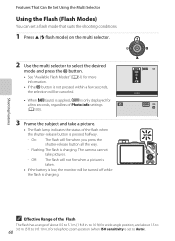
...). 3 Frame the subject and take pictures. - Off: The flash will not fire when a picture is taken. • If the battery is low, the monitor will be canceled. Flashing:The flash is charging. to 16 ft) for wide-angle position, and about 0.5 to 5.1 m (1 ft 8 in .) for telephoto zoom position (when ISO... the selection will fire when you press the shutter-release button all the way. - On: The flash will be turned off while the flash is charging. Features That Can Be Set Using the Multi Selector Using the Flash (Flash Modes) You can set to Auto). 60 Auto • When U ...
...). 3 Frame the subject and take pictures. - Off: The flash will not fire when a picture is taken. • If the battery is low, the monitor will be canceled. Flashing:The flash is charging. to 16 ft) for wide-angle position, and about 0.5 to 5.1 m (1 ft 8 in .) for telephoto zoom position (when ISO... the selection will fire when you press the shutter-release button all the way. - On: The flash will be turned off while the flash is charging. Features That Can Be Set Using the Multi Selector Using the Flash (Flash Modes) You can set to Auto). 60 Auto • When U ...
Reference Manual
Page 200
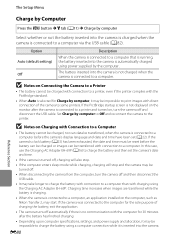
... and turned on Connecting the Camera to a Printer • The battery cannot be impossible to the printer. Off The battery inserted into the camera. B Notes on the computer, such as Nikon Transfer 2, may be charged with connection to a printer, even if the printer complies with connection... to a computer before the battery can be charged or images can data be transferred...
... and turned on Connecting the Camera to a Printer • The battery cannot be impossible to the printer. Off The battery inserted into the camera. B Notes on the computer, such as Nikon Transfer 2, may be charged with connection to a printer, even if the printer complies with connection... to a computer before the battery can be charged or images can data be transferred...
Reference Manual
Page 201
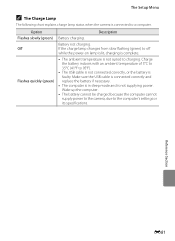
...not connected correctly, or the battery is not suited to off while the power-on lamp is lit, charging is complete. • The ambient temperature is faulty. Battery not charging. Make sure the USB cable is connected correctly and replace the battery if necessary. • The...the computer. • The battery cannot be charged because the computer cannot supply power to the camera, due to a computer. Option Flashes slowly (green) Off Flashes quickly (green) Description Battery charging. The Setup Menu C The Charge Lamp The following chart explains charge lamp status when the camera is...
...not connected correctly, or the battery is not suited to off while the power-on lamp is lit, charging is complete. • The ambient temperature is faulty. Battery not charging. Make sure the USB cable is connected correctly and replace the battery if necessary. • The...the computer. • The battery cannot be charged because the computer cannot supply power to the camera, due to a computer. Option Flashes slowly (green) Off Flashes quickly (green) Description Battery charging. The Setup Menu C The Charge Lamp The following chart explains charge lamp status when the camera is...

Reference Manual
Page 211
... the grooves, the cover or cord may be damaged when the cover is completely used up -to-date information on accessories for the COOLPIX S9300/S9200. Reference Section E91 Optional Accessories Rechargeable battery Charging AC adapter Battery charger Rechargeable Li-ion Battery EN-EL121 Charging AC Adapter EH-69P1, 2 Battery Charger MH-65 (Charging time when the battery is closed.
... the grooves, the cover or cord may be damaged when the cover is completely used up -to-date information on accessories for the COOLPIX S9300/S9200. Reference Section E91 Optional Accessories Rechargeable battery Charging AC adapter Battery charger Rechargeable Li-ion Battery EN-EL121 Charging AC Adapter EH-69P1, 2 Battery Charger MH-65 (Charging time when the battery is closed.

Reference Manual
Page 219
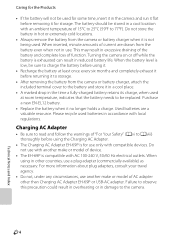
...and has no more than 0.01% being missing or defective. Whenever possible, carry a fully charged spare battery when taking pictures on the battery terminals can prevent the camera from charging normally. • On cold days, the capacity of "For Your Safety" (Avi to ...dry cloth before heading outside to dim or flicker, contact your Nikon-authorized service representative. Do not continue charging once the battery is fully charged before use ; Once warmed, a cold battery may decrease. • The battery is not charged at ambient temperatures below 0°C (32°F) or above 60...
...and has no more than 0.01% being missing or defective. Whenever possible, carry a fully charged spare battery when taking pictures on the battery terminals can prevent the camera from charging normally. • On cold days, the capacity of "For Your Safety" (Avi to ...dry cloth before heading outside to dim or flicker, contact your Nikon-authorized service representative. Do not continue charging once the battery is fully charged before use ; Once warmed, a cold battery may decrease. • The battery is not charged at ambient temperatures below 0°C (32°F) or above 60...
Reference Manual
Page 220
... not be used for some time, insert it in the camera and run it flat before removing it no longer holds a charge. When the battery level is compatible with another make or model of "For Your Safety" (Avi to the camera. F4 Technical Notes and Index Turning the camera... on or off while the battery is not being used batteries in the time a fully-charged battery retains its charge, when used at least once every six months and completely exhaust it before returning it to storage. • After removing...
... not be used for some time, insert it in the camera and run it flat before removing it no longer holds a charge. When the battery level is compatible with another make or model of "For Your Safety" (Avi to the camera. F4 Technical Notes and Index Turning the camera... on or off while the battery is not being used batteries in the time a fully-charged battery retains its charge, when used at least once every six months and completely exhaust it before returning it to storage. • After removing...


