
Reference Manual
Page 8
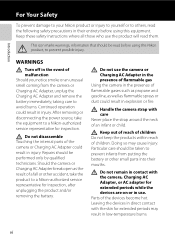
...of flammable gases such as propane and gasoline, as well as the result of a fall or other small parts into their entirety before using this Nikon product, to prevent possible injury. Particular care should be performed only by qualified technicians. Keep out of reach of children Do not keep the ...Touching the internal parts of the camera or Charging AC Adapter could result in the event of an infant or child. Parts of children. WARNINGS Turn off in injury. Doing so may result in use the product will read them. Leaving the devices in direct contact with the skin for ...
...of flammable gases such as propane and gasoline, as well as the result of a fall or other small parts into their entirety before using this Nikon product, to prevent possible injury. Particular care should be performed only by qualified technicians. Keep out of reach of children Do not keep the ...Touching the internal parts of the camera or Charging AC Adapter could result in the event of an infant or child. Parts of children. WARNINGS Turn off in injury. Doing so may result in use the product will read them. Leaving the devices in direct contact with the skin for ...
Reference Manual
Page 9
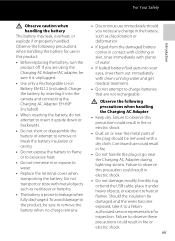
... shock. To avoid damage to the product, be damaged and the wires become exposed, take it to observe this product: • Before replacing the battery, turn the product off. Should the insulation be sure to remove the battery when no charge remains. • Discontinue use could result in electric shock. •...
... shock. To avoid damage to the product, be damaged and the wires become exposed, take it to observe this product: • Before replacing the battery, turn the product off. Should the insulation be sure to remove the battery when no charge remains. • Discontinue use could result in electric shock. •...
Reference Manual
Page 10
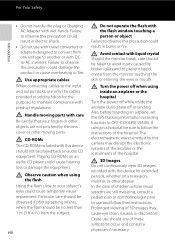
...Using the flash close to use and follow the instructions of children whose visual systems are not pinched by Nikon for extended periods, whether on a television, monitor, or other display. viii Do not operate the flash...your subject's eyes could damage the product or cause overheating or fire. If using inside an airplane or the hospital Turn the power off while inside the airplane during take off when using in a hospital, be no less than 1 m... • Do not use should not be taken to OFF (COOLPIX S9300). Playing CD-ROMs on an audio CD player could result in burns or fire.
...Using the flash close to use and follow the instructions of children whose visual systems are not pinched by Nikon for extended periods, whether on a television, monitor, or other display. viii Do not operate the flash...your subject's eyes could damage the product or cause overheating or fire. If using inside an airplane or the hospital Turn the power off while inside the airplane during take off when using in a hospital, be no less than 1 m... • Do not use should not be taken to OFF (COOLPIX S9300). Playing CD-ROMs on an audio CD player could result in burns or fire.
Reference Manual
Page 11
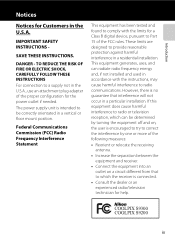
...Radio Frequency Interference Statement This equipment has been tested and found to comply with the instructions, may cause harmful interference to radio communications. COOLPIX S9300 COOLPIX S9200 ix If this equipment does cause harmful interference to Part 15 of the FCC rules. IMPORTANT SAFETY INSTRUCTIONS - DANGER - The...for help. TO REDUCE THE RISK OF FIRE OR ELECTRIC SHOCK, CAREFULLY FOLLOW THESE INSTRUCTIONS For connection to correct the interference by turning the equipment off and on, the user is encouraged to try to a supply not in the U.S.A., use an attachment plug ...
...Radio Frequency Interference Statement This equipment has been tested and found to comply with the instructions, may cause harmful interference to radio communications. COOLPIX S9300 COOLPIX S9200 ix If this equipment does cause harmful interference to Part 15 of the FCC rules. IMPORTANT SAFETY INSTRUCTIONS - DANGER - The...for help. TO REDUCE THE RISK OF FIRE OR ELECTRIC SHOCK, CAREFULLY FOLLOW THESE INSTRUCTIONS For connection to correct the interference by turning the equipment off and on, the user is encouraged to try to a supply not in the U.S.A., use an attachment plug ...

Reference Manual
Page 13
...driving a car. • Use information (such as direction) measured by the camera as of June 2011; Introduction Notes on GPS/electronic compass (COOLPIX S9300 only) ● Location name data of this camera Before using Create log, GPS functions will not be identified from the camera may be updated....Point of Interest: POI) for Japan is as a guideline only. The location name information will continue to operate even when the camera is turned off the camera. ● Using the camera overseas • Before taking the camera with GPS function overseas for travel, consult your travel ...
...driving a car. • Use information (such as direction) measured by the camera as of June 2011; Introduction Notes on GPS/electronic compass (COOLPIX S9300 only) ● Location name data of this camera Before using Create log, GPS functions will not be identified from the camera may be updated....Point of Interest: POI) for Japan is as a guideline only. The location name information will continue to operate even when the camera is turned off the camera. ● Using the camera overseas • Before taking the camera with GPS function overseas for travel, consult your travel ...
Reference Manual
Page 14
... Contents...ii About This Manual...iii Information and Precautions...iv For Your Safety...vi WARNINGS ...vi Notices ...ix Notes on GPS/electronic compass (COOLPIX S9300 only xi Parts of the Camera and Basic Operations 1 Parts of the Camera ...2 The Camera Body...2 Controls Used in Shooting Mode ...4...Charge the Battery 16 Preparation 3 Insert a Memory Card 18 Internal Memory and Memory Cards...19 Approved Memory Cards ...19 Step 1 Turn the Camera On ...20 Turning the Camera On and Off...21 Setting the Display Language, Date, and Time 22 Step 2 Select a Shooting Mode...24 Available Shooting...
... Contents...ii About This Manual...iii Information and Precautions...iv For Your Safety...vi WARNINGS ...vi Notices ...ix Notes on GPS/electronic compass (COOLPIX S9300 only xi Parts of the Camera and Basic Operations 1 Parts of the Camera ...2 The Camera Body...2 Controls Used in Shooting Mode ...4...Charge the Battery 16 Preparation 3 Insert a Memory Card 18 Internal Memory and Memory Cards...19 Approved Memory Cards ...19 Step 1 Turn the Camera On ...20 Turning the Camera On and Off...21 Setting the Display Language, Date, and Time 22 Step 2 Select a Shooting Mode...24 Available Shooting...
Reference Manual
Page 23
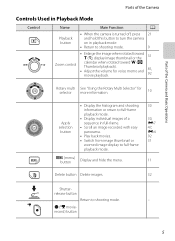
... individual images of the Camera Controls Used in Playback Mode Control Name Main Function A Playback button • When the camera is turned off, press 21 and hold this button to turn the camera on in full-frame. • Scroll an image recorded with easy panorama. • Play back movies. • Switch from...
... individual images of the Camera Controls Used in Playback Mode Control Name Main Function A Playback button • When the camera is turned off, press 21 and hold this button to turn the camera on in full-frame. • Scroll an image recorded with easy panorama. • Play back movies. • Switch from...
Reference Manual
Page 24
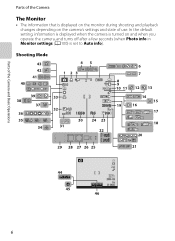
... The Monitor • The information that is displayed on the monitor during shooting and playback changes depending on and when you operate the camera, and turns off after a few seconds (when Photo info in Monitor settings (A100) is set to Auto info). Shooting Mode 43 42 41 40 39 38 37...
... The Monitor • The information that is displayed on the monitor during shooting and playback changes depending on and when you operate the camera, and turns off after a few seconds (when Photo info in Monitor settings (A100) is set to Auto info). Shooting Mode 43 42 41 40 39 38 37...
Reference Manual
Page 31
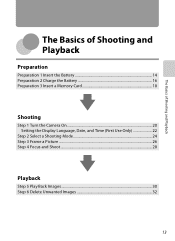
The Basics of Shooting and Playback The Basics of Shooting and Playback Preparation Preparation 1 Insert the Battery 14 Preparation 2 Charge the Battery 16 Preparation 3 Insert a Memory Card 18 Shooting Step 1 Turn the Camera On 20 Setting the Display Language, Date, and Time (First Use Only 22 Step 2 Select a Shooting Mode 24 Step 3 Frame a Picture ...26 Step 4 Focus and Shoot...28 Playback Step 5 Play Back Images ...30 Step 6 Delete Unwanted Images 32 13
The Basics of Shooting and Playback The Basics of Shooting and Playback Preparation Preparation 1 Insert the Battery 14 Preparation 2 Charge the Battery 16 Preparation 3 Insert a Memory Card 18 Shooting Step 1 Turn the Camera On 20 Setting the Display Language, Date, and Time (First Use Only 22 Step 2 Select a Shooting Mode 24 Step 3 Frame a Picture ...26 Step 4 Focus and Shoot...28 Playback Step 5 Play Back Images ...30 Step 6 Delete Unwanted Images 32 13
Reference Manual
Page 33
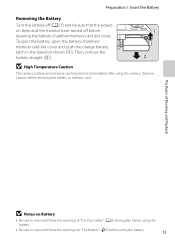
... latch in the direction shown (1). B High Temperature Caution The camera, battery, and memory card may be sure that the poweron lamp and the monitor have turned off (A21) and be hot immediately after using the camera. Observe caution when removing the battery or memory card. The Basics of Shooting and Playback... for "The Battery" (F3) before opening the battery-chamber/memory card slot cover. Then, remove the battery straight (2). Preparation 1 Insert the Battery Removing the Battery Turn the camera off before using the battery. 15
... latch in the direction shown (1). B High Temperature Caution The camera, battery, and memory card may be sure that the poweron lamp and the monitor have turned off (A21) and be hot immediately after using the camera. Observe caution when removing the battery or memory card. The Basics of Shooting and Playback... for "The Battery" (F3) before opening the battery-chamber/memory card slot cover. Then, remove the battery straight (2). Preparation 1 Insert the Battery Removing the Battery Turn the camera off before using the battery. 15
Reference Manual
Page 34
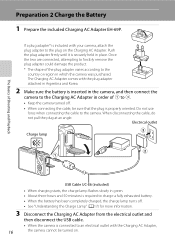
...to the Charging AC Adapter in which the camera was purchased. Do not use force when connecting the cable to 3. • Keep the camera turned off . • See "Understanding the Charge Lamp" (A17) for more information. Electrical outlet Charge lamp The Basics of 1 to the camera....connect the camera to charge a fully exhausted battery. • When the battery has been completely charged, the charge lamp turns off . • When connecting the cable, be turned on the Charging AC Adapter. Once the two are connected, attempting to forcibly remove the plug adapter could damage the ...
...to the Charging AC Adapter in which the camera was purchased. Do not use force when connecting the cable to 3. • Keep the camera turned off . • See "Understanding the Charge Lamp" (A17) for more information. Electrical outlet Charge lamp The Basics of 1 to the camera....connect the camera to charge a fully exhausted battery. • When the battery has been completely charged, the charge lamp turns off . • When connecting the cable, be turned on the Charging AC Adapter. Once the two are connected, attempting to forcibly remove the plug adapter could damage the ...
Reference Manual
Page 35
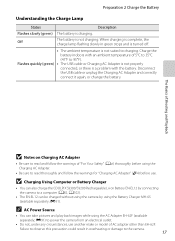
...available separately; Charge the battery indoors with the battery. B Charging Using Computer or Battery Charger • You can also charge the COOLPIX S9300/S9200 Rechargeable Li-ion Battery EN-EL12 by connecting the camera to charging. Preparation 2 Charge the Battery Understanding the Charge Lamp Status ...Description Flashes slowly (green) The battery is not charging. Failure to observe this precaution could result in green stops and is turned off. • The ambient temperature is a problem with an ambient temperature of 5°C to 35°C (41°F to ...
...available separately; Charge the battery indoors with the battery. B Charging Using Computer or Battery Charger • You can also charge the COOLPIX S9300/S9200 Rechargeable Li-ion Battery EN-EL12 by connecting the camera to charging. Preparation 2 Charge the Battery Understanding the Charge Lamp Status ...Description Flashes slowly (green) The battery is not charging. Failure to observe this precaution could result in green stops and is turned off. • The ambient temperature is a problem with an ambient temperature of 5°C to 35°C (41°F to ...
Reference Manual
Page 36
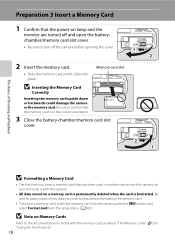
... Card Correctly Inserting the memory card upside down or backwards could damage the camera or the memory card. B Note on lamp and the monitor are turned off and open the batterychamber/memory card slot cover. • Be sure to format it clicks into the camera, press the d button and select Format... memory card is formatted. Be sure to confirm that the power-on Memory Cards Refer to the documentation included with this camera, be sure to turn off the camera before formatting the memory card. • To format a memory card, insert the memory card into place.
... Card Correctly Inserting the memory card upside down or backwards could damage the camera or the memory card. B Note on lamp and the monitor are turned off and open the batterychamber/memory card slot cover. • Be sure to format it clicks into the camera, press the d button and select Format... memory card is formatted. Be sure to confirm that the power-on Memory Cards Refer to the documentation included with this camera, be sure to turn off the camera before formatting the memory card. • To format a memory card, insert the memory card into place.
Reference Manual
Page 37
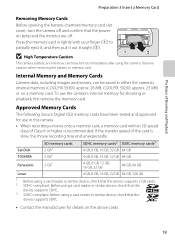
... with an SD speed class of Class 6 or higher is slow, the movie recording may be saved in either the camera's internal memory (COOLPIX S9300: approx. 26 MB; If the transfer speed of Shooting and Playback Preparation 3 Insert a Memory Card Removing Memory Cards Before opening the battery-...chamber/memory card slot cover, turn the camera off . Before using a card reader or similar device, check that the poweron lamp and the monitor are off and confirm that...
... with an SD speed class of Class 6 or higher is slow, the movie recording may be saved in either the camera's internal memory (COOLPIX S9300: approx. 26 MB; If the transfer speed of Shooting and Playback Preparation 3 Insert a Memory Card Removing Memory Cards Before opening the battery-...chamber/memory card slot cover, turn the camera off . Before using a card reader or similar device, check that the poweron lamp and the monitor are off and confirm that...
Reference Manual
Page 38
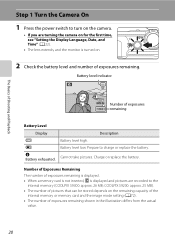
...The number of exposures 1140 remaining Battery Level Display b B N Battery exhausted. Description Battery level high. Prepare to the internal memory (COOLPIX S9300: approx. 26 MB; Battery level indicator The Basics of Shooting and Playback 29m 0s Number of exposures remaining shown in the illustration differs... battery level and number of exposures remaining. Cannot take pictures. Battery level low. Step 1 Turn the Camera On 1 Press the power switch to turn on the camera. • If you are turning the camera on for the first time, see "Setting the Display Language, Date, and Time...
...The number of exposures 1140 remaining Battery Level Display b B N Battery exhausted. Description Battery level high. Prepare to the internal memory (COOLPIX S9300: approx. 26 MB; Battery level indicator The Basics of Shooting and Playback 29m 0s Number of exposures remaining shown in the illustration differs... battery level and number of exposures remaining. Cannot take pictures. Battery level low. Step 1 Turn the Camera On 1 Press the power switch to turn on the camera. • If you are turning the camera on for the first time, see "Setting the Display Language, Date, and Time...
Reference Manual
Page 39
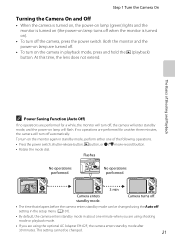
... and hold the c (playback) button. Both the monitor and the power-on lamp are performed for another three minutes, the camera will flash. To turn on the monitor again in standby mode, perform either one minute when you are using shooting mode or playback mode. • If you are performed... for a while, the monitor will turn off, the camera will enter standby mode, and the power-on lamp will turn off . • To turn on the camera in about one of Shooting and Playback C Power Saving Function (Auto Off) If no...
... and hold the c (playback) button. Both the monitor and the power-on lamp are performed for another three minutes, the camera will flash. To turn on the monitor again in standby mode, perform either one minute when you are using shooting mode or playback mode. • If you are performed... for a while, the monitor will turn off, the camera will enter standby mode, and the power-on lamp will turn off . • To turn on the camera in about one of Shooting and Playback C Power Saving Function (Auto Off) If no...
Reference Manual
Page 40
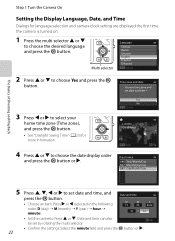
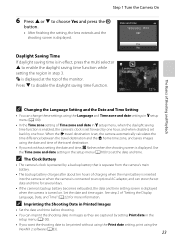
... the k button. • See "Daylight Saving Time" (A23) for language selection and camera clock setting are displayed the first time the camera is turned on. 1 Press the multi selector H or I to choose the date display order and press the k button or K. Date and time can also Edit... the multi selector. • Confirm the settings: Select the minute field and press the k button or K. The Basics of Shooting and Playback Step 1 Turn the Camera On Setting the Display Language, Date, and Time Dialogs for more information. 4 Press H or I to choose the desired language and press the...
... the k button. • See "Daylight Saving Time" (A23) for language selection and camera clock setting are displayed the first time the camera is turned on. 1 Press the multi selector H or I to choose the date display order and press the k button or K. Date and time can also Edit... the multi selector. • Confirm the settings: Select the minute field and press the k button or K. The Basics of Shooting and Playback Step 1 Turn the Camera On Setting the Display Language, Date, and Time Dialogs for more information. 4 Press H or I to choose the desired language and press the...
Reference Manual
Page 41
.... Use the Time zone and date setting in z setup menu, when the daylight saving time function is enabled, the camera's clock is turned on. See step 2 of the monitor. Step 1 Turn the Camera On 6 Press H or I to disable the daylight saving time function. London Casablanca Back The Basics of Shooting and Playback...
.... Use the Time zone and date setting in z setup menu, when the daylight saving time function is enabled, the camera's clock is turned on. See step 2 of the monitor. Step 1 Turn the Camera On 6 Press H or I to disable the daylight saving time function. London Casablanca Back The Basics of Shooting and Playback...
Reference Manual
Page 44
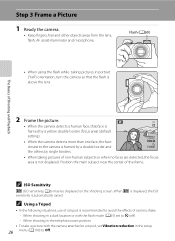
... camera shake: - When shooting in the telephoto zoom position • To take a picture with the flash mode (A61) set Vibration reduction in portrait ("tall") orientation, turn the camera so that face is framed by single borders. 29m 0s 1140 • When taking pictures in the setup 26 menu (A100) to W (off...
... camera shake: - When shooting in the telephoto zoom position • To take a picture with the flash mode (A61) set Vibration reduction in portrait ("tall") orientation, turn the camera so that face is framed by single borders. 29m 0s 1140 • When taking pictures in the setup 26 menu (A100) to W (off...
Reference Manual
Page 45
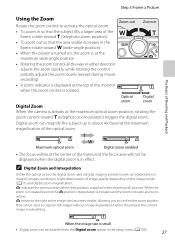
... a Picture Using the Zoom Rotate the zoom control to about 4× beyond the V position, interpolation is initiated and the zoom indicator also turns yellow. V moves to the right as interpolation to capture still images without image degradation before shooting at the center of image quality depending on ... magnification of Shooting and Playback Maximum optical zoom Digital zoom enabled • The focus will not be displayed when the digital zoom is turned on the image mode (A71) and digital zoom magnification. The Basics of the optical zoom. Zoom out Zoom in • To...
... a Picture Using the Zoom Rotate the zoom control to about 4× beyond the V position, interpolation is initiated and the zoom indicator also turns yellow. V moves to the right as interpolation to capture still images without image degradation before shooting at the center of image quality depending on ... magnification of Shooting and Playback Maximum optical zoom Digital zoom enabled • The focus will not be displayed when the digital zoom is turned on the image mode (A71) and digital zoom magnification. The Basics of the optical zoom. Zoom out Zoom in • To...


