
Reference Manual
Page 20
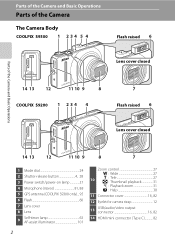
...Parts of the Camera The Camera Body COOLPIX S9300 1 2 3 4 5 4 Flash raised 6 Lens cover closed Parts of the Camera and Basic Operations 14 13 12 11 10 9 8 COOLPIX S9200 1 2 3 4 4 7 Flash raised 6 Lens cover closed 14 13 12 11 10 9 8 7 1 Mode dial 24 2 Shutter-release button 4, 28... 3 Power switch/power-on lamp 21 4 Microphone (stereo 81, 88 5 GPS antenna (COOLPIX S9300 only)... 95 6 Flash 60 7 Lens cover...
...Parts of the Camera The Camera Body COOLPIX S9300 1 2 3 4 5 4 Flash raised 6 Lens cover closed Parts of the Camera and Basic Operations 14 13 12 11 10 9 8 COOLPIX S9200 1 2 3 4 4 7 Flash raised 6 Lens cover closed 14 13 12 11 10 9 8 7 1 Mode dial 24 2 Shutter-release button 4, 28... 3 Power switch/power-on lamp 21 4 Microphone (stereo 81, 88 5 GPS antenna (COOLPIX S9300 only)... 95 6 Flash 60 7 Lens cover...
Reference Manual
Page 22
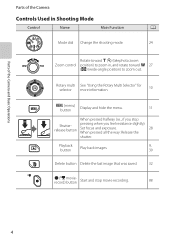
... stop movie recording. 88 4 Parts of the Camera and Basic Operations Parts of the Camera Controls Used in Shooting Mode Control Name Main Function A Mode dial Change the shooting mode. 24 Rotate toward g (i) (telephoto zoom Zoom control position) to zoom in, and rotate toward f 27 (h) (wide-angle position) to zoom out...
... stop movie recording. 88 4 Parts of the Camera and Basic Operations Parts of the Camera Controls Used in Shooting Mode Control Name Main Function A Mode dial Change the shooting mode. 24 Rotate toward g (i) (telephoto zoom Zoom control position) to zoom in, and rotate toward f 27 (h) (wide-angle position) to zoom out...
Reference Manual
Page 27
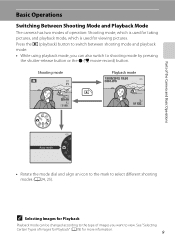
... Parts of Images for Playback" (A78) for viewing pictures. See "Selecting Certain Types of the Camera and Basic Operations Auto mode • Rotate the mode dial and align an icon to the mark to select different shooting modes (A24, 25). Basic Operations Switching Between Shooting Mode and Playback Mode The camera...
... Parts of Images for Playback" (A78) for viewing pictures. See "Selecting Certain Types of the Camera and Basic Operations Auto mode • Rotate the mode dial and align an icon to the mark to select different shooting modes (A24, 25). Basic Operations Switching Between Shooting Mode and Playback Mode The camera...
Reference Manual
Page 39
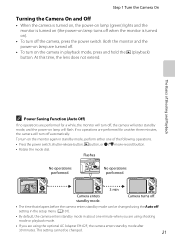
... power switch. The Basics of the following operations. • Press the power switch, shutter-release button, c button, or b (e movie-record) button. • Rotate the mode dial.
... power switch. The Basics of the following operations. • Press the power switch, shutter-release button, c button, or b (e movie-record) button. • Rotate the mode dial.
Reference Manual
Page 42
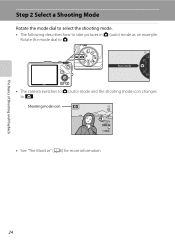
Shooting mode icon 29m 0s 1140 • See "The Monitor" (A6) for more information. 24 Auto mode • The camera switches to A (auto) mode and the shooting mode icon changes to take pictures in A (auto) mode as an example. The Basics of Shooting and Playback Step 2 Select a Shooting Mode Rotate the mode dial to select the shooting mode. • The following describes how to A. Rotate the mode dial to A.
Shooting mode icon 29m 0s 1140 • See "The Monitor" (A6) for more information. 24 Auto mode • The camera switches to A (auto) mode and the shooting mode icon changes to take pictures in A (auto) mode as an example. The Basics of Shooting and Playback Step 2 Select a Shooting Mode Rotate the mode dial to select the shooting mode. • The following describes how to A. Rotate the mode dial to A.
Reference Manual
Page 43
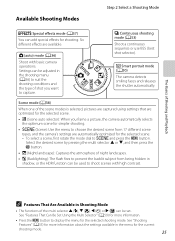
C Continuous shooting mode (A53) Shoot a continuous sequence or use BSS (best shot selector). To select a scene, first rotate the mode dial to choose the desired scene from being hidden in the menu for the selected shooting mode. C Features That Are Available in Shooting Mode • The ...
C Continuous shooting mode (A53) Shoot a continuous sequence or use BSS (best shot selector). To select a scene, first rotate the mode dial to choose the desired scene from being hidden in the menu for the selected shooting mode. C Features That Are Available in Shooting Mode • The ...
Reference Manual
Page 56
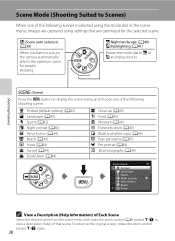
... Suited to the original screen, rotate the zoom control toward g (j) to view a description (help) of that are captured using the mode dial or the scene menu, images are optimized for simpler shooting. To return to Scenes) When one of Each Scene Select the desired scene from the... scene menu and rotate the zoom control (A4) toward g (j) again. 38 j Night landscape (A40) W Backlighting (A41) Rotate the mode dial to display the scene menu and choose one of the following shooting scenes. y (Scene) Press the d button to j or W and take pictures. x (Scene...
... Suited to the original screen, rotate the zoom control toward g (j) to view a description (help) of that are captured using the mode dial or the scene menu, images are optimized for simpler shooting. To return to Scenes) When one of Each Scene Select the desired scene from the... scene menu and rotate the zoom control (A4) toward g (j) again. 38 j Night landscape (A40) W Backlighting (A41) Rotate the mode dial to display the scene menu and choose one of the following shooting scenes. y (Scene) Press the d button to j or W and take pictures. x (Scene...

Reference Manual
Page 68
... Smile Timer Mode When using face detection and smile detection is activated and the camera turns off the camera. - When more information. Rotate the mode dial to switch to the center of the situations indicated below persists and no other than F (Smart portrait) mode. Shooting Features 1 Frame the picture and wait...
... Smile Timer Mode When using face detection and smile detection is activated and the camera turns off the camera. - When more information. Rotate the mode dial to switch to the center of the situations indicated below persists and no other than F (Smart portrait) mode. Shooting Features 1 Frame the picture and wait...
Reference Manual
Page 122
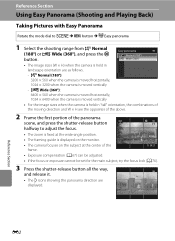
... camera is held in landscape orientation are displayed. Reference Section Using Easy Panorama (Shooting and Playing Back) Taking Pictures with Easy Panorama Rotate the mode dial to adjust the focus. • The zoom is fixed at the wide-angle position. • The framing guide is displayed on the monitor. 29m 0s...
... camera is held in landscape orientation are displayed. Reference Section Using Easy Panorama (Shooting and Playing Back) Taking Pictures with Easy Panorama Rotate the mode dial to adjust the focus. • The zoom is fixed at the wide-angle position. • The framing guide is displayed on the monitor. 29m 0s...
Reference Manual
Page 125
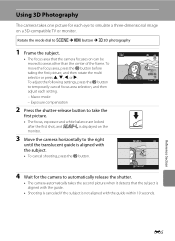
Macro mode - Rotate the mode dial to y M d button M s 3D photography 1 Frame the subject. • The focus area that the subject is aligned with the guide. • Shooting is canceled if the ...
Macro mode - Rotate the mode dial to y M d button M s 3D photography 1 Frame the subject. • The focus area that the subject is aligned with the guide. • Shooting is canceled if the ...
Reference Manual
Page 174
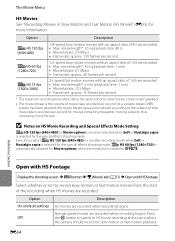
... Nostalgic sepia is selected for the special effects shooting mode, i HS 60 fps (1280×720) is automatically selected for Movie options when the mode dial is rotated to the section shot for slow motion or fast motion playback. • The movie bitrate is the volume of movie data recorded per...
... Nostalgic sepia is selected for the special effects shooting mode, i HS 60 fps (1280×720) is automatically selected for Movie options when the mode dial is rotated to the section shot for slow motion or fast motion playback. • The movie bitrate is the volume of movie data recorded per...
Reference Manual
Page 214
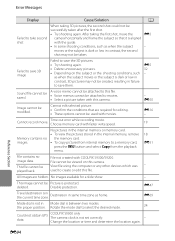
...subject moves or the subject is dark or low in contrast, the second shot may not be created, resulting in Mode dial is not set correctly. COOLPIX S9300 only The camera clock is between two modes. E94 Reference Section Sound file cannot be modified. E50 Image cannot be saved..... Time out error while recording movie. the proper position. Cannot edit selected picture. • Confirm the conditions that it is aligned with COOLPIX S9300/S9200. File not created with the guide. • In some shooting conditions, such as home. After taking 3D pictures, the second shot...
...subject moves or the subject is dark or low in contrast, the second shot may not be created, resulting in Mode dial is not set correctly. COOLPIX S9300 only The camera clock is between two modes. E94 Reference Section Sound file cannot be modified. E50 Image cannot be saved..... Time out error while recording movie. the proper position. Cannot edit selected picture. • Confirm the conditions that it is aligned with COOLPIX S9300/S9200. File not created with the guide. • In some shooting conditions, such as home. After taking 3D pictures, the second shot...
Reference Manual
Page 227
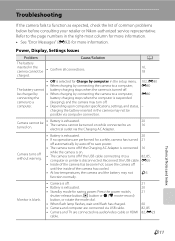
...TV are performed for saving power: Press the power switch, shutter-release button, c button or b (e movie-record) button, or rotate the mode dial. • When flash lamp flashes, wait until the inside of the camera has cooled. • At low temperatures, the camera and the battery...• • Battery is turned off. Leave the camera off - E26 • Inside of common problems below before consulting your retailer or Nikon-authorized service representative. Refer to the page numbers in the setup menu. 102, E80 • When charging by connecting the camera to a (sleeping...
...TV are performed for saving power: Press the power switch, shutter-release button, c button or b (e movie-record) button, or rotate the mode dial. • When flash lamp flashes, wait until the inside of the camera has cooled. • At low temperatures, the camera and the battery...• • Battery is turned off. Leave the camera off - E26 • Inside of common problems below before consulting your retailer or Nikon-authorized service representative. Refer to the page numbers in the setup menu. 102, E80 • When charging by connecting the camera to a (sleeping...
Reference Manual
Page 241
... 64 Maximum movie length 88, 90 Memory capacity 20 Memory card 18, 19, 72 Memory card slot 18 Metering 37, E35 Microphone 2, 81, E50 Mode dial 2, 38 Monitor 6, 8, F6 Monitor brightness 100, E70 Monitor settings 100, E70 Motion detection 101, E74 Movie frame E71 Movie options 91, E53 Movie playback 92...
... 64 Maximum movie length 88, 90 Memory capacity 20 Memory card 18, 19, 72 Memory card slot 18 Metering 37, E35 Microphone 2, 81, E50 Mode dial 2, 38 Monitor 6, 8, F6 Monitor brightness 100, E70 Monitor settings 100, E70 Motion detection 101, E74 Movie frame E71 Movie options 91, E53 Movie playback 92...


